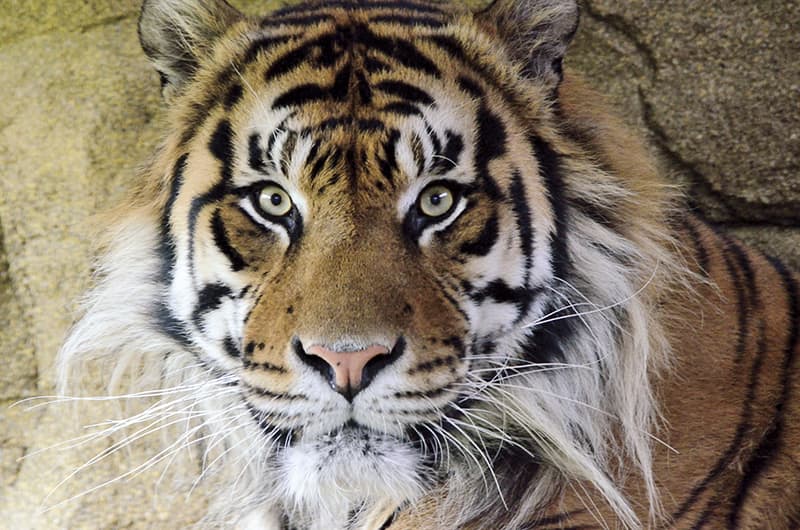
Photo by Alan Clifford
Nikon D7000, 80-400mm, 1/200sec at f/5.3, ISO 3200
Down at the Zoo
Focus on the eyes
It’s all in the eyes, they say, and while it’s a
useful tip for portrait photography, it also works with animals. ‘The
eyes let you connect with the animal you’re shooting, albeit in a
clichéd way,’ Dave Stephenson says. ‘A great shot of the eyes hooks people. There’s
nothing wrong with an unashamedly anthropomorphic photo so long as it’s
a good shot.’ It’s also a useful tip if you want to win awards.
‘Behavioural shots often win wildlife competitions,’ adds Dave. ‘It’s
usually a combination of movement, composition, anticipation and the
eyes’
Most people have neither the time nor the money to get away and land scintillating photos of glorious animals in their natural habitats. The next best thing, however, may just be an AP Masterclass with a professional photographer in a more accessible setting. Robin Bailey, Alan Clifford, Lesley Madigan and Paul Stoddart went to London Zoo to learn from renowned wildlife photographer Dave Stevenson about the secrets of getting great animal shots.
We begin the day with a talk from Dave on the basics of wildlife photography, as he takes us through some of the highs and lows of chasing all manner of beasts around the world, and starts with a stark message. ‘Most animal photography has already been done,’ he says. There’s no chance of spotting a rare new find at a zoo in the heart of the capital, so the key to getting good shots will be in the detail.
‘There’s nothing like shooting animals in the wild, but a zoo is a good learning environment for would-be wildlife photographers,’ continues Dave. The fact that the animals are captive, and many have distinct patterns of behaviour and routines, will allow time to concentrate on putting all the steps together to build a great shot, and these skills can then be taken into the wild.
So we head out in the unseasonably warm October sunshine to the pelican and flamingo enclosures, where Dave urges our class to take advantage of the ‘lovely direct light’ and they duly oblige with some gorgeous shots. Dave warns of overegging the pudding by applying filters, though. ‘Filters aren’t necessarily useful – covering an £800 lens with a £70 piece of glass seems odd, so I’d sooner risk it [not using one],’ he explains.
Next up are the black-capped squirrel monkeys, which get up close and personal with our intrepid explorers. Jill gets her hair pulled, while Robin picks up an inquisitive friend, reminding us that for all the signs and enclosures, these are still animals that are unpredictable. Dave suggests using a slow shutter speed due to the quick movements of the monkeys. ‘With panning, the key is that you have to intend to do it – accidental panning always looks accidental,’ he says.
 Photo by Paul Stoddart
Fujifilm FinePix S100FS, 28-400mm
Next up we’re all a flutter in Blackburn Pavilion, with exotic birds giving our readers the chance to experiment with capturing colour and movement. It’s a tricky task, and a little more akin to being out in the wild, particularly given the humid conditions. Then it’s on to the crowd pleaser – the meerkats.
Their recent popularity is no surprise when we find three or four of them huddled tight together, trying to grab a rest, while others scurry around in earnest. This offers a perfect range of shots. While cameras are dangled down to get shots of the furry insurance experts, Dave does warn us of avoiding a common pitfall in zoo photography. ‘Any shots craning up or craning down always have a “captive” feel,’ he says. ‘It forces animals into unnatural poses, which look forced.’ It is much better, he goes on to explain, to capture a family embrace, rather than a startled portrait shot from above.
We then arrive at Tiger Territory, where male Jae Jae was taking a nap. However, he soon woke up, and delighted the crowds with some sprinting with his keeper before settling down for pictures in front of the reinforced glass.
With fierce interest in particular animals, Dave humours us with a top tip on avoiding crowds, exclaiming, ‘Be tall!’ He also suggests that humans can actually improve a shot. ‘There’s no reason to crop the whole zoo out,’ he explains. ‘One of the best reasons for a zoo is for people, especially kids, to have that initial reaction, and take that away with them. People’s reactions, especially younger generations, can make a picture special.’
The tragic accidental drowning of the unnamed tiger cub just days after the Masterclass is a stark reminder that while the zoo exists to protect animals, they are still unpredictable and cannot be controlled 24 hours a day.
The day flies by and we are soon finishing up, and the readers are delighted with the results of their tuition. Paul was pleased to learn about the key ingredients to a great group shot. ‘Dave talked about social animal images being the best to try if you want to catch the eye of viewers,’ he says. Meanwhile, Alan also left with a top tip. ‘Dave said to use a slower shutter speed and pan to get motion blur and a sense of movement,’ he explains. It may be a zoo, but capturing kinetic energy is key.
While Dave is the expert, he lets us in on a welcome secret. ‘A rule that follows “always” or “never” is usually bunk, so it’s fine to break the rules,’ he says. ‘Sometimes I cross my fingers and hope for a great shot.’ Dave recommends the tried-and-trusted rule of thirds for composition, but insists that you can still get fine shots by experimenting. The key to successful animal photography, then, seems to be to learn the rules and then break them occasionally – a great message for photographers everywhere.
Your AP expert…
 Dave Stevenson
Dave Stevenson runs regular workshops at London zoo, with two levels of course available: General (beginners to intermediate) and Masterclass (advanced). Both cost £125 and include lots of time out in the zoo to take pictures. For information and to book visit www.zsl.org/photography or www.davestevenson.co.uk
About the readers…
 Robin Bailey
Robin was grateful to get the chance to shadow Dave, saying: ‘It wouldn’t have been the same without him,’ while also managing to land a number of top shots.
Canon EOS 40D and Sigma 120-400mm f/4.5-5.6 DG OS HSM lens
 Alan Clifford
It was all in the eyes for Alan. ‘I took Dave’s advice about the eyes seriously throughout the day,’ he says. A penguin, tiger and otter were the undoubted stars of his photos.
Nikon D7000 with Nikkor 80-400mm and 18-200mm lenses
 Lesley Madigan
Lesley loved being introduced to new ways of photographing animals, and is now confident in the light with Dave’s tips. ‘I won’t be afraid of using a higher ISO now, as I always tried to go as low as possible before for fear of noise,’ she says.
Nikon D7000 with Sigma 80-300mm, Tamron 90mm macro and Nikkor 18-55mm f/2.8 DX lenses
 Paul Stoddart
Paul feels that he learned a lot from Dave’s passion for wildlife photography. He says he will be ready when the opportunity strikes to land better shots in the future.
Fujifilm FinePix S100FS with 28-400mm lens
Glass and Wire
One of the trickiest tasks when shooting at a zoo is to find a way round the glass and wire. Nothing ruins a great picture of one of nature’s finest specimens like the faint reflection of your own camera or ugly fencing. ‘Get at a perpendicular angle to the glass and get as close as possible,’ says Dave.

‘A lens hood makes a nice seal to counteract reflections, and means you can get as close as possible without damaging your lens. You can add saturation afterwards during editing if needed.’ Robin demonstrates the technique with his clean image of hunting dogs.
 Photo by Robin Bailey
Canon EOS 40D, 120-400mm, 1/64sec at f/5.6, ISO 400
For wire, Dave says, ‘If you use a big long lens and get as close to the subject as possible, the fence will dissolve. Choose the proper focal length – 300-400mm is best – and if there’s a boring background, close it down. Conversely, a busy background will pull the eye all over the place.’
Extra Kit
If the thought of lugging bulky/expensive kit around on a hot day while negotiating the crowds doesn’t appeal, Dave says you can get by with the minimum amount of kit. ‘There’s no need to take lots of gear – not even a polariser,’ he says. ‘A long lens is useful – a 70-300mm was great for photographing meerkats.’
Top tip
One of the things to remember about shooting at the zoo is that there’s simply not enough time to cover everything in detail in one day, so pick your routes wisely.
Shooting inside the Reptile House
 Photo by Lesley Madigan
Left: Nikon D7000, 18-55mm, 1/320sec at f/2.8, ISO 2200
The Reptile House gives our readers the chance to experiment with macro settings under difficult lighting to close the minimum focus distance, with Paul and Lesley getting some fine shots of the lizards.
 Photo by Paul Stoddart
Fujifilm FinePix S100FS, 28-400mm
Shooting in Poor Light
 Photo by Robin Bailey
Canon EOS 40D, 120-400mm, 1/320sec at f/5.6, ISO 400
Poor light for the duration of the afternoon restricted the variety of shots available, yet Dave suggests the only thing you can do is soldier on in trying conditions. ‘You shoot what you can – you’d be an idiot to see an amazing moment and wait for the light, because it won’t come,’ he says. ‘The best images are always a combination of an amazing moment with great lighting, but when you can’t get everything perfect you still have to just crack on.’
Getting the shot
 Photo by Alan Clifford
Nikon D7000, 18-200mm, 1/250sec at f/5.6, ISO 1000
At Penguin Beach, Dave says the ‘holy grail’ of penguin photography would be an underwater shot with bubbles flowing close to the glass, or one of a penguin ‘porpoising’ energetically out of the water, although our expert insists one has to anticipate the leap, which is tough. Still, the social nature of the birds still allows for some fine group shots, with strong colours contrasting vividly.
Show the Teeth
 Photo by Robin Bailey
Canon EOS 40D, 120-400mm, 1/640sec at f/5.6, ISO 1600
Teeth are always in style – and it seems that getting the best shots often comes down to ‘dentistry’, as Dave suggests. ‘Teeth, tusks – anything that’s energetic, dangerous or playful – makes a great picture,’ he says. Plenty of animals afforded the chance to be snapped, so to speak, with the giraffes an unlikely winner with the use of their long tongues. ‘Nobody needs any dull portrait shots of animals, so make sure you capture action.’
Who to go with
It pays to let any travelling buddies know what your day out entails. ‘Going to the zoo’ and ‘going to the zoo to take pictures’ are different concepts altogether, Dave warns. Make sure your trekking partner realises you will be spending a little longer with some animals, and potentially miss out areas altogether. They may not want to spend 45 minutes waiting for you to get that ‘perfect shot’ of a sleepy giant tortoise while the meerkats await.
 Photo by Robin Bailey
Canon EOS 40D, 120-400mm, 1/100sec at f/5.6, ISO 400
Feeding Times
While it’s not exactly like tracking rarities in the Serengeti, chances are that you may miss most of the action at the zoo if you don’t do your research first.
 Photo by Alan Clifford
Canon EOS 40D, 120-400mm, f/5, 1/320sec and ISO 640
‘Learning behaviour and routines of the animals you’re hoping to get pictures of is incredibly effective, especially for intelligent animals such as otters and monkeys that show repetitive behaviour,’ Dave says. ‘They know their own feeding times, so if you can react accordingly, you’ll get good shots.’

Photo by Alan Clifford
Canon EOS 40D, 120-400mm, f/5.3, 1/320sec and ISO 500
Would you like to take part?
Every month we invite three to five AP readers to join one of our four experts on a free assignment over the course of a day. If you would like to take part, visit transport.kelsey.host/amateurphotographer/masterclass for details of how to apply. Please remember to state which Masterclass you would like to attend and make sure you include your name, address, email address, daytime telephone number, some words about your work and three or four of your images.