Photo Insight with David Noton

One of the foremost travel and landscape photographers working today, David Noton tirelessly travels the world in search of new challenges, which he shares with you here
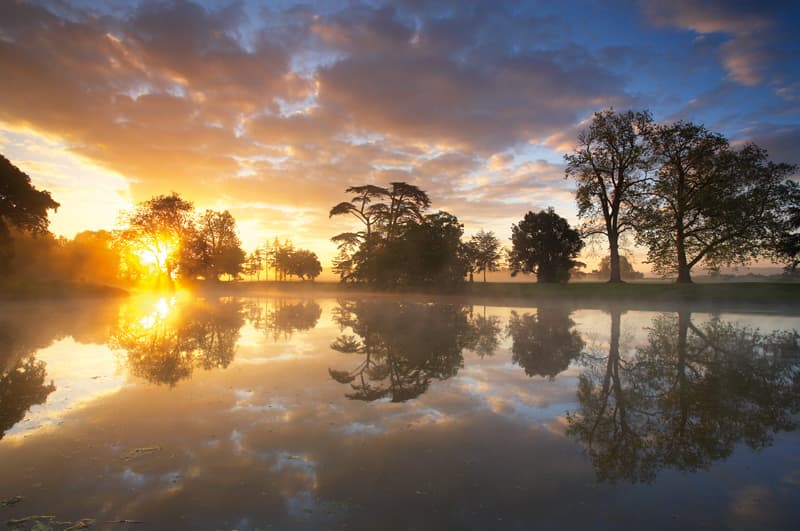
I took this image while working on a commission for the National Trust. The organisation had sent me to photograph historic Croome Park in the mid-1990s, when it was considering whether or not to acquire the estate, which it eventually did. Ten years later the trust asked me to go back to photograph it again.
Landscape architect Lancelot ‘Capability’ Brown designed the garden and lake in 1752. Brown, along with George William Coventry (who had inherited Croome Court and the surrounding 15,000 acres of land) transformed the landscape into an idyllic garden.
I spent a couple of days shooting at the estate. I was working to a brief, but there was scope within this to come up with my own ideas – to create pictures that showed the estate at its best. I took this image in early summer when the days were long. I was on the estate before the light started to break through and started taking shots before the sun made an appearance.
My aim was to depict the mellow English countryside at its verdant best. The sun was just coming up over the horizon so it was still low in the sky. I framed my shot so the sun was positioned just behind the trees on the left-hand side. If I hadn’t had those trees to mask the sun, I’d have had all sorts of problems with flare as the sun would have shone straight into my lens.
There was a fantastic sky with amazing cloud formations. The light reflects off the bottom of the clouds and onto the surface of the water. This created a perfect symmetry, with the horizon slicing cleanly through the centre of the composition and dividing the frame neatly in two. Normally you would avoid cutting a picture in half, but there is a time for symmetry and this was such an occasion. Generally, I don’t try to overanalyse the way I compose a shot. I try to work instinctively, following the harmony of the picture and the way that the shapes fall within the frame.

The key to successful landscape photography, as always, is to have a good idea of what you’re trying to capture in your shot beforehand. On this occasion I’d scouted the location the previous day and walked around the lake many times, sussing out the strongest vantage points. I was ready and waiting when the sun came up. You can’t just turn up and hope to stumble across a scene like this. You’ve got to be very organised and think how you can make sure you are in the right pace at the right time. A key skill is to be able to look at a scene in the harsh light of day or under leaden grey skies and to envisage how it might look in more desirable conditions.
There is a trace of mist hovering over the water, and when it’s backlit by the sun it looks like melted gold. This has happened to some extent on the left-hand side – the light is ‘melting’ into the water. I hoped this would happen and had been waiting with baited breath, my camera primed and ready.
I was using a Canon EOS-1Ds Mark II with a 16-35mm lens mounted on a tripod. I used the wide lens because I wanted to include the trees on the right-hand side of the frame, as well as the reflections. It’s a case of looking at the scene and deciding which lens will give the best angle of view.
There is quite a lot of contrast in the picture – the trees are silhouettes and the highlights are very bright. The issue was to avoid burning out the highlights where possible. I was shooting in aperture priority mode and using evaluative metering. This is how I work 99% of the time. As I’m shooting, I’ll keep checking my exposure, paying close attention to the highlights. In this particular picture, there was no way I could retain the highlights to the left where the sun was coming up next to the trees. You have to be realistic – you can’t perform miracles! Dropping some highlight detail in this area wasn’t something I was going to lose sleep over. I was able to assess my exposure by looking at the histogram to make sure I had retained the detail in the rest of the picture. I could then concentrate on the composition knowing that my exposure was accurate.
I used a 0.6 ND grad filter, which I aligned along the edge of the water. A 0.6 ND grad, which has a 2EV range from clear to dark, is perfect for balancing reflections and sky. If I’d taken this shot without the filter, the sky would have been far brighter than the water. If I’d used a 0.9 ND grad (a 3EV difference), the top half of the picture would have been darker than the bottom half, which would have looked completely wrong.
David Noton was speaking to Gemma Padley