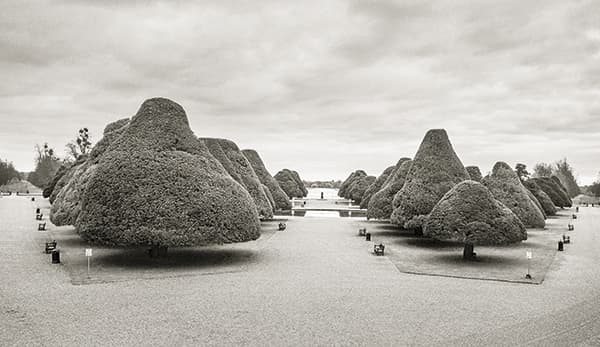
This photograph by Piero Serra was shot as a JPEG. It’s about a stop underexposed, but that allowed plenty of room to lighten using the Exposure slider and fine-tune the tone settings to achieve the high-key contrast version you see here.
Before.
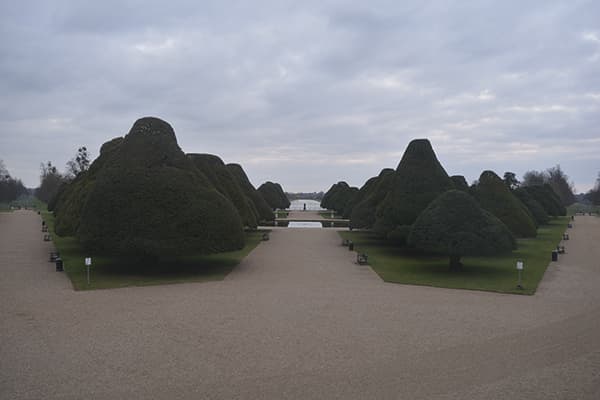
The treatment I applied was inspired by the edited version Piero sent in. I wanted to match what he’d done, but also make use of the Lens Corrections panel to get the photo looking more symmetrical. The final version reminds me of the old days in the darkroom, watching an image emerge. That often encouraged you to see your photos differently and to try out different printing methods. There’s a lot to be said for those moments when film photography inspired you to think differently.

After.
1. Apply lens corrections
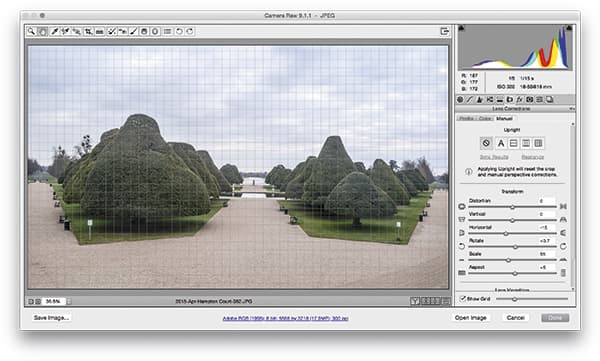 Clearly it was necessary to visit the Basic panel first to lighten the original image, but it was also important to go to the Lens Corrections panel. There I applied the Manual adjustments shown here to perfectly align the horizon, and also to tweak the Horizontal slider to obtain near perfect symmetry – which I was able to check with the help of the grid overlay.
2. Darken the sky
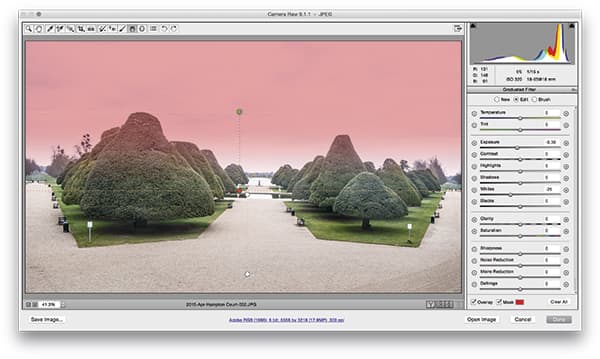 I then selected the Graduated Filter and applied a filter adjustment to darken the sky slightly using a negative Exposure and negative Whites setting. I also added a second Graduated Filter to darken the bottom of the photo. These subtle adjustments were all made with the goal in mind of helping to focus more attention on the trees.
3. Convert to black & white
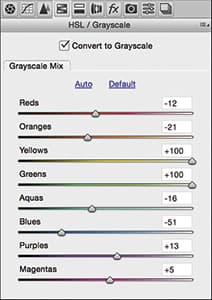
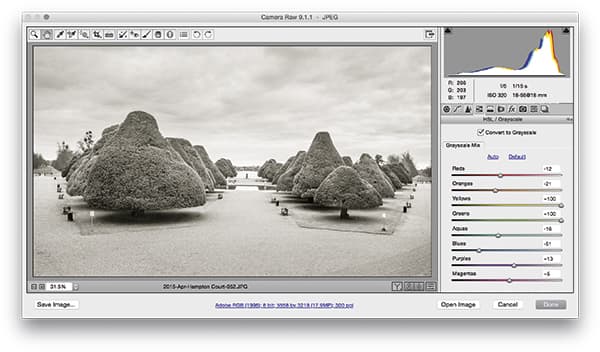 I then converted the image to black & white. It’s important to note that I adjusted the Grayscale Mix sliders to set the Yellows and Greens to +100. This lightened the trees considerably relative to all the other colours in the original scene. I followed this by applying a Split Tone adjustment to add a gentle sepia colouring effect to the photograph.
Grayscale Mix adjustments
Camera Raw has an HSL/Grayscale panel, while in Lightroom it’s called the HSL/Color/B&W panel. Despite the different naming, both offer identical controls for editing the hue, saturation and luminance of a colour scene, and provide Grayscale Mix/Black & White Mix controls for adjusting the tonal brightness of the original colours in a scene when applying a black & white conversion.
Gray scale panel.
These sliders give you a lot of control over the appearance of the final black & white image. Once you appreciate the power of these sliders for manipulating the tonal mix from a colour original, you’ll appreciate how useful it is to capture all your originals in colour, rather than shoot black & white in JPEG mode, or use a camera that has a fixed monochrome sensor.


