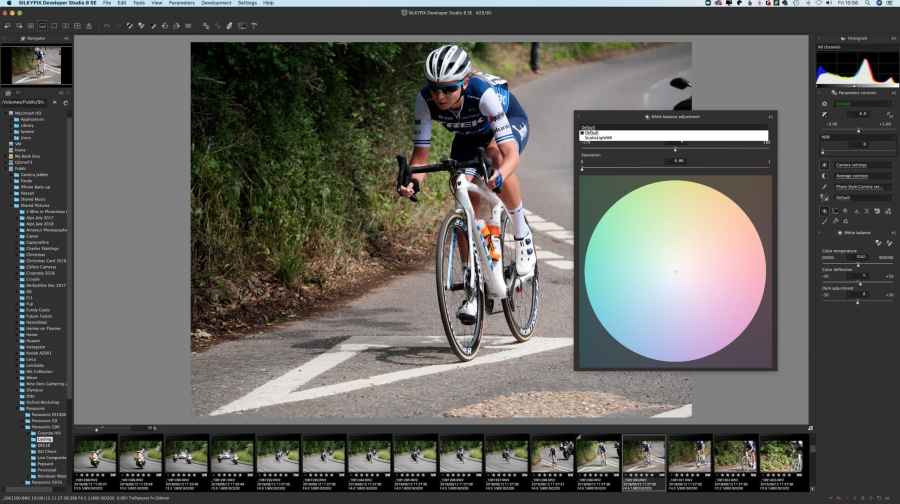
If you don’t want to use a third-party software package like Adobe Photoshop or Lightroom when you buy a Panasonic camera, the solution is to install Panasonic Silkypix Developer Studio SE. Currently on version 8, this has all the tools you need to help you find your favourite images and process your camera’s raw files to get them looking just right before sharing them with the world. It has a good blend of easy-to-use one-click tools and more advanced controls, along with the ability to batch-process your shots.
Getting started with Panasonic Silkypix Developer Studio SE

Panasonic Silkypix Developer Studio SE uses your computer’s filing structure and there’s no need to import images into the software, you just need to locate them using the folder organisation column on the left of the screen.As soon as you click on a folder of images, thumbnails appear at the bottom of the screen. Simply click on any thumbnail image to get a larger preview. As you scroll through your images, click on the stars beneath the thumbnail to assign a rating. Alternatively, select Settings > Shortcut Settings and scroll down to the ‘Set rating’ options and set the keys (for instance, Command+1 etc) that you want to use to set the star ratings quickly. After you’ve rated your images you can use View > Filter images to find your favourites.
Clean it up

Dust marks and unwanted objects are inevitable, but Panasonic Silkypix Developer Studio SE makes it easy to edit them out of your images. Select Tools > Spotting Tools to open a box showing a section of the image, the area is also marked on the main preview and you can drag it to the location you want to work on. If necessary, use the magnification controls at the bottom left of the box to zoom in or out. For the best results, select the ‘Copy’ brush then click on the ‘Relative Position’ box and drag the centres of the sample and copy circles to suitable areas. Once you’re happy, tap the ‘Relative Position’ box again and adjust the brush size and softness before painting over the offending article. Finally, click on Tools > Spotting Tools to finish.
Quick adjustments

The adjustment controls are located in the column on the right of the screen. Towards the top, under the histogram, the exposure compensation control lets you adjust the image brightness quickly using a slider or by entering a specific value. Beneath that there are three quick adjustments controls that let you edit the white balance, contrast and overall look (colour and contrast) of the selected image using dropdown options. As soon as you click on any of the options, a set of sliding controls appear lower down, enabling you to make more precise adjustments. Click on the recycling icon to reveal the Editing History palette and step back to previous versions of your edit if you wish.
Taking more control

Beneath the quick adjustment controls there’s a collection of icons that give access to more advanced controls over thewhite balance, tone curve, highlights, colour, lens aberration and rotation and shift effects. The white balance control is especially intuitive as you can drag a point around a coloured circle to adjust the balance accordingly. Also, as with the other adjustments, if you click on the + at the top right of the panel, next to the ‘Custom’ dropdown box, you can save the adjustment (and others) for future use. You just need to select the adjustments that you want to save and give it a memorable name. This is especially useful if you regularly shoot in the same conditions, perhaps using some studio lights that demand a bespoke white balance value.
Colour and curves


The Tone Curve control in Panasonic Silkypix Developer Studio SE is very powerful and a therefore something that needs to be used with care. However, it provides a great way of adjusting exposure, contrast and colour with one control just by clicking on the master (RGB) curve or one of the colour channel curves and dragging points up or down. There’s also a separate ‘Fine color controller’, which looks quite complicated but is actually very easy to use. It gives control over eight colour channels which are selected via the dropdown box at the top of the panel or by clicking on the relevant section in the circle at the bottom. Then it’s just a case of using the sliding controls to tweak the hue, saturation and lightness.
Output settings

Once you’ve finished making the edits to your raw file you need to output it by selecting Development > Develop. This opens a dialogue box with options to specify the size, format and storage location of your final image. At the top of the ‘Basic settings’ section there’s a dropdown box that lets you set the final file format to JPEG or TIFF. Beneath that, the file output is set automatically to Silkypix default, but change it to High Quality, or whatever you want. Further down you have the option to set the image size, which is handy if you want to create smaller versions of your images for sharing on social media. In the ‘Enhanced settings’ area, you can apply some sharpening before hitting ‘Develop’ to process and save the image.
Photographer and journalist, Angela Nicholson started reviewing cameras for Amateur Photographer in 2004 and was our Technical Editor before leaving for pastures new in 2010. Last year she founded SheClicks, a community for female photographers. See squeezymedia.com
Read more:
[collection name=”medium”]


