 Martin Evening is a London-based advertising photographer and noted expert in both photography and digital imaging. As a successful photographer, Martin is well known in London for his fashion and beauty work, for which he has won several awards. In 2008, he was inducted into the NAPP Photoshop Hall of Fame.
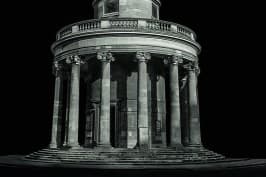
In this feature I want to show how to isolate a building using a pen path to cut out the outline and place it against a solid black background. This isn’t an original idea, as I have seen other photographers use this technique before, particularly with architectural photographs. The main task here was to create a pen path that accurately defined the outline of the subject. There are quicker and in some cases semi-automated methods you can use to create a cutout. However, with a subject like this, there really is no alternative but to use a pen path.
I’ll be honest here and admit that even for an experienced Photoshop user like myself, it does take quite a long time to mask a detailed building outline like this. You will notice that I switched back and forth between Lightroom and Photoshop. For the early steps you can just as effectively use Camera Raw in Photoshop or Photoshop Elements. And for the latter stages where I converted the photo to black & white, you could just as easily add a black & white adjustment layer in Photoshop and use Curves adjustment layers combined with layer masks to apply the final dodging and burning.
The subject in this photograph is All Souls Church in Langham Place, London. This was one of those rare wintry days when the sun was out and I was able to quickly grab a photo with as few people as possible in front of the church.
How to Cut Out a Subject in Photoshop – Step by Step
 1. Here you can see the photograph I shot of All Souls. This shows the original photograph, as imported into Lightroom using zeroed Develop settings. 1. Here you can see the photograph I shot of All Souls. This shows the original photograph, as imported into Lightroom using zeroed Develop settings. |
 2. The first step was to tone-correct the photograph and get rid of the heavy shadows. I did this using the Basic panel, where I raised the Shadows slider to +100 (shown here) and also used the Tone Curve panel to specifically lighten the shadows. 2. The first step was to tone-correct the photograph and get rid of the heavy shadows. I did this using the Basic panel, where I raised the Shadows slider to +100 (shown here) and also used the Tone Curve panel to specifically lighten the shadows. |
 3. I then used the crop overlay tool to apply a tighter crop and also rotate the image slightly so that the church building appeared upright in the cropped frame. 3. I then used the crop overlay tool to apply a tighter crop and also rotate the image slightly so that the church building appeared upright in the cropped frame. |
4 . Next, I went to the Lens Corrections panel and applied a manual transform to the image. I adjusted the Vertical slider to correct for the converging verticals. I also applied a slight rotate to the transform (which is slightly different to applying a rotated crop). . Next, I went to the Lens Corrections panel and applied a manual transform to the image. I adjusted the Vertical slider to correct for the converging verticals. I also applied a slight rotate to the transform (which is slightly different to applying a rotated crop). |
 5. I then created an edited copy of the raw master image, opening it in Photoshop. I added an empty new layer above the Background layer and used the Clone Stamp tool to remove the few people who were captured just in front of the building. 5. I then created an edited copy of the raw master image, opening it in Photoshop. I added an empty new layer above the Background layer and used the Clone Stamp tool to remove the few people who were captured just in front of the building. |
 6. Now for the tricky part. I had to use the Pen tool in Photoshop to define a path outline of the church, including all the little gaps. As you can see, this meant adding a lot of anchor points, but it was the only way to create an accurate mask of detailed subject 6. Now for the tricky part. I had to use the Pen tool in Photoshop to define a path outline of the church, including all the little gaps. As you can see, this meant adding a lot of anchor points, but it was the only way to create an accurate mask of detailed subject |
 7. With the path still selected and with black as the foreground color in the Tools panel, I added a solid fill layer by selecting Solid Color… from the ‘Create new fill or adjustment layer’ menu at the bottom of the Layers panel. This automatically added a solid black layer, masked using the pen path that was active. 7. With the path still selected and with black as the foreground color in the Tools panel, I added a solid fill layer by selecting Solid Color… from the ‘Create new fill or adjustment layer’ menu at the bottom of the Layers panel. This automatically added a solid black layer, masked using the pen path that was active. |
 8. I saved the photo in Photoshop. This also automatically saved and added the photo to the Lightroom catalog, next to the original raw master. I then converted the image to black & white in Lightroom and used the Split Toning controls shown here to apply a warm sepia tone. 8. I saved the photo in Photoshop. This also automatically saved and added the photo to the Lightroom catalog, next to the original raw master. I then converted the image to black & white in Lightroom and used the Split Toning controls shown here to apply a warm sepia tone. |
 9. For the finishing touches I added a number of graduated filter adjustments in Lightroom to lighten and darken various portions of the picture so that the final edited version looked more evenly lit at the bottom of the picture. 9. For the finishing touches I added a number of graduated filter adjustments in Lightroom to lighten and darken various portions of the picture so that the final edited version looked more evenly lit at the bottom of the picture. |
Visit Martin’s website https://www.martinevening.com/