 Martin Evening is a London-based advertising photographer and noted expert in both photography and digital imaging. As a successful photographer, Martin is well known in London for his fashion and beauty work, for which he has won several awards. In 2008, he was inducted into the NAPP Photoshop Hall of Fame.
I shot this image for the cover of my book on Lightroom 3. Previously, the cover images I’d used had been rather dark, so I decided to go to the opposite extreme. The ‘before’ image gives you an idea of the basic lighting that was used. I had a single umbrella above the camera and two lights bounced either side of the subject into polystyrene boards to provide overexposed light hitting the model from slightly behind where she was sitting. I used these same lights to light the backdrop, which was a white wall that I allowed to go to a light grey colour.
The retouching work started in Lightroom, where I chose to add a blue cast and lighten the corners. I retouched this image using the Vignetting Amount slider in the Lens Corrections panel to apply the corner lightening. However, since Lightroom 3 and Camera Raw 6 the Effects panel can be used to apply a more controlled lightening (or darkening) vignette effect. I then used Photoshop for the remaining retouching and added a shadow mask layer to produce the rippled lighting effect seen in the final version.
How to Create High Key Portaits – Step by Step

1. Here is the original photograph that I started with, which was opened in Camera Raw using the default settings. When shooting in the studio using an Elinchrom flash, I normally have the white balance set to 4700K, which is fairly close to the measured white balance for these particular flash units. In this example, the light-grey backdrop appeared almost completely neutral in colour. |
 2. In this step I adjusted the Basic panel settings and dragged the Temperature slider to the left to apply a cooler white balance. I also raised the Exposure to lighten the image, fine-tuned the remaining sliders to optimise the tones and decreased Vibrance colour saturation slightly 2. In this step I adjusted the Basic panel settings and dragged the Temperature slider to the left to apply a cooler white balance. I also raised the Exposure to lighten the image, fine-tuned the remaining sliders to optimise the tones and decreased Vibrance colour saturation slightly |
 3. To achieve the washed-out look I was after I needed to deliberately bleach out the corners of the photograph. There are several ways you can do this, and for this image I went to the Effects panel and adjusted the Amount slider in the Post Crop Vignetting section, setting this to +40. 3. To achieve the washed-out look I was after I needed to deliberately bleach out the corners of the photograph. There are several ways you can do this, and for this image I went to the Effects panel and adjusted the Amount slider in the Post Crop Vignetting section, setting this to +40. |
 4. I was then ready to open the raw image in Photoshop and carry out the remaining retouching. To start with, I created a new layer group called ‘Retouching’, added a new empty layer within it titled ‘Spotting’ and carried out some basic retouching work to remove obvious blemishes and spots, as well as the catchlight that was hitting the model’s cheek. 4. I was then ready to open the raw image in Photoshop and carry out the remaining retouching. To start with, I created a new layer group called ‘Retouching’, added a new empty layer within it titled ‘Spotting’ and carried out some basic retouching work to remove obvious blemishes and spots, as well as the catchlight that was hitting the model’s cheek. |
 5. I created a merged duplicate layer (Command+Alt+Shift+E on a Mac and Control+Alt+Shift+E on a PC), which was automatically added to the top of the layer stack and erased all but the area that covered the face and neck. I then used the Brush tool to paint over the skin to soften the shadows. I added a layer mask to selectively hide some of the paintwork and set the overall layer Opacity to 48%. 5. I created a merged duplicate layer (Command+Alt+Shift+E on a Mac and Control+Alt+Shift+E on a PC), which was automatically added to the top of the layer stack and erased all but the area that covered the face and neck. I then used the Brush tool to paint over the skin to soften the shadows. I added a layer mask to selectively hide some of the paintwork and set the overall layer Opacity to 48%. |
 6. I then added a new empty layer, retouched out some of the loose flyaway strands of hair and added a further layer, where I worked on the hair braid to make it appear a little straighter. I didn’t want to go overboard as hair can look rather unnatural if it appears too retouched. 6. I then added a new empty layer, retouched out some of the loose flyaway strands of hair and added a further layer, where I worked on the hair braid to make it appear a little straighter. I didn’t want to go overboard as hair can look rather unnatural if it appears too retouched. |
 7. I added another new empty layer and in the bottom right corner removed the model’s leg. To do this, I created a pen path that followed the model’s outline in the bottom section and then used the Clone Stamp tool to make the leg disappear. 7. I added another new empty layer and in the bottom right corner removed the model’s leg. To do this, I created a pen path that followed the model’s outline in the bottom section and then used the Clone Stamp tool to make the leg disappear. |
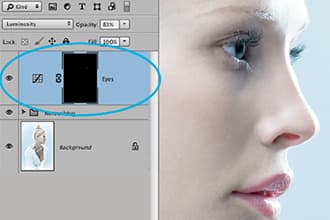
 8. I then zoomed in on the face and made a Lasso selection of the model’s eye. Having done this, I feathered the selection by 2 pixels and added a Curves adjustment layer – this automatically added a Curves layer with a layer mask based on the selection. I then applied a lightening curve to lighten the eye slightly. 8. I then zoomed in on the face and made a Lasso selection of the model’s eye. Having done this, I feathered the selection by 2 pixels and added a Curves adjustment layer – this automatically added a Curves layer with a layer mask based on the selection. I then applied a lightening curve to lighten the eye slightly. |
 9. Finally, I added a shadow mask layer to the top of the layer stack and set the layer blend mode to Screen at 100%. This added the ripple effect you see here. I didn’t want this effect to be applied to the face though, so I added a layer mask and painted it with black to hide the effect where it overlapped the face and body. 9. Finally, I added a shadow mask layer to the top of the layer stack and set the layer blend mode to Screen at 100%. This added the ripple effect you see here. I didn’t want this effect to be applied to the face though, so I added a layer mask and painted it with black to hide the effect where it overlapped the face and body. |
Visit Martin’s website https://www.martinevening.com/

 Martin Evening is a London-based advertising photographer and noted expert in both photography and digital imaging. As a successful photographer, Martin is well known in London for his fashion and beauty work, for which he has won several awards. In 2008, he was inducted into the NAPP Photoshop Hall of Fame.
 2. In this step I adjusted the Basic panel settings and dragged the Temperature slider to the left to apply a cooler white balance. I also raised the Exposure to lighten the image, fine-tuned the remaining sliders to optimise the tones and decreased Vibrance colour saturation slightly
 3. To achieve the washed-out look I was after I needed to deliberately bleach out the corners of the photograph. There are several ways you can do this, and for this image I went to the Effects panel and adjusted the Amount slider in the Post Crop Vignetting section, setting this to +40.
 4. I was then ready to open the raw image in Photoshop and carry out the remaining retouching. To start with, I created a new layer group called ‘Retouching’, added a new empty layer within it titled ‘Spotting’ and carried out some basic retouching work to remove obvious blemishes and spots, as well as the catchlight that was hitting the model’s cheek.
 5. I created a merged duplicate layer (Command+Alt+Shift+E on a Mac and Control+Alt+Shift+E on a PC), which was automatically added to the top of the layer stack and erased all but the area that covered the face and neck. I then used the Brush tool to paint over the skin to soften the shadows. I added a layer mask to selectively hide some of the paintwork and set the overall layer Opacity to 48%.
 6. I then added a new empty layer, retouched out some of the loose flyaway strands of hair and added a further layer, where I worked on the hair braid to make it appear a little straighter. I didn’t want to go overboard as hair can look rather unnatural if it appears too retouched.
 7. I added another new empty layer and in the bottom right corner removed the model’s leg. To do this, I created a pen path that followed the model’s outline in the bottom section and then used the Clone Stamp tool to make the leg disappear.
 8. I then zoomed in on the face and made a Lasso selection of the model’s eye. Having done this, I feathered the selection by 2 pixels and added a Curves adjustment layer – this automatically added a Curves layer with a layer mask based on the selection. I then applied a lightening curve to lighten the eye slightly.
 9. Finally, I added a shadow mask layer to the top of the layer stack and set the layer blend mode to Screen at 100%. This added the ripple effect you see here. I didn’t want this effect to be applied to the face though, so I added a layer mask and painted it with black to hide the effect where it overlapped the face and body.


