Technique Explained: How to Create Catchlights in Portraits
Requirements:
Software: Adobe photoshop, Photoshop Elements or similar software
System Requirements: Windows PC or Mac
Skills Required: Medium
Time to Complete: 20 minutes

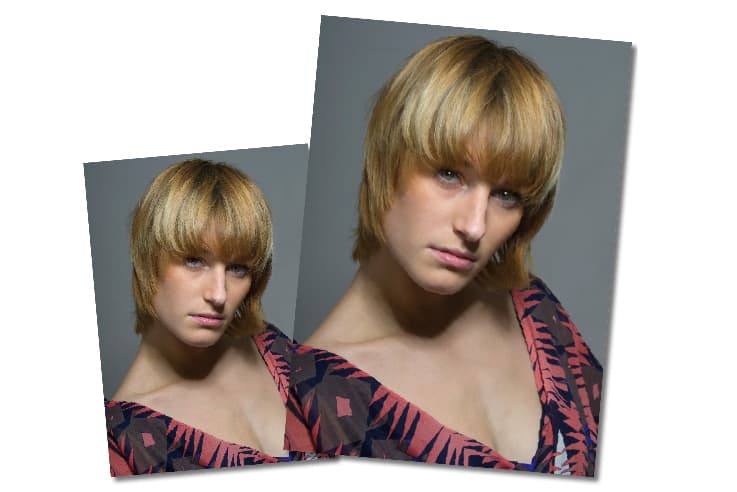
I recently took a series of portraits. I really liked the way they were lit, but the eyes were a little dark and lifeless.
Had I noticed this at the time of taking the picture I could have lowered the lighting in the studio
to add a catchlight. However, this would have altered the lighting
across the rest of the subject,
which I am fairly pleased with.
In the heyday of Hollywood film studios, catchlights would be added or strengthened in the darkroom by using masks and dodging effects. Alternatively, catchlights could be added to eyes using a brush to apply a small drop of diluted photographic bleach or by airbrushing an image.
Of course, these days it is extremely straightforward to add catchlights using Adobe Photoshop. In this example I have used a circular brush to replicate the effect of a standard studio flash and diffuser. However, with a little ingenuity you can replicate different light modifiers. For example, try using a square brush and the distortion tool to create a softbox catchlight, or use a circular brush with the centre erased for a ring flash catchlight.
Although I have used Adobe Photoshop CS3 for this tutorial, you can also perform the technique in Photoshop Elements and other image-editing software.
Creating catchlights
Step 1.

Open your image and create a new layer (Layer>New Layer). Name this layer ‘Catchlight’.
Step 2.

In this image I can see a faint catchlight in the subject’s left eye. It is important to try to place the catchlights you create in a natural position, so I will place mine over the existing one.
Step 3.

To do this I have selected the Brush tool and set the brush to a suitable size – in this case 30. So the effect isn’t too harsh, change the Hardness to around 30%. Then simply paint a single spot on the eye to act as a fake catchlight. By using different shaped brushes you can make it look like different light modifiers have been used.
Step 4.

The catchlight in the subject’s other eye must be identical to the first one. To ensure this I’ve used the Marquee tool to select and copy the white spot. As the rest of the Catchlight layer is empty, no other part of the image will be selected.
Step 5.

Selecting Edit>Paste creates a new layer and pastes the spot to this layer. Using the Move tool I’ve positioned the spot correctly over the subject’s right eye. To merge the two catchlights to a single layer select them both by clicking on both layers while holding the Shift key. I then selected Layer>Merge Layers.
Step 6.

There are now two layers: one with the catchlights and the original background layer. I removed the catchlight on the Catchlight layer where it crept out of the eye and onto the eyelashes and eyelid by selecting and using the Eraser tool.
Step 7.

After doing this for both eyes, the catchlights look a lot more natural, but are still a little too bright. To solve this I have changed the Opacity of the layer to 55%. The eyes in the final image have a lot more impact than those in the original.
Advanced techniques

For a more advanced effect I want to create square catchlights to resemble softboxes reflected in my subject’s eyes. First, create a new layer, then create a square selection using the Marquee tool. Next, set the foreground colour to white, and fill the square by going to Edit>Fill>Foreground Color. Now select the square using a loose square selection leaving plenty of room around the edges, and blur it to taste (Filter>Blur>Gaussian Blur)
I’ve rotated this square slightly (Edit>Transform> Rotate), copied it (which creates a third layer) and pasted both squares into position over my subject’s eyes. I then selected both new layers and clicked Layer>Merge Layers. This allows me to adjust both squares on the same layer. I have set the Opacity of this layer to 80%, to avoid the ‘reflections’ from looking unnatural, and used the Eraser tool to erase part of the squares as in step 6, above.


