When photographing the landscape, it can be tricky fitting everything into the frame. Even using your widest focal length there are situations in which it is impossible tosa capture the scale of a place in a single shot. As frustrating as this can be, there is a solution: to shoot a sequence of frames and stitch them together in Photoshop to create a panoramic image. In this month’s Masterclass, Tom Mackie and three AP readers trek to the Yorkshire Dales to try their hand at shooting and stitching panoramic images.
 The sweeping landscape of Aysgarth Falls provided the ideal location for shooting panoramics
Tom met the readers the night before and discussed the plan for the following day over dinner. ‘Depending on the weather, we’ll attempt a dawn panorama over the village of Askrigg and then visit Aysgarth Falls in Wensleydale, North Yorkshire, and photograph the Upper, Middle and Lower Falls,’ says Tom. ‘We’ll then drive to West Burton Falls, a short distance away, and finally, if we have time, travel to Hardraw Force, England’s largest single drop waterfall, which is great for vertical panoramas’.
The following morning, as the rain lashed down, a dawn shoot was out of the question, but the readers, huddled under umbrellas and undeterred, set out to capture some of North Yorkshire’s most majestic waterfalls.

They had brought their own cameras, lenses, tripods and cable releases with them, and Tom was on hand to help them set up their tripods and cameras, and share his in-depth knowledge throughout the day. ‘While you don’t need a tripod with an expensive panoramic head to create sweeping panoramas, a good-quality tripod, preferably with a ball head and spirit level on the tripod neck, is useful,’ says Tom. ‘You may want to use an ND grad filter, but avoid using a polariser when shooting the sky as the polarisation will vary. You could use a polariser for the waterfalls [if there’s not much sky in the frame] to reduce the shutter speed and blur the water. This will also reduce the glare on the water. Try using a 2-3sec exposure and see if you can create interesting swirls and patterns using the foam on the surface of the water. Think creatively and try to previsualise your shots.’
Tom advised the readers to use manual focus as they rotated the camera across the scene. One approach is to manually focus on a point in the middle distance, making sure there is enough depth of field.
The readers shot horizontal and vertical panoramas (where they used the camera in portrait format) in each of the locations. ‘I’ll typically shoot five to seven frames for a 6x17cm image,’ says Tom, ‘although how many pictures you shoot is up to you.’
Your AP Master…
 Tom Mackie
A former contributor to AP’s Photo Insight series , Tom Mackie, is one of the world’s leading photographers. He has spent many years as an architecutural, industrial and landscape photographer and has a penchant for panoramic photography. Tom has published several books and written numerous articles for photography magazines. He also lectures on photography and regularly holds workshops in the UK and abroad. www.tommackie.com
The AP Readers…
 Kim Benson
Kim, 48, lives in Oxfordshire and works in medical publishing. While she likes to photograph most subjects, Kim especially enjoys detail shots of flowers and abstracts. Kim uses a Canon EOS 400D with an 18-250mm and 500mm mirror lens. ‘I had a great time today,’ says Kim. ‘It was an enjoyable, enlightening experience.’
 Lee Miles
Lee, 39, is a software developer and lives in Kent. He likes landscape and street photography and uses a Nikon D70 with 18-70mm and 70-300mm lenses. ‘I really enjoyed the Masterclass,’ says Lee. ‘It was a great opportunity to hear sound advice from Tom.’
 Norman Robertson
Norman, 64, is a member of Leeds Photographic Society and lives in Leeds. Now retired, his main interests are landscape and wildlife photography, as well as some sports and action photography. He uses a Canon EOS 5D Mark II with 17-40mm, 24-105mm and 100-400mm optics. ‘The lessons from Tom about setting up the camera and tripod, and how to stitch the frames together afterwards, were invaluable,’ says Norman. ‘I had a really good time.’
Would you like to take part?

Every month we invite three to five AP readers to join one of our experts on an assignment over the course of a day. If you would like to take part, visit transport.kelsey.host/amateurphotographer/masterclass for details of how to apply. Please remember to state which Masterclass you would like to attend and make sure you include your name, address, email address and daytime telephone number in your application. Each participant will be able to use his or her own camera, lenses and other equipment.
Shooting Panoramic Images
Shooting panoramic images requires a
little thought to achieve striking compositions. While you could, in
theory, make any scene into a panoramic, to produce an image that is
engaging to look at you need to look and ‘see’ in a panoramic format as
you are composing your image. Most important is that there are
interesting elements to keep the eye hooked from left to right. Decide a
beginning and end point for your panorama, and think about the balance
of subjects between these two points. Look for elements that complement
and support your main subject. You could place your subject on a third,
but be careful not to include all the interesting material at one end –
you want to compose your shot to retain the viewer’s attention across
the whole image and ensure the eye glides seamlessly from one side to
the other.
 Norman Robertson captures this dawn view over Wharfedale in the Yorkshire Dales
‘Think
about how you can use foliage and bracken to frame your shot,’ says
Tom, ‘and omit anything that doesn’t enhance the main subject or that is
obviously distracting to the eye. As you’re framing your shot, keep
colour in mind and think about how you can balance different colours in
the frame. Remember that you are composing for a 6x17cm frame and this
requires a different compositional mindset. You may find it helpful to
have a 6x17cm viewfinder card when looking at the scene to help you
envisage your final composition.’
Setting up the Tripod and Camera
Before
you start shooting, it is vital to set up the camera and tripod
carefully otherwise you will run into difficulty at the stitching stage.
First, you need to make sure your tripod is level and that your camera
is level on the tripod. A tripod with an built-in spirit level is
useful, as is a spirit level attached to the camera’s hotshoe.
Once
your camera is set up and levelled, rotate the camera across the scene
to make sure everything is positioned where you want it in the frame.
When you come to take your sequence of shots, keep the camera level as
you rotate it. ‘The tripod head you use is important in keeping the
movement smooth,’ says Tom. ‘A tripod with a pan-and-tilt head is ideal,
but a ball-and-socket tripod will work fine, too.’
Shooting
Once
the readers had set up their cameras and tripods, they were ready to
start shooting. Tom suggested they overlap each frame by a third to
ensure sufficient overlap and shoot more frames than they needed. The
readers tried shooting with their cameras horizontal and vertical. While
horizontal panoramics can look effective, they allow less room to
develop the composition from top to bottom and the final panoramic will
be long and thin. Positioning the camera vertically on the tripod and
taking a series of shots will instead give you a composition with more
height, although you will most likely need to take more frames if you
use this approach.
 Rotating her camera vertically, Kim captures the drama of Aysgarth Falls
Nodal Point and Parallax Error
When
panning the camera to shoot a series of frames, parallax error can
sometimes occur. This is due to the shifting relationship between near
and distant elements in the scene. One way to avoid this is to choose
scenes with no foreground detail, but if you do have foreground detail
in your shot you can solve the problem by rotating the camera around its
optical centre or ‘nodal point’. A detachable bracket called a nodal
slide that fixes to your tripod allows you to position the camera in
relation to the tripod head so it rotates from its optical centre.
Exposure
Norman Robertson uses a slow shutter speed to record the motion in the water at West Burton Falls
One
of the biggest considerations when shooting panoramic landscapes is how
to make sure your exposure is the same from frame to frame. It’s not a
good idea to use autoexposure, as the darker and lighter areas of the
scene will affect the exposure as you rotate the camera. When you come
to stitch the images together, the join between individual frames will
be visible and you’ll need to make adjustments, which can be time
consuming and fiddly. Tom suggested exposing for the waterfall to ensure
the highlights aren’t lost. You can then either dial in the reading
manually or work in aperture priority mode and use exposure
compensation. Alternatively, you could meter for an average part of the
scene and use this as your exposure for each frame. An easy way to
ensure that your exposure is even is to expose for an area that is
neither the darkest nor the lightest part of the scene, switch to manual
mode and dial in this exposure.
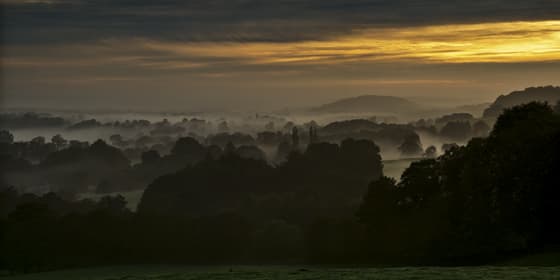
 Lee Miles stayed in Askrigg for a couple of days after the Masterclass and was lucky enough to capture this superb sunrise
Once
you are happy with the exposure, take a series of test shots across the
scene to check that the exposure is consistent and use this for each
frame. ‘Photographing in bright overcast light is ideal to give an even
exposure,’ says Tom. ‘You don’t want to shoot in bright sunshine as the
light will be too contrasty and wreak havoc with your metering. Dialling
in your exposure manually is particularly useful if you are
photographing a sweeping dawn shot where areas around the sun are much
lighter and cause variance in the scene. When photographing waterfalls
you want just enough water to create a swill,’ he adds. ‘If you have a
huge deluge, the white areas will burn out.’
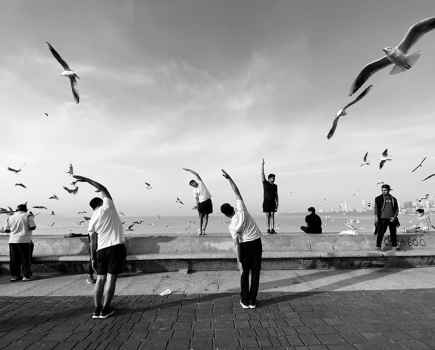
 Photo by Kim Benson
Including a figure in the scene can help to create a sense of scale of your panorama
Tom
suggested using cloudy white balance to get an idea of how the image
will look and to shoot in raw to allow maximum control over the file
during the editing process. ‘One thing to bear in mind when you’re
shooting panoramics is moving clouds or people moving through the
scene,’ says Tom. ‘You may need to retouch your image afterwards to
clone out any duplicated objects.
Lens and Focal Length
Tom
suggested the readers use a standard or telephoto lens, and explained
why these lenses are more effective for panoramic images than a
wideangle lens. ‘If you use a wideangle lens you will get what’s known
as a “bow-tie” effect in your final stitched image,’ says Tom. ‘This is
caused by the distortion that occurs with wideangle lenses. If you
choose your focal length carefully and avoid using the widest focal
length of your lens, the bow-tie effect should be reduced. I find
50-70mm the best focal length to use.’
Black & White
 Lee Miles converts his image of the Ribblehead Viaduct to black & white, adding impact to the scene
Although
the readers concentrated on shooting in colour, Tom suggested they
might like to try a few shots and convert their image to black &
white afterwards. Scenes that would work well include those with obvious
shapes and patterns. After the Masterclass Lee stayed for an extra day
and photographed the Ribblehead Viaduct in the Yorkshire Dales National
Park, which lends itself perfectly to a panoramic approach. The arches
look especially dramatic in black & white as they cut through the
rolling landscape. In this shot, industry is juxtaposed with nature and
this creates an interesting tension.
Stitching the Images Together and Top Tips

Top Tips
- Make
sure your tripod and camera are level before shooting. This will enable
you to rotate the camera smoothly across the scene. After you have
levelled your tripod, mount your camera and use a hotshoe-mounted spirit
level to check that the camera is level. - Decide where your
panoramic will start and finish, and pan across the scene, roughly
planning your overlaps and the number of frames. - To calculate
your exposure, take a reading from an average part of the scene and,
switching to manual mode, dial in the exposure. Use this for each frame
you shoot, but watch out for changing light. - Focus manually and
start taking your shots. Move the camera to the right, making sure you
overlap each frame by approximately a third. Continue this process until
you have the desired number of frames.