Why not head to the sea and try your hand at some coastal landscapes? Many of the general rules for landscape photos are relevant for coastal images as much as they are for more inland scenes. However, coastal scenes are unique for a number of reasons.
Firstly that there is always some movement, so you need to make a choice as to whether to freeze it or to extenuate it.
Secondly, your viewing direction is often more limited to facing out to sea, therefore the positioning of the light needs to be more precise.

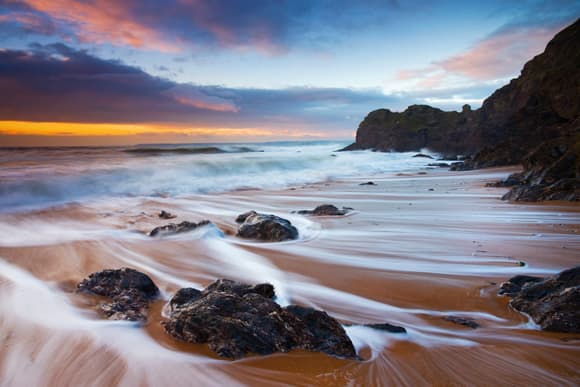
Hope Cove, Devon. The slow shutter speed has given the tide a soft pattern across the beach as it retreats – Adam Burton
Shooting Coastal Landscapes: Waves and water
Depending on the weather, the water in your scene could vary between a virtual mill pond and a raging tidal storm, and can therefore have a dramatic effect on the look of your image.
Impressive breaking waves can be great to photograph and can look menacing if frozen with a fast shutter speed but equally be calmed by using a longer shutter speed.
Many coastal photographers will use neutral density filters to increase the length of their exposures to create calmer looking water. This process can also have an interesting effect on fast-moving clouds.
It’s not just the wind that will affect the look of your sea though. Depending on the time of day the tide level can dramatically alter the look of the shot. Coastal photographers tend to prefer a low tide to maximise foreground interest so you should study a tide chart to find the high and low tide times for the area before heading out.
The best times of day for coastal landscapes, as with most landscapes, are during the golden hours of dusk and dawn. However, depending on the direction of your chosen beach or bay, there may be a better time to choose. If the sun sets over the land, a sunrise might offer a better shot.
Shooting Coastal Landscapes: Caution
If you’re shooting on the beach, be aware of incoming tides, especially in dune areas, where it may not be immediately obvious that your route back has been blocked. To be safe, work with an outgoing tide so that you’re chasing it out, rather than it chasing you in.
Watch your footing for loose rocks or sinking sand. No coastal photograph is worth losing your life for.
Salt water can be very bad for your camera gear, so make sure you keep all of your equipment dry; if anything does get into the water rinse it off in fresh water before letting it dry out. This includes your tripod legs, as they can start to seize up if left covered in salt water. Specialist tripods are available for sea water but these are pretty expensive.
Shooting Coastal Landscapes: Architecture
When considering your landscape composition don’t overlook including some of the local buildings or artefacts in your shots.
Lighthouses, castles, statues, stately homes or even cottages can add a sense of scale to the image as well as a unique identity and sense of location.
The building or structure doesn’t necessarily have to be the focus of your image, and in some cases it is better if it isn’t. Placing it in the background allows it to become part of the landscape rather than to dominate it.

The cliffs of Étretat, France, made famous by impressionist painters – Emmanuel Coupe
When placing an object in your landscape it is important that it falls into one of two camps: either a silhouette or a well-lit subject.
If the subject is meant to be seen, make sure the light is hitting it, rather than allowing it to fall into shadow, otherwise its placement in the scene will look accidental. In the evenings these buildings and structures can often be lit with spot lights, which can really help to make them stand out. So it is worth checking to see when the lights get switched on, as it may mean that, by waiting another 30 minutes, your scene can be transformed.
Some locations may hold events such as historical re-enactments or celebrations, which can also create some great photo opportunities.
These buildings and structures can also be useful for grabbing some detail shots, during the mid-day sun or when the weather turns nasty.
Using a macro or long lens will help you get some more close-up subjects, or you could even use the building to provide a natural frame to your landscape in the form of an archway or an open window.
Remember that these pieces of heritage may be privately owned or have restrictions on their being photographed, with the likes of the National Trust being particularly hostile to the requirements of photographers including use of tripods or featuring the images in competitions.
Shooting Coastal Landscapes: Night shots

Tony Worobiec- The unmistakeable view of Castle Stalker, on the shores of Loch Linnhe, Appin, Argyll – Tony Worobiec
Some photographers assume that once the sun has gone down, that is the end of their photography, but in reality it is often the best time to start taking your shots. Coastal locations are particularly well suited to this approach.
It is sometimes assumed that one needs to shoot towards where the sun has set, but great results can also be achieved with your back to it.
In this kind of low light, one might be required to make exposures of several minutes or more. Needless to say, you do need to use a sturdy tripod and a quality cable release.
It is a perverse irony, but despite the sophistication of modern DSLR cameras, they operate more effectively at night time when all the automated options are closed down.
Firstly, with exposures of 30 seconds or more, set the shutter speed to Bulb.
Turn off autofocus, because in low light it tends to go into ‘hunt’ mode. Ideally try to focus on the subject before it gets too dark.
I take light readings using a handheld light meter; for exposures longer than 60 seconds, I set the ISO to a higher rating, and with a quick bit of mental arithmetic, I am able to work out an accurate exposure for the camera.
While contrast is significantly reduced in the late evening, you are still likely to encounter contrast between the sky and the reflected water. In order to overcome this I use a graduated Lee filter, either a 0.6 or 0.9.
When working close to water, it is important that you check to see that no splashes have got onto your filter or lens, otherwise you will encounter unwelcome flare.
Shooting Coastal Landscapes: Before You Go
- Check tide times to find out when the tide will be at its lowest point, so you can arrive an hour or so before it, giving you the best view.
- Use a map and compass to find the likely positioning of the sun and the best time to go.
- Be wary of incoming tides and getting caught out – don’t take unnecessary risks.
- Get a sturdy tripod to allow you to keep your camera still for long exposures.
- Use graduated ND filters to balance the exposure between the sea/sky/land or solid ND filters to extend the exposure time.
Shooting Coastal Landscapes: Using Filters

In this image the overcast sky and the sea are fairly well balanced…..
Water in coastal landscapes can cause serious exposure issues for photographers due to its highly reflective nature.
The easiest way to balance your exposure is to take a spot reading from both the water and the sky – and the beach if included – and then use a graduated filter to balance the exposures between them.
In some extreme cases where the water appears brighter than the sky, you may need to use the filter in reverse. While on some occasions the brightness between the two may be fairly evenly balanced and only the foreground requires the extra exposure, and so you’ll need to put the filter quite low down over the lens.

…..but by adding a 2-stop ND grad in front of the lens it is possible to increase the detail in the sky and create far more atmosphere in the shot.
Larger format square filters are handy for this reason, as smaller filters may not cover enough of the image.
A polarising filter can also be handy for coastal shots, as they can, by turning, control the amount of reflection in the water as well as darkening the blueness of the sky.
Once you have your scene in mind, use Aperture Priority mode and your camera’s spot metering and point the central area of your viewfinder at the sky and then the sea, making a note of the readings.
Shooting Coastal Landscapes: Photoshop Levels

Step 1: The tonal range is bunched up to the left of the histogram due to underexposure.
With low-contrast scenes especially, a quick Levels adjustment can make the world of difference to your coastal landscapes.
Conservative metering can often leave your images looking flat, or overly dark in some areas.
By adjusting your black, white and midpoint markers you can add some much-needed contrast to your image, or bring out some of the shadowy detail.
Most editing programs feature a form of Levels palette but in Photoshop CS or Elements it can be accessed by hitting Ctrl+L on the keyboard, or via the top menu bar.

Step 2: By moving the black, white and midpoints in to meet the various tonal values, the image is pleasingly brightened up.
The main graphic is a histogram display of all of the tones in your image, ranging from pure black through to white.
A perfect exposure would follow an even curve with the largest amount around the centre and tailing off at either end.
The three markers under the histogram represent your black/white/midpoints. By sliding the black and white points over to meet where the tonal range finishes, you will obtain a fuller range, while moving the midpoint will allow you to adjust your contrast.
AUTHORS: Mat Gallagher, Craig Roberts, Tony Worobiec