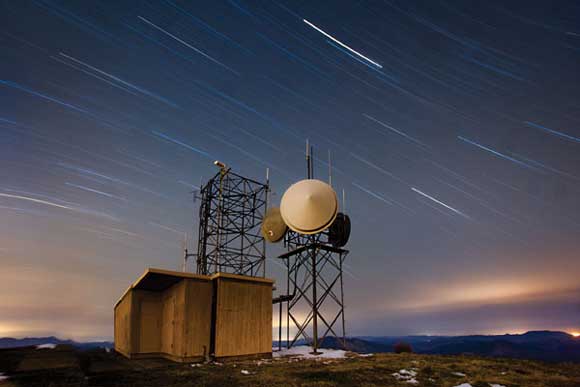

This exposure was over an hour in length to get enough light on the weather station, this has also meant the stars moved, causing trails across the sky. EF 24-70mm f/2.8, at 35mm, f/4, 1 hour and 7 minutes (4020 second) exposure. © Ben Canales
Every night we go to sleep, there is an incredible display of beauty slowly passing overhead that we have forgotten – the stars. Now, thanks to the advances involving high ISO capabilities, taking a picture of that beauty with your DLSR is not just possible. In fact it is relatively easy to photograph stars. I’ll give you some ideas, tips, and techniques showing you how to photography stars, so you can make the most of your first trip out ‘shooting stars’.
How to photograph stars: Research
First, do some homework by researching your location of star shooting.
Search online for ‘dark sky locations’ or using popular mapping sites, look for the least populated regions within driving distance. The farther you go from the cities and their light pollution, the darker the skies and better potential your shots have. I recommend going when the moon is at a 1/4 phase or less (it cycles from full to none and back to full on a monthly basis).
Our cameras are affected by all light sources, so when the moon is at a half phase or more the light will wash out the stars and take away the dark sky contrast we need to get good star shots. We do want some moonlight to illuminate our landscape foreground, but with too much light, we begin to sacrifice how many stars we can capture. While researching the phases, also write down the moon rise and set times.
It is very helpful to know when to expect the moon to show up or disappear when you are in the field shooting.
Last but not least, dress warm. Bring extra clothing to make your experience more enjoyable and an extra set of batteries for your torch or headlamp.
How to photograph stars: Exposure
 Okay, you have picked your evening and location, you are there and have your camera ready to shoot – what do you do now?
I begin by taking an overexposed shot that will show me on my camera’s LCD screen what is going on and is available around me much better than my own eyes can see. To do this I turn the ISO up as high as it will go, set the aperture as wide open as it can be, and turn exposure to 30 seconds (if you have a cable release or remote, use it for a 2-5 minute exposure), and put the focus to infinity.
Doing this, I will get an image that is usually too bright and too noisy. This is OK because it is only a test shot that shows me if there are any passing clouds overhead blocking the stars, the sources of light pollution from cities on the horizon, contours and features in the landscape around me, and I can take test shots at various directions to locate the Milky Way. All this information is used to decide the composition of my shot.
After you decide on your composition, change your settings for a more balanced exposure. To start out, one of my common settings when using my Canon 5D Mark II and 24-70mm f/2.8 lens is: ISO 3200-4000, f/2.8 for a 25-second exposure. If you don’t have a f/2.8 aperture setting, use the widest that you have. Your equipment’s abilities will affect the overall brightness, but one of my most published star images was shot with my old Canon EOS 30D and the 10-22mm f/3.5-4.5 lens.
It is up to you to decide the combination of settings to make your exposure. I recommend you experiment changing all three so you can compare results when you are on your computer editing back at home. Here is what to expect when changing your settings:
- Increasing your ISO brightens the image but increases image noise and limits potential exposure length.
- Opening your aperture brightens the image, but decreases your depth of field, therefore making focusing much trickier in dark conditions.
- Extending your exposure will brighten your image but if exposed too long you will record the movement of the stars across the sky. The formula to know the maximum exposure you can use without getting star trails is: ‘600/focal length = exposure (in seconds)’. For example a 20mm lens would be 600/20mm, equalling a maximum 30-second exposure.
How to photograph stars: Shooting tips
All these factors may seem intimidating at first, but with trial and error, you will quickly catch on. Here are a few more tips to smooth out the process for your first time:
- For better focus, use live view to zoom into the brightest star you see and turn your focus until the star is a sharp point.
- Put a building or structure in the composition and use your torch or headlamp to illuminate it during the exposure.
- Get a cable release, remote or use a timer to avoid camera shake and take exposures longer than 30 seconds that give you brighter foreground that you can mask in later using Photoshop.
- For fun, get in the shot itself and use your torch or headlamp aimed at the camera to ‘paint’ words or shapes into the image. Long exposures won’t reveal your presence in the final shot.
- Lastly, when you finally get away from the city and under the stars, make sure you take some time to step away from the camera and just look up, to enjoy the experience.
How to photograph stars: Star trails
Star trail images show the motion of the stars over a period of time. There are two methods to get a star trail shot:
- You can do a single, very long exposure of 45-90 minutes (or more) at lower exposure settings allowing the camera to record in one image the motion of the stars across our sky.
- Using the ‘stacking’ method (right), you continuously take shorter 30-second (+/-) exposures at regular star shot settings over that same 45- to 90-minute period and combine the resulting images in Photoshop to create the illusion of the single, long exposure.
Both methods have their positives and negatives. Stacking can succeed in challenging light situations that the long exposure would get overexposed, and also allows for higher ISO to be used which is better at picking out more stars from the sky, resulting in a more heavily star-saturated image. But, single long exposure star trails have a cohesion in the final image that stacking cannot achieve.
An online search for ‘stacking star trails’ will provide links to download Photoshop actions that will automatically do all the layering work for you to make a complete star trail image. To use either method, you need a cable release or timer remote.

© Ben Canales
Want more advice about night photography? See our guide to astrophotography
Ben lives on the West Coast of the USA and spends most of his free time photographing stars. https://www.thestartrail.com
How to photograph stars: Essential kit
- Canon EOS 5D Mk II
- Canon EF 24-70mm f/2.8
- Head torch
- Manfrotto 190XProB tripod
- Cable release
- Extra jacket
- Coffee
- 5x HR Energy shots