We show you how to get your best car photos with these great tips and tricks, from epic outdoor shots of cars, to perfect interior shots, this guide on car photography is for you. Or perhaps you’re looking to sell your car as quickly and easily as possible, with the biggest return possible, and if so, then great car shots are essential!
Welcome to the AP Improve Your Photography Series – in partnership with MPB – This series is designed to take you from the beginnings of photography, introduce different shooting skills and styles, and teach you how to grow as a photographer, so you can enjoy producing amazing photography (and video), to take you to the next level, whether that’s making money or simply mastering your art form.

Each week you’ll find a new article so make sure to come back to continue your journey, and have fun along the way, creating great images. If you’ve found these articles helpful, don’t forget to share them with people you know who may be interested in learning new photography skills. You’ll find a whole range of further articles in this series.
Be prepared to put in practice time in order to refine your panning technique. Photos by Phil Hall and Andrew Sydenham
Even if you only have a passing interest in cars, you’ve probably flicked through the pages of glossy car magazines and looked on enviously at some of the striking car photography on display.
Of course, not all of us will have access to an Aston Martin or Ferrari, but that shouldn’t put you off trying car photography yourself. We’re going to show you how it’s possible to get great car shots, regardless of the motor you have. Don’t forget as well that there are also a number of events that will let you get up close to a host of impressive vehicles to try out some of these car photography ideas.
Former Technique Editor at AP, Phil Hall is now Editor at heycar and Honest John and explains all.
How to capture movement in car photos
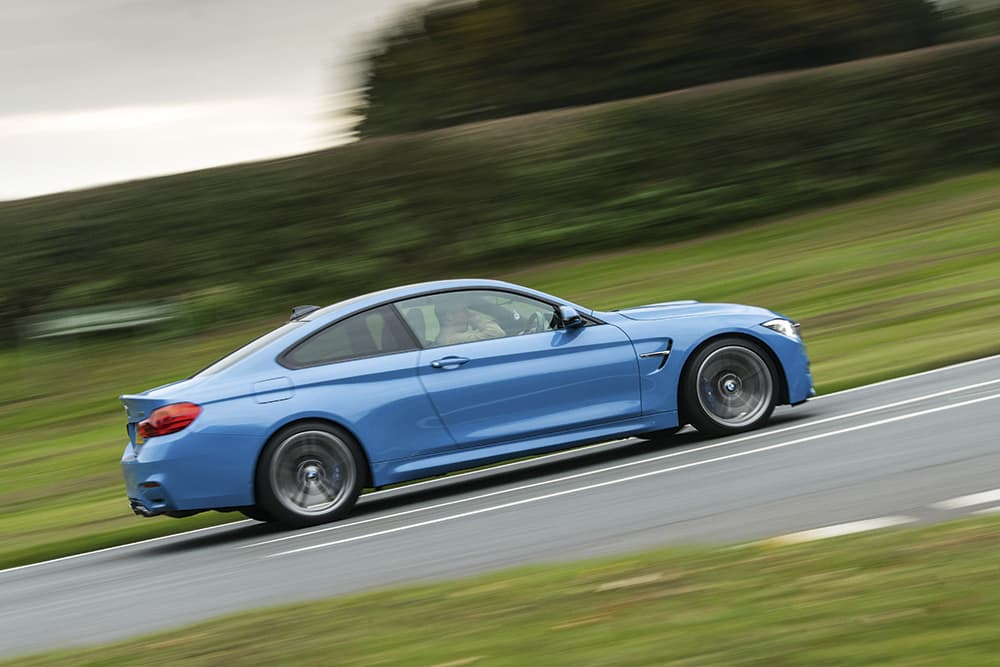
For creating a sense of speed and movement in a car shot, panning is invaluable. It’s one of the best ways to convey motion, and you’re not restricted to a specific car, as you can apply this technique at motoring events or simply by sitting next to a suitable section of road.
Getting to grips with panning for car photography
You may have had a go at panning in the past, but it’s worth a recap. Panning is where you follow your subject with a slow shutter speed to blur the background, but keep the point of interest sharp as the subject passes in front of you.
Camera settings for panning
The shutter speed you opt for will depend on the car’s speed, so be prepared for a bit of trial and error. A good starting point for a car travelling at 30-40mph is around 1/80sec, although shooting in daylight conditions will often mean dropping the ISO down to 100 or 200, and stopping the lens down to f/11.
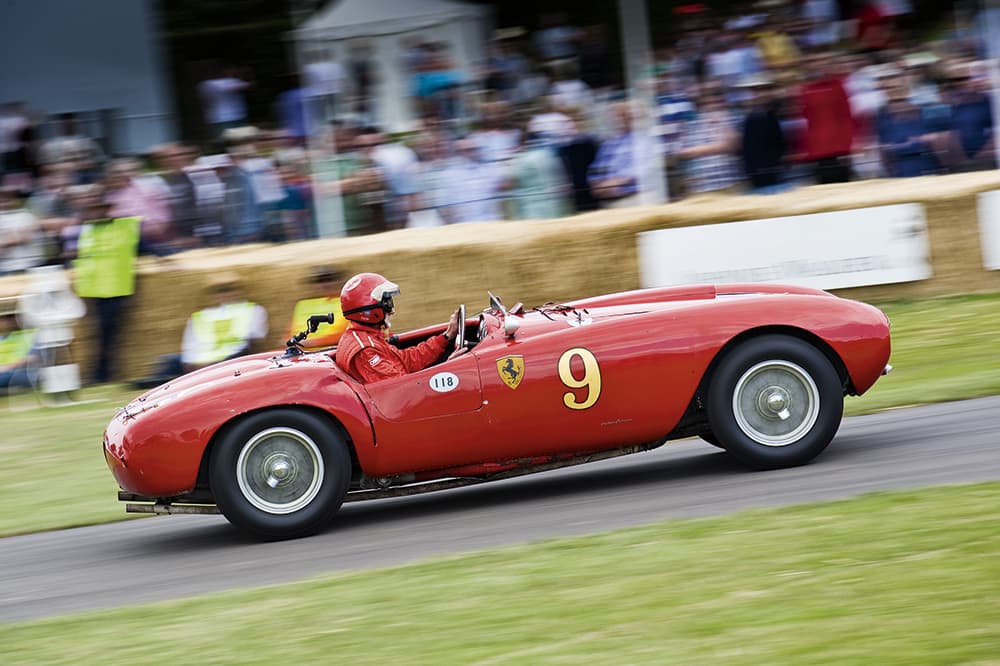
Events like the Goodwood Festival of Speed are great places to try panning.
Opting to use your camera’s AF can produce mixed results – if it gets it right, it can’t be faulted, but you may find that your camera can misfocus or settle on the wrong point of the car. An alternative is to focus on a point in the road where you know the car is going to pass, then switch to manual focusing. As you’ll probably be shooting at a relatively large depth of field, you can ensure your focusing is spot-on and concentrate fully on your positioning relative to the car.
How to position yourself when panning
Where possible, you want to get as far back as you can from the passing car, while also ensuring you have plenty of space in the frame as it passes – this will also be useful later when cropping as you may want to tilt the image slightly to accentuate the sense of speed. A telephoto zoom lens is ideal for this.
Try to avoid moving your feet when panning, so position them slightly apart facing forwards, using your torso to twist from left to right as you follow your subject. As the car approaches, follow it in one smooth, fluid movement, only firing the shutter once the car is close enough. Don’t be disheartened if you don’t get it bang-on first time – panning requires plenty of practice and patience. Get it right and you’ll be rewarded with stunning car photos.
Take you car photography up a gear with a tracking shot
While panning requires you to move your lens at the same speed as a moving vehicle passing in front of you, an alternative is to shoot alongside it in a secondary moving car.
As with panning, you’ll need to shoot with a slow enough shutter speed to introduce that feeling of movement, but by matching the speed of the two vehicles, the car you’re shooting remains pin-sharp. Rather than using a telephoto zoom lens, you might want to try a standard zoom, or even a wide-angle. Remember though, this shouldn’t be tried on public roads.
Tracking from another car can provide excellent results.
How to photograph cars on location
Cars don’t always have to be moving for successful automotive photography – a static car location shot can be just as striking.
Choose you location
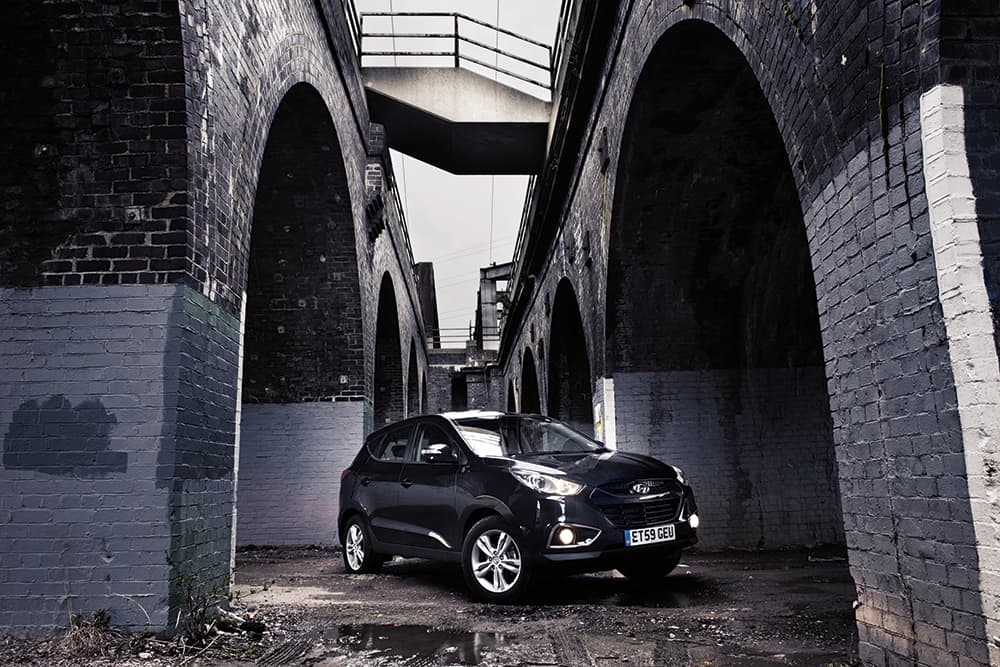
The location you choose is really dependent on the car you have, so whether you opt for urban and industrial or rural and quaint, it needs to complement or contrast with the styling and age of the car you’re shooting. Wherever you decide to shoot, though, it’s important to check whether you are allowed to do so.
Think about how you’re going to light your car
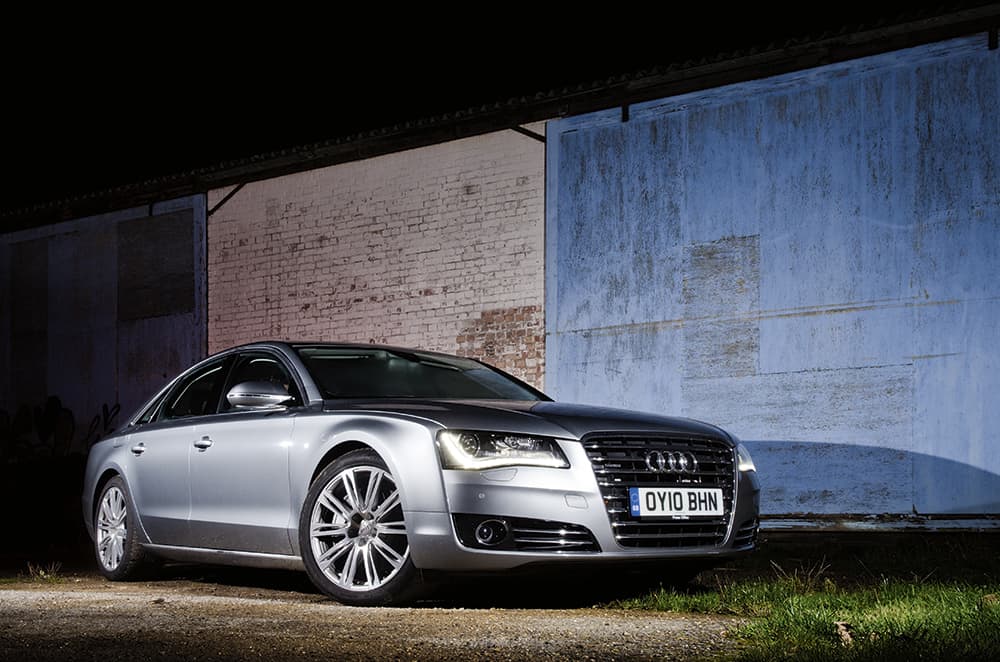
Once you’ve got the location sorted, you need to think about lighting. If you’re working from a dramatic location or when the sun’s a bit lower in the sky, then you might want to opt for natural light.
Some locations work really well if you inject some additional lighting and really make your car stand out. While dedicated location lighting is useful, you’ll still be able to do this effectively with one or two flashes, along with some lighting stands and modifiers. Results can be very impressive, especially if you purposefully underexpose the background by a couple of stops and expose correctly for the car – a combination that makes for a striking car photo.
Choosing the right lens for car photography on location
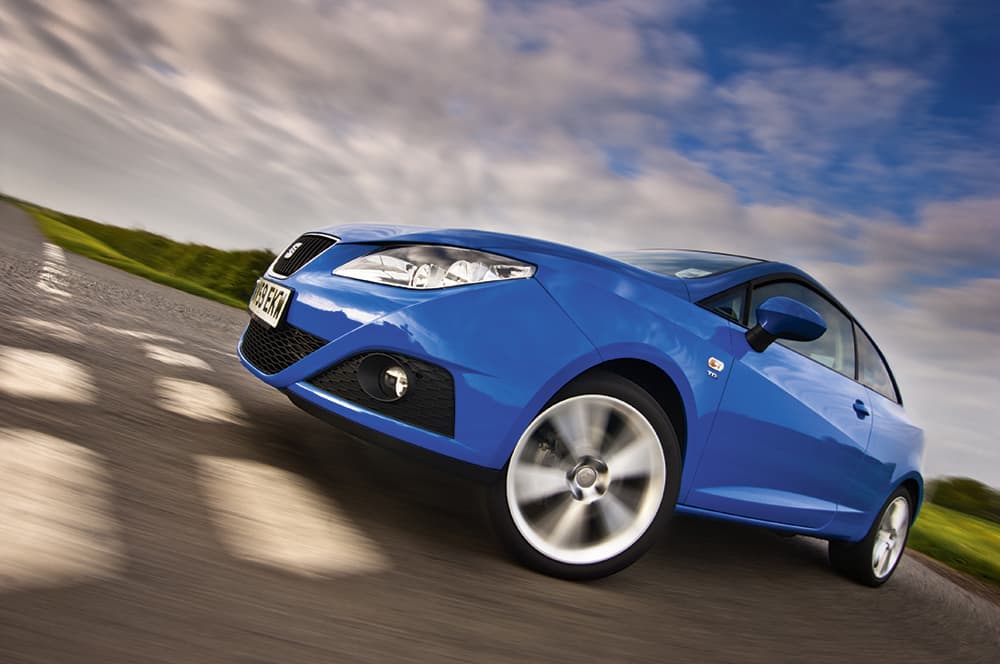
While you can go for a wider view when photographing cars on location, a telephoto focal length can also be a useful option – an 85mm lens on a full-frame camera works well, or a 70-200mm zoom. Get down low on the ground – even try lying flat – as the compressed perspective will produce a dramatic image. This is where you might want to flip-out the screen and use Live View to compose your shot.
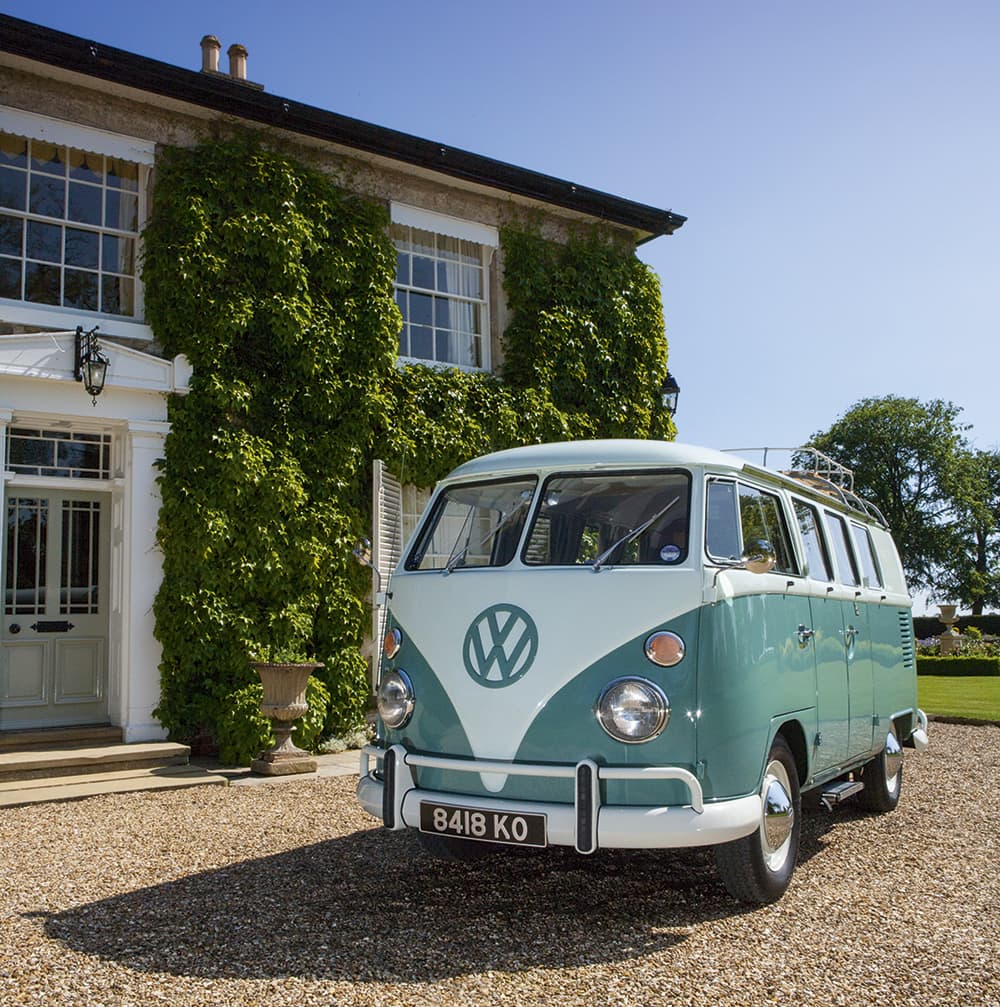
The background you choose will play a crucial part in the final image.
How to compose your car photos
When photographing a car on location, it’s important to think about the positioning of the car. Be prepared to move the car around a little to get the framing right, while you might want to think about turning the front wheels into the frame – if they’re pointing forward, it can take some of the dynamism out of the shot.
Shots from a higher elevation also work well, as it’s an angle that we don’t often view a car from. You may be able to find a higher spot to shoot from, but as this isn’t always possible it’s worth taking a small step ladder with you.
Car details and interiors
Rather than trying to shoot the whole car, take a different approach and focus on interesting details, as more often than not these are what makes a car unique. Arm yourself with a standard zoom, or a fast prime like a 35mm or 50mm if you have one, and gradually move around the car looking for points of interest. This could be a badge, a radiator grille or simply a curve in the bodywork, but once your eyes are drawn to a spot, look to get the best angle, whether that’s getting down low or to the side.
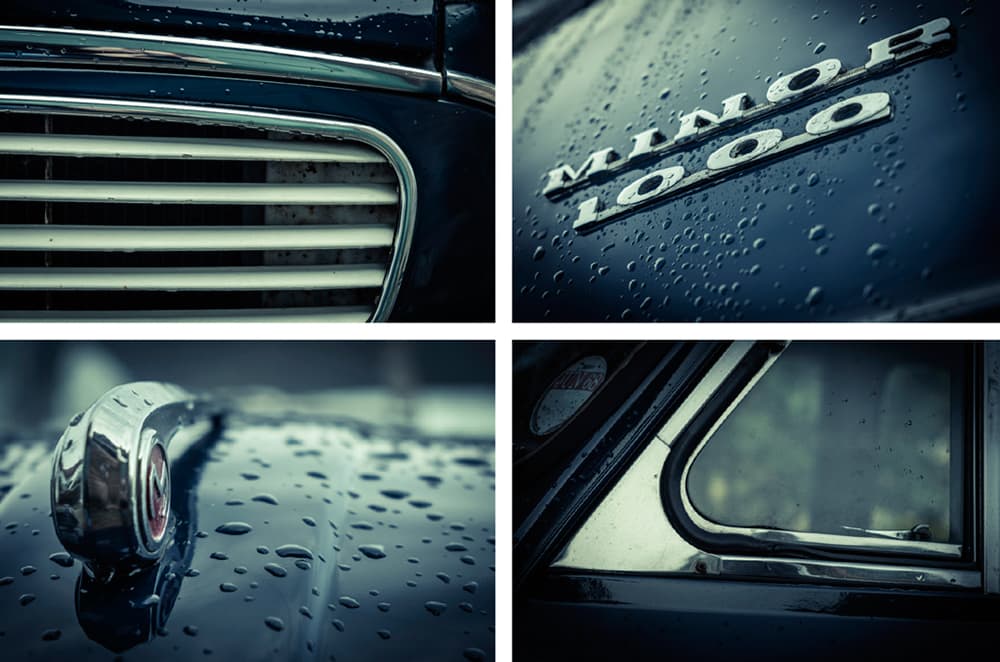
Work your way around the car looking for points of interest
The car you shoot doesn’t have to be in pristine condition, either (although it does need to be clean) – more often than not a car that looks like it’s had some faithful use will make better subject matter. Just be careful when working close to the car as you’ll need to keep an eye out for reflections, especially if the car is dotted with chrome. Weather also plays an important part – an overcast day can work really well as the soft diffused light means you’ll avoid hard shadows, while the warm glow of early morning or at the end of the day can add an extra element to your shot.
How to take good interior car photos
Just like the outside, when it comes to interior photos of a car, you might want to focus on specific details. Try and use a relatively ‘fast’ aperture lens – a standard prime with a maximum aperture of f/1.8 or faster will be ideal as it not only allows you to put the background in relief, but it also means you can shoot at workable shutter speeds when shooting handheld.
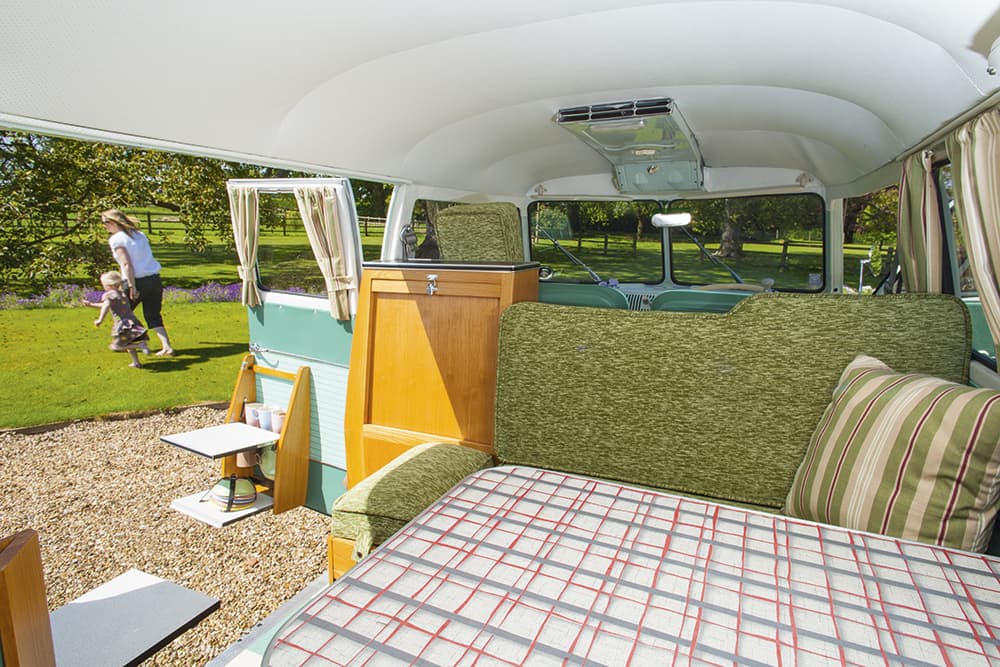
A wideangle lens will be necessary when shooting interiors
How to photograph cars for sale
If you’re looking for photograph your own car with a view of listing on a website like www.carsite.co.uk, then there are a couple of things to consider before you start.
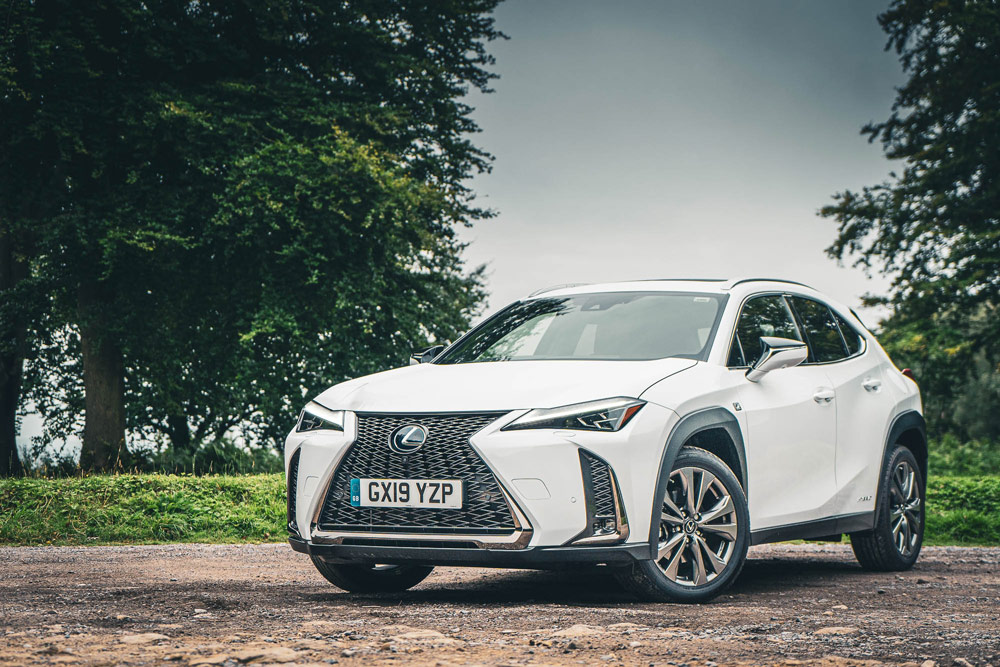
Phil Hall, Lexus, Car photography, taken with the Sony A7 Mark III
The car needs to be centre stage, so rather than looking for a dramatic landscape for the car to sit in, you want a fairly unobtrusive background that isn’t a distraction from your car. A quiet car park in the countryside can be a great spot.
It might sound obvious, but before taking any photos, make sure your car is clean. Give it a thorough wash before you shoot and take some cloths with you to get rid of any dirt that might have built up on the journey to your location.
For the exterior shots of your car, try and get as many shots as possible – take front, back and side profiles, as well as a three-quarter shot of the car that you can use as the main image. Get some close-ups of each wheel to clearly illustrate the alloy wheel condition, before moving to the inside.
You don’t need moody details of the interior – instead, you want to achieve a brighter, airier look. A large piece of white card (A1 or A0 size will do the job and can be found in art shops) is perfect for lighting shadows, while a wide-angle lens will let you cram in as much as possible and make the car’s cabin appear nice and large.
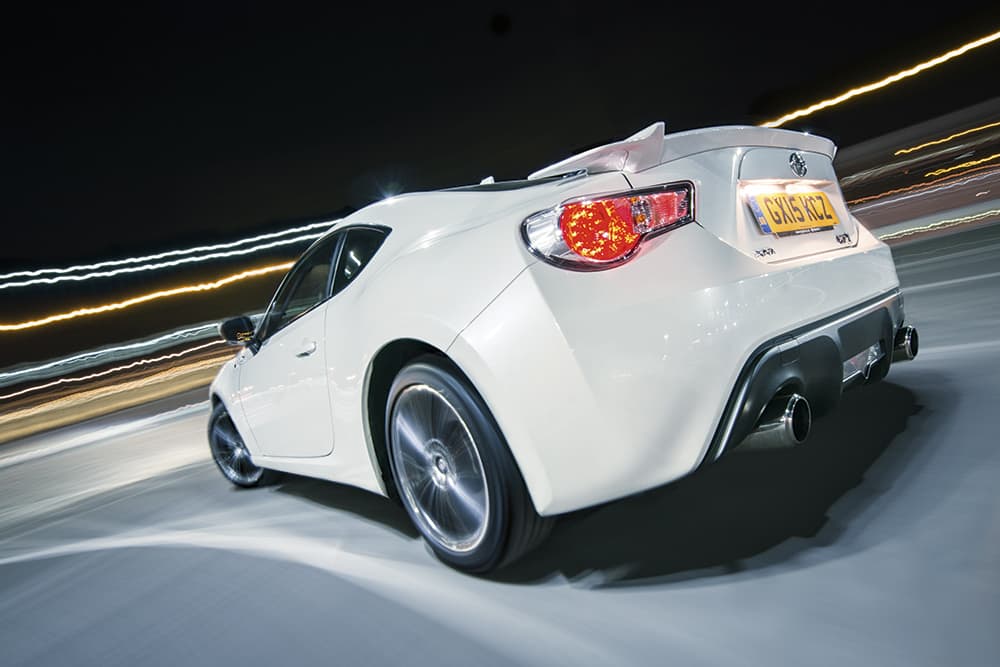
How to photograph cars at night
Introducing a car into your low light photography can work really well. Taking your car into the city at night can provide loads of excellent locations (provided you have permission to do so), while light trails can really add some energy to a shot. Another technique to try when photographing a car at night is light painting.
Painting with light
Almost like modern-day pieces of sculpture, cars lend themselves perfectly to painting with light, as it really allows you to reveal the shape and form of the bodywork. You don’t need a huge amount of expensive kit, either, as a flashgun or torch will do a decent job to get the ball rolling. For more control, though, you can look at using an LED panel. For this shot we used the Gloxy Power Blade that has 298 LEDs grouped together in a strip, but there are a range of options to suit all budgets. While different light sources will produce slightly different results, the principles for a successful shot remain the same.
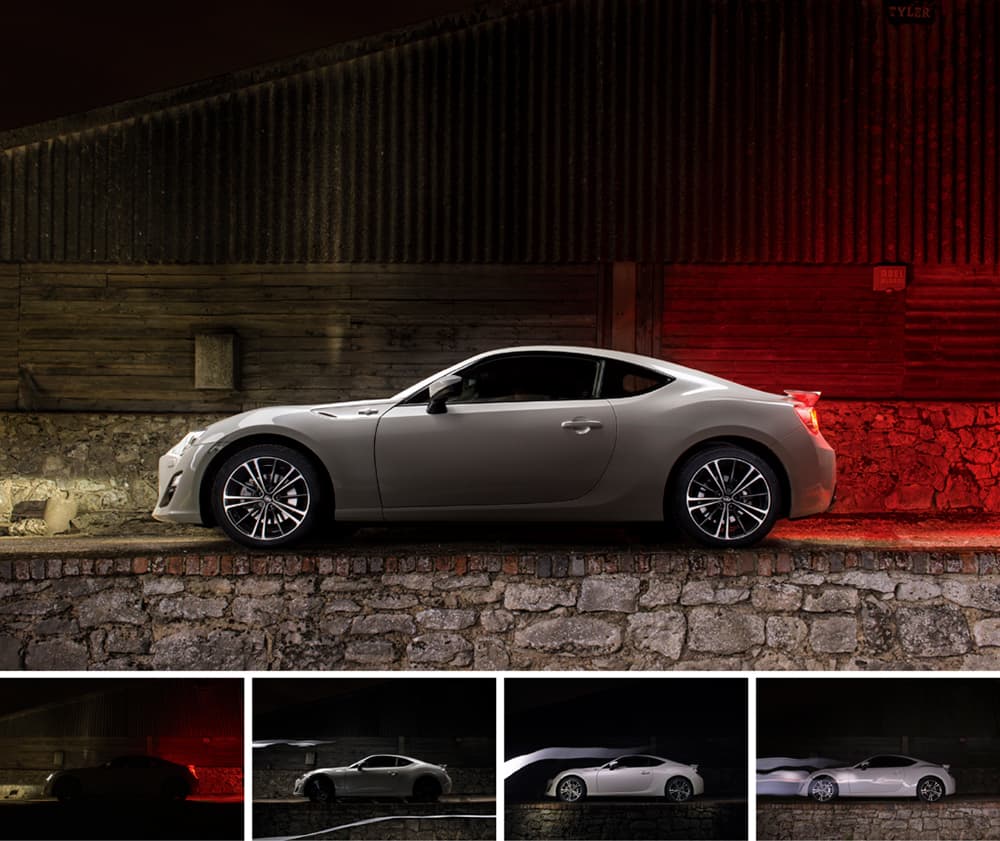
Work on individual elements of the car for each shot, then merge the image into a single photo. The final composite image is made up of the four separate shots. Car shown (GT86) kindly supplied by Toyota GB
Light painting basics
Pick your background. In this case we opted for an old farm building to contrast with the clean, defined lines of the car, but an urban background could work just as well. Also remember that you need to consider the amount of ambient light in the area – you want as little as possible, otherwise it risks encroaching on the scene and ruining the image.
Once you’ve got your location sorted, it’s time to set up. If you can, bring a friend to help out. Not only can they collaborate on the shoot (life’s a lot easier with someone firing the shutter), but it’s always good to have some company if you’re working in the dark at night.
Camera settings for light painting
With your camera placed on a tripod, working in the dark can make focusing tricky, so get your friend to throw some light on the car while you set the focus. Once you’re happy, lock it off and then dial in the exposure. Set the ISO at 100-200 and then, as a starting point, set the aperture at f/11 and an exposure at 30secs.
This shot was constructed from multiple images lit with a single flashgun
Unless you’re extremely lucky, you’re not going to get the perfect shot in a single capture. Instead, you want to build up elements of the shot that can then be merged later in Photoshop, so it makes sense to pick out the elements you want to work on. One could be the cabin, another could be the side panels and another the wheels, while you might also want to bring in elements of the background. If you want to include the head and tail lights, do this separately first. Then switch them off and start your light painting. Try to keep your movements as smooth as possible and shield them from the lens. Once you’ve taken a variety of shots, it’s time to pack up and head home to blend them together.
Car Photography – Top tips
When shooting in some locations, make sure you get permission first
Keep it clean
When shooting cars, the most important thing to do is to make sure the car is clean. However good you are at Photoshop, you’ll struggle to ‘clean’ a car digitally. Get it cleaned thoroughly before you shoot and take some cloths with you to get rid of any dirt that might have built up on the journey.
Cleaning up an image – Step by step guide
1. Select images
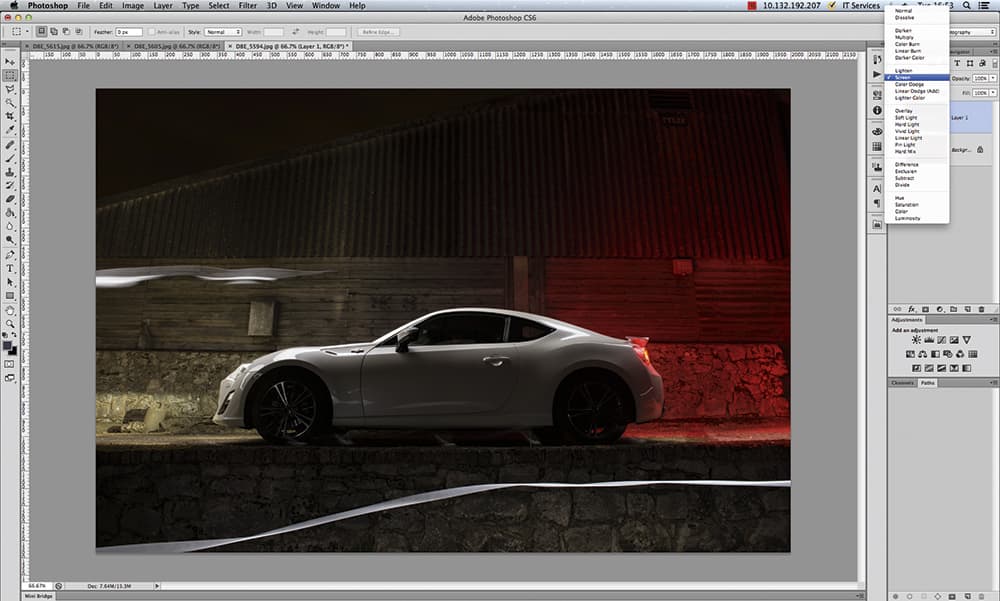
Once you’ve selected the images you want to use, batch convert the raw files in Lightroom or Photoshop. Then, with an ambient headlight shot working as your background layer, paste in another image and change the Blending Mode to Screen.
2. Layer mask
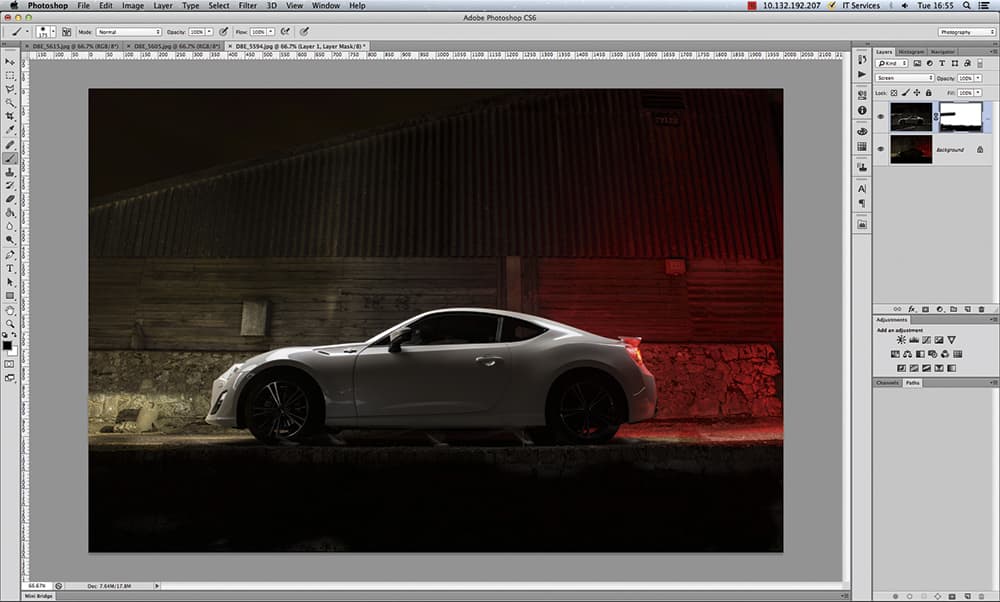
You may want to hide some elements of the image, so with Layer 1 selected, create a new Layer Mask and with a black Brush, run over the areas to you want to remove. You can then look to add your next layer.
3. Fill to black
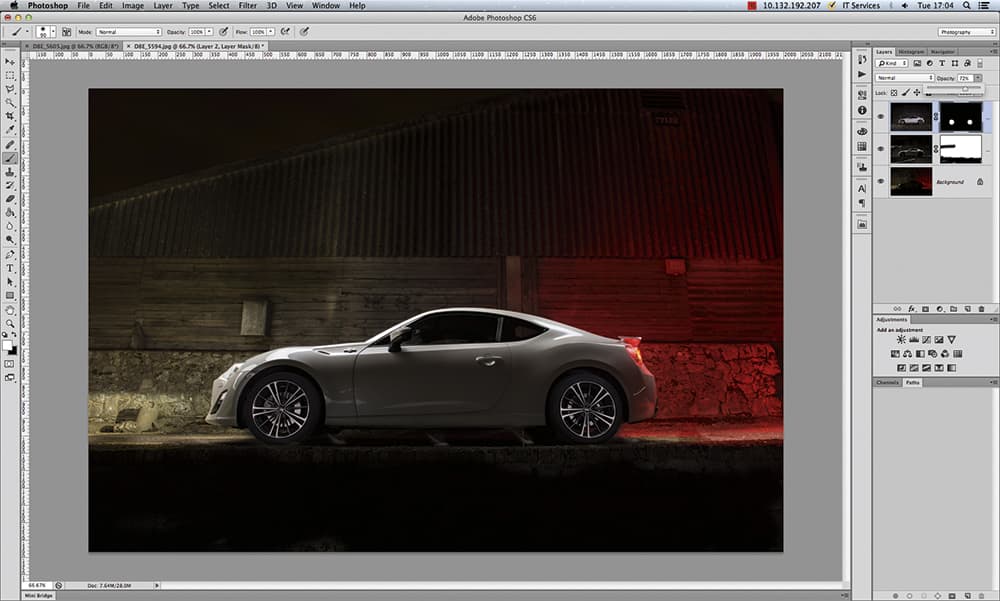
Some layers don’t need a Screen Blending Mode. Instead, apply a Layer Mask filled Black before using a White brush to reveal certain areas – in this case we only wanted to have the wheels show in this layer. Continue until you’re happy with the look.
Car photography kit list
- Gloxy Power Blade – With a long beam of solid and neutral light, this is a great piece of kit to use for illuminating a car.
- Flashgun – While not quite as precise as an LED light, your humble flashgun can still deliver decent results.
- Torch – If you don’t have any LED lights, try using a torch for a similar effect, although be prepared for a slightly warm result.
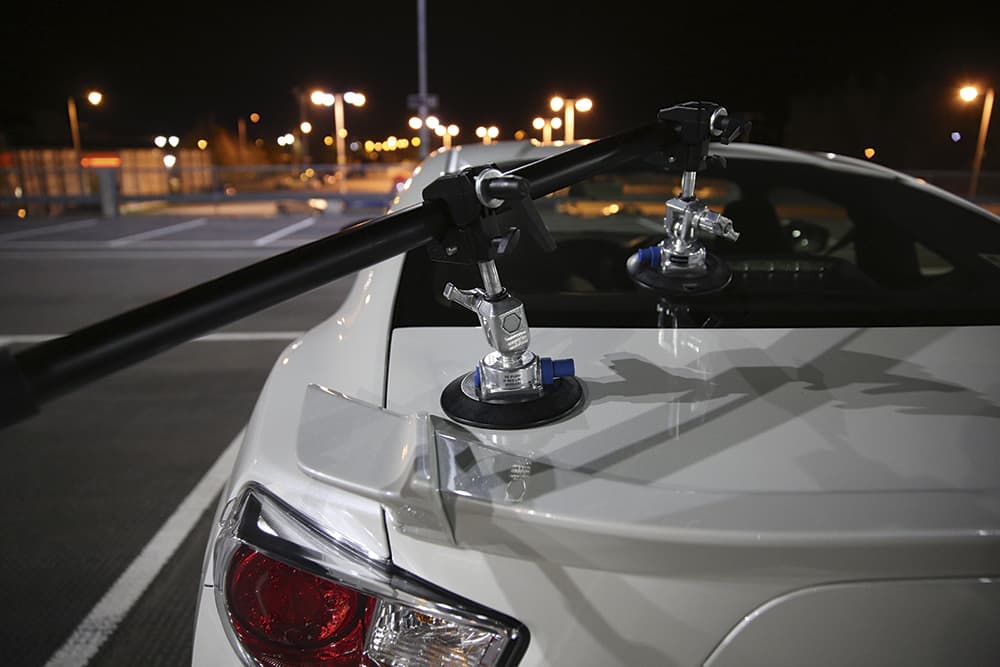
How to use a car mount for car photography
The car mount uses suction cups to form a bond with the car
If you want to take things a little further, you can look at using a camera rig. By temporarily fixing a rig to the car in this way, you’re allowing the camera to move at an identical speed to the car, introducing motion blur into the shot while keeping the car pin-sharp and adding a real sense of movement to the image.
You’ll find camera rigs in all shapes and sizes, but a popular choice is to use a couple of Manfrotto pump cups, Manfrotto super clamps and a telescopic pole with a Manfrotto magic arm attached, onto which you can then lock the camera. Because you’re shooting relatively close to the car, you’ll need a fairly wide focal length – something like a 16-35mm on a full-frame DSLR fits the bill perfectly. That’s not forgetting a whole lot of faith as you let your camera kit dangle from the car as it moves along. But don’t worry, it won’t actually be travelling that fast. More on that in a moment.
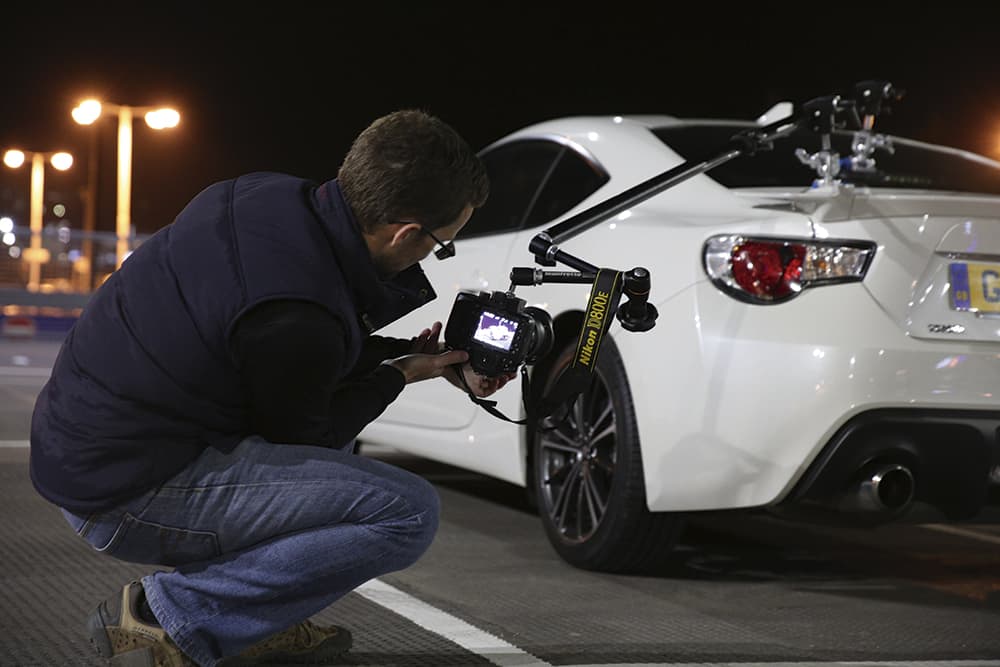
In use
When setting up a shot with a rig, front or rear three-quarter images tend to work best, although you should discount detail in front or rear shots. Just remember that there is no getting away from having the rig appear in your shot and it’s going to have to be removed later in post-production. One thing you can do to make life easier in Photoshop is to position the camera upside down so the telescopic arm is rising from the camera, as it’s much easier to clone a pole out against a sky or background than it is to have to rebuild sections of the bodywork.
This can make composition a little tricky, especially as you’ll potentially be working at awkward angles. However, this is where live view becomes extremely useful, as it makes it much easier to frame your shot. Once you’ve got your focus, it’s best to lock it off in manual to avoid the camera’s AF shifting focus inadvertently when shooting.
The final shot, once the car mount has been cloned out in post-production
Shutter speeds
Just like panning, getting the right shutter speed is the real key to the success of the final image. You need to be slow enough to introduce blur into the shot, but not so much so that you risk compromising image sharpness.
If you’re shooting in daylight, start by dropping your ISO down to 100-200 and in shutter priority mode, experiment with shutter speeds of 1/15-1/60sec as a starting point. You’ll find that the car only needs to be moving at around 5-10mph to introduce blur and make it appear as if it’s travelling much faster. If you’re struggling to achieve a balanced exposure – it may be too bright, for instance – pop a neutral density filter on the front. When it comes to night shooting, try a shutter speed of around 1-1.5sec as this will render lights as long light trails.
Avoiding vibration
With a long telescopic arm protruding out from the car, it will be no surprise to hear that vibration can become an issue, introducing loss of sharpness in the image. Some photographers like to attach guide lines from the telescopic arm to the corners of the car for extra stability, but simply holding the camera as the car moves can help. It is important to look for smooth roads and make sure the car maintains a consistent speed.
Alternatively, rather than shooting with the engine on, you can simply push the car to minimise the effect of engine vibration. If you try this and you’re still having trouble with unwanted vibrations, one trick is to shoot a static shot and then blend it with the moving image later.
Finally, triggering the shutter. You can use a remote trigger such as PocketWizard Plus IIIor, if your camera has one, you can use its intervalometer to fire a series of shots in quick succession as the car moves along.
Rather than shooting with the engine on, you can push the car to reduce vibration
Car mount – kit list
- Hague SM11 telescopic mount rig – You can build your own rig from individual parts, but Hague’s all-in-one solution is a great option at £276.
- Manfrotto Magic Arm – The Manfrotto Magic Arm with a super clamp (£112) offers a bit more flexibility when it comes to framing your shot.
- Remote Trigger – To fire the shutter as the car moves along, a remote release is essential. Happily there are numerous options available on the high street.
Now you’ve learnt some of the best methods for improving your car photography, why not share some of your images with us on Facebook, or Twitter.
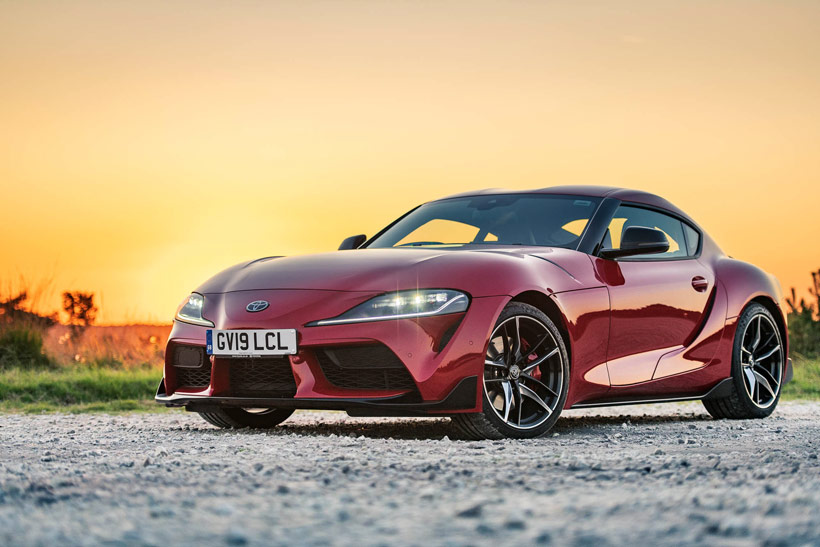
Featured image: Phil Hall, Toyota Supra, taken with the Nikon D850.
Tune in next week, for the next article in the series of the AP Improve Your Photography Series – in partnership with MPB.
- Part 1: Beginners guide to different camera types.
- Part 2: Beginners guide to different lens types.
- Part 3: Beginners guide to using a camera taking photos.
- Part 4: Beginners guide to Exposure, aperture, shutter, ISO, and metering.
- Part 5: Understanding white balance settings and colour
- Part 6: 10 essential cameras accessories for beginners
- Part 7: Beginners guide to the Art of photography and composition
- Part 8: Beginners guide to Photoshop Elements and editing photos
- Part 9: Beginners guide to Portrait Photography
- Part 10: Beginners guide to Macro Photography
- Part 11: Beginners guide to Street Photography
- Part 12: Beginners guide to Landscape Photography
- Part 13: How to shoot Action and Sports Photography
- Part 14: How to shoot wildlife photography
- Part 15: Raw vs JPEG – Pros and cons
- Part 16: How to create stunning black and white images
- Part 17: How to photograph events and music
- Part 18: Pet photography – how to photograph pets
- Part 19: The ultimate guide to flash photography
- Part 20: The ultimate guide to tripods
- Part 21: Create awesome photos with light painting
- Part 22: Beginners guide to file and photo management
- Part 23: How to shoot food photography
- Part 24: Complete guide to outdoor light
Find the latest Improve Your Photography articles here.