Raw Vs JPEG Pros and Cons. The raw vs JPEG question can be tricky to get one’s head around at first. In this guide we cover what raw and JPEG files are: how they differ, and the pros and cons of shooting in each. We’ll also touch upon raw software and image editing tips for those who want to take that next step in their photography life.
Note: JPEG = Joint Photographic Experts Group – the people who created the JPEG standard. More at the bottom of this article.
Raw and JPEG? I’m confused…
In a nutshell, raw and JPEG are simply file formats that your camera records. You can set your camera to shoot in just raw, JPEG or both. How you access the setting will depend upon your camera system – most are under an ‘Image Quality’ setting in the main shooting menu.

What is a Raw file?
A raw file is an uncompressed and unprocessed image. It’s worth noting that cameras on many modern smartphones can shoot in raw, too. Most, if not probably all, professional photographers and serious hobbyists shoot using a raw file format as they produce far higher quality results compared to a JPEG.
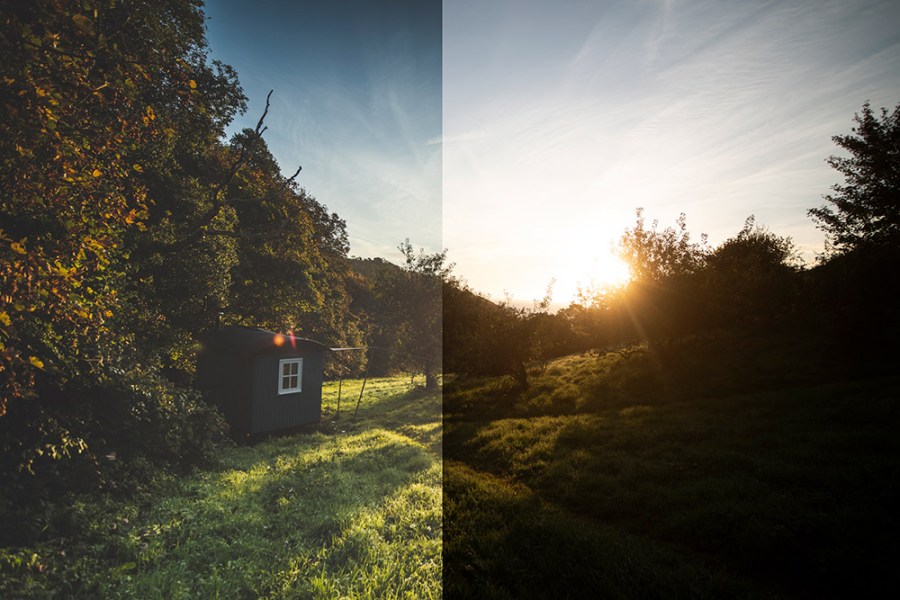
A raw file is not ready to be printed or displayed until it has been processed through some sort of image editing software. In fact a raw file looks dull and soft when it comes out of the camera. Beginners may even think there is something wrong with their camera when reviewing a raw image file as they can look very flat!
Think of raw like shooting film (for those old enough to remember!). To see the images once you’ve shot a film, you need to develop and process the negatives. It’s the same for digital raw image. Once you’ve shot your images you need to develop and process the raw files on a computer to bring out what you’ve captured. We explain how to process them shortly.
What is a JPEG file?
A JPEG file is a compressed image file format that your camera has processed. This compression of the file means the camera has deliberately shed some of the image data to render the file smaller.
When shooting in the JPEG format your camera processes basic settings like the contrast, saturation and sharpening effects. This is great if you have no intention or enthusiasm to process your final images. However, this is to allow your camera to make all the creative decisions for you; giving you less control over the final outcome.
It’s also important when shooting in a JPEG file format to ensure your exposure settings are spot on. There is far less scope to rescue any incorrectly exposed shadow and highlight detail at the editing stage. You can still edit a JPEG file to a certain degree but if you push and pull the pixels around too much you’ll start to encounter a problem called “banding” where images appear more pixelated.
For shooting JPEGs, we recommend the you set your camera to the highest possible quality. You can always downsize JPEG images on your computer if you need them smaller, but can’t upscale them if you’ve shot the originals at a lower quality (without additional difficulty).
Now you know what JPEGs and raw files are, lets recap on the advantages and disadvantages:
Pros and cons of shooting RAW
What are the advantages of shooting in raw?
- Raw files produce high quality results.
- You can recover the highlight and shadow detail in a raw file to a far greater level compared with a JPEG, giving improved dynamic range.
- You can extensively edit raw files to boost the tone, sharpen the image, and make many other basic image adjustments.
- You can adjust the white balance setting in a raw file post production meaning you don’t need to worry about this setting when shooting.
What are the disadvantages of shooting in raw?
- The file sizes are larger than JPEGs therefore they take up more storage space on your memory card and computer.
- Raw files come out of the camera appearing flat. If you don’t process them they are no good. You cannot upload raw files directly to social media or online.
Pros and cons of shooting JPEGs
What are the advantages of shooting JPEG?
- They are much smaller in size so therefore take up less storage space on your memory card and computer.
- Your camera makes all the basic edit adjustments – this is an advantage if you have no interest in editing your images, or you want to upload them quickly from a shoot to social media with minimum fuss.
What are the disadvantages of shooting JPEG?
- Less creative control at the editing stage: for example you’re unlikely to be able to rescue the blown out highlights in the sky of a JPEG file.
- Your camera is making the basic image edit adjustments. This means you have less creative control over the final image.
- You can’t correct the white balance setting at the editing stage. You need to shoot this right in camera.
- If you over edit a JPEG file you get a technical issue called banding and the image appears more pixelated.
What software should I use?
Whether you choose to shoot in raw or JPEG you’ll need image editing software to make the most out of your images.
If you’ve shot in raw you need to make sure the image software you are using is compatible with your camera’s raw format. The make of camera will determine what type of raw file it produces. A Canon camera produces a .CR2/.CR3 raw file, Nikon a .NEF file, Sony an .ARW and Fujifilm’s raw format is an .RAF to name just a few of the major camera manufacturers.
If you are having compatibility issues you can convert your original raw file to a DNG file using Adobe’s DNG Converter. A DNG stands for Digital Negative and is a more universally read raw image file format.
There are many excellent software packages out there designed to boost your images – some you have to pay for whereas others are free. For example Nikon’s own raw software NX Studio is free to download (for Nikon users only), and Canon have a similar program called Digital Photo Professional (DPP) which has been designed for the CR2/CR3 file (Canon users only). If you have a different camera see our guide to manufacturers photo editing software.
Other image editing programs that may by of interest:
- Adobe Lightroom Classic
- Adobe Lightroom CC
- Adobe Camera Raw
- Adobe Photoshop Elements
- Capture One
- Affinity Photo
- DxO PhotoLab
- DxO PureRaw 2
- ON1 Photo RAW
- Exposure X7
- CyberLink PhotoDirector
What are the basic image adjustments?
For those who are now feeling enthusiastic about raw you’ll need to get your head around these basic settings. We’d recommend you having a play around with each of them to see how the image reacts as you adjust. You’ll learn by adjusting:
- Exposure – Determines how bright or dark the image is.
- Highlights – Selects the light parts of your image and makes them lighter or darker. You can recover some or all highlight detail that may have got blown out.
- Shadows – Works the darker parts of your image and increases or decreases the light depending on the look you want. If you’ve lost detail in the shadows you can increase to get it back.
- Whites – Works similar to the highlight slider but this slider just affects the whites in the image rather than a range of highlights.
- Blacks – This slider affects the black parts in the image and can rescue lost detail.
- Contrast – By increasing the contrast you are making the shadows darker and the highlights lighter.
- White Balance – This controls the colour temperature of your image. You can make it warmer or cooler using the temperature slides.
- Saturation – This slider boosts all the colours in your image.
- Sharpening – You’ll need to sharpen your raw files as they come out from your camera a little soft.
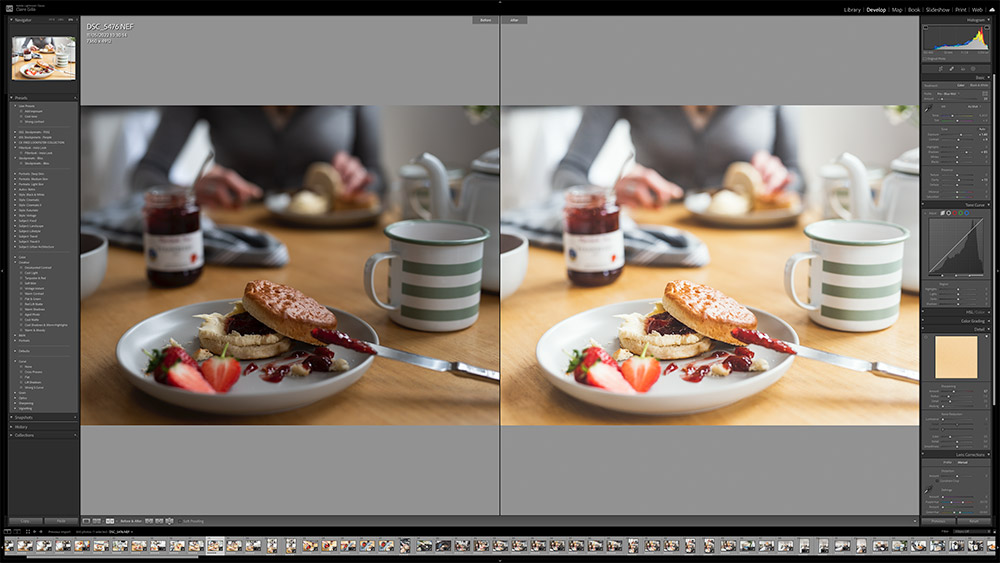
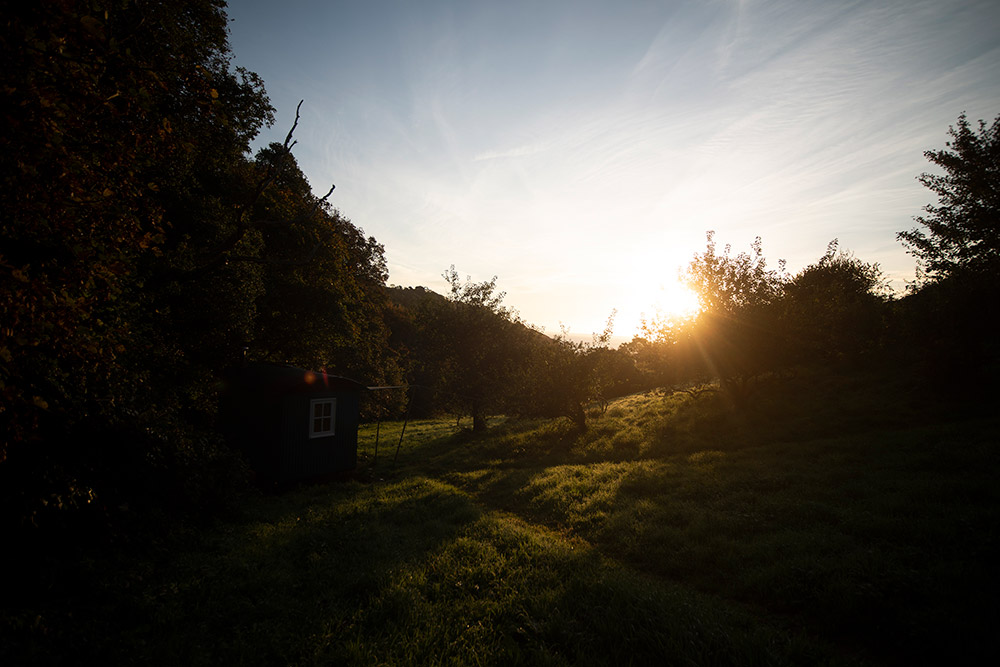
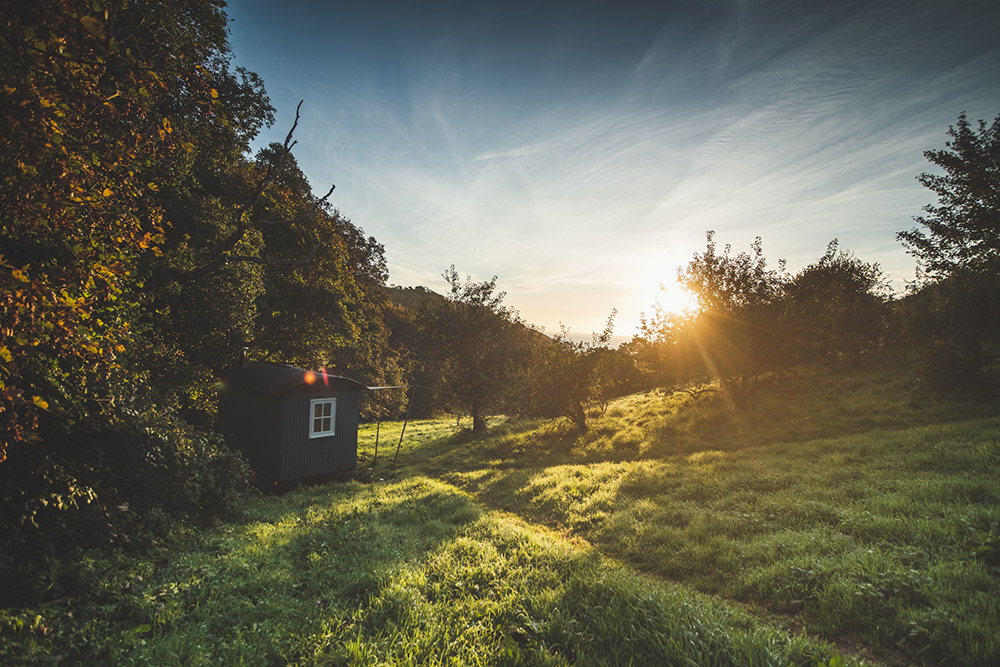
Raw examples, before and after processing:
What now – JPEG or Raw?
It’s completely up to you and what your needs are! If you want your photography to progress we recommend shooting in raw or at least giving it a go every so often so you get used to the image processing procedure. Once you’ve got your head around the basics you’ll find your photography will elevate to the next level and then go beyond!
Raw vs JPEG – Frequently asked questions (FAQ):
What does JPEG stand for?
JPEG is an acronym for “Joint Photographic Experts Group”, the group that created the file format standard in 1992. If you’re interested in more technical information on JPEG, have a look at this Wikipedia entry, and check out our guide to the best camera brands for JPEGs.
Is it JPG or JPEG?
JPEG is the full name, but the majority of files simple end in .JPG. Some people use .jpeg, and that also works, but the majority of people use .jpg. When typing JPEG, or JPG it should be in capitals, but files are normally all lowercase.
How do you pronounce JPEG?
Jay-peg. Imagine you’ve seen a Jay (bird), and it was flying through the sky whilst carrying a peg, of all things! That’s how you say JPEG, as Jay-peg.
Is it raw or RAW?
As raw is a “word” rather than an acronym, it doesn’t need to be capitalised, although it often is by many people. If you want additional information, have a look at this Wikipedia entry.
Article: Claire Gillo
Tune in next week, for the next article in the series of the AP Improve Your Photography Series – in partnership with MPB.
- Part 1: Beginners guide to different camera types.
- Part 2: Beginners guide to different lens types.
- Part 3: Beginners guide to using a camera taking photos.
- Part 4: Beginners guide to Exposure, aperture, shutter, ISO, and metering.
- Part 5: Understanding white balance settings and colour
- Part 6: 10 essential cameras accessories for beginners
- Part 7: Beginners guide to the Art of photography and composition
- Part 8: Beginners guide to Photoshop Elements and editing photos
- Part 9: Beginners guide to Portrait Photography
- Part 10: Beginners guide to Macro Photography
- Part 11: Beginners guide to Street Photography
- Part 12: Beginners guide to Landscape Photography
- Part 13: How to shoot Action and Sports Photography
- Part 14: How to shoot wildlife photography
Find the latest Improve Your Photography articles here.