There are few shooting techniques currently more popular than HDR, yet it’s one that’s easy to get wrong, so why not let Paul Nuttall help you make the most of this new technique?

1. Storm Chase
While the midst of a storm may not be the most pleasant of conditions to take photos in, stormy weather has the potential to produce some of the most stunning High Dynamic Range (HDR) images. The combination of broken skies, bright light and gloomy clouds can be difficult to capture with a single shot, but the exposure blending of HDR processing means that you’ll be able to get the correct exposure for every element of the shot, allowing gloomy clouds and bright cloud breaks to sit together in perfect harmony!
So, keep an eye on the weather charts and barometer, and the next time the sky looks moody, pick up your camera and tripod and get that shot. Also, try to predict when a storm is about to hit, an encroaching weather front can provide even more dramatic skies.
2. Taking the Shot
The HDR capture phase involves bracketing several shots at different exposure values, and then combining them in an HDR-specific software package. Due to the exposure bracketing, there are several things to remember in the capture stage…

Always use a tripod where possible
One of the most important tips for the capture phase of HDR photography is to use a tripod wherever possible. When bracketing exposures – depending on your camera’s frame rate – it will take a short time to complete the bracketing process. During this period, if there is any camera movement at all, you’ll struggle to align the exposures in your HDR software. As a result you’ll have a final image in which ghosting (the appearance of multiple images marginally misaligned and therefore having blurry edges) will appear, and so the full HDR effect will be difficult to achieve.
Keep the ISO as low as possible
During the HDR production process noise can appear more readily, or amplified, and as a result makes itself known in areas such as shadows and highlights. Some of the best HDR images are those with nice clean lines and minimal image flaws, so keep the ISO set as low as possible.
Always capture and process at the highest quality
HDR processing is designed to display the maximum amount of image data from a scene. As a result it follows that, in each individual exposure, you should try to maximise the image data recorded. To do this, be sure to always shoot at the highest quality setting available, or Raw if possible. Also, during your digital workflow, attempt to use the highest quality file type that your computer will sensibly process – highest resolution JPEG is fine, but TIFF files are preferable if your processor is up to it!
3. In-Camera Histogram
A good way to sense when it may be a suitable time for an HDR shot and when isn’t, is to take a look at your camera’s histogram. If there is visible clipping at either end of the histogram on the image you’re trying to capture, ie a peak at either the far left or far right of the graph, then that image data is being lost in either the highlights or shadows of the image.
To remedy this, simply bracket enough exposures to make sure that there is an even balance of peaks throughout the range of exposures, and therefore image data for all areas of the frame.
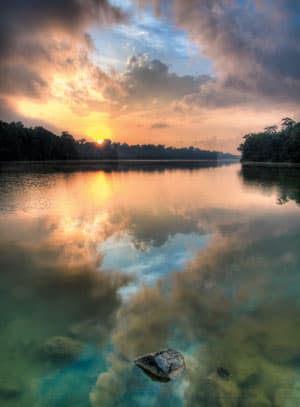
 4. Sunrise, sunset, sunshine!
The harsh directional light provided by both sunrise and sunset can make accurate exposures a bit of a problem. Again, HDR photography proves beneficial as it will allow you to blend and tonemap several different exposures to provide a full range of detail through the shot. It will allow you to include a relevant and enticing amount of foreground detail that will, more often that not, juxtapose the light and detail of the sunset perfectly and in a way unachievable as a single exposure.
5. High Contrast
When you’re out looking for potential HDR shots, but are struggling to find an opportune vista, a good test of the scene is to consider how much contrast is present.
Chances are that if there isn’t much contrast within the scene you are looking to capture then a conventional capture should suffice.
However, if the scene features extreme bright and dark areas yet you still want an even exposure, then bracketing off multiple exposures will reveal detail throughout the shot and will more than likely offer a ‘true to the eye’ representation of the scene.

6. Interiors
The many cracks and crevices of an interior scene can often baffle your camera’s sensor into struggling with exposure. It can also be an issue if you require both the view to the exterior and the interior in detail, for example if you want to expose a scenic view out of a window and the detail of the inside at the same time. However, bracket shots at the extreme ends of the exposure range and you’ll get both inside and out in detail. One of the main advantages of this is that you will no longer have to worry about the highlights blowing out when trying to get the fine architectural detail of a historic building in focus, for example.

 7. Unconventional Subject
Those subjects that, no doubt, lend themselves perfectly to the HDR treatment dominate the world of HDR. As mentioned previously, there is something satisfying about boosting up a skyful of storm clouds to bursting point in your chosen software.
However, why not turn the technique to a different subject matter and get a fresh look on your HDR images? Though sometimes difficult to capture due to the time it takes to bracket images, an HDR treatment of a conventional portrait can be striking and reveal textures that give the subject a real sense of emotion.
Also, night photography is often seen as the domain of long-exposure images, but why not bracket some long exposures and see what the effect is like?
8. Black & White Processing
While it is true that the HDR processing technique has the ability to boost colours to the very limit of their capacities, the effect often detracts from the overall look of the image. If this is the case, why not try converting the processed image into black & white?
Not only will this remove any possibly distracting colours, but also the expansion of tones throughout the frame often has even more impact when viewed with the loss of colour.

9. Photoshop Step-by-Steps for HDR
The market is awash with software options for processing your bracketed images into a single HDR image, Photomatix (www.hdrsoft.com) being one of the market leaders. However, a good alternative is Photoshop. Here’s how you can use it to produce your own HDR image in minutes…

Step 1 Convert your Raw files to TIFF files, then select them in Adobe Bridge, however few or many of them there may be, then click Tools > Photoshop > Merge to HDR. Alternatively, simply open the required images in Photoshop and then click File > Automate > Merge to HDR.
Step 2 You’ll now be taken to a dialogue box, in which you select the images desired. Click OK and, after a short wait, a preview window will pop up. In this window is a pretty ghastly image which is the raw version of our finished product. To head to the next step, click OK, then when back in Photoshop click Image > Mode > 16Bits/Channel.
Step 3 A new HDR Converter dialogue box will now appear, and this is where the ‘magic’ happens. Simply select Local Adaptation from the dropdown menu and alter the curves to your desire. Then hit OK and you’re back in Photoshop to finish the toning. Once done, change back to 8 Bits/Channel to save as a JPEG.
 10 . Keep it Subtle
As with any image-processing technique in digital photography, and, even previously in film, the temptation is there to push the parameters to their limits and, ultimately, overdo the effect. If you succumb to this urge when processing your bracketed exposures, chances are that you’re going to end up with a garish image, laden with halos and other such obtrusive artefacts.
Instead, why don’t you minimise the processing and try to keep the HDR effect subtle? The best way of doing this is to begin processing with all your parameters set to the lowest level, then slowly tweak them to a point at which the effects of HDR processing can be seen, but isn’t overwhelming.


