You don’t need a professional studio to get great results when photographing indoors, here are some creative photo tips and techniques to try in the comfort of your own home.

Winter is arguably one of the worst times of the year for photography. Sure, you can get some great winter landscapes when the light is good, but more often than not we’re served with uninspiring and gloomy afternoons.
So what better time to set up a home studio? Sounds expensive? Not at all. Of course, you can spend a fortune on studio flash and backgrounds if you want, but you don’t have to. With home studio photography you can improvise not only in your choice of subjects, but also in your choice of lights and backgrounds.
In this article we’re going to focus on practical, low-cost techniques you can try, using items you probably already have in your home. The idea is to have some fun experimenting with new ideas and techniques, and to banish the mid-winter blues with some creative shooting.
Indoor Photography – Getting Started
 Camera
You can, of course, use any camera for home studio photography, a DSLR is by no means essential. However, there are a few features that will make life easier. A manual exposure mode will give you a lot more control over things like exposure and depth of field. You’ll also need to be able to focus fairly closely if you’re doing, say, small-scale table top photography. If you’re fortunate enough to own a camera with a PC flash sync socket, this will make life easier if you’re using flash too.
Tripod
This is an essential item for the home studio, especially for still-life photography. A tripod will enable you to fine-tune your composition, and will ensure sharper pictures, even at ‘hand-holdable’ shutter speeds. It will also enable you to shoot at long exposure times of many seconds or minutes, which opens your photography up to a variety of creative techniques.
Tabletop
If you’re doing still-life photography you’ll need a flat surface. A kitchen table, coffee table or any other flat-surfaced item of furniture is ideal, and of course this may dictate where in the house you have to work. If push comes to shove you can always use the floor, though this would mean spending a lot of time on your knees, which isn’t ideal from a comfort point of view.
 Remote Release
With long exposures, the act of pressing the shutter button can introduce vibration, which can reduce the sharpness of your pictures. A remote release not only eliminates this risk but can also allow you to fire the shutter while standing some distance away from the camera, depending on the type of release.
This means that if you’re working around a table top you don’t have to keep going back to the camera position to take a picture. Even for portraits a tripod and remote release will enable you to make eye contact with the subject and get a better rapport going than when your face is hidden behind the camera.
 Background
Regardless of the subject you are shooting there’s a good chance that you’ll need a background. Thankfully, with still-life this needn’t be very big and you have an infinite variety of options. Sheets of stiff card are ideal, you can buy them from graphic arts shops in many different colours. Perspex is more expensive but more durable and can be lit from behind.
In the right circumstances fabric also works well as a photographic background, white bed sheets and sheers of black cotton can be used, though they tend to work better as portrait backgrounds because the texture of the fabric may remain in focus on a still-life set taken shot with a small aperture, which can be distracting. With portraits, however, the subject is usually some distance in front of it so the texture is easy to blur using a wide-ish aperture. Another option that makes a great free-standing white backdrop for half-length portraits is to source an old projector screen. These can be found at car-boot fairs for pennies.
In portraiture you can sometimes dispense with a background altogether and use your house as a set. Pose your subject in an armchair or on a window ledge, and make the room part of the picture. Of course, the success of this depends on the room, and your furniture. This approach does tend to work best with uncluttered period or ultra-modern rooms.
Indoor Photography – Light Sources
Daylight
By positioning your Object close to a window you can take advantage of natural daylight. A north-facing window will provide the most consistent illumination since you won’t get direct sun periodically making things difficult. The rule of thumb is that even, diffused light is best. Beggars can’t always be choosers though, so if your only option is a south-facing window you can diffuse it with net curtains or even greaseproof paper. If you have a conservatory this will provide a lot of light but it will be from all directions and difficult to control.

 Domestic lights
Forget about the lightbulb that hangs from your ceiling as a light source, it’s very unflattering for both portraiture and still-life work. Desk lamps and, better still, anglepoise or spotlights are better as they offer direction and can be moved around to the ideal position. They aren’t very bright though, so you’ll be limited to a slow shutter speed or a high ISO.
Torchlight
If your subject is static, try using a standard pocket torchlight as a light source. Simply set the camera to Bulb, and move the torch around the subject over a period of several seconds until it has been evenly lit. See page 41 for more about this technique.
Flashguns
A flashgun (or two) can be a great asset to the home studio photographer. They’re small, so ideal for confined spaces, and very versatile. Bounce them off a wall or the ceiling, or fire them through a diffuser such as a bedsheet.
 Some flashguns can be triggered wirelessly, while others can be fired using a cable or slave flash as a trigger. Although there is no modelling light, you can review and refine your efforts on the camera’s LCD screen.
Studio Lighting
If you have a few hundred pounds to spare, the best option of all is to invest in a studio lighting kit. Studio lighting gives you more power, the ability to preview the effect of the light before shooting, and the system can also be modifed with a wide range of accessories. You’ll find that even a single light will greatly increase your options, but a twin-light kit is the ideal option.
Indoor Photography – Useful Extras
Reflectors
 Reflectors are a versatile substitute for an extra light and can be very useful, if not essential for some situations. They come in all shapes and sizes as well as colours (typically white, silver or gold) and can be moved around to bounce stray light back into shadow areas, whether you’re shooting a still-life or a portrait.
Mirrors
Small mirrors, like those used for make-up or shaving, can be used as very concentrated reflectors on still-life sets, bouncing light into very specific areas as they don’t diffuse the light hitting them.
Blu-tack
What did we do before Blu-tack was invented? We use tons of this in our own product photography for holding things in place, raising the angle of a camera or lens, and you can also use them for holding those reflectors and bits of mirror, or fixing props in place.
 Clamps
Some things are too heavy for Blu-tack, and that’s where clamps come in. A good clamp, such as Manfrotto’s Superclamp or Nano-clamp, can be used to hold lights, flashguns, backgrounds, big reflectors, boom arms or props such as bottles in place. No professional studio would be without a box full of clamps.
Black card
For the opposite effect to a white reflector, a black card is a handy tool for preventing fill light from hitting the shadow side of your subject. While the immediate use of such a tool might not be apparent, they can be very useful for removing all the light from dark shadows, often adding extra impact to a portrait.
Stands
Lighting stands give you something to attach your lights or reflectors to, and two together can be used to hold up a background. They’re height-adjustable too, making them very versatile. They don’t have to be expensive and can be bought second-hand on the cheap. It really doesn’t matter if they don’t match.
Indoor Photography – Reflective and Shiny Still Lives
Photographing Reflections

Product photographer Bip Mistry reveals some trade secrets for capturing perfect still-life images of tricky subjects such as glassware and shiny metal
Good product photography is all about highlighting the detail of a finely crafted object. Whether it’s the metallic bezel of a precisely engineered watch or the rich maroon hue of an expensive Bordeaux claret, knowing exactly how to deal with shiny and reflective surfaces are vital skills for any aspiring still-life and product photographer to master.
Taking still-life pictures of glass objects can be especially tricky as you often get all sorts of problems, not least unwanted reflections and distortions. But there are several solutions that will make glass objects sparkle and gleam just the way you want them to. These techniques can also be used to bring out and enhance the colour of the contents of glass objects.
In addition to a solid studio technique, digital post-production is an equally important part of the image-capture process. Through an understanding of the key tools of Photoshop such as dodge and burn, cloning, selection tools, levels and curves, saturation and suchlike you will find that you’re able to deal with those parts of the image that just do not look right in-camera, especially those elements that are difficult to light correctly.
Now we will looks at photographing a watch and a wine glass using a single softbox as a light source. I have used a Canon 17-40mm L lens (at 40mm), which doesn’t appear to be affected by lens flare.
www.bipmistry.com
 Photographing Shiny Objects
Lighting shiny metallic objects such as a watch can be tricky to photograph, especially when you want to define its shape without losing its shiny metal qualities. I find the best way is to use sheets of black card in tandem with a diffused light source. Done correctly this results in a sharp, well-defined image with shiny surfaces.
For this image I placed the watch on a table covered with white paper. I then positioned a softbox close and above the watch to provide a soft, clean light. The output will depend on your kit, but I set my 200-watt strobe unit to 1/4 power. Exposure can be established with a few test shots.
The watch should be slightly raised from the tabletop, and shot at an angle to avoid awkward reflections. In this example a piece of black card, positioned to the right-hand side of the watch was used in order to create a black edging along the chrome casing. I moved this card around until I was happy with the edging effect it created. When attempting this yourself, try cutting the card and experimenting with different shapes.
For this image I placed a piece of card in front of the watch to make the nearside top casing of the watch completely black. This also created black lines to the left- and right-hand sides that I later tidied up in Photoshop. The Dodge tool in PS can be used to make the background pure white.

Glass is reflective and transparent, which can pose problems when photographing it.
Photographing Glass
For this shot I filled a washed and polished wine glass with (slightly diluted) red wine and placed it on a sheet of clear glass raised several inches off the top of a table (see set-up pic, top right). The table had a sheet of black PVC on it to minimise glare and the softbox was placed behind the glass. To create the black curved shapes on either side of the glass I placed two pieces of large foamboard covered with black card directly in front of the softbox, leaving about a six-inch gap of light to shine through the glass. Blocking out as much light from the softbox as possible reduces the chance of lens flare.
I then moved the glass closer to the softbox, which made the black shadows look smaller. To compensate I widened the light gap to 10 inches. Notice how moving the card on the left affects the shadow created on the right-hand side of the glass and vice versa. Once satisfied with the shape, I placed two white cards on either side and in front of the glass to provide some modelling in the dark areas. Finally, I used Photoshop to remove unwanted reflections, and to add a soft glow.
I also chose to create some bubbles at the rim of the glass by disturbing the liquid. Bubbles don’t always stay though, so it is useful to have an assistant! As with the first shot, by moving the wine glass towards and away from the camera and adjusting the size of the strip of light the effect on the glass will be apparent.
What you will need
Digital camera ‚ Tripod ‚ USB cable ‚ Flash unit, Lighting stand ‚ Softbox ‚Table White/black paper, Spirit level, Black card ‚ White card, Foamboard, Gaffer tape.
Indoor Photography – Photographing Water
 Seeing is believing ‚ or is it? Jamal Alayoubi reveals how to create liquid images that beguile the senses.
This striking image of a wine glass that appears to be throwing its contents into the air catches the imagination because it appears to contradict everything we think we know about gravity.
When we look at the image we subconsciously think: ‘How did they do that?’
The answer isn’t to be found in Photoshop or in a wizard’s wand either; rather it’s a deliberate set-up using a carefully positioned flashgun, a moving glass board, a wine glass, some glue and some food colouring. Read on to find out how it’s done and how you, too, can experiment and achieve similar effects.
Photographing Water – Jamal’s Technique
Basic Set Up
Place the table 30cm away from the background , a plain white wall will make an ideal background. Place your flashgun under the table and point it towards the background. The trick is to prevent any reflections appearing on the glass or the splash.
Place the mirror or glass board on the table, making sure that you can easily slide it across the table. Secure the glass on the mirror, using double-sided tape or glue, ensuring that it’s neat and clean. Pour a little water into the glass and add a drop of food colouring to it. Don’t make the water too dark, though the effect works best when the liquid is translucent.

Camera & Flash Settings
Place your camera on a tripod and set your angle, but make sure that you keep enough space in the upper part of the frame where the splash will take place. The correct camera settings will depend on your equipment, but I set mine to Manual mode, with a shutter speed of 1/100sec, an aperture of f/16, and ISO 200. For the image pictured here a 50mm lens was used, but you can use any.
Attach your flash cable or set up your flash to work wirelessly in commander mode with your camera. As with camera settings your flash settings will depend on what kit you’re using my flash was set to Manual with power set at 1/64. A shutter speed of 1/100sec isn’t fast enough to freeze high-speed motion in normal light, so shoot in very low light instead to ensure the flash freezes the shot. You could use a lamp instead of a flash and rely on a fast shutter speed to freeze things, but you’ll need a very high-powered lamp to do so.
Take a test shot without moving anything to ensure you’ve got the correct lighting. Move your flash up or down, left or right until you get the best possible light.
 Capturing the Image
Draw a line on the table along the far edge of the mirror. This marks where the mirror should be when you fire the flash and take the shot. In order to get the splash effect, pull the mirror slowly away from the line and then push it quickly forward, bringing it to a sudden stop at the line. Take the shot at this point. If you don’t have a cable release you may want to ask someone to help you with the sliding while you capture the image.
And For My Next Trick…
If you try to arrange the glasses without any water the glasses will simply topple over, the trick is to use the weight of the water to help balance the glasses. Do this by filling up the first glass (the one at the bottom of the pile) as it will then be the heaviest. Then place the second glass into the first one and add a little water in it. Now place the third glass in the second one and add just a small amount of water. You’ll have to add or subtract the water in the second and the third cups until you get the correct balance. Stay patient, as it’s not easy!
What you will need
Wooden table, Mirror or a glass board, Superglue or double-sided sticky tape, Wine glass, Food colouring, Camera, Tripod, Off-camera flashgun‚ Flash-cable or wireless commander system.
Indoor Photography – Using a Lightbox
Produce vibrant colours and stunning photos with this lightbox technique…

Using a lightbox to illuminate your subject from below can yield some interesting results, as our two examples here show. The strong under-lighting can be used to boost the vibrancy of your subject, or highlight its internal texture, or it can be used to give it an ethereal glow.
Of course, if you happen to own a proper photographic lightbox so much the better, but fear not if you don’t because there’s nothing to prevent you from constructing your own.
The two main things you need to construct an impromptu lightbox are a pane of glass (or sheet of clear acrylic) and a diffused light source such as a desk lamp. Bear in mind that the glass or acrylic pane needs be strong enough to support your subject, and it also has to be raised high enough off the ground so that the light source can be placed safely underneath without turning the whole set-up into a fire hazard.
Also, try to ensure your light source is as even and diffused as possible, either by using a lamp with as wide a beam as possible, or by placing a white sheet or piece of card over (or under) the pane of glass or acrylic.

Once you’ve got your lightbox – be it commercial or home made – in place, you’re ready to try your hand at some new creative techniques.

Watermelon by Anna Goldsbrough
Don’t be put off if you don’t get it right first time; play around with the exposures until you get the final image you want. The veritable feast of props you can photograph is endless and you’ll have heaps of fun. Enjoy!
Watermelon by Anna Goldsborough
‘First of all the individual slices were cut thin enough to let the light from a lightbox pass through them to give them a glow and pick up the patterns of the fruit. I didn’t want the slices looking static so I tried different positioning of the slices to get an abstract composition.
‘The only source of light for this shoot was from the lightbox. I used a Nikon D70s with an 18-70mm lens for this shoot: the aperture was dropped down to f/5.6 because of the brightness of the lightbox. The camera was put on a tripod to give a precise framing of the image and to make sure there was no movement within the image. I took a fair few images using different angles before settling on this final image – this one flows and grabs people’s attention.’
 Indoor Photography – Scanner Photography
Modern photographic scanners are capable of whole lot more than just creating a digital archive of your old film prints, as Rodd Halstead explains…
Modern photographic scanners now boast resolutions as high as 4800 dpi, which in essence, means they can be employed as extremely sharp and powerful ‘digital’ cameras.
Rodd Halstead is one of a growing number of photographers to have discovered scanner photography, although as Rodd himself admits, it was an avenue of photography he discovered purely by accident.
 ‘On Christmas Day 2003 my younger daughter received a new Barbie Doll’ he explains ‘Out of curiosity or perhaps even boredom we put the doll on the scanner bed, covered it with a piece of white paper and scanned it. I was blown away by the results the photograph had incredible sharpness, and great colour and lighting. The biggest surprise, though, was the depth of field, which was as good as most camera macro lenses.’ Why not give it a go yourself, by following Rodd’s instructions below?
Scanner Photography – Step by Step
Select the Right Equipment
It is important to use a ‘photo scanner’ for this kind of high-quality optical work. I use an old Epson Perfection 2450 Photo scanner. Scanners like the Epson Photo series have a xenon lamp, and use a mirror to focus the image on to a CCD scanner, similar to a digital camera. Anything comparable should work fine.
 Clean Everything
To get high quality images without dust, streaking and other defects, you will need to wipe down the glass plate with a lint-free cloth (or paper towel) with a computer screen cleaning fluid. It will also help to dust off your scanned object.
Choose a Subject
While it is possible to capture objects up to an inch away from the scanner bed, I prefer to work with objects where the area of interest will be within 1/2 inch from the glass. Working within this distance will result in scanner photos with more even lighting and focus.
Position and Scan
Place the object on the glass and scan with your scanner’s ‘Color Photograph’ image setting. A black background can be obtained by scanning in a dark room with the object uncovered. I have also used white (matte photo paper) to cover a small object, which results in a white (or grey) background.
Scanner Photography – Scanner Subjects

Clematis Flower by Rodd Halstead
Here is a list of 3D objects that I have successfully imaged using a scanner.
- 1. Flowers, especially blossoms that are relatively flat. My all-time favourite is the Clematis flower.
- 2. Ferns, leaves, bark and other natural materials.
- 3. Fruit, especially fruit cut into cross-sections and placed on the scanner bed.
- 4. Rocks, gems and jewellery.
- 5. Framed photographs (even when covered with glass). As long as the underlying image is relatively flat and not too shiny, this technique is a good way of copying old family photography.
Indoor Photography – Painting by Torchlight
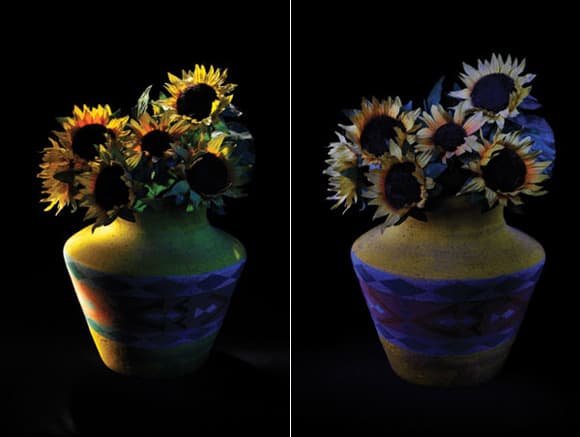
 Nigel Atherton used only a humble pocket torch to create this still-life
‘Inspired by the torchlit portraits of Chad Coombs I decided to try the technique myself using my pocket Maglite’ says Nigel.
I covered my kitchen table with a black cloth, hung from two old light stands and with the camera on a tripod I simply held the shutter open using a remote release and ‘painted’ the subject by moving the torchlight around it. After some experimentation I settled on an aperture of f/11 and an exposure time of 30 seconds, at ISO 200, which gave me plenty of time to work around the subject.
The great thing about this technique is that no two results are the same and you can have great fun creating backlight, spotlight or dappled light effects.
Below Right: Experiment to find the best exposure for your torch. Here I used an LED mini Maglite, which was cooler and less bright, resulting in a blue cast and underexposure.
Below Left: Here I used the torch mainly from behind and to the side of the vase for a moody backlit effect.


