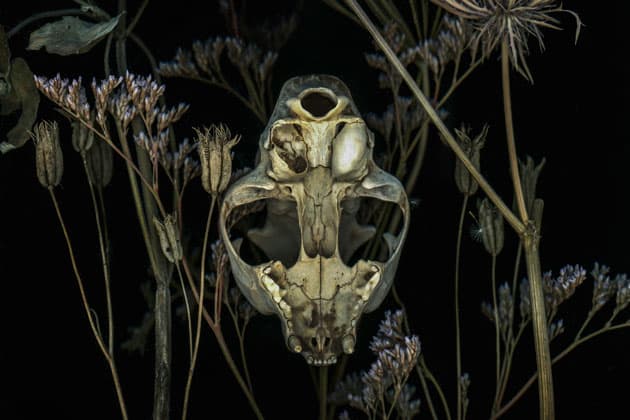
By scanning interesting objects such as this animal skull and some dead flowers, you can create something unique. Credit: Claire Gillo
With those long winter months in sight and the weather miserable and cold more often than not, now is the time to hibernate indoors. In the winter season a great project to immerse yourself in is scanner art. Producing a photographic image without the use of a camera is a creative and fun thing to do. It requires a little bit of patience and consideration in the initial set-up and ideas stage, but once these are in place it’s plain sailing from then on.
Choosing a scanner for scanner art
It goes without saying but to try this at home you will need a computer and a flatbed scanner. It doesn’t have to be an expensive scanner to get good results. We’ve tried this technique on a variety of models, and price doesn’t really come into it. Each scanner produces results in its own unique way. If you have access to a few scanners take some time to experiment and see which one gives you the result you prefer.
There are many subjects that lend themselves to scanner art. Flowers are one of the most obvious, and these are definitely the most scanned subject amongst the scanner-art community. There are a number of ideas to try in order to break away from the norm, such as hands and feet, natural objects like animal skulls and skeleton bones, and even food can look effective, although you don’t want your scanner to get too messy. There really is no limit to your creativity and imagination.

Get experimental in your approach. Movement can work well with body parts like hands and feet. Credit: Claire Gillo
Scanner resolution
The main thing to take into account when scanning your subject is the resolution size. Depending on how much detail you want your scanner to pick up will determine what setting you opt for. You don’t have to go big, as the higher the resolution the longer it will take to scan. If your computer is not the fastest it can be extremely frustrating processing your image at the editing stage if your image is too large. The higher the resolution the more detail you’ll be able to see, but your decision should also take into account the size of your object your scanning. If it’s something small and you want to enlarge it, you’ll need to select a larger resolution.
The resolution is determined by the dots per inch (dpi) setting on your scanner. It has a range from 50-12,800. We recommend you start with a resolution around 600dpi and increase or reduce accordingly.
Before you begin you need to take into account whether you want to scan in colour or black & white (grayscale) and at what bit Color or bit Grayscale setting. On our scanner we have a 24-bit Color setting and 48-bit. The grayscale comes in 8-bit Grayscale and 16-bit. Bits are all about the amount of colours or black & white tones in your scan, and as you can imagine, the higher the number on the setting the more colours or range of tone you have. It’s important to note the bit setting has nothing to do with the resolution. Your screen displays at 24-bit, and a JPEG file does too as it compresses the image to this amount. Really the Bit aspect only starts to matter when you want to print an image at a very large size or if you make a lot of image edits where you’re pushing and pulling the pixels around. If this is the case scan at 48-bit (16-bit Grayscale) and save as a TIFF file. However for our scanner art we used the lower-quality settings and saved out as JPEG, which was good enough for our needs.

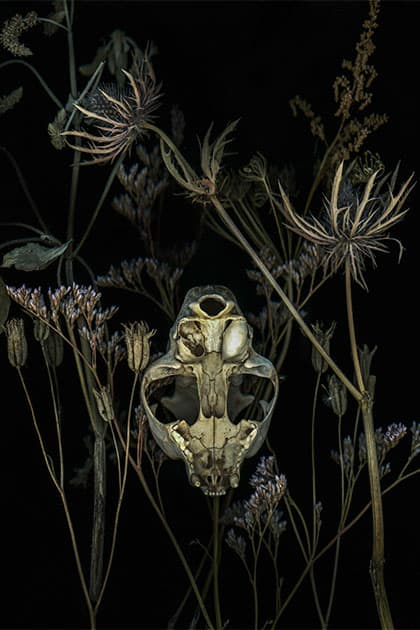
Credit: Claire Gillo
Scanner art top tips
- Pixels per inch (ppi) This is the resolution screen on the computer. Dots per inch (dpi) is what your image will print out at. The scanner setting for resolution is set to dpi on the Epson scanners.
- Switch your scanner’s setting Use the professional mode as you have the most control over the final outcome.
- Keep the liquids away! Try to get as little moisture on your scanner as possible.
- Keep your scanner clean In between scans spray some glass cleaner onto a cloth and wipe over the flatbed. This will do the trick.
- Do a preview and build your image When starting out it can be tricky to know what might work, so build up your scene slowly and gradually. Sometimes less is more. More simplistic set-ups can often be more effective than throwing in everything at once.
- You can always scan individual objects Scan objects one at a time and create a montage using Photoshop. Repeating patterns and objects can look effective.
- Scanner set-up We placed ours underneath a dark office table, so even without the lid down the background was dark. If you want to use different coloured backgrounds get some card and lay over the back.
- For a creative result Try moving your hand or object as it scans. Remember not to look at the light as it can damage your eyesight.
Step-by-step scanner art guide

Credit: Claire Gillo
1. Scanning software
Start by opening your scanning software and go to the professional setting. We scanned our objects in at a resolution between 600 and 720dpi. This was large enough for what we needed it for. We also set the Image Type to 24-bit color (for higher quality, select 48-bit).

Credit: Claire Gillo
2. Lay out your objects
Next arrange your subjects on the flatbed. You want to include the smaller items at the front so place them in first, and then the larger bits behind. Less can be more so build up your image slowly. Think about your background choice too at this stage.

3. Scan in
Once happy click Preview to see a quick view. Decide if you want to add in more objects, move any around or take any away. Once happy you can select the area you want to scan and check your resolution is set to the amount you want it.

Credit: Claire Gillo
4. The final edit
Once your image has been scanned you can then edit it as much as you see fit. For ours we opened them into Photoshop and tweaked the tone and contrast. We also used the Spot Healing tool to remove dust marks and prints in the background.
Kit list
- Scanner We used the Epson V600 Photo for our shoot; however any flatbed scanner will do. Make sure your scanner software is installed, and switch to the professional mode for best results.
- Pick a subject You’ll need to find objects to scan. It can be anything from plants to objects you have lying around the house. Get creative!
- Background Decide what colour you want the background to be and lay some card behind your subjects. This will have a great impact on the end result.
- Glass cleaner In between scans give your scanner a clean with glass cleaner to remove unwanted marks and fingerprints.