Staircases have been around for centuries, and many are designed as part of a building’s internal beauty rather than just a means of emergency escape if the lifts fail. Square or spiral, metal or wooden, their designs are often unique and, fortunately, many lend themselves to abstract studies.
Stay alert to opportunities: they can be all too easy to miss if you take the lazy route to an upper floor. However, if you seek them out when visiting a town, city or other location, they make a welcome addition to a portfolio of images, as this guide will reveal.
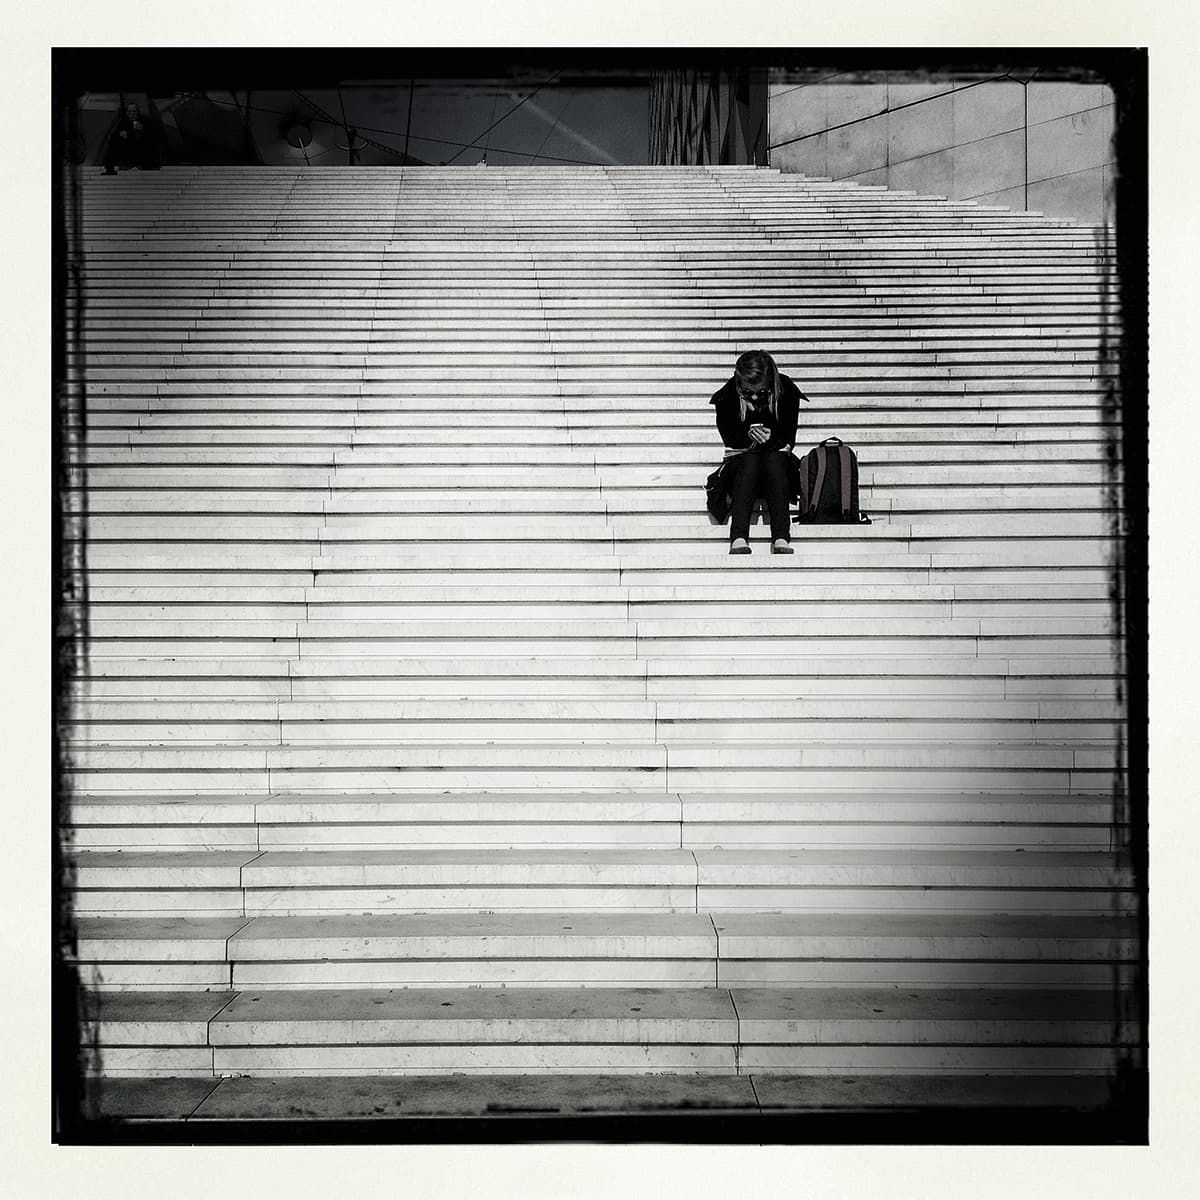
Remember to include people using the stairs in your shots, as they can provide additional interest
Design
Photography is about composition, and composition is about shape, design and, in many cases, patterns. Fortunately, staircases have all these in abundance. The natural design of staircases makes them very photogenic and pleasing to the eye, especially the way they lead from one floor to another, changing direction and overlapping each level.
This shaping acts as a natural pattern for the eye to follow around the frame and you can use this as the basis of your composition, or alternatively, shoot in more abstract form. This also applies to spiral staircases, but there are still images to be captured in the less-dramatic, straight-up design too, and it’s this contrast in design that makes them so interesting and unique.
You may find an interesting staircase in an otherwise ordinary location, such as your local shopping centre
Exposure and white balance
Shooting indoors brings with it two key problems – artificial light and low-light conditions. Tungsten bulbs are bright enough to illuminate the interior for your eyes, but less effective for your camera. They also cause some odd colour shifts that, again, only your camera records, as your brain can neutralise this back to a standard white light. Thankfully, digital cameras have a built-in correcting system and this is where the white balance feature comes in.
You can tailor the white balance to suit the light source, and tungsten is just one of the preset choices available. This usually corrects the colour cast with a press of a button, but sometimes it can be nice to have a slight glow of colour shift, which adds to the look and feel of the staircase. This can be tailored in-camera if shooting JPEGs using the custom white balance control, but a much easier way to do this is to shoot in raw and adjust this back at home on the computer. You can then dial this in to suit the picture and fine-tune it for the perfect look and feel.
Correcting it entirely can leave the image looking a bit cold and sterile, so tweaking the white balance to allow some of the warmth created from tungsten lighting to stay in the picture is the best option.
With white balance taken care of, you then need to consider your ISO setting to allow image capture without any annoying camera shake. Light levels inside buildings are often low, so you may need ISO 800, or even ISO 1,600, to get a high enough shutter speed, while still maintaining a good aperture selection for sufficient depth of field.
Switch on the image-stabilising system (either on the camera or the lens itself) to help you with camera shake and then use banisters or walls around the staircase to brace yourself for a slow shutter speed. Good handholding technique comes into its own here, so tuck in your elbows, hold your breath and press the shutter button nice and slowly, rather than stabbing at it, to guarantee sharp images.
It’s inevitable that a tripod probably won’t be allowed or even be an option on a staircase, so get your camera set up and the technique perfected for blur-free handheld shots.
Composition
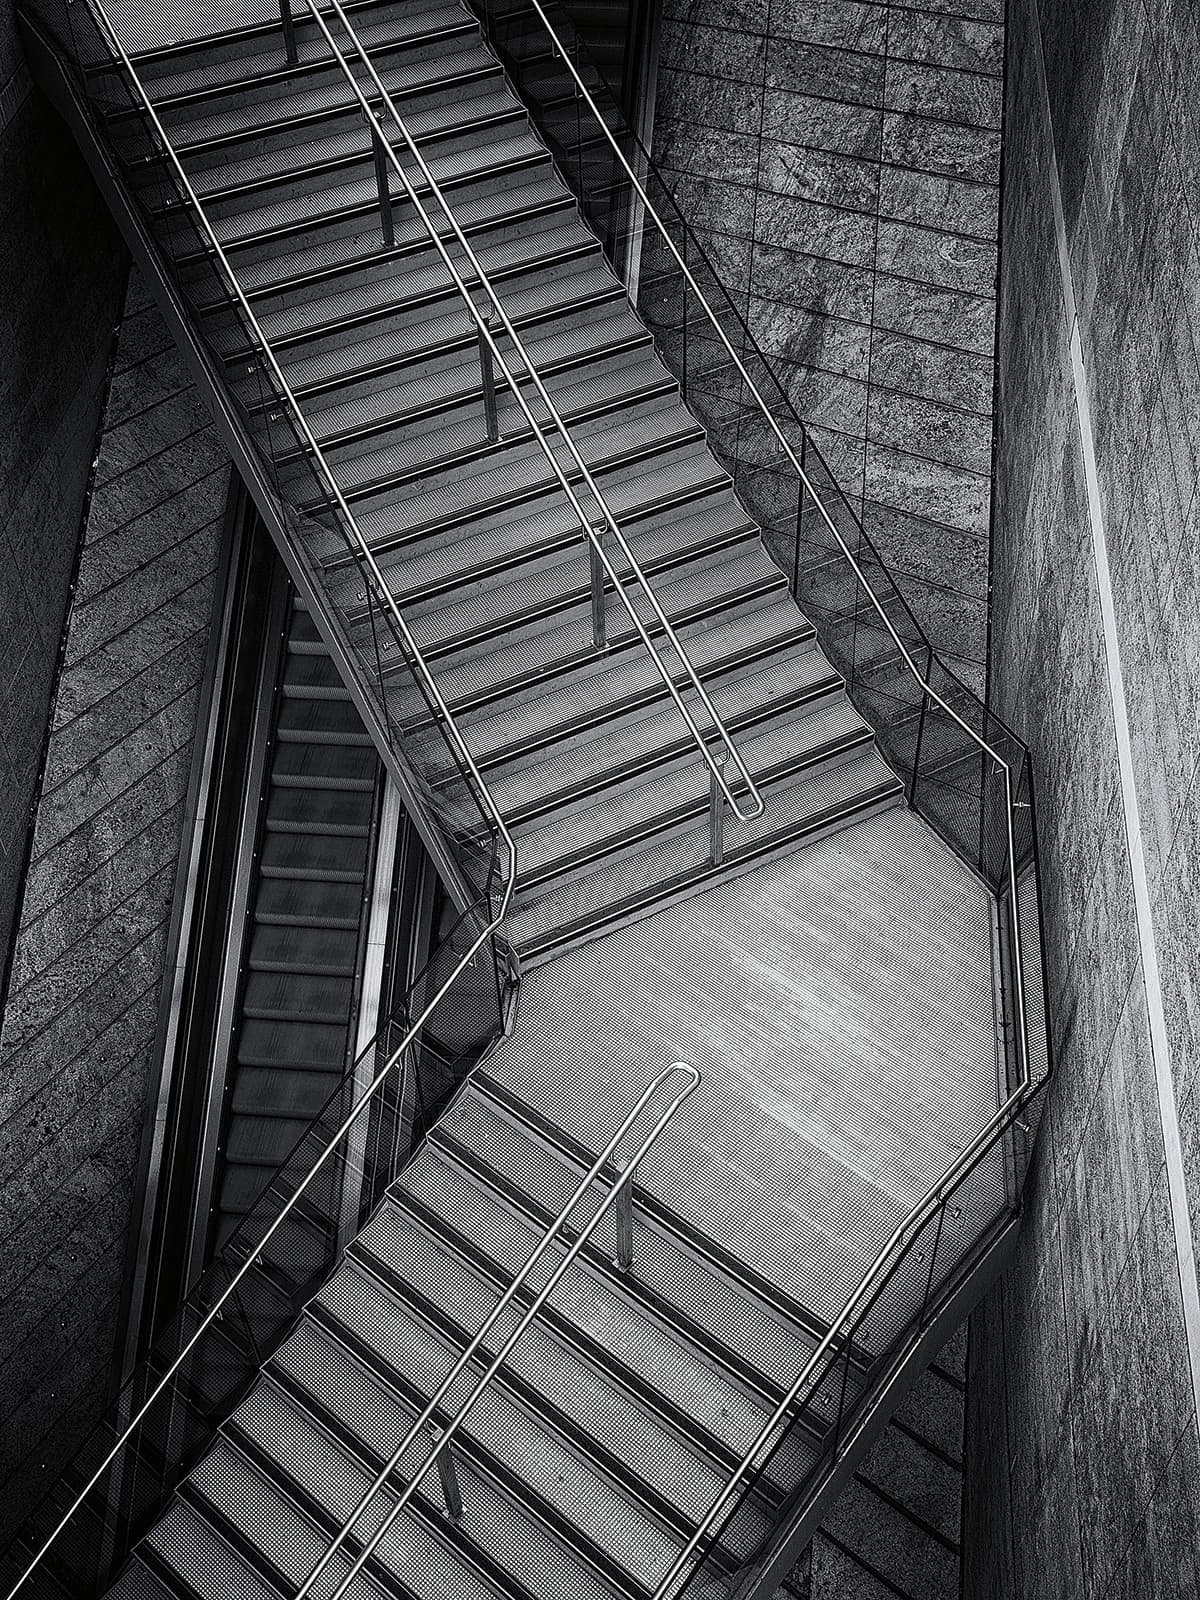
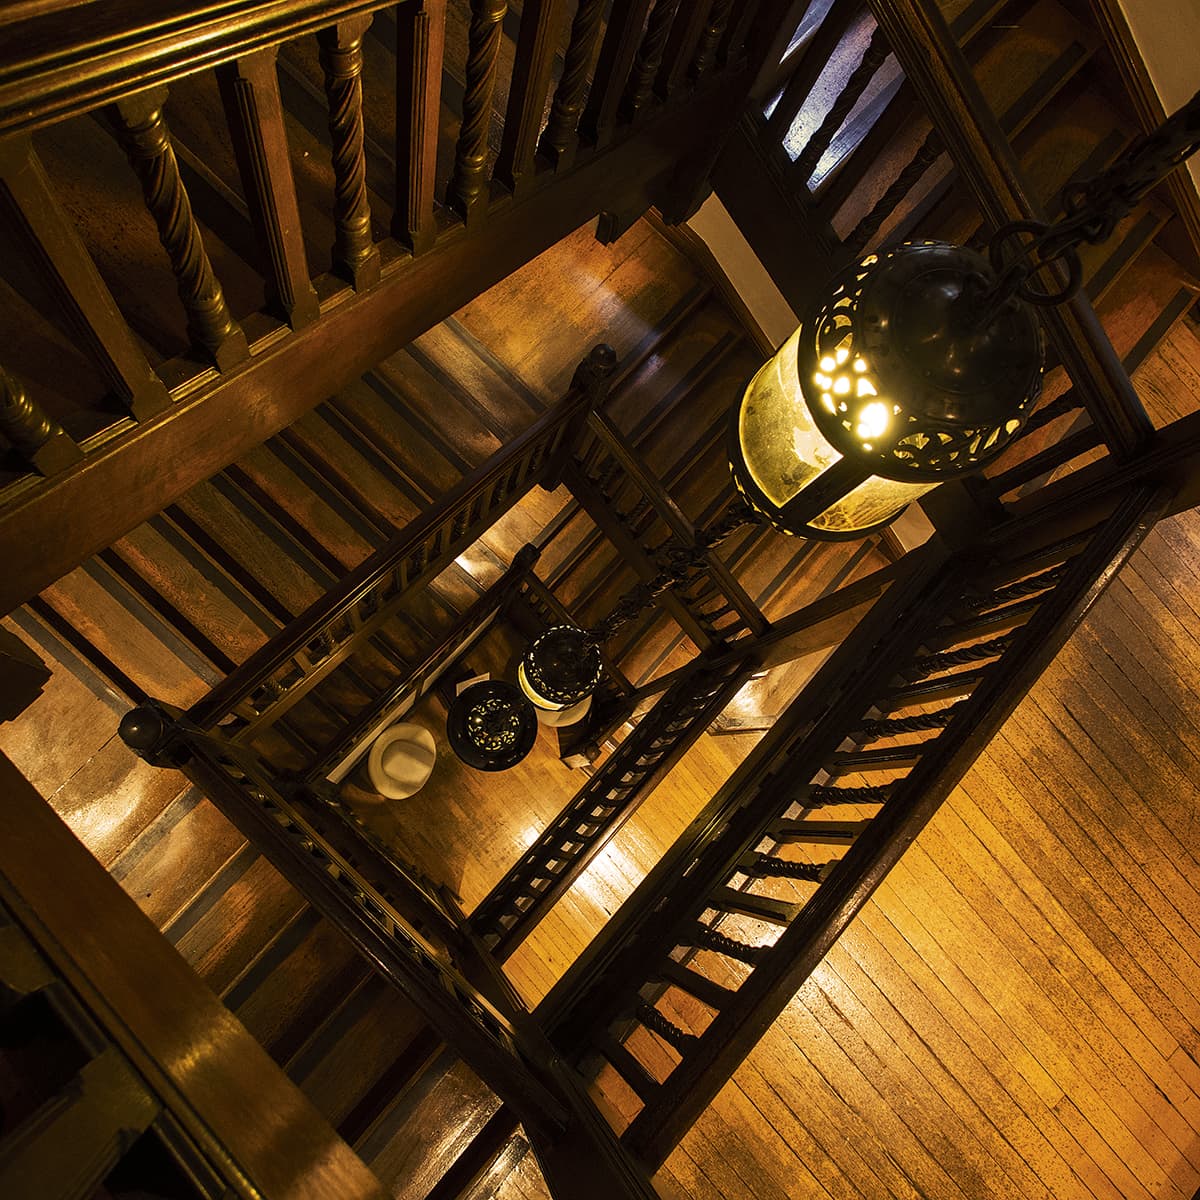
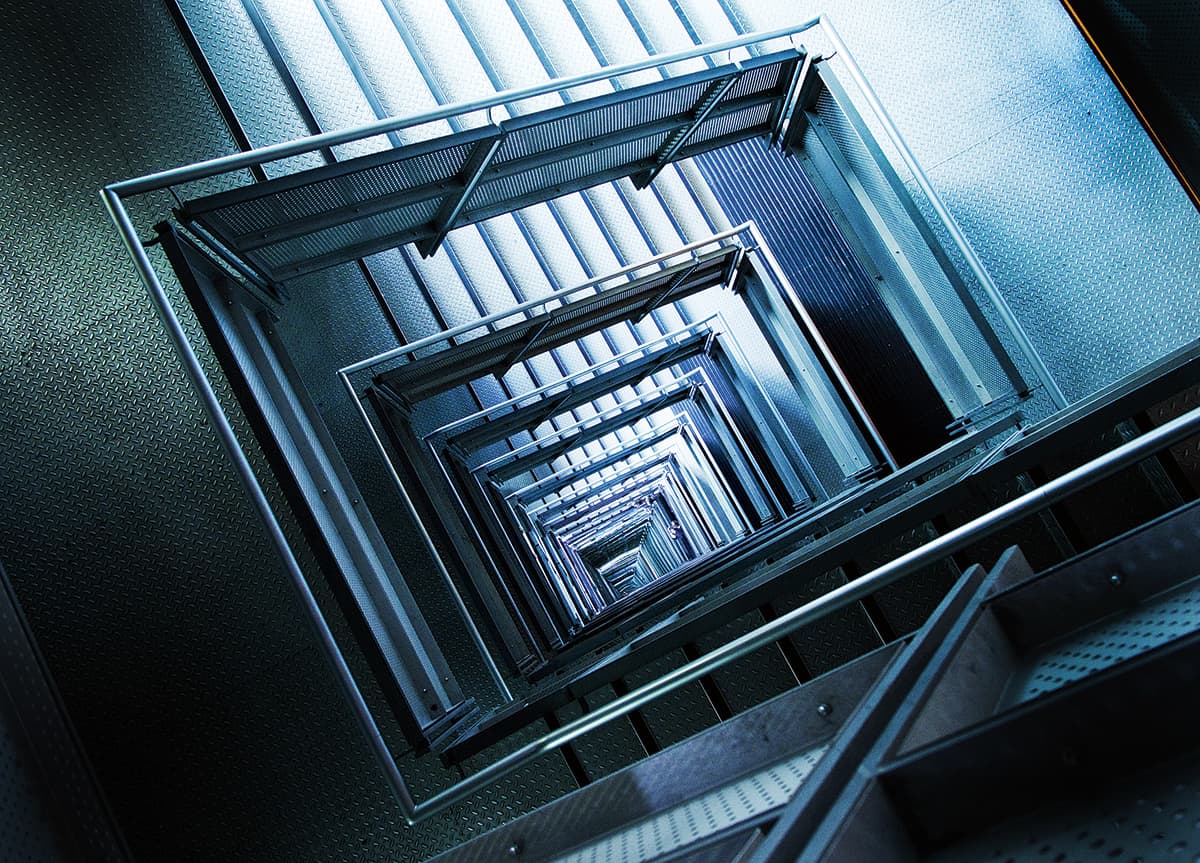
We’ve already mentioned the patterns and shapes inherent in staircase design, and this is what you need to be looking out for as you frame up your shots. The best approach is to head to the top floor and start shooting from there first, looking down from the top of the staircase. This often gives the best view, with the full shape revealed all the way to the ground floor.
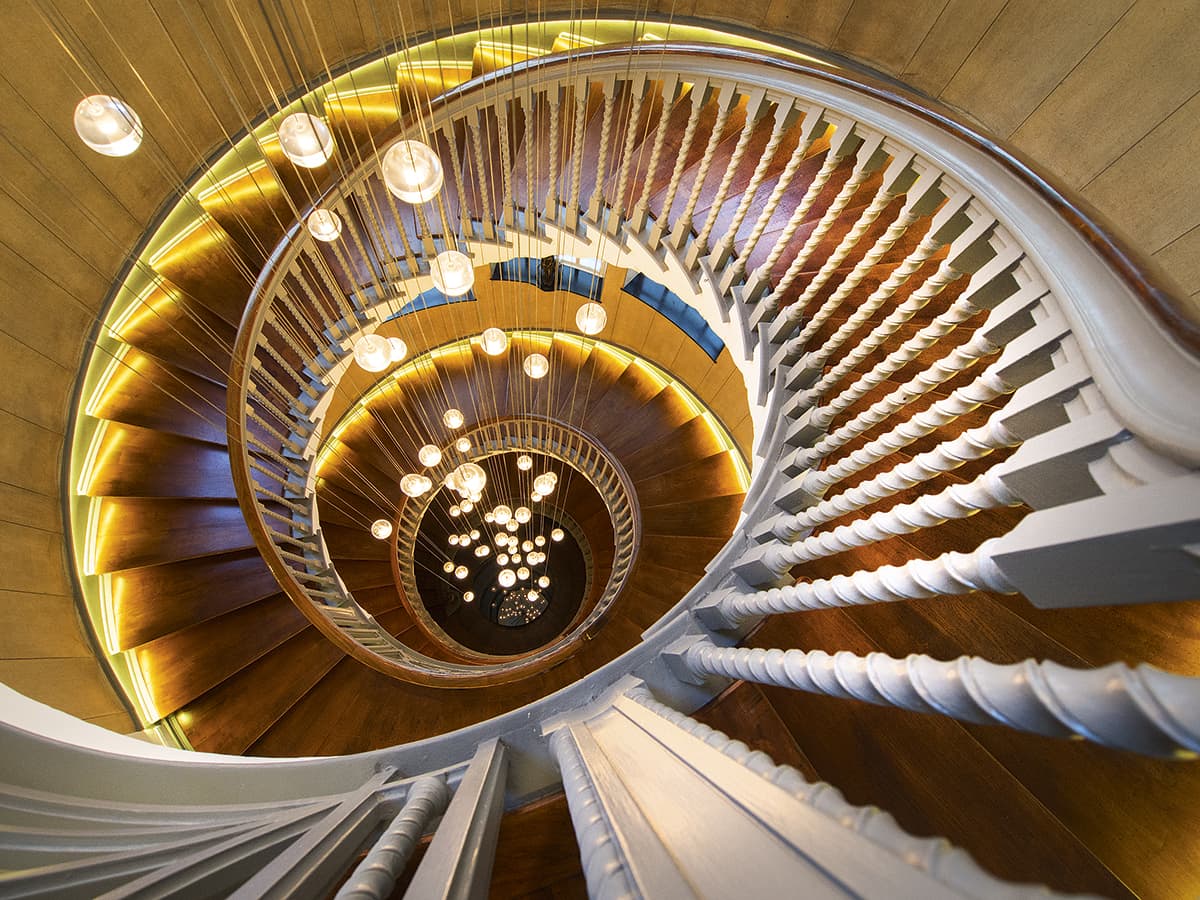
Look down the staircase to see how you can compose your image. Use a neck or wrist strap to avoid dropping your camera
Then, with that view in the bag, start making your way down the staircase and capture the other views you’ll see on the way. Look out for lights, chandeliers or side windows, which will add to the overall pattern and complement the shape of the stairs.
Look at the steps themselves. See how the light catches them and the shapes they make on their own. You may need a slightly longer focal length to capture these in more abstract form and these can provide secondary, closer views of the same staircase. Work your way down to the ground floor, shooting as you go – but of course, not shooting as you walk – and avoid getting in the way of other people using the staircase.
Once you reach the bottom, look up. This will give you quite a different view of the entire staircase. Watch for roof lights, which may affect your exposure, and you might need to overexpose your images by 1 or 2 stops to allow for any brighter areas fooling your camera’s internal metering. Check the results on your camera’s LCD screen and use the histogram to determine any exposure adjustment required.
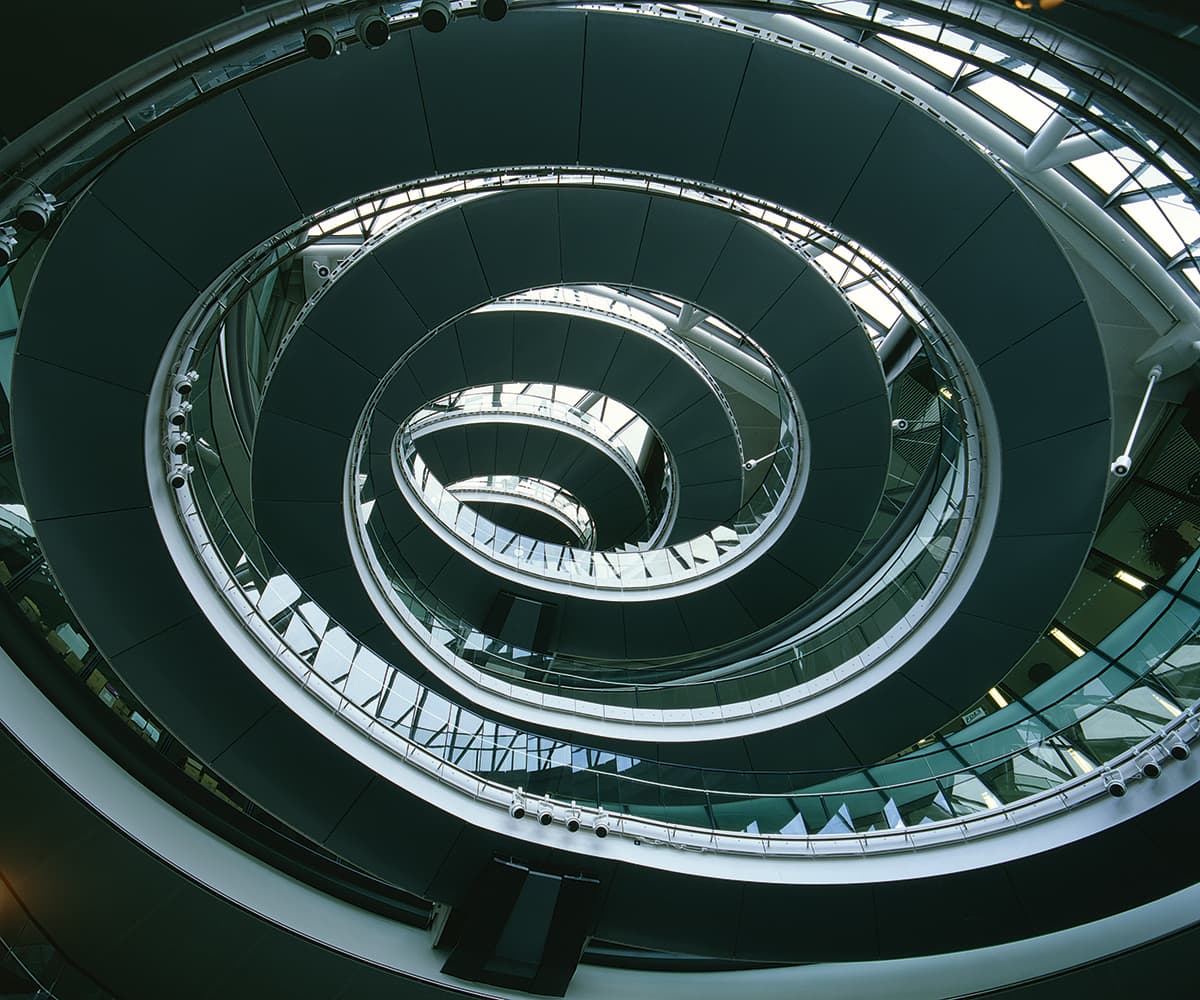
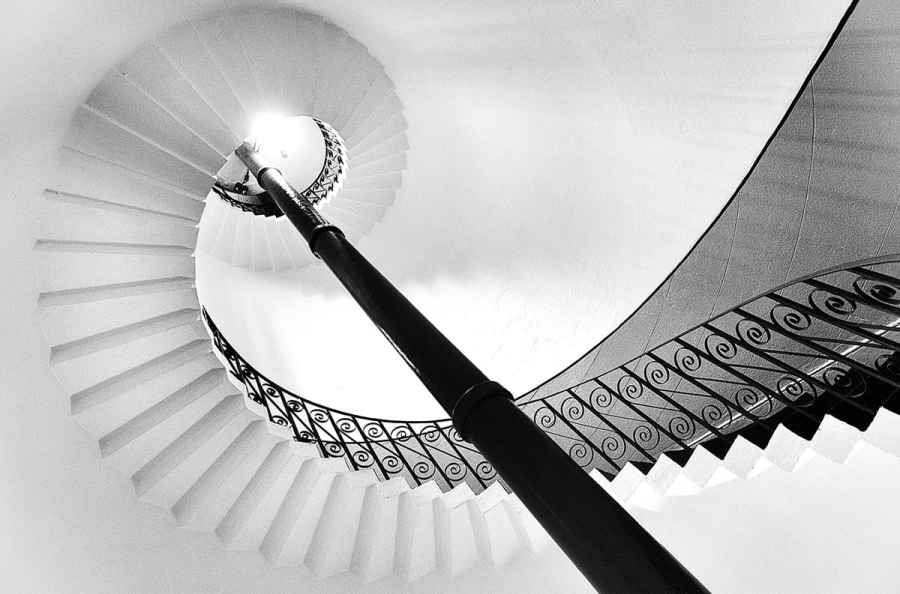
Looking up from the bottom of a staircase can often reveal a new and exciting shape that you don’t see as you climb to the upper floors
Getting permission
Many staircases will be in a public place, so shooting them shouldn’t be a problem. If they are photogenic enough, you won’t be the only person who will have taken pictures of them. However, some hotels and private buildings feature great staircases too, so it’s worth asking at reception, or even the security personnel, if you can take a few pictures. They may say no, but in many cases you’ll probably find they will allow you a few minutes to take photos – if you avoid getting in anyone’s way. So have your camera set up ready to make the most of your available time and make a quick route from top to bottom, capturing the best views.
Kit list for photographing staircases
Wideangle lens
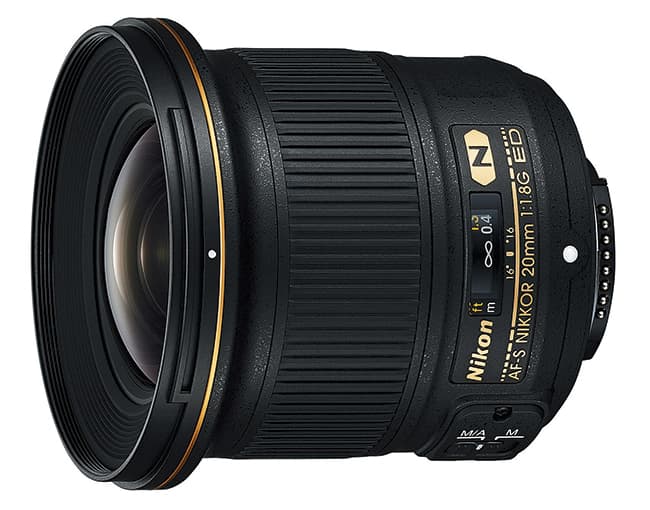
A 20-28mm focal-length range will enable you to get good views of most staircases, but shooting with an extreme wideangle will allow you to get much more dramatic views and include the whole shape.
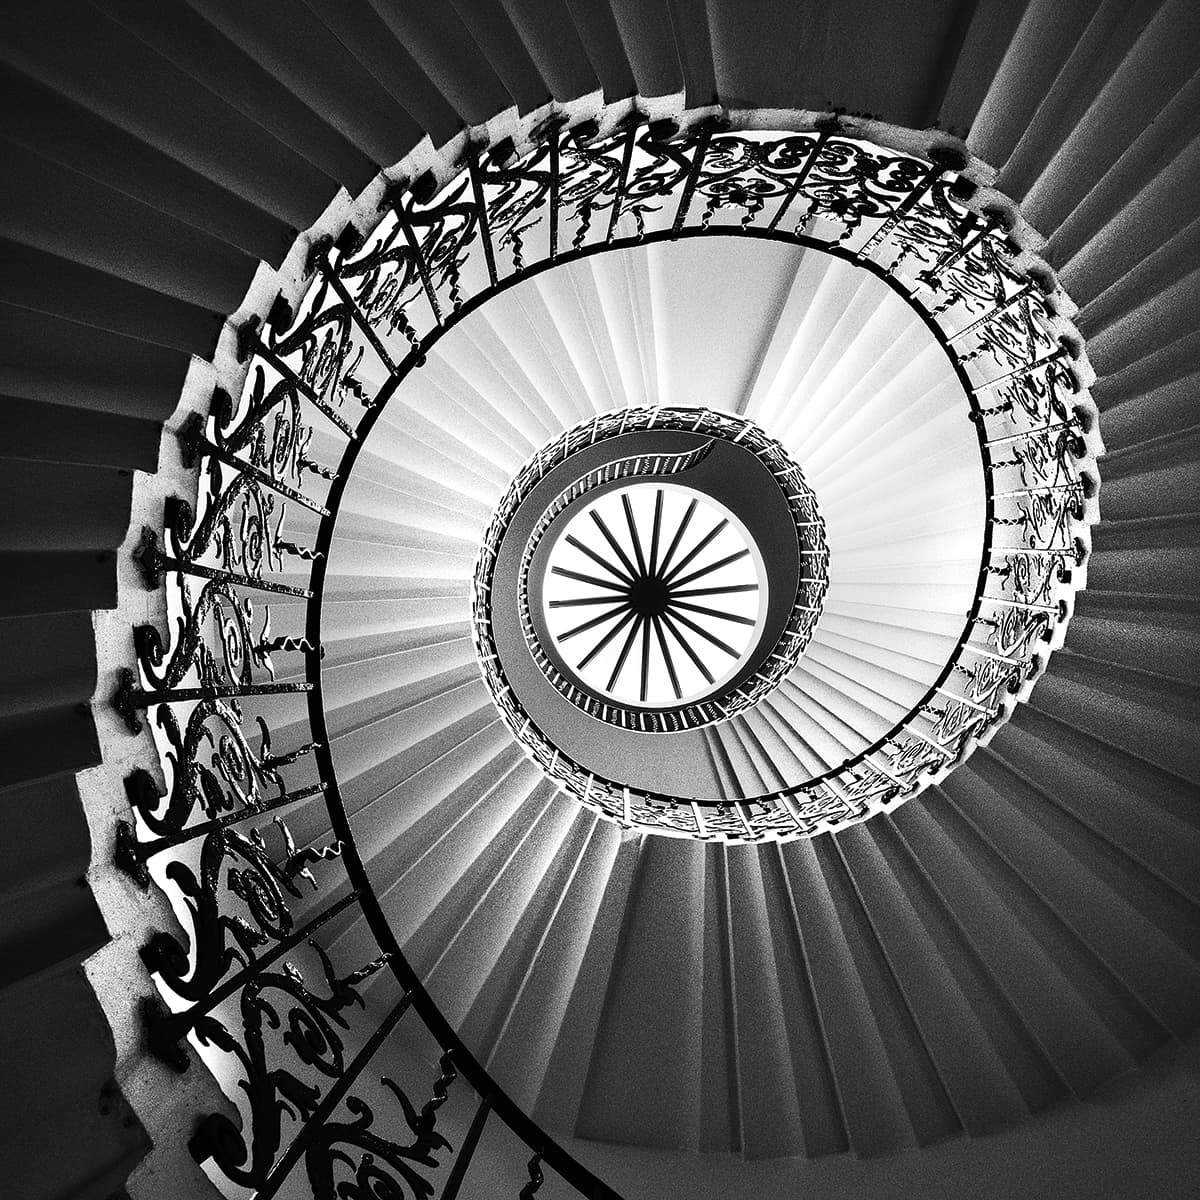
You can almost guarantee spectacular results with spiral staircases. Shoot from below with your wideangle lens and allow the spiral effect to create the image
Fisheye lens

A fisheye lens will not only offer an extreme angle of view, but also distort the natural pattern formed by the staircase, adding a unique interpretation to your image.
Fisheye lenses aren’t as expensive as they once were and really come into their own with these types of subjects. However, be careful not to include your own feet in the shot
Tilting LCD screen
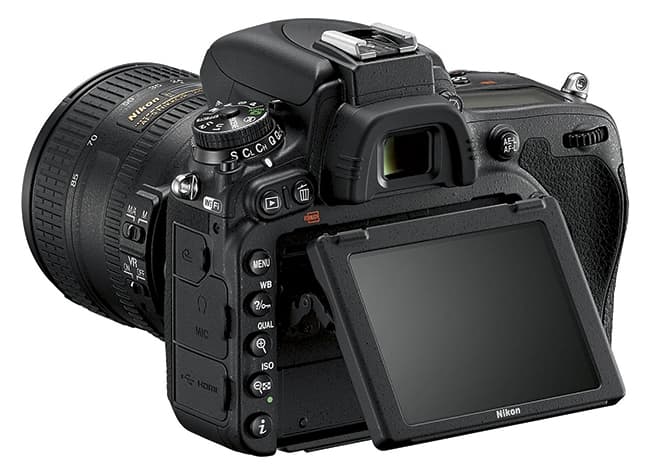
If your camera has one, use the tilting LCD screen to compose your images. You could also shoot via Wi-Fi from your smartphone if your camera has this option. Both are great ways to shoot looking straight up.
Beanbag
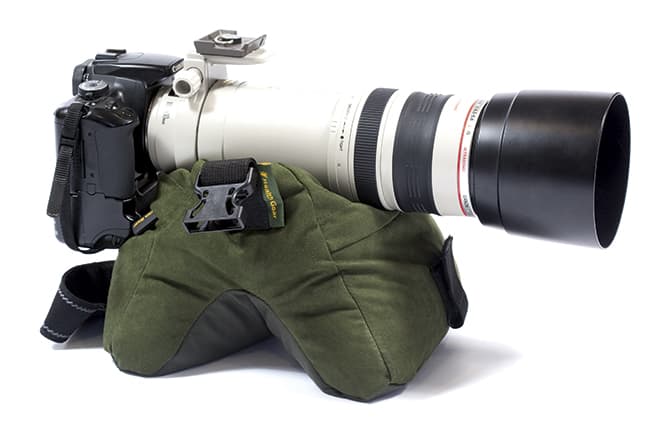
A small beanbag is a useful accessory to place on a banister for support, especially in locations where a tripod isn’t convenient or allowed.
Wrist strap or neck strap
When leaning over the top banister of a tall flight of stairs with your camera, the last thing you want to do is drop it. Use a strap to avoid an expensive and possibly dangerous accident.
Five top staircases
The Internet is a fantastic tool for finding new and unusual-looking staircases around the country. You only have to search a photo library or photo-sharing website such as Flickr and you’ll find a plethora of different-shaped staircases that fellow photographers have captured. It’s also an idea to keep an eye out when on your travels for interesting staircases. In the meantime, here are a few top locations to get you started.
- The Queen’s House, Greenwich, London SE10
- City Hall, London SE1
- De La Warr Pavilion, Bexhill, East Sussex
- Museum of Liverpool, Liverpool L3
- Baltic Centre, Gateshead, Tyne and Wear
 About Craig Roberts
Craig Roberts has been a professional photographer for more than 20 years and specialises in travel and landscapes.
He’s written technique articles for every major photo magazine and now offers online photography courses and tuition from his website at www.craigrobertsphotography.co.uk.