Technique Explained: Dynamic Range, In Camera Optimisation
Our eyes and brains are clever, adaptable organs. Even on a very bright sunny day we can usually discern some detail in the strong shadows under the trees and hedgerows in a landscape. Then, when we look up at the bright white clouds we are able to see their billowing form as a series of subtly different shades. However, capturing all this detail in a single exposure has always been a challenge for photographers. Set the exposure for the shadows and the clouds burn out, but set it for the clouds and the darker areas become a deep, impenetrable black. Using a mid-way exposure may make the majority of the scene look acceptable, but the brightest highlights and darkest shadows are lost.
These days many digital cameras feature technology that can help. It usually works by brightening dark tones while darkening the brightest areas so more detail is visible across the tonal range. Although this effect is sometimes referred to as ‘dynamic range extension’ because it enables detail to be seen where previously it could not, it actually involves a compression of the range because the lower and higher brightness values are adjusted towards the mid-point.

Dynamic range optimisation systems have a variety of different names, including Active D-Lighting, Dynamic Range Optimisation, Shadow Adjustment Technology, Intelligent Exposure and Auto Lighting Optimiser. In many cases the effect may be applied at different, selectable levels.
Some systems, such as Panasonic’s Intelligent Exposure and Nikon’s Active D-Lighting mode, may adjust the exposure of the image, which has an impact upon both raw and JPEG files.
However, the image-adjustment phase takes place during the in-camera processing of JPEG files.
In some cases the effect may also be applied to raw files when they are processed using proprietary software.
Image: The Active D-Lighting of the Nikon D300s in its higher settings has a dramatic impact upon the brightness of the shadows in these images. The large peak of the histogram moves progressively to the right as the level increases
How it works
There are several factors that govern a camera’s dynamic range:the design of its sensor; the size of the photosites; and the bit-depth of the A/D converter and image processor, for instance. A dynamic range optimising system cannot adjust the actual dynamic range of a camera or increase the number of tones that it is capable of distinguishing; it can only help translate the recorded data into visible detail.
Some cameras now have 14-bit rather than 12-bit image processing. This extends the number of tones that can be recorded in an image, but JPEG files are still only 8-bit so the 12 and 14-bit data must be downsampled, or compressed. A good dynamic range optimisation system can assist with this compression process and help to ensure that detail is visible where it needs to be to produce a natural-looking result.
In basic terms, a dynamic range optimiser works by applying a tone curve to an image to lighten the shadows, while darkening the highlights to bring out the details.
The curve simply modifies the gain (or amplification) that is applied to the sensor signal to produce the image. As anyone who has done this post-capture in an image-editing software package will know, it can result in a reduction in both local and image-wide contrast. So rather than applying a uniform curve, most dynamic range optimisation systems work by analysing the image and applying gain more selectively.
The image analysis goes some way to explaining why the results from using a dynamic range optimisation system can seem rather unpredictable. They are adaptive and their response changes depending upon the scene. Consequently, like many photographers, I have several examples of images taken with and without the system being activated that are indistinguishable. Yet there are others that are distinctly different.
The human eye is better at seeing detail in shadows than it is in highlights, so most dynamic range optimisation systems are calibrated towards extracting detail from the darker parts of the image. However, there is usually also an element of highlight recovery. In some cases – like with Canon’s DSLRs and the Pentax K-7, for example – the user can opt to enhance the shadows and highlights separately. The highlight preservation mode often restricts the minimum sensitivity setting available as it involves underexposing the image (for example, by using ISO 100 when ISO 200 is selected), and there is a reduction in the gain applied to the brightest areas so they appear a little darker.
Tonal Adjustment
To investigate how an image’s tonal range is adjusted I took a series of shots of a Sekonic 25-patch Exposure Profile II chart (£128) using a Nikon D300s with the Active D-Lighting set to Off and Extra High at different exposures. I then measured the brightness value of each patch and compared the image histograms.
Interestingly, I found that in its Extra High Mode the Active D-Lighting differentially increases the brightness of all the tones in the profile chart images. However, these increases are relatively small, with the brightest patches pushing the lightest patch from 247 to 249. As the patches get darker (or the exposure is adjusted to make them darker), the difference in the brightness values increases. The greatest numerical difference is seen in the patches that are just a little darker than the 128 midtone value.
Using the Extra High Active D-Lighting increased the brightness reading of these ‘dark-midtones’ by a value of around 50 on the 0-255 scale. As the patches darken further, the numerical value of the brightening effect decreases, but its significance as a proportion grows.
 The patch with a brightness value
of 24 with Active D-Lighting turned off, for example, has a reading of 49 in the image taken with Active D-Lighting in its Extra High setting. This makes an increase of 25, which is more than the value of the original brightness reading.
The patch with a brightness value
of 24 with Active D-Lighting turned off, for example, has a reading of 49 in the image taken with Active D-Lighting in its Extra High setting. This makes an increase of 25, which is more than the value of the original brightness reading.
On my computer monitor the last five dark patches in the non-Active D-Lighting image cannot be distinguished from their black surroundings. In the Extra High Active D-Lighting image, however, all but the last can be seen.
Although it is surprising that the lightest patches were brightened rather than darkened, I got similar results when photographing landscapes with Active D-Lighting activated. This suggests that Nikon has decided to allow D300s users to protect the highlights by reducing the exposure, while the camera brightens the shadows. However, as the system is adaptive, it may also darken the highlights when the conditions match specified criteria.
Image: These images were taken in manual mode to show the impact of Nikon’s Active D-Lighting in the D300s without any exposure adjustment – it is most significant in the darker areas. Each grey patch has been lightened and more of the dark rectangles can be seen. As well as moving to the right (indicating brightening), the histogram is stretched out as the tonal range is expanded
These images were taken in manual mode to show the impact of Nikon’s Active D-Lighting in the D300s without any exposure adjustment – it is most significant in the darker areas. Each grey patch has been lightened and more of the dark rectangles can be seen. As well as moving to the right (indicating brightening), the histogram is stretched out as the tonal range is expanded
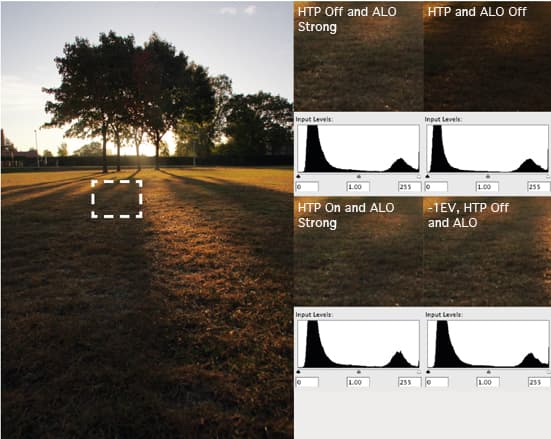
Canon splits its dynamic range optimisation system into two parts: Automatic Lighting Optimiser (ALO), which works on the shadows; and Highlight Tone Priority (HTP), which is designed to preserve highlights. With the Canon EOS 500D I found that although reducing exposure by 1EV mimics the results of using the highlight-focused HPT, images taken at the ‘correct’ exposure with HPT still have a little more highlight information.

Image: Reducing the exposure by 1EV preserved most of the highlights in this high-contrast scene, but activating the Canon EOS 500D’s Highlight Tone Priority mode introduced more information to the very brightest areas. The Auto Lighting Optimizer brightens the shadows noticeably
Conclusion
Although there is an element of highlight darkening with some dynamic range optimiser systems, the most noticeable impact of their use is usually the brightening of the shadows. As a result, it makes sense to use exposure to preserve the highlights and rely on the in-camera system to bring out the shadows.
While raw files contain more data, it isn’t always easy to selectively brighten the shadows of an image (post-capture) as effectively as a camera’s dynamic range optimisation system can. Fortunately, most proprietary raw file conversion software allows in-camera type adjustments to be applied post-capture. Also, most DSLRs allow simultaneous recording of raw and JPEG files, so it is possible, and sensible, to cover both bases.
The future
At present, Apical (see below) supplies version 6 of Iridix, but version 7 will soon be available,
and I am told there is a camera under development that includes it.
This version offers improved colour fidelity and s harpness over earlier editions, but the main focus for its developers has been the reduction of the level of noise seen in brightened areas. The amount of noise in the source area of the image limits the amount of gain that can be applied – and the shadow areas are usually the noisiest part of an image. With Iridix 7, Apical’s CEO MichaelTusch claims the company is able to make much stronger adjustments without increasing noise levels.
Iridix 7 is designed to work with full 1080p video, and stills images of up to 64 million pixels a
nd 20-bit depth to cater for potential future camera developments.
In the meantime, Apical is gearing up to release a PC and Mac-compatible software package th
at will enable photographers to manipulate raw files to get the best from the camera’s dynamic range. The price of the software has still to be set, but Tusch tells me that the company is aiming to make it accessible to enthusiast photographers rather than just professionals. I look forward
to testing it in the not too distant future.These images were taken in manual mode to show the impact of Nikon’s Active D-Lighting in the D300s without any exposure adjustment – it is most significant in the darker areas. Each grey patch has been lightened and more of the dark rectangles can be seen. As well as moving to the right (indicating brightening), the histogram is stretched out as the tonal range is expanded.
Apical
Apical is a UK-based company responsible for the dynamic range optimising algorithms found in many DSLRs.
Although only Nikon, Olympus and Sony publicly acknowledge that they use Apical’s system, it is likely that it is used more widely.
I spoke to Michael Tusch to find out a little more about the technology. According to Tusch, Apical’s aim is to mimic the response of the human eye and brain to a scene containing a wide range of brightness values.
The intention is not to produce images that have an obvious HDR (high dynamic range) effect, but to subtly boost the amount of detail visible in the brighter and darker areas. The challenge stems from the fact that the eye is extremely adaptable and the brain is capable of interpreting a scene.

This is nicely demonstrated by the simple diagram included here. We see the sequence of squares and interpret them as being a chess board that has just two colours.
In addition, we see the cylinder as an object resting on it and casting a shadow. In this instance our brains are a little too clever because we interpret the square B as being lighter than square A, whereas in fact they are exactly the same tone.
Apical’s dynamic range engine, Iridix, works by assessing the brightness of each pixel and comparing it with the brightness of its immediate neighbours, as well as looking at the tonal range of the whole image. It then applies a variable tone curve across the image with individual pixels being brightened separately. In practice, ‘all the pixels in one area will have a very similar level of gain applied,’ Tusch explains. ‘The curve varies smoothly, pixel by pixel.’
Tusch tells me that Iridix is supplied as ‘IP core’, which describes a layout for part of the silicon chip, or an embedded software library, which becomes part of the camera firmware. The variation that we see between different cameras that use Iridix stem from the fact that manufacturers can choose how to implement it.
The effect of the system can be increased or decreased, and weighting parameters allow the system to be set to work on the highlights and shadows separately. Iridix doesn’t adjust the exposure of an image when it is activated; that is something the camera manufacturer takes control over.


