Time lapse photography is easy with an interval timer and you may already have one built into your camera.

Interval Timers fire a camera’s shutter at pre-determined intervals, be it seconds, minutes, hours or even days.
It is used for the production of Time Lapse sequences, which are a series of still shots that show changes in a scene during the passing of time.
Time Lapses are popular for showing things like the construction of a building from start to finish, or the opening of a flower. They are often joined together to create a slideshow, or edited into a time-lapse movie using video-editing software.
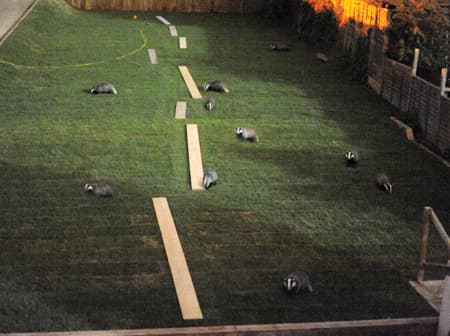
Another option, shown below, is to create a single layered photoshop image to produce a composite multi-exposure photo comprised of a selection of your time lapse shots.
External timers for time lapse photography
If your camera does not have a built-in interval timer you can still shoot time lapse using a suitable accessory remote control.
Some manufacturers produce a remote release with Intervalometer feature, such as the Canon Remote Controller TC-80N3 and there are third- party options too.
These include the inexpensive Seculine Twin 1 ISR which costs around £40 from most major retailers, and the more expensive Pclix intervalometer from around £100 (from www.pclix.com).
How to shoot a time lapse photograph
Set up the camera on a sturdy tripod
Place it on a solid surface that won’t be disturbed for the duration of your time lapse. Choose a spot that gives a good view of your subject, with a lens wide enough to cover not just the scene as it is now but how it may change during your sequence.
Think about the movement of the sun during your sequence, and avoid positions where it may shine into the lens at certain points.
Set the camera to manual focus and manual white balance
Consistency is the name of the game with time lapse. Pre-focus on your subject and switch to manual to ensure the camera doesn’t randomly focus on passing birds etc.
Also, small changes in lighting, such as the sun going behind a cloud, can have a dramatic effect on the camera’s white balance, so rather than relying on Auto White Balance, it’s best to set this manually too.
Camera Settings
If your subject is under fixed lighting then set manual exposure for consistency.
Auto exposure can be affected by something as simple as the position of your subject in the frame. If your time lapse will cover both night and day, choose Aperture priority and a mid-range aperture such as f/8.
If shooting at night at short intervals or with moving subjects, use a higher ISO to keep exposure times short.
Shooting Raw will give you better image quality with more scope for matching consecutive images if required, though you may need high-capacity cards.
Set your interval and duration times
 Program your timer to select the interval you require between frames, and the number of frames you want to shoot in total.
The interface will vary between devices but it should be fairly self-explanatory.
Close your viewfinder blind before you start shooting to ensure stray light doesn’t enter the eyepiece.
Now you’re ready to shoot.
Afterwards
If you want to show your images in a sequence use a simple video-editing application to create a mini movie.
Or just run them as a slideshow using software such as Elements, or even Powerpoint.
Alternatively, if the subject lends itself (as the badgers image at the top of this article) you can create a multi-layered Photoshop document, to produce a single composite image.


