If you’re looking to get the very best results from your printer, ink and paper combination, you’ll want to use an ICC profile. If you haven’t heard of this before, it’s data that provides a way to ensure consistent colour and accurate reproduction when producing prints.
 ICC profiles were created by a consortium of companies that wanted to achieve consistent and accurate colour across input and output devices, and most paper manufacturers offer a list of several profiles, which are individually tailored for the most popular printers.
Once you’ve downloaded an ICC profile it needs to be correctly installed on your computer before it’s ready to be used with imaging software such as Photoshop. Below you’ll find some tips on how to correctly install and use ICC profiles.
Profile Installation Instructions for PC users.
1. Visit the website of your paper manufacturer and locate the relevant ICC profile.
2. Save the profile to somewhere convenient – My Documents or Desktop
3. Right-click on the saved file (which should show as an RGB triangle).
4.Select the top option from the menu – Install Profile.
5. Open Photoshop. If already open then close and reopen.
6. So where has your profile been put? Navigate to
My computer/ local disk C / windows / system32 / spool / drivers / color
And there you are, this is where your profiles are.
6. To uninstall your profile either right click on the profile on the
desktop and choose UNINSTALL or go to the profile as shown in 5 and delete it.
Profile Installation Instructions for Mac users.
1. Visit the website of your paper manufacturer and locate the relevant ICC profile.
2. Drag and drop the profile onto your desktop.
3. Navigate to: HD/ Your name/ Library/ ColorSync/ Profiles
Top tip – If you’re running a Mac on the OS X Lion operating system you may have trouble locating the library folder. To find it, open the Finder, hold down the ALT key and click on GO at the top. You’ll find library listed roughly half way down.
4. Drag and drop the profile into the profile folder
5. If you have Photoshop open, close it and then reopen.
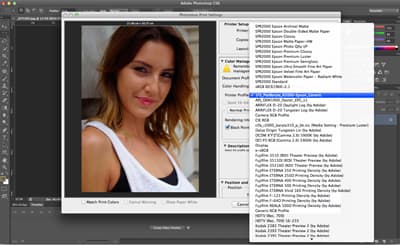
Selecting an ICC profile within Adobe Photoshop
1. Go to File / Print
2. Beside Color Handling make sure you select Photoshop Manages Colors and not Printer Manages Colors
3. Move below Color Handling and click on the Printer Profile drop down list.
4. Scroll through the long list of ICC profiles to locate the profile you’ve downloaded.
5. Click on the correct ICC profile to select it.
6. Set the Rendering Intent to Perceptual and tick Black Point Compensation for the best results.
7. Finally, click print and inspect your results from using the correct ICC profile.


