In our pursuit of razor-sharp images, it’s easy to forget the creative potential of a bit of blur. There are many instances where using a long shutter speed to capture a moving subject can convey the atmosphere of a scene in a way that a fast shutter speed never can. A very short exposure of a field of barley being buffeted by the wind produces an image in which the stems look bent and distorted. We can see that it is windy, but the image doesn’t communicate the feeling or impression of the breeze whirling through the crop. Using a long exposure with the camera held firmly on a tripod, however, allows the barley’s movement to be recorded as a soft, silky blur, turning the field into a green shimmer.
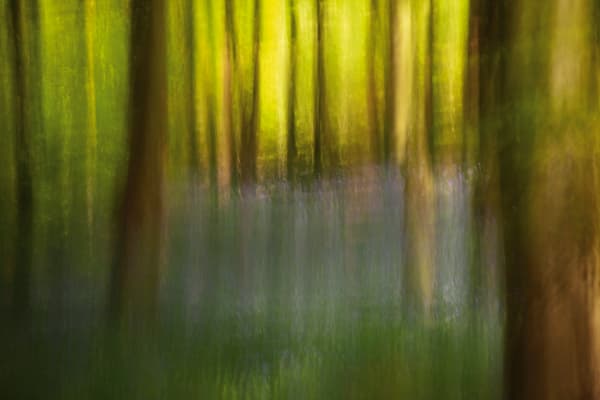
Even if a subject isn’t moving, images can sometimes be made much more attractive and evocative by introducing a bit of blur through camera movement. When we walk though a woodland, for instance, our eyes are constantly moving and we don’t see each scene as a series of still images. We see some parts only fleetingly in our peripheral vision as we walk past, and other areas are blurred by a turn of the head. A long exposure, accompanied by a bit of appropriate camera movement, can capture all this and rekindle the emotions we experience during a springtime woodland stroll.
Using blur – Shooting
Unless your eye is at the eyepiece, it’s important to cover the viewfinder during very long exposures as stray light can enter the camera through it and confuse the lightmeter. It can also cause an overexposed rectangle to appear on the image. Olympus DSLRs have a built-in viewfinder shield that can be flipped into place, while other cameras come supplied with a viewfinder cover. If your camera doesn’t have either of these, a piece of cloth or even a jacket can be laid over the camera or you can hold a hand over the viewfinder.
Even when making comparatively short exposures of just a second or two and with the camera held to my eye, I find it helpful to set the camera to its self-timer mode (preferably with a short delay of 2secs). It’s easier to keep any camera movements smooth when the press of the shutter release isn’t followed immediately by the shutter opening.
It’s also one of the few times where the audible signal is useful, as the beep counts down to the exposure and gives you time to steady yourself. On a few occasions I have introduced blur by moving a branch or a few leaves in front of the camera and this meant triggering the camera using a wireless remote. Although I was unable to hear the shutter firing I could usually hear the countdown beep that let me know the exposure was about to begin.
 Natural movement created by the wind often requires an exposure of a minute or more to register as a smooth blur. Digital cameras offer an advantage with this kind of hit-and-miss shooting as the results can be inspected on the LCD screen.
Check the exposure after the first shot and use the magnified view to examine the amount of blur. If more blur is required, close down the aperture by 1 stop and double the exposure time.
Alternatively, keep the aperture constant and attach another ND filter to the lens to enable the shutter time to be increased.
When introducing blur by moving the camera I find it’s usually best to limit the exposure to 4secs or less. When adding vertical blur to an image of a woodland, for instance, I hold the camera to my eye with the camera pressed against my face for extra support, and I keep both eyes open so I can see around the camera to judge the changing composition during the exposure even though the viewfinder is black. As the self-timer beeps reach their crescendo to indicate the shutter is about to open, I start to move the camera.
My best results have usually been when I made one slow, steady movement rather than moving the camera back and forth, but there are no rules and experimentation is the key.

Using filters to achieve blur
At this time of year, when the sun is high in the sky, there’s usually too much light around to allow very long exposures during the day even with the lowest sensitivity setting selected or the slowest film loaded. Solid neutral density (ND) filters provide a simple solution by reducing the amount of light that reaches the film or sensor.
The most common ND filters remove only 1, 2 or 3EV of light, but they can be stacked together to combine their light-reducing power.

Image: Standard ND filters may not cut out enough light unless they are used together
A better option is to use a denser filter such as Hoya’s ND X400 or Lee Filters’ Big Stopper.

The Hoya ND X400 is a circular screw-in filter available in a range of sizes that extends the exposure time by 9EV. Meanwhile, Lee Filters’ Big Stopper is a square filter that is compatible with the company’s 100mm holder system.
It has a foam strip around its perimeter to create a seal against the filter holder to prevent stray light from entering the lens. It reduces the amount of light reaching the film or sensor by 10EV. Therefore, a 1/60sec exposure becomes an 8sec exposure and a 1sec exposure is extended to 8mins.
As the Hoya ND X400 and Lee Filters’ Big Stopper are very dark filters, there are a few things you must do before they are mounted on the lens – unless you are shooting in very bright light. First, if the camera is fixed on a tripod so that it stays stationary while the subject moves, the image must be composed and the lens focused.
The focusing can be done automatically, but make sure that the camera is set to manual focus before pressing the shutter release to take the shot, otherwise the camera will attempt and fail to focus once the filter is in place. It is sometimes possible to compose images using Live View with the filter in place, but it depends upon the brightness of the scene. I found it worked fine on a sunny day in a glass-roofed railway station and outdoors, but it was less reliable in a shady woodland.
As well as obscuring all but the brightest parts of the scene, these very dense ND filters often prevent the camera’s metering system from functioning correctly, so a meter reading should be taken prior to the filter being attached. Simply extend the exposure by the correct number of stops.
If the exposure is 30secs or less, most DSLRs can be used in manual mode with the camera regulating the timing, but longer exposures require a bulb exposure with the photographer keeping track of the time and closing the shutter at the appropriate point. A remote release like the Hähnel Giga T Pro (£79.99) is very handy because as well as allowing the shutter to be triggered wirelessly, it has a bulb exposure timer.
Although a round filter is a neat solution, it takes a little longer to fix it on and remove it from a lens, so a cumbersome square filter and holder can offer some advantage, especially if the lens needs to be focused frequently or several different scenes need to be composed.
Where to buy filters
The Hoya ND X400 is available in filter sizes from 49-77mm (£66.17-£137.93). For more information visit www.intro2020.co.uk or call 01628 674 411.
The Lee Filters Big Stopper is a square glass (£94) filter that is compatible with the Lee Filters’ 100mm filter holder system. For more information visit www.leefilters.com or call 01264 366 245.
Using panning to create blur
Panning is a great way of introducing a bit of creative blur with a moving subject and it’s often a better way of conveying a sense of activity than when the movement is completely frozen.
The basic principle is simple: select a shutter speed that is slower than is needed to freeze the subject and follow the target in the viewfinder as it progresses around the scene.
The aim is to move, or pan, the camera at the same speed as the subject so that it is recorded sharply while the background is blurred. Selecting the correct shutter speed takes practice and depends on the speed at which the subject is moving as well as the amount of blur you want, although 1/60sec is often a good starting point.

Image: Panning with the lead cyclist and using a shutter speed of 1/80sec has kept
him sharp while blurring his bike’s wheels, the background and the other cyclists
Using exposure to create blur
At the risk of sounding like Sybil Fawlty on Mastermind (specialist subject – stating the bleeding obvious), recording movement as a blur requires a longer exposure than freezing it.
Generally, the slower the shutter speed, the greater the amount of blur, but this isn’t universally true. With very long exposures an object can pass through the scene without it registering on the film or sensor because its effective exposure time (the time when it is one place) is such a small proportion of the time the shutter is actually open.
 When shooting the images for this article, for example, there were a couple of occasions when someone walked through the scene I was photographing, but they failed to register in the final image. At one time a man and his dog were visible in the scene for the entire two-minute exposure, but because he was constantly moving and progressed from the top to the bottom of the frame, he isn’t in the image.
The shutter speed needs to be carefully selected bearing in mind the subject and the speed of any movement. A long exposure and lots of movement of a multi-coloured subject may result in a smudgy-grey image, so it’s a case of trial and error.
When shooting moving trees or crops, it may be necessary to open the shutter for a few minutes. However, when the camera is moved to introduce blur, a shorter exposure of just a second may be all that’s needed.
Image: I used a Gorillapod Focus and ballhead to clamp a Canon EOS 5D Mark II to a railing to take this 2.5sec exposure