Craft your own beauty dish from tinfoil and toothpicks. Credit: Claire Gillo
Photography is an expensive hobby. If you’re like us then you probably think on a regular basis, ‘oh go on then, I’ll just buy one more lens…’, ‘Oh and maybe I’ll think about upgrading my camera body.’ Before you know it you’re out of pocket, and eating baked beans out of the tin for the rest of the month. However it doesn’t have to be this way when it comes to lighting. There are many cheap DIY home solutions you can hack your way around to get professional-looking and impressive results.
In this feature we’re going to show you how to put together eight alternative lighting set-ups so you can capture better portraits and still-life scenes. We will be using a host of accessories and gadgets that can be found in the comfort of your own home – from your mobile phone to torches, and greaseproof paper to candles and tinfoil dishes. The possibilities are endless.
Beauty dish (picture above)
Transform your portraits with some tinfoil, toothpicks and an external flashgun
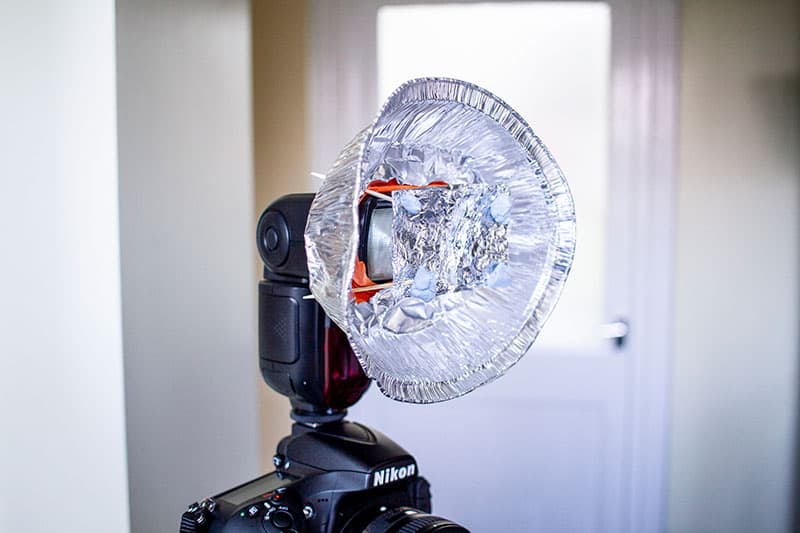
Use a tinfoil bowl as a starting point for your homemade beauty dish. Credit: Claire Gillo
A beauty dish is a curved shallow bowl that attaches to a light source. A small plate hovers in the middle of the dish and covers the main source, which in turn pushes the light out and round the dish. The result is a semi-hard light that is reflected over the model rather than diffused. The light is softer than a directional flash but harder than a softbox.
To craft our beauty dish we used a tinfoil bowl, tinfoil and toothpicks and constructed the dish around our external flashgun. To make your own, place the head of the flashgun in the centre of the bowl and draw around. Cut out the middle part and push the flashgun head through the gap. If the hole is too big, use some tape along the edges to secure. Next, out of tinfoil construct a rectangle shape slightly larger than the flash head and use four toothpicks to secure in place.
To get the most flattering results position the dish slightly higher than your model and point downwards, as this accentuates their cheekbones.
Low-key lighting
Use candles and a lamp to capture atmospheric images that emerge from the shadows
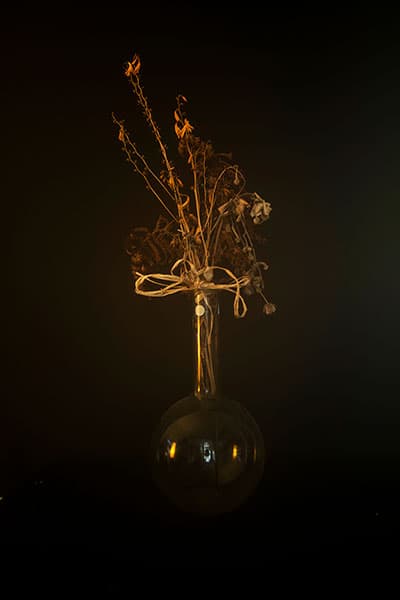
A simple two-light set-up can be achieved with a lamp and candles. Credit: Claire Gillo

Low-key lighting is a technique in photography where your subject is softly lit against a dark background; it uses shadows to let objects/people emerge to create an atmospheric result. Someone once described the technique to us as ‘illumination and elimination’, which we think is a rather good rule to remember.
The good news is you don’t need much in terms of technical kit to try low-key lighting at home. we simply used a candle and a household lamp to capture our shot. we had the lamp positioned to the left hand side of the glass container as our key light, and held the candle up and to the adjacent side of the flowers to pick out some detail. Remember to be careful if shooting dried flowers and using an open flame.
Despite low-key lighting being an easy technique to try at home, it can be difficult to get the results you’re after on your first try, so practice makes perfect. If you want some inspiration to get started, look at the work of Renaissance painters such as Leonardo da Vinci (his painting ‘St. John the Baptist’ is a great example of low-key lighting) or any of the still-life painters from that era. Objects such as dried flowers, skulls, dusty books and fruit, all make excellent subject matter to shoot in a low-key lighting way.
Gels
Turn a torch and external flashgun into colourful light sources using cellophane

The combination of colour gels will create a two-tone effect. Credit: Claire Gillo
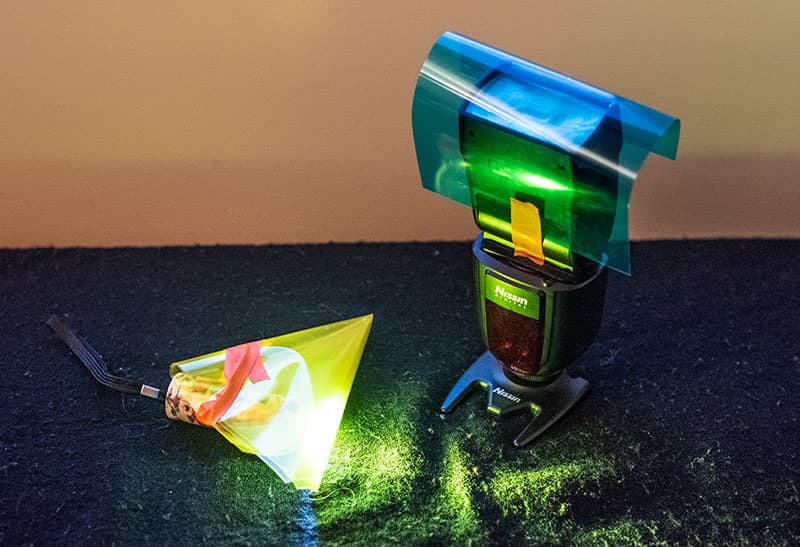
A colour gel, also referred to as a colour filter, lighting gel or sometimes just gel, is a transparent piece of material which creates a colour cast. Gels are often used to correct white balance issues; however in recent years mixing strong colour gels together for a distinct look has become very popular. Look at the work of photographers such as Nadav Kander for inspiration.
When using gels it’s best to stick to a couple of colours to begin with. As you improve your technique and understanding of the colours, you can bring as many into the mix as you like. For our shoot we used a cool blue colour teamed against a warm yellow.
To attach the cellophane (gel) to our flashgun we simply cut a small square of blue transparent material and wrapped it over the front. As we only had one flashgun for our other light source we taped the yellow cellophane over a torch. To ensure no other light reached our subject we took our shot against a black background in a dark room. Our shutter speed setting read 8 seconds. The flashlight (blue) caught the splash of the grape in the water then we shined the torch (yellow) over the set-up to bring in that warm tone.
Cheap lightbox
Tape some greaseproof paper to a window and voilà, you have yourself a homemade lightbox
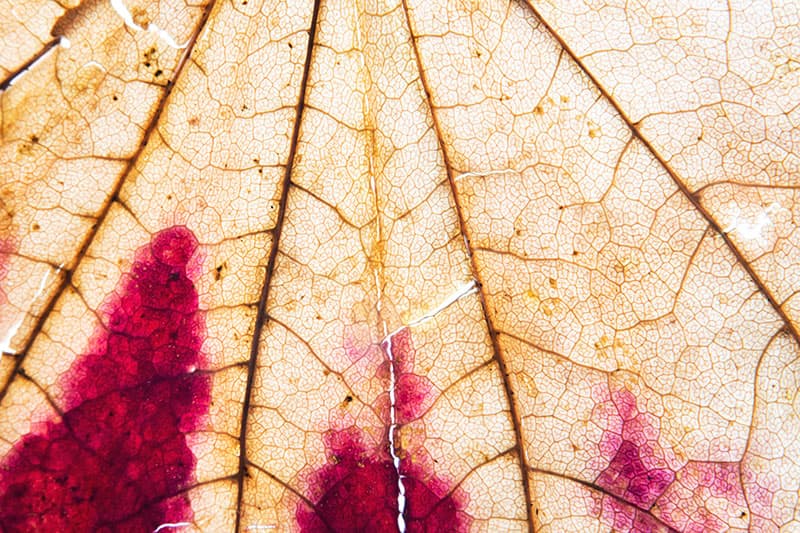
Transparent objects such as fruit, flowers and leaves are great for this lighting technique. Credit: Claire Gillo
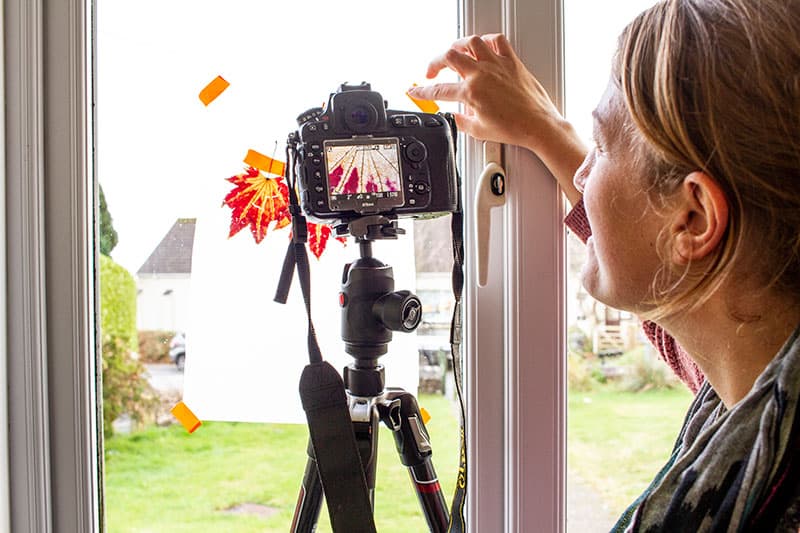
A lightbox is a flat continuous light source that enables you to backlight your subject and capture some unique results. To create a DIY home lightbox all you need is a small piece of greaseproof paper, tape and a window. This lighting solution works best when shooting a transparent object such as a leaf (like in our example) or thin slices of food (for example, cucumber). Although this is a great and simple solution to a lightbox design, owing to gravitational forces you are limited in what you can photograph. You’ll also need to consider that any subject you want to capture will need to be secured to the paper, so get some good tape.
DIY softbox
Craft a homemade softbox for your flashgun to improve your portraits
Oblong and square-shaped softboxes are typically used in most studio environments. Credit: Claire Gillo
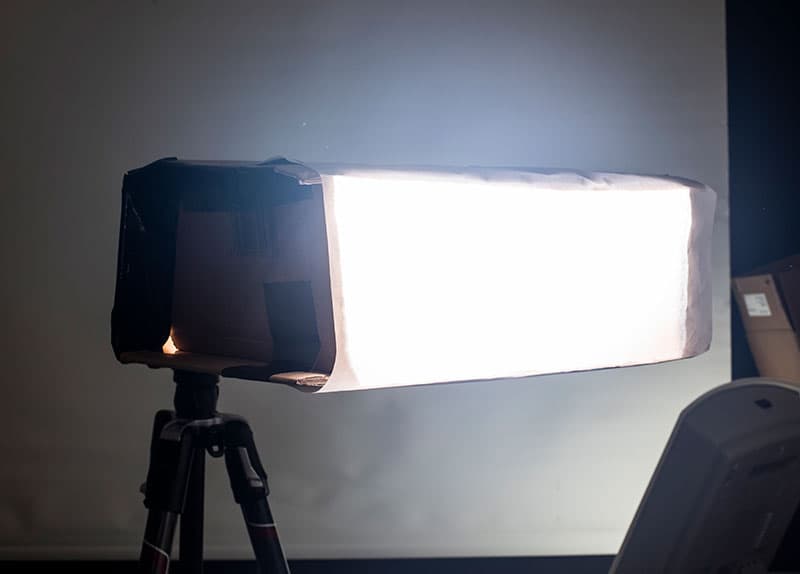
A softbox is a studio photographer’s best friend, and basically works how it sounds. It diffuses the light to reduce harsh shadows and creates a soft and even effect. Instead of spending a fortune on a branded model you can easily construct one at home for your external flashgun using some cardboard, tape, tinfoil and greaseproof paper. We crafted ours into an oblong shape. To construct your softbox, first you need to create your frame out of cardboard and tape together leaving off the front panel. Next you want to line the inside with foil (glue or tape it in place), which enables the light to bounce around before being diffused through the greaseproof paper, which can be draped and attached over the front. Make sure the paper completely covers the front. Finally we traced around our flashgun head on the back of the box (place in centre), cut out and then secured the head in place through the hole.
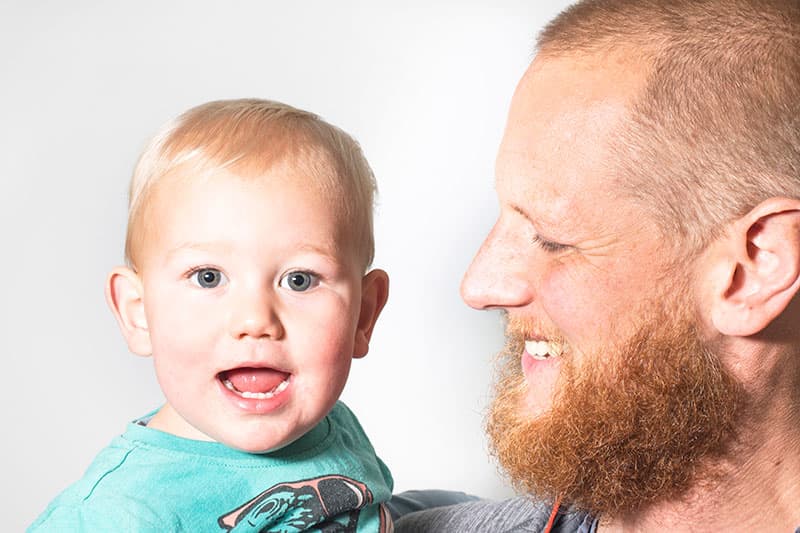
When shooting our models we had the box placed slightly to the side and at eye level. We also lit the background separately with a continuous light source to eliminate the shadows.
Halogen lighting
Experiment with an inexpensive portable halogen light, to achieve lovely golden tones in your portraits
Jessica Kobeissi took this striking images using a cheap shop-bought light. Credit: Jessica Kobeissi
AP asked photographer Jessica Kobeissi for her tips, as she took this feature’s striking cover image using a 250-watt portable halogen light from US DIY store, Home Depot. The light cost only $20 and although Home Depot doesn’t operate in the UK, you can easily pick up this kind of portable halogen light from DIY centres in the UK for similar money. As Jessica explains, she had a lot of fun with the halogen light, experimenting with using it as a backlight, sidelight, and direct light. Since the light is quite strong and harsh, it’s a good idea to put some kind of diffuser between it and your model (a white sheet can also work well). Whatever you use, don’t put it too close to the light, however, as it can get very hot. ‘I love the fact that the light adds a nice warm tone to the photos,’ says Jessica. ‘When used as a backlight it gives a lovely warm golden tone to the image, without the need for much editing. You also get these nice warm golden tones with direct lighting. If you’re just starting out with lighting models, this is a great light to experiment with. You do need to be very careful though when using the lights around your house.’ For the image on our cover, Jessica used a Canon EOS 5D Mark III with a EF 50mm f/1.2L lens: exposure was 1/320sec at f/1.6, ISO 250.
Mobile phone
Use your mobile phone to create results that look like they were shot in a studio
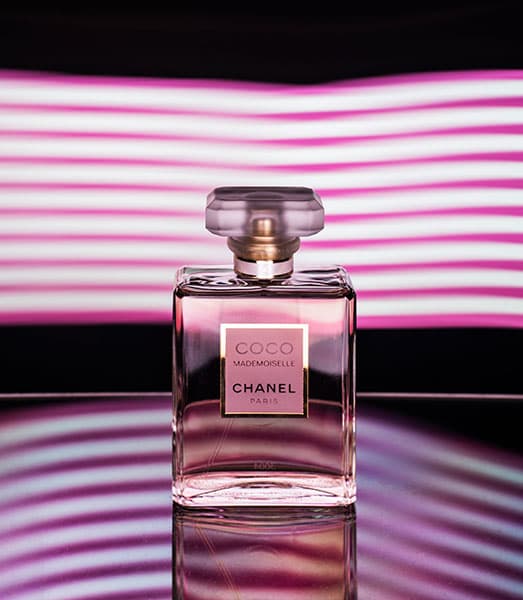
Creative impressive backgrounds by simply moving your mobile phone. Credit: Claire Gillo
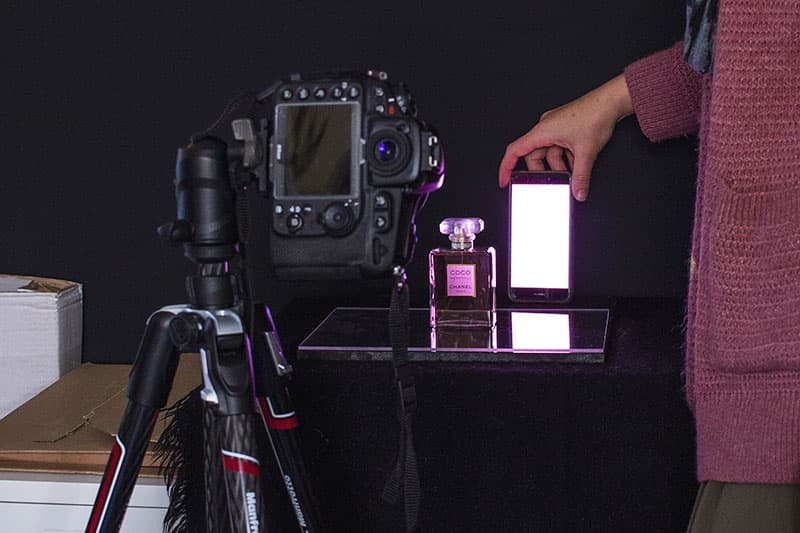
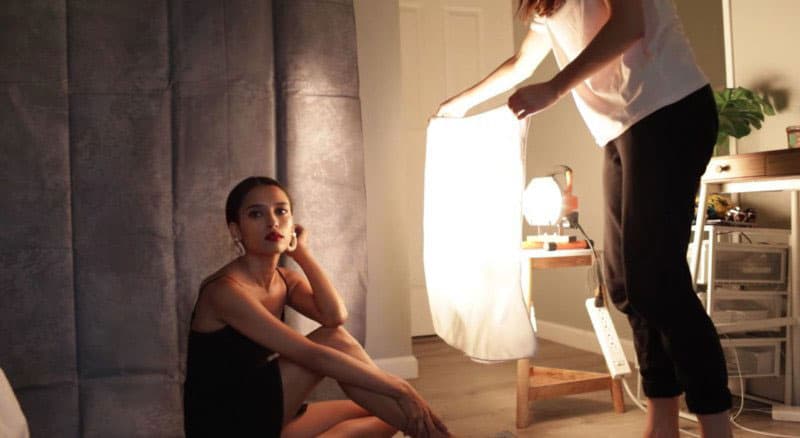
This image of a perfume bottle has been purely lit with a mobile phone in a completely dark room. If you don’t have blackout blinds you can just shoot at night instead.
First we placed our bottle of perfume onto a piece of Perspex so that it created a glossy reflection. Next we downloaded two images onto our phone. The first was pink-and-white striped and the second was plain blue. We decided to mix the two light sources together and create a light trail behind our bottle. For this reason our shutter speed setting was reading 20 seconds, which gave us enough time to swipe the phone behind and then shine the light over the bottle at the front. The trick is to keep the phone moving so that you get an evenly distributed lighting effect.
Tablet tricks
Use an iPad or tablet to create a bright and colourful bokeh background for an easy hack
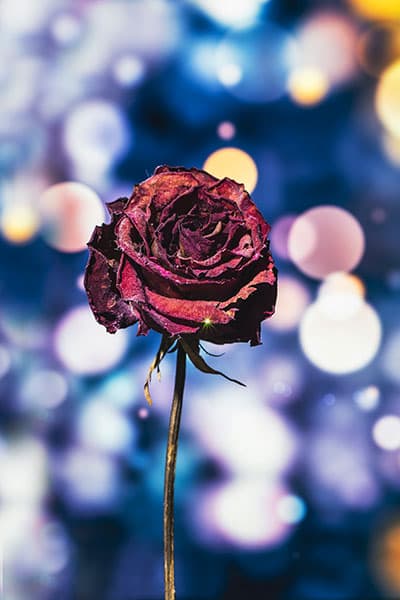
The bokeh effect works well for creative flower shots. Credit: Claire Gillo
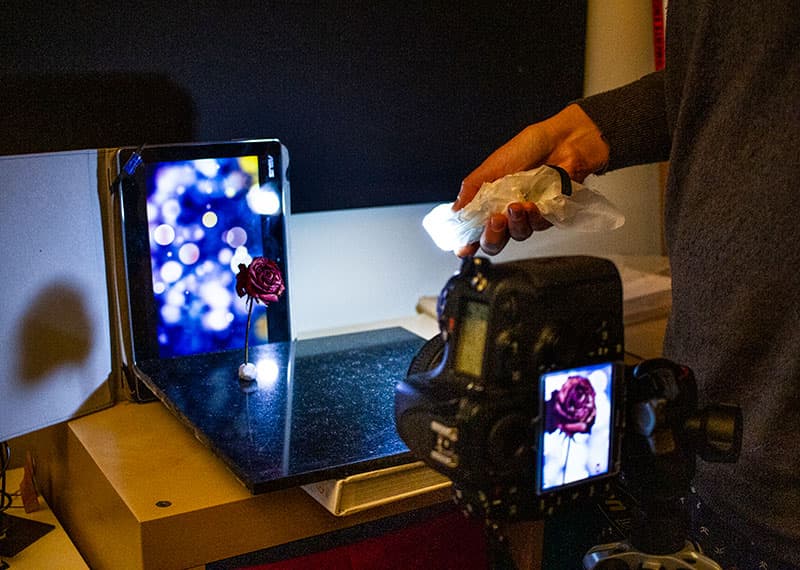
When shooting small objects such as flowers, a quick and simple solution for an interesting backdrop is to download an image to your tablet. For our background we searched for a bokeh design. To make sure our tablet didn’t keep switching off during the shoot we had to change the ‘power down’ setting to continuously on.
As the light from the tablet is brighter than the light reflecting from the flower, we shone a torch (with a bit of greaseproof paper wrapped around the end to soften the light) over the flower in the foreground. Our shutter speed was reading 1.3 seconds in a dark room. Finally to add a bit of bling we sprinkled a little glitter over the flower.