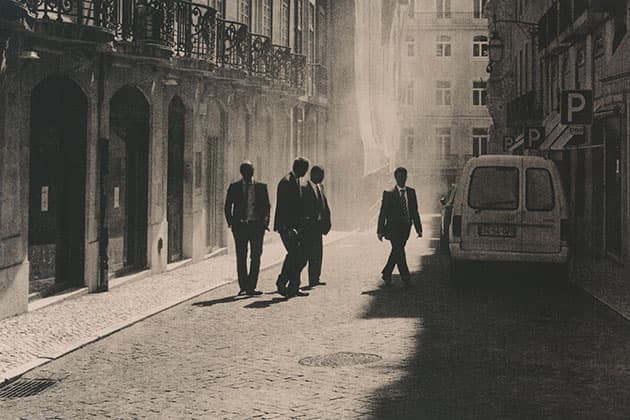

Lisbon, Portugal. An initial test on a Foma paper recently imported to the UK. It produced beautiful warm brown midtones, colder shadows (enhanced with selenium toning) with a pleasing tactile matt surface. I look forward to exploring its possibilities further. Digital negative from Fujifilm X-T10 file. Foma Variant 113, Moersch SE5 Lith Developer (1+1+20), Kodak Selenium Toner, 1+20, 2 minutes. Credit: Mike Crawford
Lith printing is a fascinating and compelling darkroom process using high-contrast developers with suitable photographic papers, producing a range of colours, contrasts and textures. While the technique has been around since (at least) the late 1960s, lith printing has dipped in and out of fashion. There is currently renewed interest in the process, mainly through online groups and forums. While it is encouraging that so many are discovering the potential of lith, it can be a challenge given the availability of appropriate materials. Many of the papers originally used are discontinued, but there are papers available that produce excellent results. In addition, many photographers are discovering the creative possibilities of printing on vintage papers bought online. For this article I thought it worthwhile to consider both approaches to lith printing.
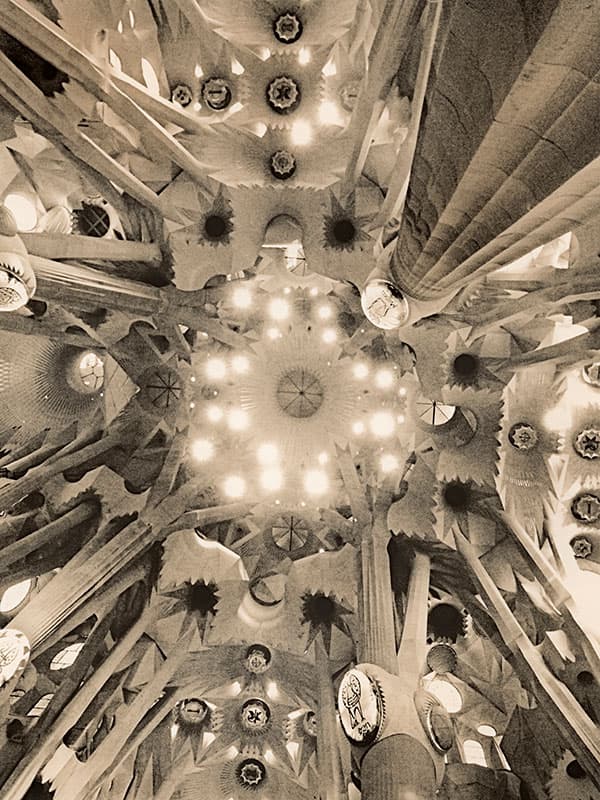
Sagrada Família, Barcelona, Spain. Fomatone produces very colourful prints when lith developed, often with red-to-orange midtones and darker, greenish shadows. I prefer to slightly selenium tone to make the shadows more neutral. Digital negative from iPhone file. Foma Fomatone 131, Moersch SE5 Lith Developer (1+1+30), Kodak Selenium Toner, 1+20, 45 seconds. Credit: Mike Crawford
History of lith printing
Specialist lith papers and films used to be available, though not used primarily, for creative results. Prior to the digitisation of the reprographic printing industry in the 1980s, such materials, produced by Kodak, Ilford and others were used for printing illustrations and text for reproduction. Pure black tones were essential, achieved by processing the paper in lith developer, a high-alkaline solution that produced the required tone after full development. With the arrival of desktop publishing, this side of the printing industry, requiring artwork prepared by hand, soon disappeared – and with it most lith materials.
Photographers and designers would sometimes use lith papers for graphic effects. If a normal black & white negative was printed, the midtones and shadows would compress into black while the highlights remained white. However, during processing, soft midtones would briefly appear next to shadows before turning black. If the development could be curtailed at just this moment, the resulting print would have harsh black shadows, warm reddish midtones and clean, bright highlights. Today, this is what we would term as a lith print. Unfortunately it was nearly impossible to stop this development at the right moment until somebody had the very logical idea to dilute the developer to slow down the process. This allowed longer processing times, making it easier to get the print into the stop bath and then fixer.

National Azulejo Museum, Lisbon, Portugal. Some vintage papers work well and others do not. When buying online there is no guarantee that the paper will not be fogged or suffer from damp or mould, so I would not recommend spending a lot of money per box. This old 8.5×6.5in Kodak Paper produced great results. The price sticker for £3.63 indicated it was originally sold in 1971, and 48 years later, at £15 for 100 sheets, I reckon it was still a good price. Some older Kodak papers print with rich red colours while this one produced a pleasing fawn tone with deep black shadows. Digital negative from iPhone file. Kodak Bromesko, Ivory Fine Lustre (Vintage Paper), Fotospeed LD20 Lith Developer (1+1+25). Credit: Mike Crawford
Alternative materials
With lith papers such as Kodalith and Transtar TP5 out of production, it was discovered that some conventional papers could produce similar effects and tones when lith printed. For example, London printer Mike Spry was probably the first to use Oriental Seagull for lith, which would then define the characteristic look of his client, Anton Corbijn’s portrait work.
Thankfully lith developers are still available such as the chemistry produced by Fotospeed and Moersch. (It is also possible to mix your own from raw chemistry, and there are many published formulae in books and online.) All come as two separate bottles, part A and part B, and these are mixed in equal quantities with water. Suggested dilutions are usually provided, such as 1 part A + 1 part B + 25 parts water, (e.g. 40ml part A, 40ml part B, 1000ml water), though often adapted by the individual user. More A and B will shorten the development time; more water will lengthen it.
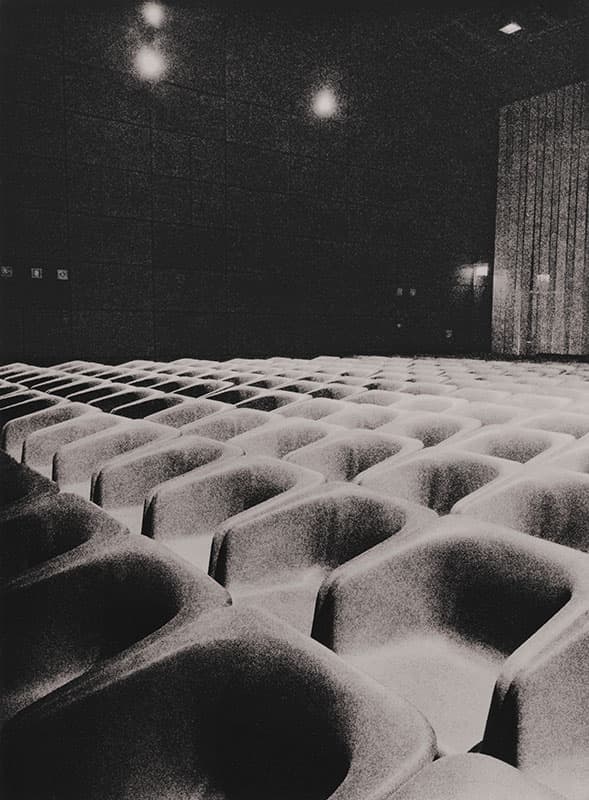
Porto, Portugal. Agfa Brovira paper is ideal for lith processing as it produces contrasty results. Other old Agfa papers worth investigating are Record Rapid and Portriga, which print with more colour. Digital negative from iPhone file. Agfa Brovira Grade 4 (Vintage Paper), Moersch Easylith Developer (1+1+25). Credit: Mike Crawford
Processing times
Lith prints are effectively underprocessed, so to compensate, exposure times tend to be long. If a negative required 10 seconds exposure when processed conventionally, it will need two, three or even four stops extra when lith printed. (In this example, possibly 40, 80 or 160 seconds.) Instead of making a test strip, expose a series of tests at different exposures, and process them together removing each as it looks correct, hopefully resulting in a range of tones and contrasts. It is the relationship between exposure and development that is the basis for controlling lith prints. When assessing tests, if more contrast is required, give less exposure, and longer development, thus increasing contrast. Likewise, a longer exposure and shorter development should result in softer contrast.
Processing times tend to be between 5 and 15 minutes, but the actual moment when the print starts to change to the desired depth and contrast happens very quickly, even in diluted chemistry. It is important to look closely at the developing print, particularly the shadows, as the muted tones of the midtones under the safelight can be misleading. I usually take the print out of the developer just before completion, watching the blacks turn deeper, holding it above the stop bath, ready to quickly immerse it into the tray.
This rapid increase in contrast is known as ‘infectious development’ and is a fundamental part of lith printing. It may take several minutes before the image starts to appear, but as the shadows begin to form and become darker, the development suddenly becomes more rapid, which is due to the developing agents in the chemistry (notably hydroquinone) reacting to the overexposed silver halide crystals. For further explanation of the chemical reactions involved in lith printing, Tim Rudman’s book The Master Photographer’s Lith Printing Course is recommended reading.
As lith developer oxidises in the tray far quicker than standard developer, it is difficult to replicate lith prints exactly from one to the next. (This is one of the reasons why the components are kept in separate bottles before use.) If a satisfactory print was achieved after 8 minutes 45 seconds development, the next print will invariably require a longer time. When times start getting excessive, the print quality may appear too coarse and gritty (though for some tastes, this may be just right), and it’s time to change the developer. I usually keep about a third of the old chemistry adding two-thirds of fresh. When initially mixed, the first few prints out of the fresh developer may be somewhat lacklustre, but continued use provides more contrast, so it is important that the developer is replenished to the right level. Some printers prefer to add about 10% of developer saved from a previous session (known as ‘old brown’), when mixing the first bath to ensure it has ripened.
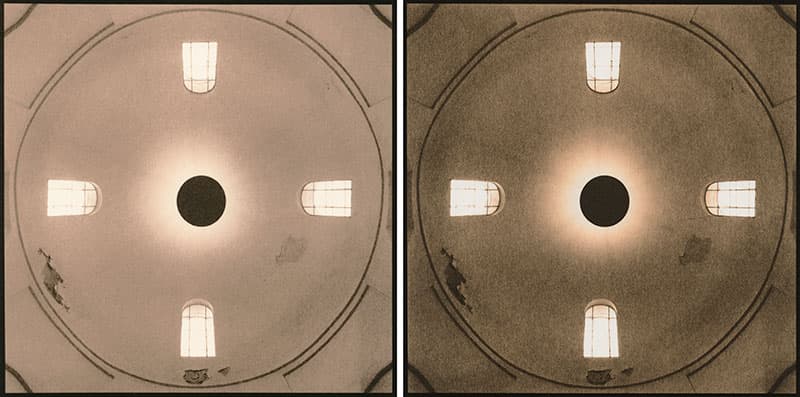
National Archaeological Museum, Sofia, Bulgaria. Printed on discontinued Forte Polywarmtone, these prints demonstrate the tonal controls possible with exposure and development. On the left, the exposure was 55 seconds, processed for 6 minutes 45 seconds. The more contrasty print on the right had 35 seconds exposure and then processed for just under 8 minutes. With lith processing it is sometimes difficult to monitor exact process times. Digital negative from iPhone file. Forte Polywarmtone Semi Matt (Vintage Paper), Fotospeed LD20 Lith Developer (1+1+25). Credit: Mike Crawford
Paper types
Foma produces the most popular papers used today. Fomatone responds well to the process, but with a tendency for strong colours, particularly in the shadows. These can edge towards green so I prefer to subsequently selenium tone very slightly, resulting in more neutral or warmer blacks. Another Foma paper, called Variant, can produce excellent results, with softer brown midtones but with more neutral shadows. It is worth noting that not all the surfaces of Variant work so well and it’s best to check with your supplier. Until recently, surface 123 (matt fine grain with a warm base) was very popular, though supplies are now limited, if not discontinued. However, at the time of writing, a different batch of Variant, surface 113 (matt fine grain with a whiter base) is now available in the UK from Process Supplies. Initial tests printed for this article look very promising.
Owing to the chemical formulation of lith developer, many older papers, which would show base fogging and reduced contrast if processed normally, respond very well to lith printing. Although the supply of such papers, often sourced from eBay, is ultimately limited, I think it is still a valid option while available. Not all papers will work, but research online through various groups and websites will indicate which are useful emulsions. For this article I used a 15-year-old Forte Polywarmtone, Agfa Brovira from the late ’70s, and some Kodak Bromesko that was almost 50 years old.
While it would be difficult to acquire enough of the same batch or type of paper to work on a major project, or even a large series of prints, the possibility to use such old, discarded materials adds more individuality to working with the process. Indeed, for many years, photographers shooting on film have more often than not had to buy second-hand cameras. If so, then why not paper?
Lith printing – Mike’s top tips
- It’s essential for the paper to slide smoothly into the developer, as partial immersion will result in uneven development. Lift the front of the tray at an angle of 30°, place the edge of the paper at the far end. Lower the tray and quickly coat the paper in an even flow as it is lowered.
- Use a developing tray at least one size larger than the paper. The agitated flow of developer can form repeated patterns that can influence the processing of the sheet if held tight in the tray. It is also useful to include a large border to prevent the edges of the image from over developing. Agitation should be steady and constant.
- It can be difficult to assess a developing print under a safelight. Have a test or previous print close to hand to compare. Particular attention should be given to the shadows, though bear in mind that the midtones will usually appear darker under the safelight.
- Lith prints are susceptible to ‘dry down’, with midtones and highlights appearing darker once dry. An after-treatment of weak Farmer’s Reducer can help to brighten the print. It is best made from raw chemistry using a Potassium Ferricyanide and Sodium Thiosulphate (Hypo) formulae. Instructions are easily sourced online.
- Lith developers contain hazardous materials, so appropriate precautions should be taken. Protective gloves should always be worn and the darkroom should have good ventilation. Gloves also make handling the print far easier than tongs, which will invariably crease or mark the print.
Developers
In the UK, Fotospeed and Moersch developers are available from main photographic suppliers or through their respective websites. Wolfgang Moersch has been producing specialist photographic chemistry for many years, particularly lith developers, and also manufactures a series of additives to expand the controls of the lith process. His website contains several resources and further information to explain the process as well as examples of many papers developed and toned with different processes.