Exposure
1. How to spot and avoid blown-out highlights
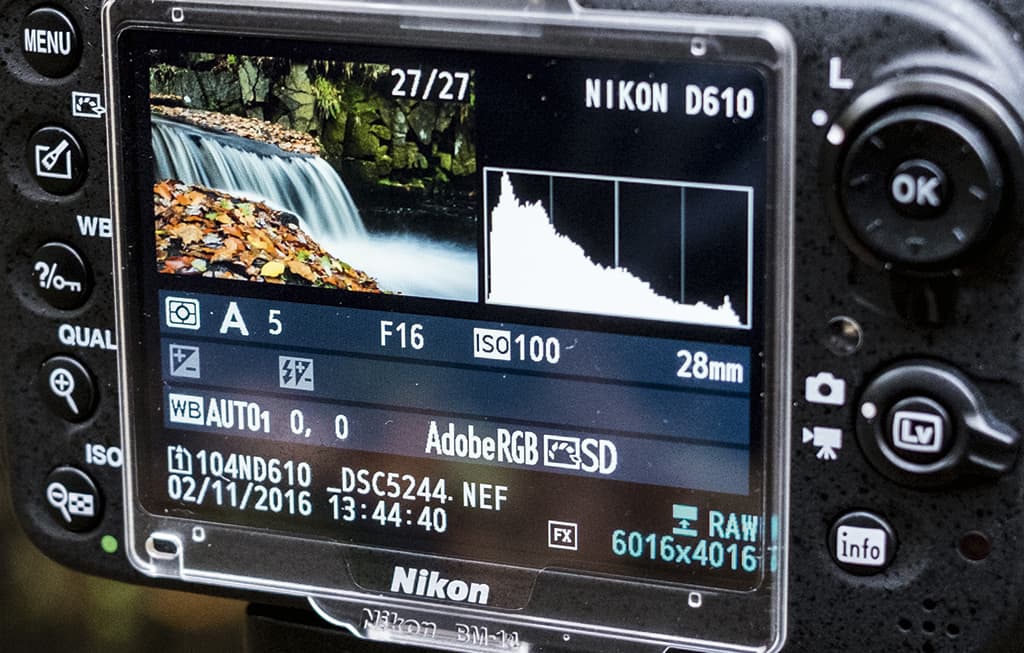 Most cameras have a histogram that can be activated when playing back your images. This graph shows the distribution of tones throughout the image, ranging from shadows on the left, to mid-tones in the centre, to highlights on the right. If the highlights or the shadows are bunched up at the side of the histogram, you’ll know that highlights have blown or shadows have clipped. To retain highlight detail, check the histogram and if it’s bunched up to the right, dial in a small amount of underexposure and take another shot.
2. Expose for highlight detail
 One way of avoiding overexposure and blown highlights is to expose for the highlights. When you do this, mid-tones and shadows will inevitably be darker but it’s easier to rescue detail from an underexposed image than it is from one with completely blown highlights showing no detail. Shoot in raw and use spot metering to meter from a highlight area, then in Adobe Camera Raw or Lightroom you’ll be able to recover detail from the underexposed parts of the image.
3. Getting the right exposure for silhouettes
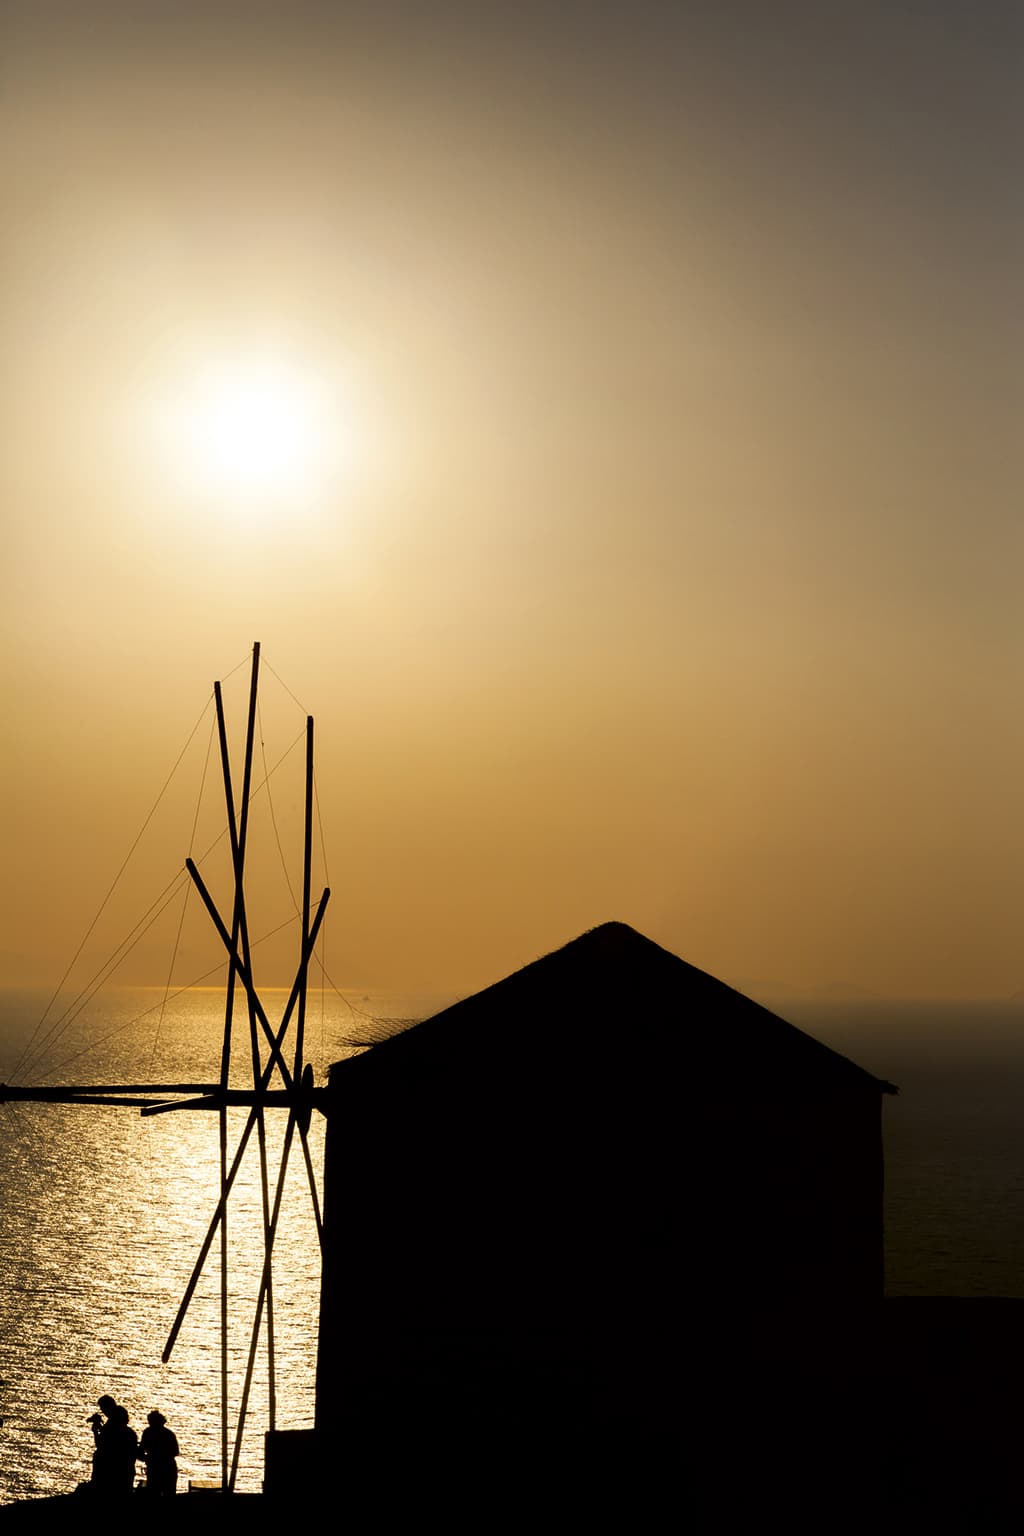
Capturing a bold figure or object in front of a beautifully coloured sunrise or sunset in pure abstract shadow is easier than you might think. Shooting a great silhouette requires little more than pointing your camera at a bright area of the sky and hoping for the best. Shoot in aperture- priority with an aperture around f/11 and metering set to evaluative. If the subject you want to capture is small in the frame you may need to set exposure compensation to overexpose slightly, and if the subject is large in the frame you may need a touch of underexposure.
4. Setting a custom white balance
When shooting indoors under mixed lighting, setting a custom white balance is the ideal way to ensure a near perfect colour balance. Most cameras offer a custom or manual white balance setting that can be accessed via the Quick menu or the main menu. Simply follow the on-screen instructions to set white balance this way.
5. Reducing noise on long exposures
With long exposures you often experience a degree of noise, particularly in the blue channel, which is the noisiest of the three (RGB). To combat this, shoot in raw so you can then apply colour noise reduction to deal with coloured flecks, and Luminance to reduce grain in areas such as the sky using ACR or Lightroom. When you output the image make sure you select 16-Bit TIFF for editing in Photoshop, and then when you’ve finished reduce down to 8-Bit or save as a JPEG.
6. Relax with Auto ISO
Auto ISO is an amazing feature that ensures ISO is always high enough for the shutter speed to be fast enough to avoid any camera shake. When using this setting you can often set the default ISO the camera will aim to use, such as ISO 100, the upper limit such as ISO 3200 and also the minimum shutter speed. This means if you’re shooting with a 50mm lens you could set minimum shutter speed to 1/125sec for peace of mind.
7. Taking targeted meter readings
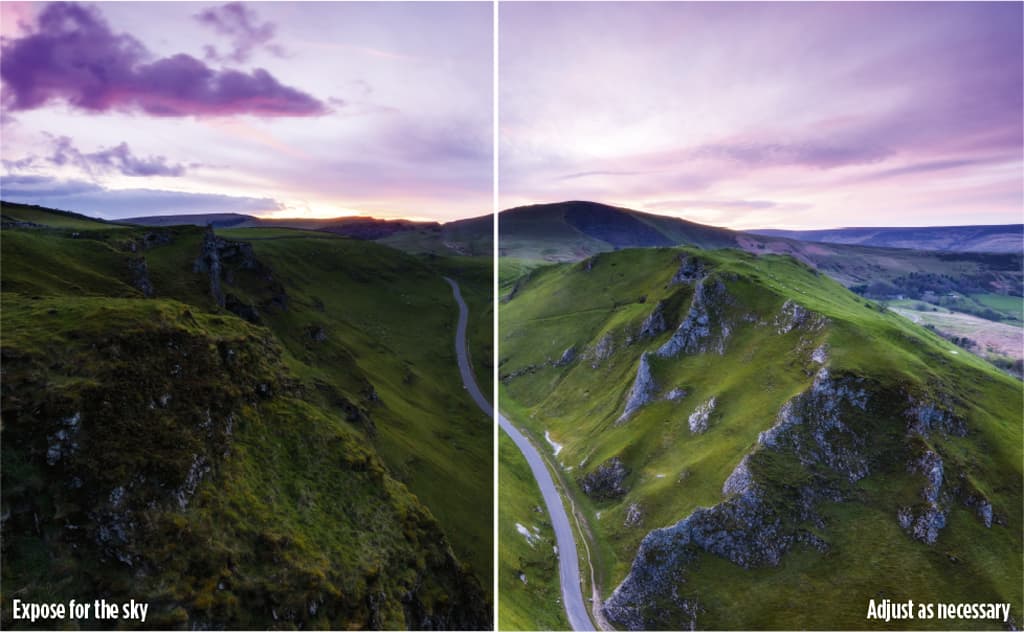 Exposing for a specific part of the subject or scene in front of the camera is an essential part of taking control of the way your shots look. With many cameras, when shooting with spot metering the camera will meter from the active focus point. So if you’re shooting a landscape without ND Grads and you want to expose for the sky to maintain detail, simply set the lens to manual focus and focus manually but set the active point to one over the sky and set spot metering. You’ll probably need to use exposure compensation to fine-tune exposure.
8. When to use the different metering modes
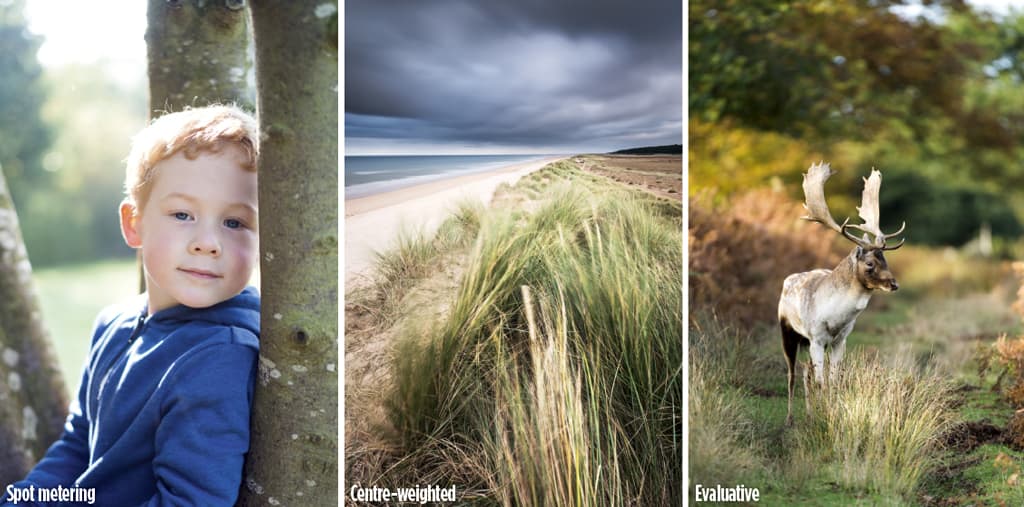 Selecting the right metering mode for the situation can be the difference between a great exposure and one that’s way off the mark. And as you know, getting a correct exposure is always preferable. For general shooting, and when there are light and dark elements in the scene, evaluative is great because it calculates a balanced exposure. When shooting landscapes with ND grads, centre-weighted is ideal as it reads from the central area of the frame and generally doesn’t read light from the filtered area, while for backlit subjects spot metering will help to avoid underexposure.
Focusing and sharpness
9. How many AF points should be activated?
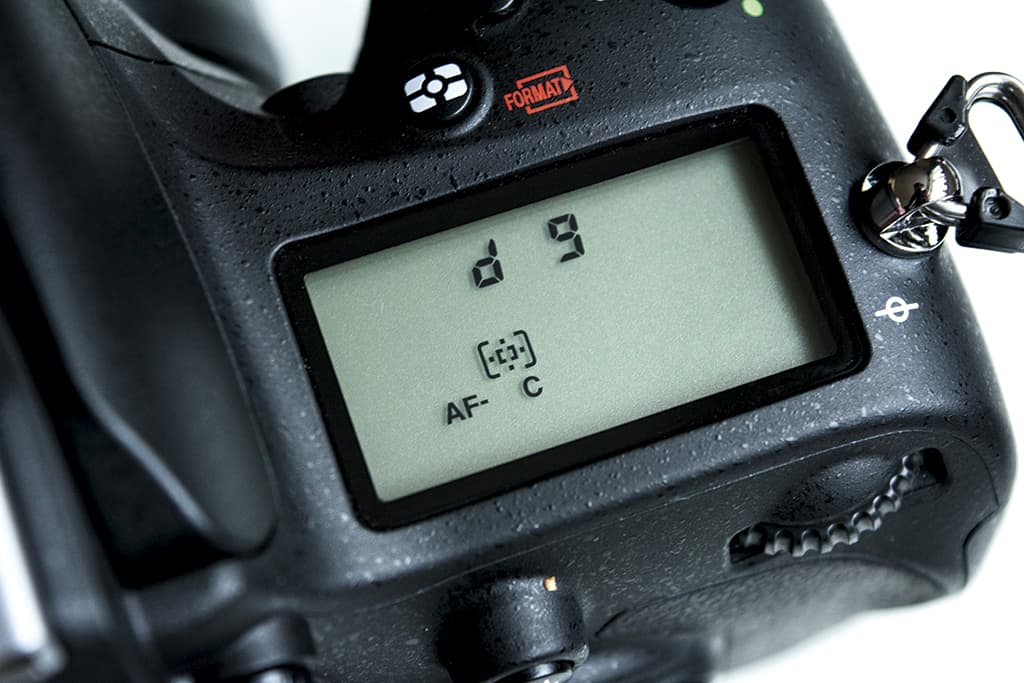
The number of active focus points you need depends on the subject. It’s safe to say there are few occasions where Auto point selection is a good option, and that most professionals shoot with a single focus point active whether they shoot portraits, wildlife, landscapes or motorsport. However, when it comes to action photography it can pay to activate a few more. Many cameras have an option where five or nine points are activated, with the central point being the dominant one. Then while shooting, if the subject moves away from the main point onto one of the others, the camera will keep it sharp and in focus.
10. Focus with the AE-L/AF-L button

The traditional method of focusing by half depressing the shutter button is the way most photographers focus. But there is another method. Most cameras allow you to assign different settings to the function buttons (Fn) but with Nikon DSLRs you can set the AE-L/AF-L button to AF-ON, which focuses while the shutter is released in the normal way. Some photographers prefer this method because they say it’s a quicker way of focusing. You be the judge.
11. Compose and focus like a pro
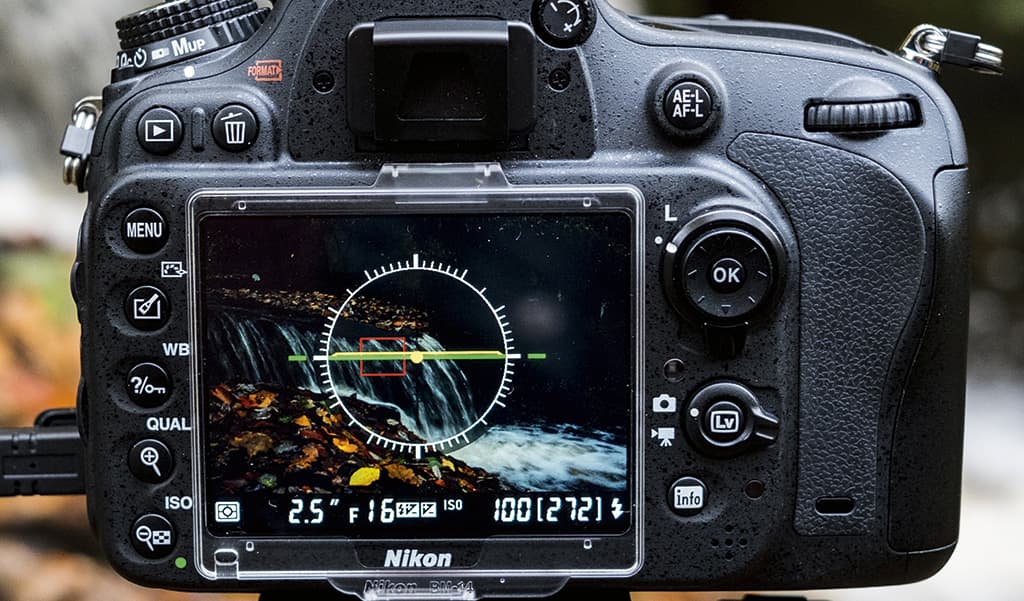
Live View is a powerful tool when it comes to composing and focusing your images. The Virtual Horizon (the name given to this feature on Nikon DSLRs) is ideal for ensuring your camera is perfectly level. To manually focus on a specific part of the scene with precision, you can zoom in to the Live View image so that it shows at 100% allowing you to focus with confidence. The image will zoom into the area covered by the active on-screen focus point.
12. Figuring out Focus Peaking on CSCs
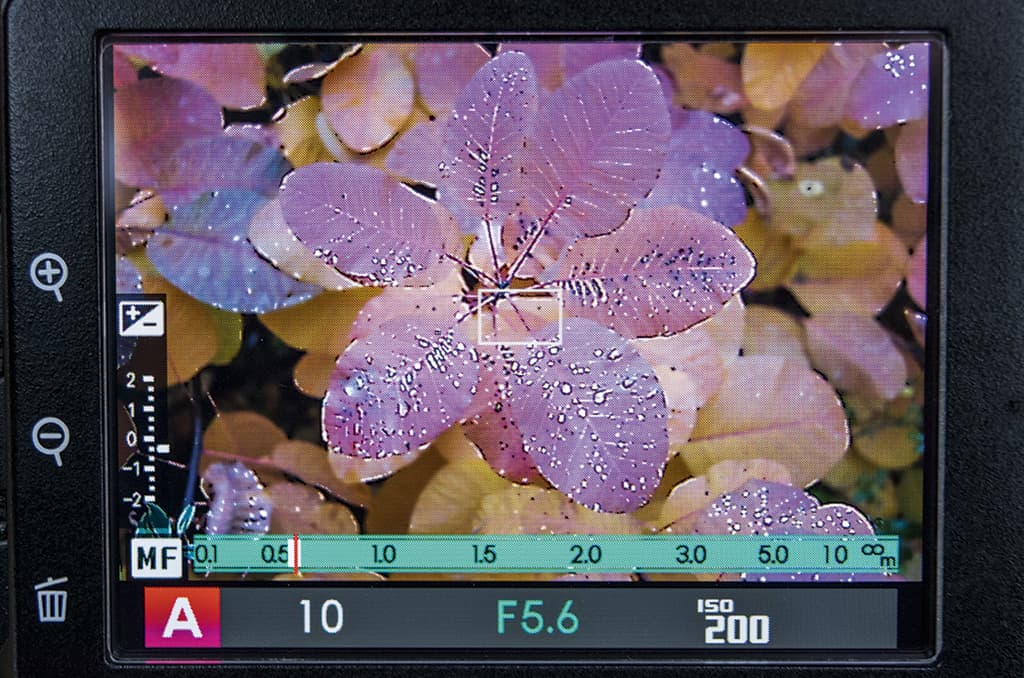
If you own a mirrorless camera or a high-end compact, you might just benefit from a manual focusing aid known as focus peaking. This feature comes from video cameras, and shows either a white or coloured highlight, depending on your camera, over the hard edges of the parts of the subject that are in focus. To get the best out of focus peaking it can be worth zooming in to the image on the LCD, or in the EVF (if your camera offers viewfinder zoom) for increased precision.
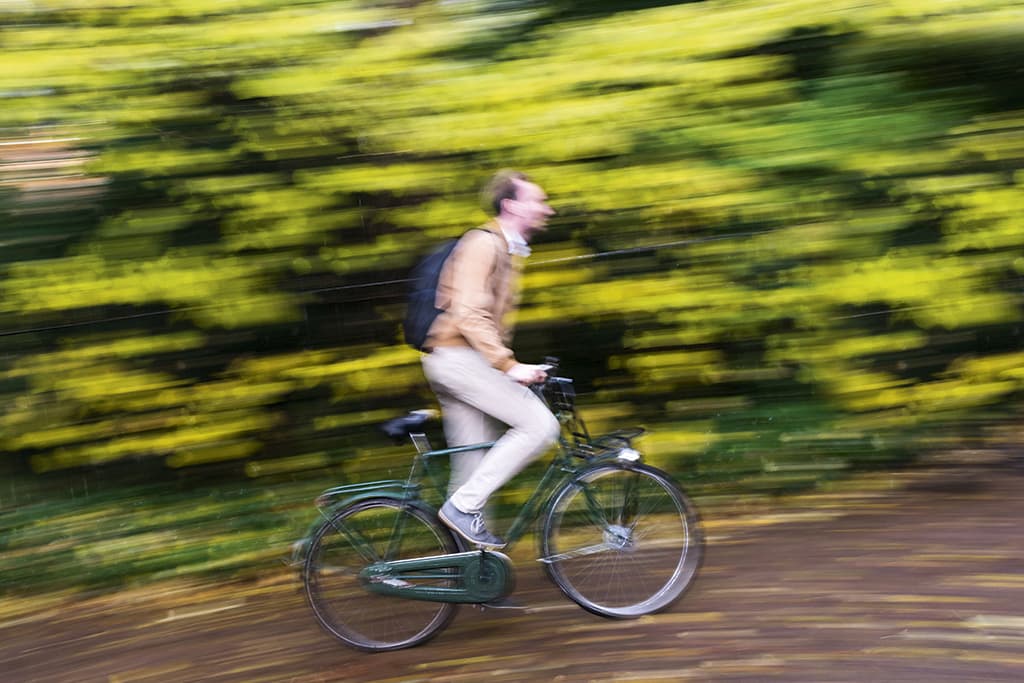
13. Use continuous focus for fast-moving subjects
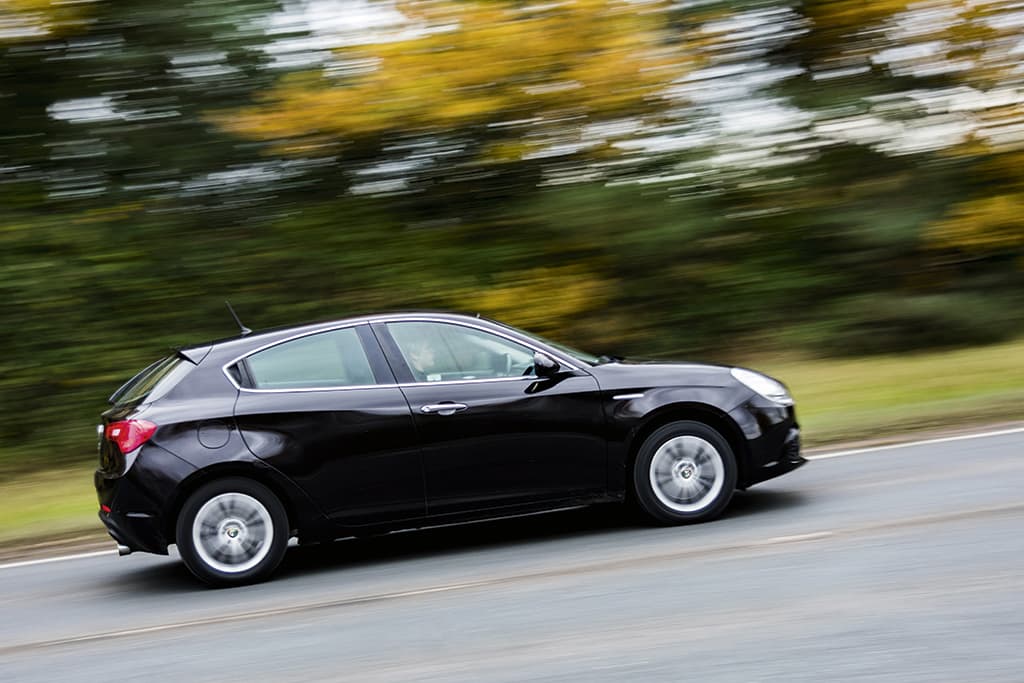
When you’re shooting a moving subject, setting the focus mode to continuous will drastically improve your chances of a sharp shot. With continuous focus selected, position the active focus point over the subject and half depress the shutter button. Now, as you track the subject, keep the focus point over it and the camera will continuously focus to keep it sharp as it moves towards or past you. Remember to leave a little space for your moving object to ‘travel’ into.
14. Avoid unwanted front and back focusing
Apart from not having control over the point of focus, the biggest downside to having Auto focus point selection turned on is that the camera may decide to focus in the wrong part of the frame. In this mode the camera will focus on what it thinks is the most prominent element in the scene, and this could be in the foreground or the background. To avoid the problem, shoot with a single focus point active so you can decide exactly where to position the active point. And don’t forget to change the position of the active point for each shot to avoid further focusing errors.
15. Adjust the size of AF points
 How many times have you been lining up the active focus point over the subject and wished it could be smaller, or indeed larger? The good news is that changing AF point size is possible, particularly with mirrorless cameras. So if you would like to take more control over how your camera focuses, try adjusting AF point size.
Lenses
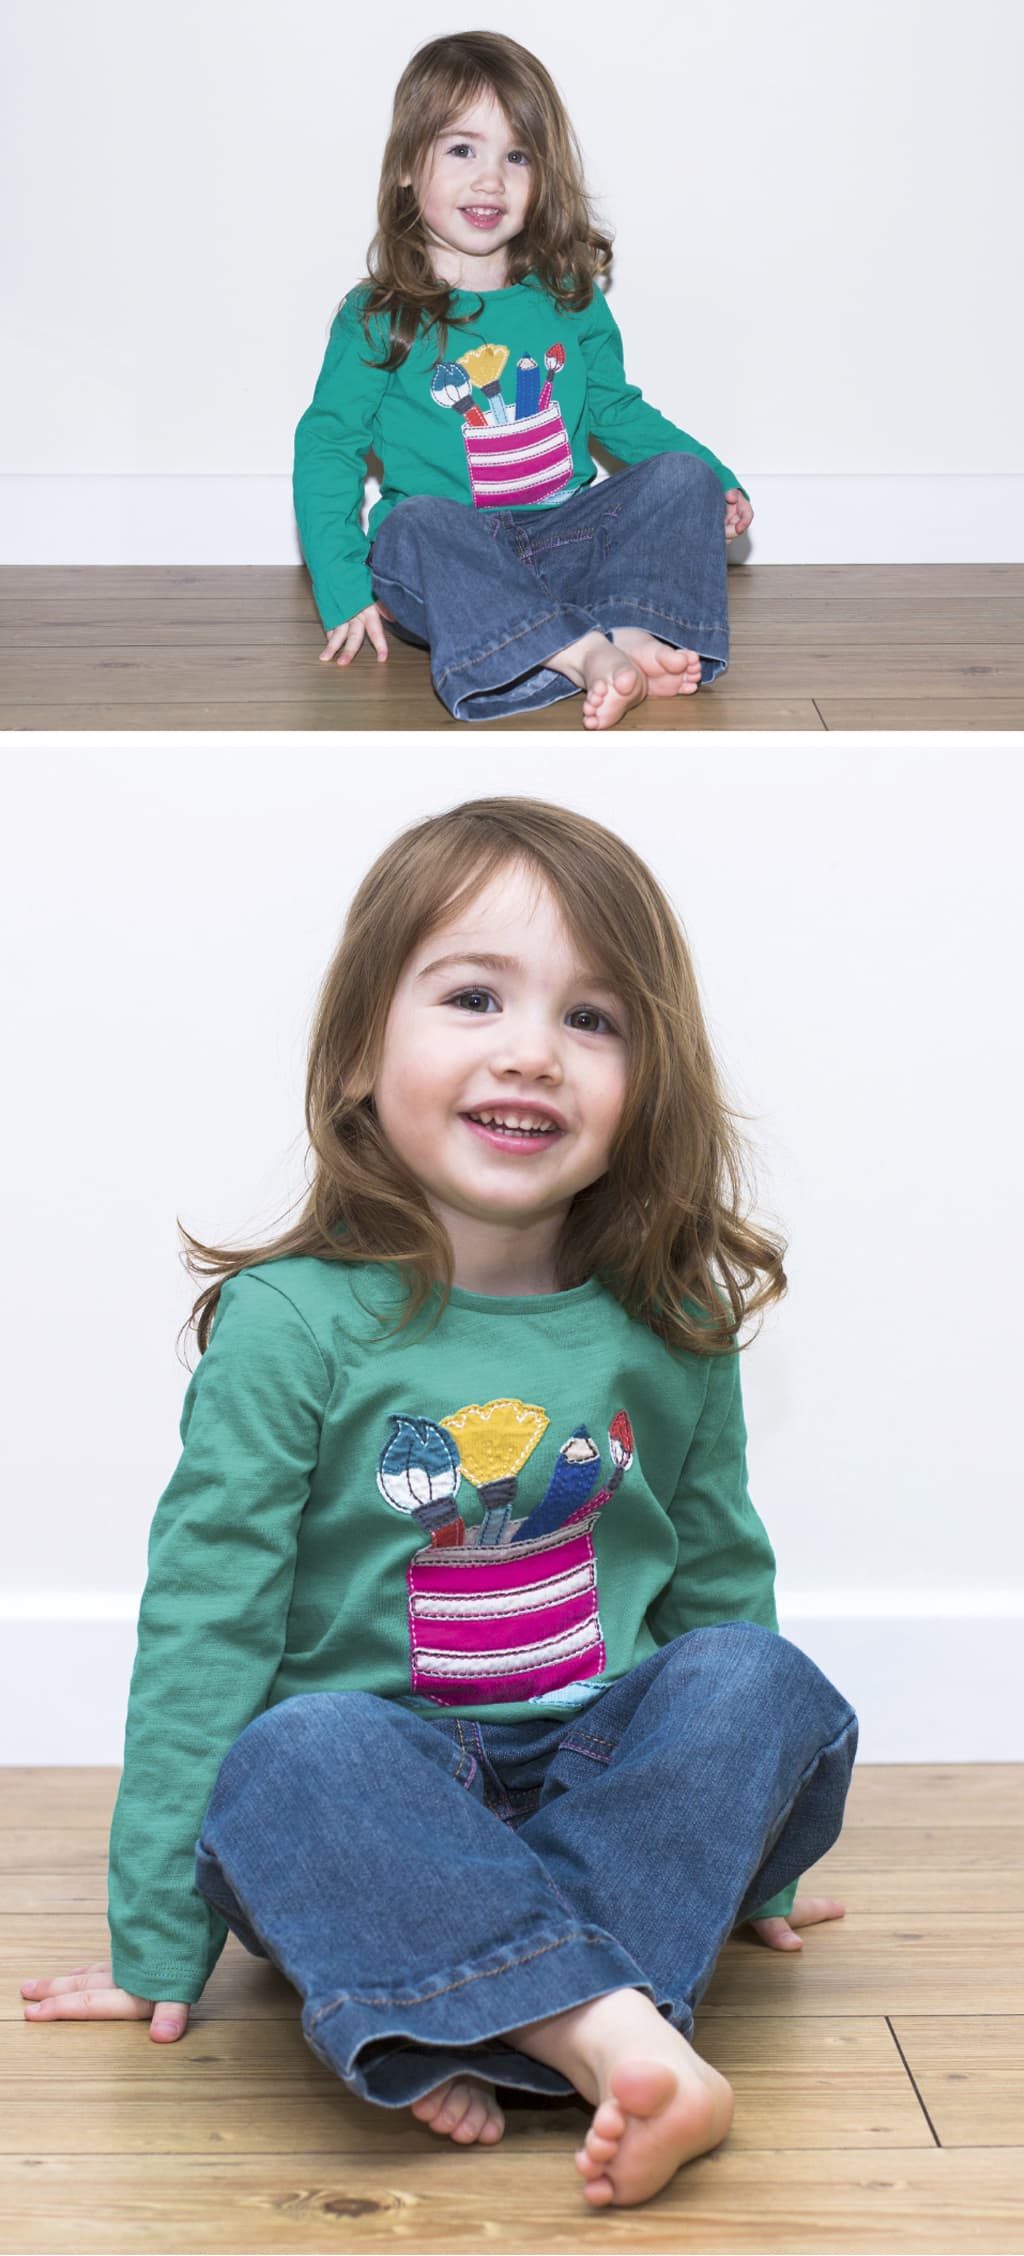
16. Staying sharp with shallow DOF
 Fast primes are fantastic for shooting portraits. Whether you’re going in close for a head and shoulders crop, or full length, the shallow depth-of-field they can create looks stunning. The difficulty comes with getting shots sharp where they should be – on the eyes. The zone of focus is so narrow that if you move a tiny amount between focusing and releasing the shutter, the point of focus is lost. One way around this is to set the camera to burst mode, and after focusing take three shots in quick succession. This will therefore triple your chances of getting a sharp shot. When shooting wide you have to shoot more frames anyway, so don’t worry about having more images to sift through – it’s all part of the process.
 17. How to focus when a macro lens is set to minimum focus
With macro lenses you’ll often want to get the most out of them by shooting at a 1:1 ratio. But when the lens is set to its minimum focus distance, what’s the best way to focus? Quite simply by moving the camera a tiny amount, with your eye to the viewfinder, backwards and forwards until the subject appears sharp. This works for handheld and when shooting with the camera on a beanbag. If using a tripod you’ll need a focusing plate that allows for this backwards and forwards adjustment.
18. Diffraction – what is it and how to spot it
Diffraction is when light disperses as it passes through the lens aperture, and causes images to be less sharp overall. This is more of a problem when the lens is stopped down to narrower settings such as f/22, which means that despite f/22 providing a greater depth-of-field than f/11, it’s not as sharp overall. So f/11 will generally produce an image that’s sharper, although depth-of-field won’t be as extensive. Many landscape photographers shoot at f/11 or f/16 – because diffraction is less problematic than when stopped down fully.
19. How to find your lens sweet spot
 Every lens has what’s known as a ‘sweet spot’ – the aperture at which it produces the sharpest image. This is not to be confused with depth of field. Most lenses have a sweet spot of f/8 or f/11, and working out the exact sweet spot of your lens is easy.
Step 1 Set up your camera on a tripod to shoot a detailed object. With ISO at 100 select aperture-priority and use the central focus point to focus on the subject.
Step 2 Take a shot at each full aperture stop, and then review and compare the results on your computer with the images zoomed in at 100%. The overall sharpness of the images will reduce as you move away from the sweet spot.
20. Spotting and correcting various types of lens distortion
Lens distortion is an issue with many lenses, but the old adage ‘you get what you pay for’ certainly stands strong with optics. Generally speaking, the more you pay the fewer types of distortion you’ll experience. The main types to look out for are barrel distortion, where images appear to bulge out from the centre, which is most common with wideangle lenses. Pincushion distortion is the opposite; images appear to be sucked in from all four sides, and this is most common with telephoto lenses.
The most troublesome type is moustache distortion, which is a combination of barrel and pincushion; the centre bulges out, while the ends of each side of the image appear sucked back in. Fortunately this is uncommon in modern lenses, although it does exist. Finally, the other thing to look out for is chromatic aberration. This is when a lens fails to focus colours at the same convergence point, and results in coloured bands along subject edges. With the exception of moustache distortion, all of these issues can be fixed in ACR and Lightroom.
Flash and lighting
21. Slow sync and rear-curtain flash
 A slow shutter speed and flash is a great way to emphasise movement in action shots. Setting up your camera is easy and the results will be different from the more standard approach. So how does it work? Shooting with a slow shutter speed, such as 1/30sec, is too slow to freeze movement, which is where the flash comes in. The slow shutter captures blur while the flash is used to freeze the subject.
Step 1 To shoot slow-sync flash, set the camera to shutter-priority with shutter speed at 1/30sec and ISO at 400. You may need to experiment with shutter speed depending on the subject’s movement.
Step 2 Attach your flashgun to the hotshoe and make sure it’s set to TTL and most importantly, set it to rear-curtain sync. In this mode the shutter opens and just before it closes the flash fires to capture blur behind the frozen subject. If you use front curtain the blur will be in front of the subject, which looks odd.
22. How to avoid heavy shadows in sunlight
It’s often said that you shouldn’t shoot portraits on bright sunny days because harsh shadows are created on the face. While this is true if you’re simply using natural light, if you have a flash you have the ability to fill the shadows with light. To overcome the problem, shoot in aperture- priority with your flashgun set to TTL, and apply flash exposure compensation if necessary. This will help you to fill shadows in the most natural-looking way.
 23. Take more control with wireless triggers
The best way to take more control over flash, and achieve creative lighting effects, is to use off-camera flash. By using wireless triggers you can fire one or more flashguns remotely, which means you can position your lights anywhere rather than being limited to the camera hotshoe. Two flashguns are all you need to achieve professional-quality studio effects on location or indoors, and don’t forget that you can also use light modifiers to shape and direct the light.
24. Avoid amateur- looking flash
 Shooting with flash indoors is the perfect remedy for low levels of light but take care because hard direct flash can look terrible. Bleached-out detail and hard shadows are the two main issues you’ll face. With a flashgun you have the ability to tilt the head upwards, or turn it to the left or right. This means that you can aim it at the ceiling so the light bounces back down soft and diffused, or off a wall or reflector. The alternative is to use a flash diffuser such as a small softbox or a Lastolite by Manfrotto EzyBounce.
25 Off-camera flash doesn’t have to be complicated
With the cost of wireless flash triggers at an all-time low, it’s easy to forget that there are other ways of triggering your flashgun when it’s off-camera. Optical slaves are one option, and while they’re old technology they can be a lifesaver when wireless triggers decide not to work. Another option that offers speed and convenience is an off-camera cable. These allow you to use your camera in TTL mode, and take advantage of all other on-camera functionality, while enjoying the ability to add modifiers to the flashgun. You can either hold the flashgun in your left hand or mount it on a light stand. The downside to this set-up is that you’re limited by the length of the cable, but you do get a quick and easy way to achieve creative lighting effects.
Processing and editing
26. Correcting noise without the dreaded waxy effect
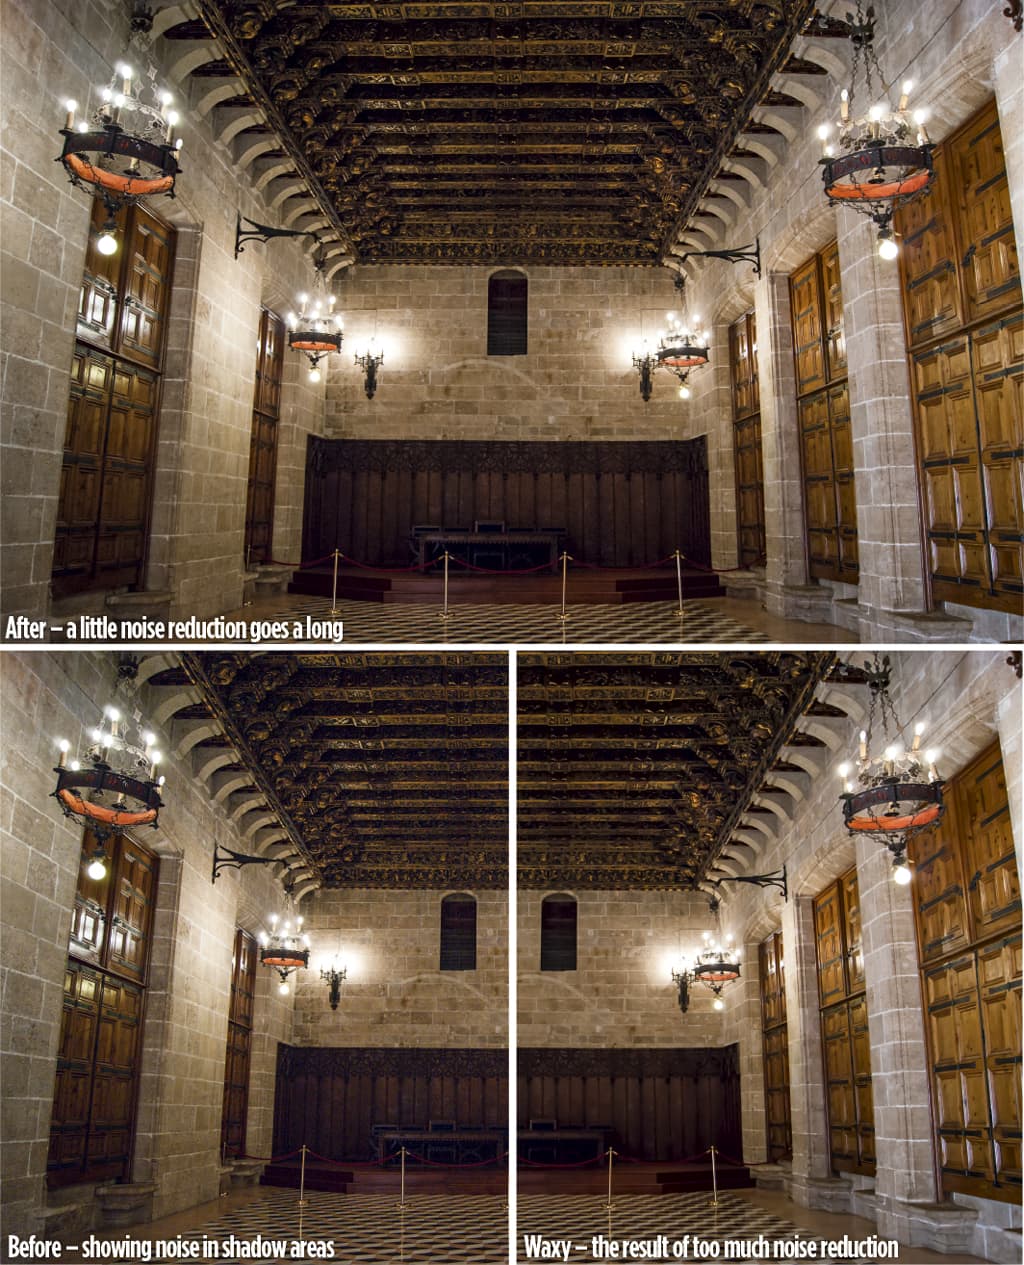 These days, cameras are excellent performers when it comes to high ISO settings but there are still times when you’ll need to apply noise removal during post-processing. It’s a simple process but the main aim is to avoid waxy details which are a result of applying noise reduction too strongly. In this situation, a little reserve goes a long way.
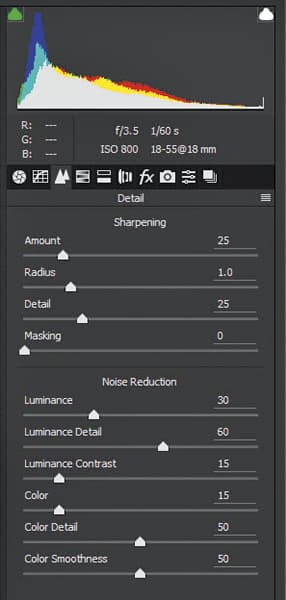
Step 1 In ACR and Lightroom locate the Noise Reduction controls and first adjust Color, which is set to 25 by default. Drag it to zero and then drag it right until the colour noise disappears – this is usually between 10 and 20.
Step 2 Drag the Luminance slider to an amount between 20 and 40. Going higher will make the image begin to appear waxy. Now you can increase the Detail slider to pull back some detail, and the Contrast slider will boost contrast in areas of continuous tone.
27. The right way to resize images for print
The easiest way to resize an image for print in Photoshop is to use the crop tool with the W x H x Resolution option selected. With this you can set the exact dimensions of the paper in inches or centimetres, and the resolution to the correct amount of 300dpi.
Step 1 Open the image to be cropped and press C on the keyboard to activate the Crop tool. Using the dropdown menu at the top left of the Photoshop window, select W x H x Resolution. Now type in the dimensions using ‘in’ or ‘cm’ after the number and then put 300 in the next box. Make sure the final dropdown option is set to px/in.
Step 2 With the image cropped to a smaller size, it’s important to save a new copy so you don’t overwrite and lose the original. Press Ctrl+Shift+S to open the Save As dialogue. Select JPEG as the file type, name the image and save it in a location where you can find it. Now it’s ready for home printing, or at a lab.
28. The right way to resize images for web
The best way to save images for email and online use is to use the Save for Web option in Photoshop, which can be accessed using the shortcut Ctrl+Alt+Shift+S.
Step 1 When the dialogue window opens, set the file type to JPEG and make sure Progressive is checked.
Step 2 Set Quality to 70%, which will maintain image quality and drastically reduce size. Now make sure Convert to RGB is checked, and use the Metadata dropdown menu to select what information is retained in the image – Copyright and Contact Info is the most commonly used option.
Step 3 Set the Image size so that the longest edge is the desired dimension, and then click on ‘save’ to be taken to the save dialogue box.
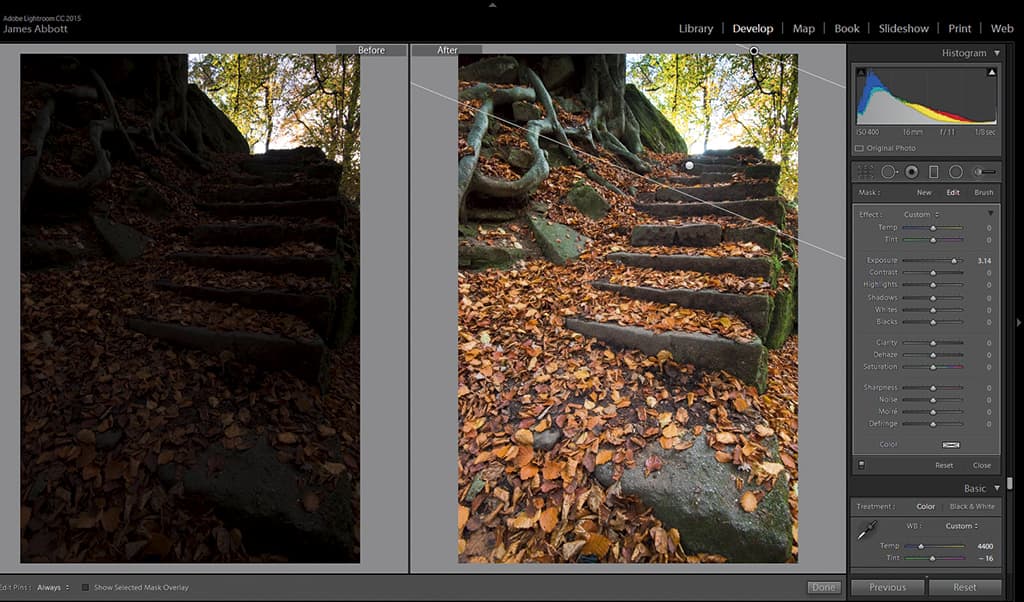
29. Fix muddiness in an instant
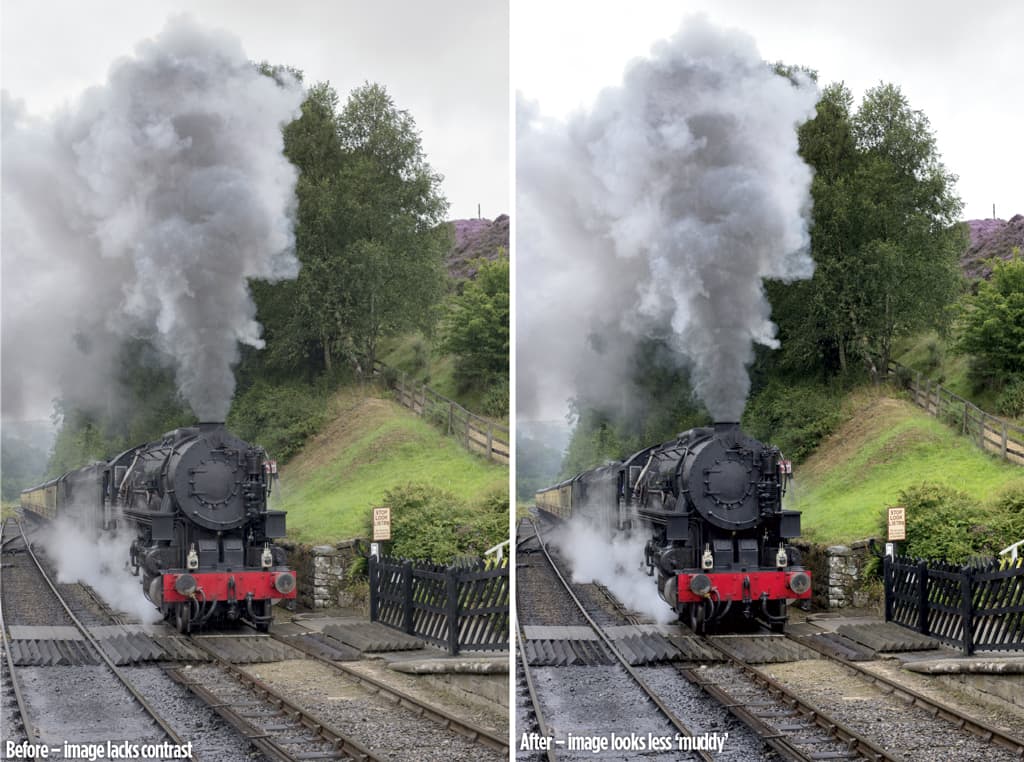 Whether you shoot in JPEG or raw, there’s a good chance that when you get your images into Photoshop, even after a raw conversion, the contrast won’t be quite where it needs to be.
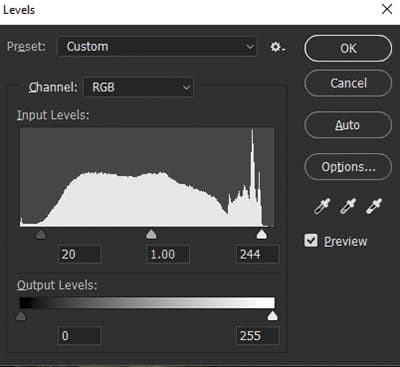
Step 1 To check and fix this problem, create a Levels Adjustment Layer or simply use Levels by pressing Ctrl+L.
Step 2 Now drag the white and black points inwards so that they sit below the two ends of the histogram where it rises.
Step 3 Holding down the Alt key while dragging the points shows shadow and highlight clipping.
30. Sharpen without creating artefacts and halos
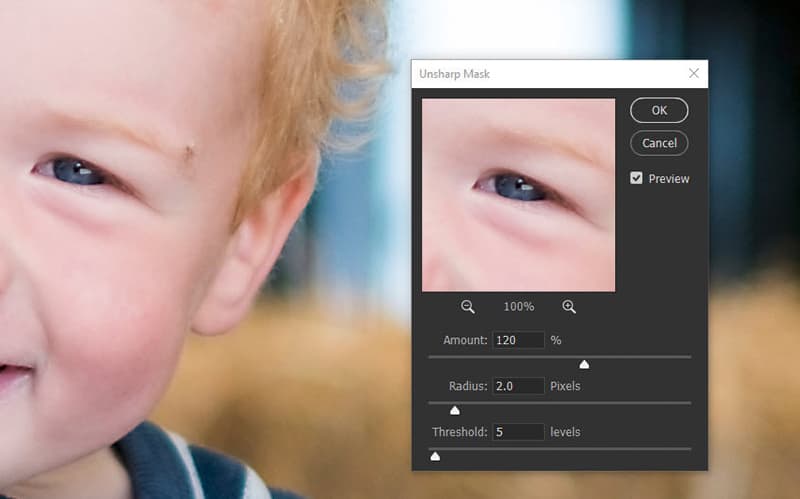
The best way to sharpen images is to use the Sharpen controls in ACR and Lightroom. The default settings are perfect nine out of ten times. However, there will be instances when you need to sharpen shots in Photoshop, so here’s how to use Unsharp Mask without creating halos.
Step 1 Go to the main Photoshop menu and select Filter>Sharpen>Unsharp Mask. When the dialogue box opens, set Radius to 2.0 Pixels and then drag the Amount slider to the right until the image looks sharp, but not so far that halos appear.
Step 2 Set Threshold to 5-10 pixels. Threshold smooths out the sharpening effect, but applying too much counteracts sharpening. Now see if you can increase the Amount without creating artefacts or halos, and hit OK when you’re done.
James Abbott is a professional photographer and journalist specialising in portrait and landscape photography. From shooting wildlife images to high-end beauty photography, if you can think of a subject there’s a good chance he’s photographed it. www.jamesaphoto.co.uk