Technique explained: Advanced retouching techniques
Requirements:
Software: Adobe Photoshop, Photoshop Elements or similar software
System requirements: Windows PC or Mac
Skill required: Medium
Time to complete: 20 minutes

As much as we try to create perfect masterpieces in-camera, there will always be occasions when an unwanted object appears in a picture. Fortunately, image-editing software gives us the ability to remove these elements, and there is no shame in doing so.
Skilled photographic printers often edit images in the darkroom, and there is many a story of altered and doctored images coming out of the old Soviet Union. The difference now is that these once mythical skills can be achieved in just a few minutes on a computer, rather than a few hours in the darkroom.
In a previous article, I removed the flagpole from the top of this fort, using a combination of sample selections, masking and cloning.
To complete the image, I am now going to remove the wires that stretch across the image on the left. This is one of the most common cloning tasks a photographer will come across, but it can be tricky if the wires are in front of a cloudy sky.
Finally, I will demonstrate how to use a little artistic licence to remove the distracting car on the left-hand side of the image, replacing it instead with a rocky mound.
Hopefully, these straightforward techniques will help you clone out unwanted areas without creating repetitive cloning patterns.

Cloning out wires and large objects
How to eliminate distracting elements without creating cloning patterns
 Step 1. The technique to rid the image of the overhead cables is similar to the one I used to remove the flagpole in the previous Last Resort. I have used the Marquee tool, with a slightly feathered edge, to select an area just above the wire.
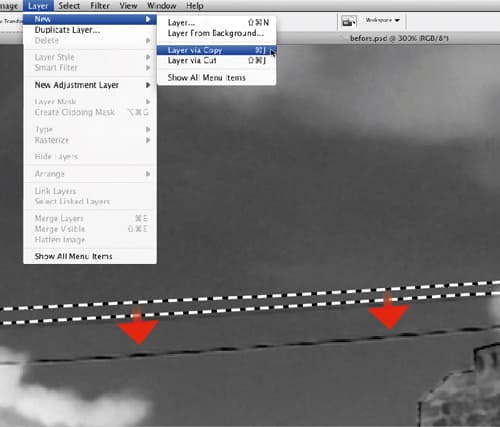
 Step 2. Use this selection to patch over the overhead cable. To do this, select Layer>New>Layer Via Copy, which will copy the selection to a new layer. With the new layer selected, use the Move tool (found in the Tools palette) and move the layer so the patch is placed over the cable.
 Step 3. I have repeated steps one and two a number of times, creating several selections until most of the cable has been removed. The image now has 33 layers. To flatten them, select Layer>Flatten Image.

Step 4. The areas where the cable meets a cloud need to be cloned to blend them. To do this, change the Opacity of the cloning brush to 80% and gradually build up the effect. Keep one hand on the Alt key and press this every few clicks to select a new clone sample. This helps prevent patterning.
 Step 5. To complete the image, I want to remove the car and structure on the left as well as the object above it. I will use some artistic licence to do so. I have set a new clone point at the bottom edge of the rock.
 Step 6. The idea is to use the Clone tool to copy this area over the car. If done carefully, it should replace the car with a realistic rock surface.
 Step 7. I have used the Marquee tool to select the rocky area, and then inverted the selection by clicking Select>Invert.
 Step 8. Using a large Clone brush set to around 70% Opacity, clone the clouds in the background over the object. Again, setting the Opacity lower than 100% allows the effect to be gradually built up, while the selection prevents the rocks being affected, producing a clear edge.

In the final image, the flag pole, cables and car have all been removed, making the image a lot neater and tidier.