
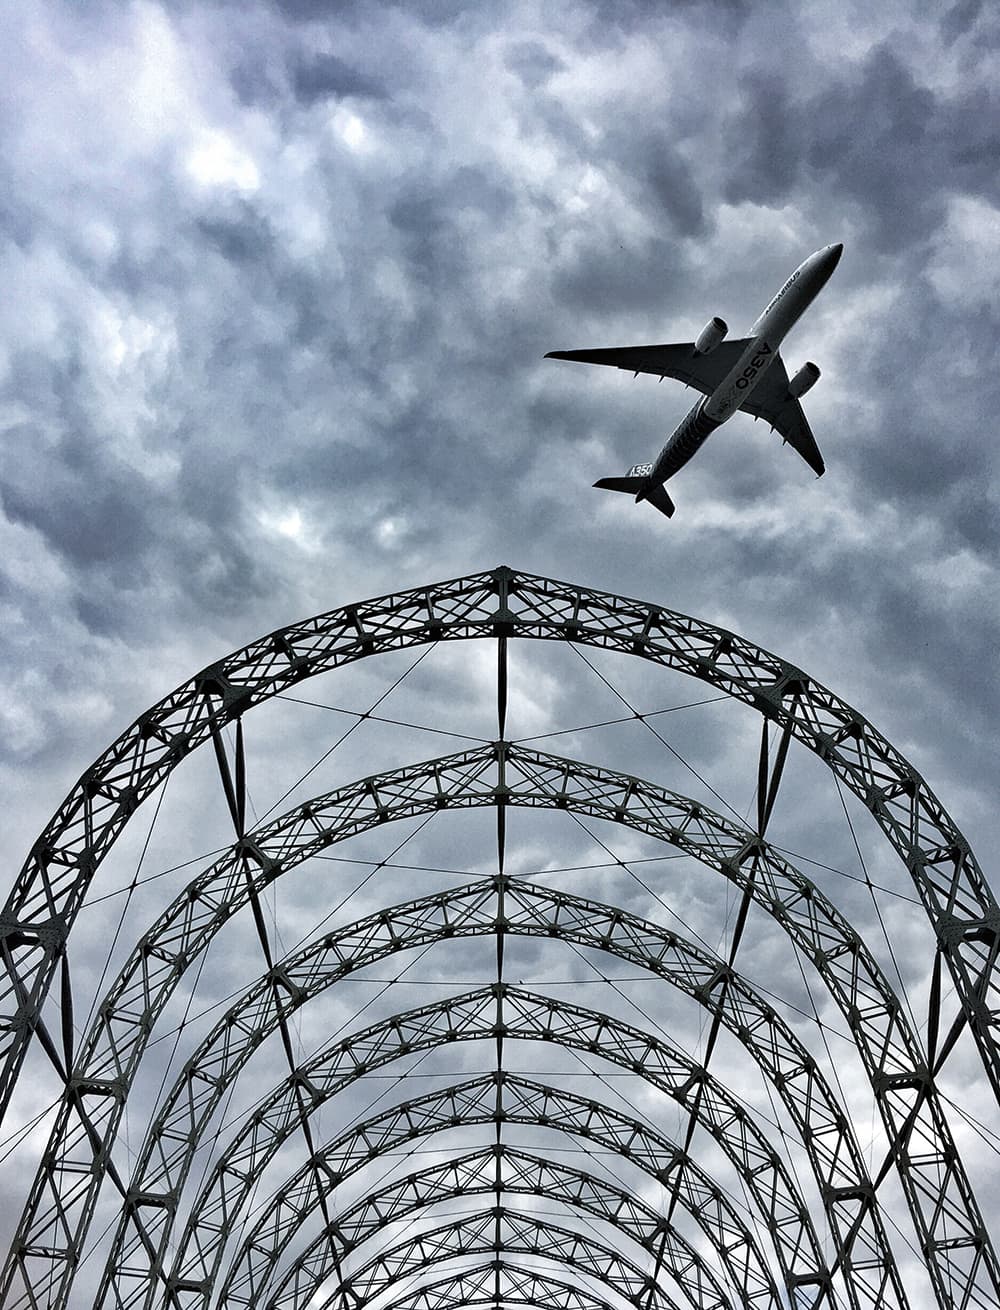
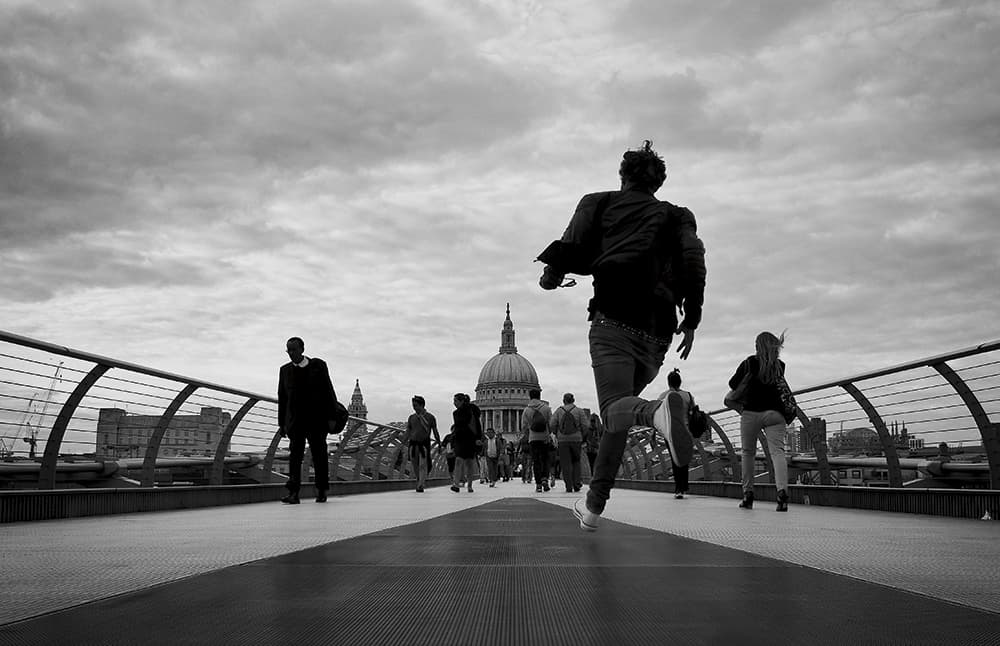
Ensuring your subject has a clear and defined shape leads to seriously impressive results. Image by Michael Topham
If you’ve ever watched the title sequence of the 1995 Bond film Goldeneye, you’ll have noticed that the producers (Barbara Broccoli and her photo-loving half-brother Michael G Wilson) are big fans of silhouettes as creative devices. Numerous dancers are positioned against a fiery backdrop swaying their arms to the title track, creating recognisable shapes that are completely devoid of detail. It’s cheesy, but it’s also effective. Moments later the unmistakable profile of Bond appears, wielding his gun. This short, but powerful, sequence demonstrates why so many photographers, and movie makers, use silhouettes in their work – they add drama, mystery and impact. What’s more, they are easy to create.
Silhouettes are basically figures or objects positioned in front of a bright light source, which allows them to fall into deep shadow and create inky-black shapes. For many photographers the preferred light source is the sun, particularly around sunrise and sunset when it sits low in the sky, but you can also use fire, the moon, streetlights or anything else you can think of. Plain, uncluttered backgrounds with vibrant colours are ideal for this technique, because they provide great contrast to your silhouettes – another reason why sunset backdrops are so popular. Generally, you want to avoid light illuminating the front of your subject, so switch off your flash.
Popular subjects for silhouettes include people, trees, mountains and architecture, but wildlife, bridges and sculptures can also be effective. Whatever your subject, you need to make sure that the outline does not merge with anything else in the frame – we have all seen awkward silhouettes of people kissing, creating odd, ill-defined shapes that appear to become part of their torso. Ultimately, you’re aiming for a clearly defined outline with a little space around it.
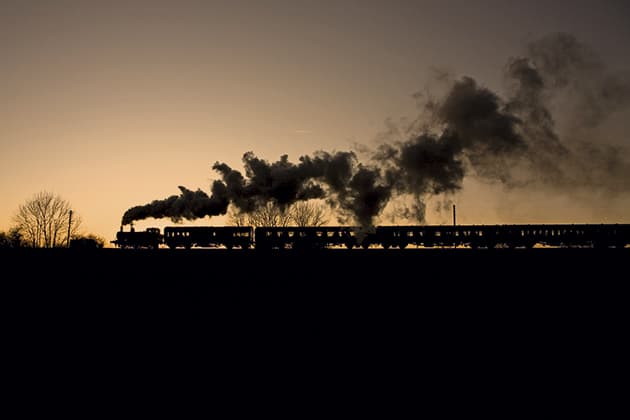
Here we see how the natural light of the sun behind the subject can be used to create silhouettes. Image by Nigel Atherton
Exposing for the background
With the primary light source behind your subject, you can now turn your attention to overriding some of the automatic controls on your camera. To ensure that your subject is reproduced as a pure black silhouette straight out of the camera you will need to use a manual-exposure mode (aperture priority, shutter priority or manual) and preferably shoot raw, as these settings will allow greater control over the end result. If your subject is stationary, then aperture priority is usually the better option, because it gives you some margin for error.
The next step is to change the metering mode to spot, which instructs the camera to take a reading from a very precise area of the scene – you can use a handheld meter if you prefer. (If you’re using a Nikon DSLR you can change the AF area mode to single-area AF and select a specific AF point, as the spot metering region and the AF area are linked. Canon cameras use the central AF point when spot metering is activated.)
Now is a good time to separate the way that exposure and focusing are obtained. Normally, when you press the shutter- release button halfway the camera locks both the focus and the exposure at the same time. On this occasion, however, you want a well-exposed background and an accurately focused subject – and both of these elements reside in different parts of the frame.
To overcome this problem, you need to use AE lock. Once you have obtained a spot-meter reading from an especially bright part of the background (remembering to avoid looking directly at the sun), you can lock it in by pressing the AE-L button (Nikon) or the * button (Canon), and then recompose. (At this point it’s worth checking that any settings designed to lighten the shadows, such as Nikon’s Active D-Lighting and Canon’s Auto Lighting Optimizer, have been disabled.) Now is a good time to check your histogram: naturally, it won’t be the gentle peaks and troughs you’re used to, but you want to avoid blowing the highlights completely.
You might find that, despite your best efforts, you can still see unwanted detail in your silhouettes, in which case you can always dial in a few stops of underexposure using the exposure- compensation dial. Creating silhouettes goes against quite a few natural photographic instincts, so be prepared to experiment and don’t hesitate to bracket exposures if you think it’s necessary.
Silhouettes while featuring recognisable subjects, still carry an air of abstract about them. Image by Nigel Atherton
Refining your focus
We know that autofocus systems need light, contrast and detail to work effectively, but when shooting silhouettes one of these elements – detail – is distinctly lacking. Thankfully, there are several ways to guarantee sharp shots.
One option is to set a relatively small aperture, such as f/11, which will provide enough depth of field to allow for small errors in focusing. (Using a small aperture also helps to limit chromatic aberration, which is especially obvious in high-contrast scenes.) If you do use a small aperture, try to keep the ISO as low as possible because noise is more noticeable in shadow areas, which is essentially what your subject comprises.
Another, much more precise method is to switch the camera to manual focus and train your lens on the point where the outline of the silhouette meets the bright backdrop – in other words, the area where contrast is at its greatest. For the best results, combine the methods.
Silhouettes make a bold statement, adding mystery and drama while also suggesting solidity and permanence. Including a prominent black shape in the frame also draws attention to the space that surrounds it, offering plenty of opportunities for playing with balance and scale. Silhouettes are more than just a novelty.
Studio silhouettes
Shooting outdoor silhouettes can be a challenge. However, working in the studio allows you take charge of the entire process, from the backdrop to the strength of the light.
- The first consideration is the background – it needs to be plain, light and preferably free of texture or complex patterns. It might be coloured, but you can always use gels on your lights to transform a white backdrop into a wash of green, blue, red and so on.
- The next step is to position your lights (or off-camera flash) behind the subject, pointing towards the backdrop. The idea is to create a wide flood of light that will bounce off the background. You may need to play around with the distance between the light and the background in order to achieve the effect you desire. The closer they are, the more immediate the fall-off.
- Once you’ve got the basics you might like to experiment with partial silhouettes (allowing a small amount of light to hit the front of your subject to reveal select details) or rim lighting (creating a thin line of light around your subject, highlighting its outline).
________________________________________________________________________________________________________
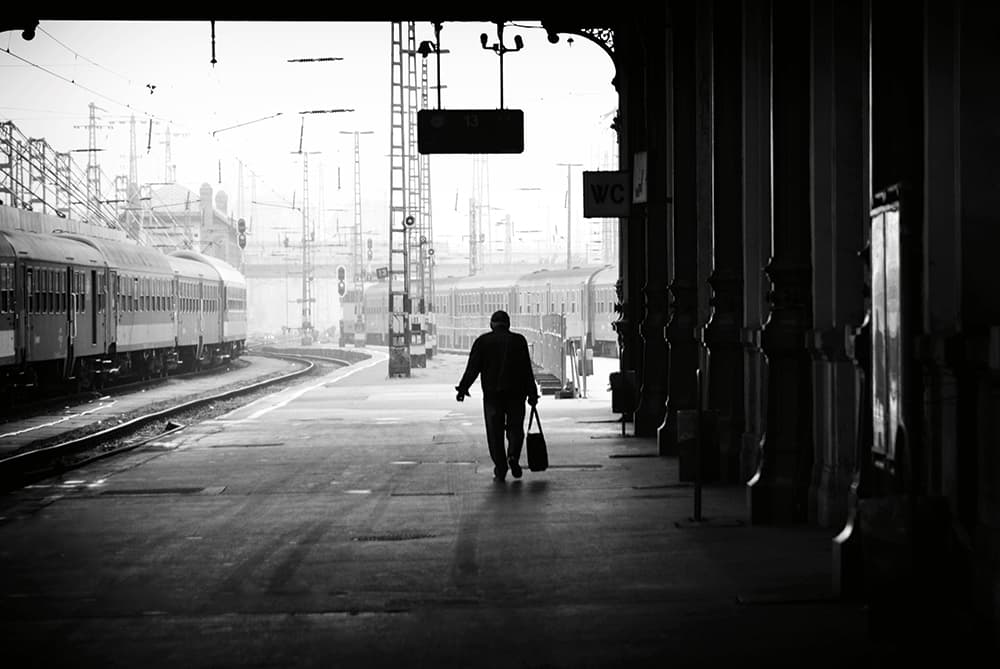
Tom Dempsey: Travel silhouettes
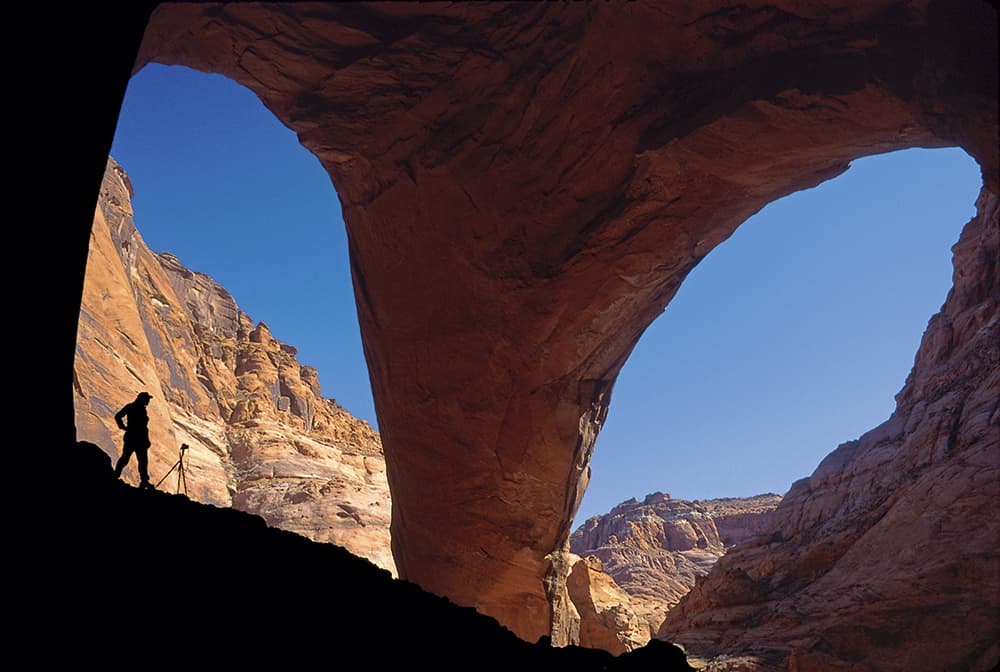
It’s impossible not to marvel at the photogenic Wrather Arch in Paria Canyon, northern Arizona, USA. Image by Tom Dempsey
Tom bought his first camera in 1978, and in 2009 he wrote Light Travel: Photography on the Go, a paperback sharing what he had learned from more than 30 years on the road. You can see more of Tom’s photography at www.photoseek.com.
‘For me, silhouettes turn a photograph into a kind of Rorschach test,’ says Tom. ‘Details are reduced down to a stark black outline, and the viewer’s eye switches rapidly from positive to negative space, adding a sense of atmosphere, mystery and drama. Subjects with recognisable outlines, such as human and animal figures, make the strongest silhouettes, but it’s important not to let the shapes overlap.

Trekkers against the face of Fang in Nepal. Image by Tom Dempsey
‘To obtain a good exposure, I take a meter reading from a medium tone in the bright background, being careful not to blow the highlights. Focusing is simply a case of training the lens on the edge of the silhouette, taking a shot, and then reviewing it on the LCD screen at 100%.
‘The equipment I use for creating silhouettes really tends to depend on the subject I’m shooting, but the Sony Cyber-shot DSC-RX10 III is now my ultimate travel camera. Its weather-sealed body includes a f/2.4-4 lens that’s super-sharp throughout the 24-600mm equivalent range. Unless the subject is moving, I tend to use aperture- priority mode, and shoot raw to give me plenty of scope in post-production. I leave the ISO set to auto, for convenience, but I try not to let it get above 640, and if I think I’m onto a real winner I will drop it to 100. I don’t tend to bracket, because I know that the raw will give me plenty of dynamic range to play with later. It should go without saying that cameras do not see the way humans do, so it’s essential to carry out some work in Adobe Lightroom so the files match your original vision.’
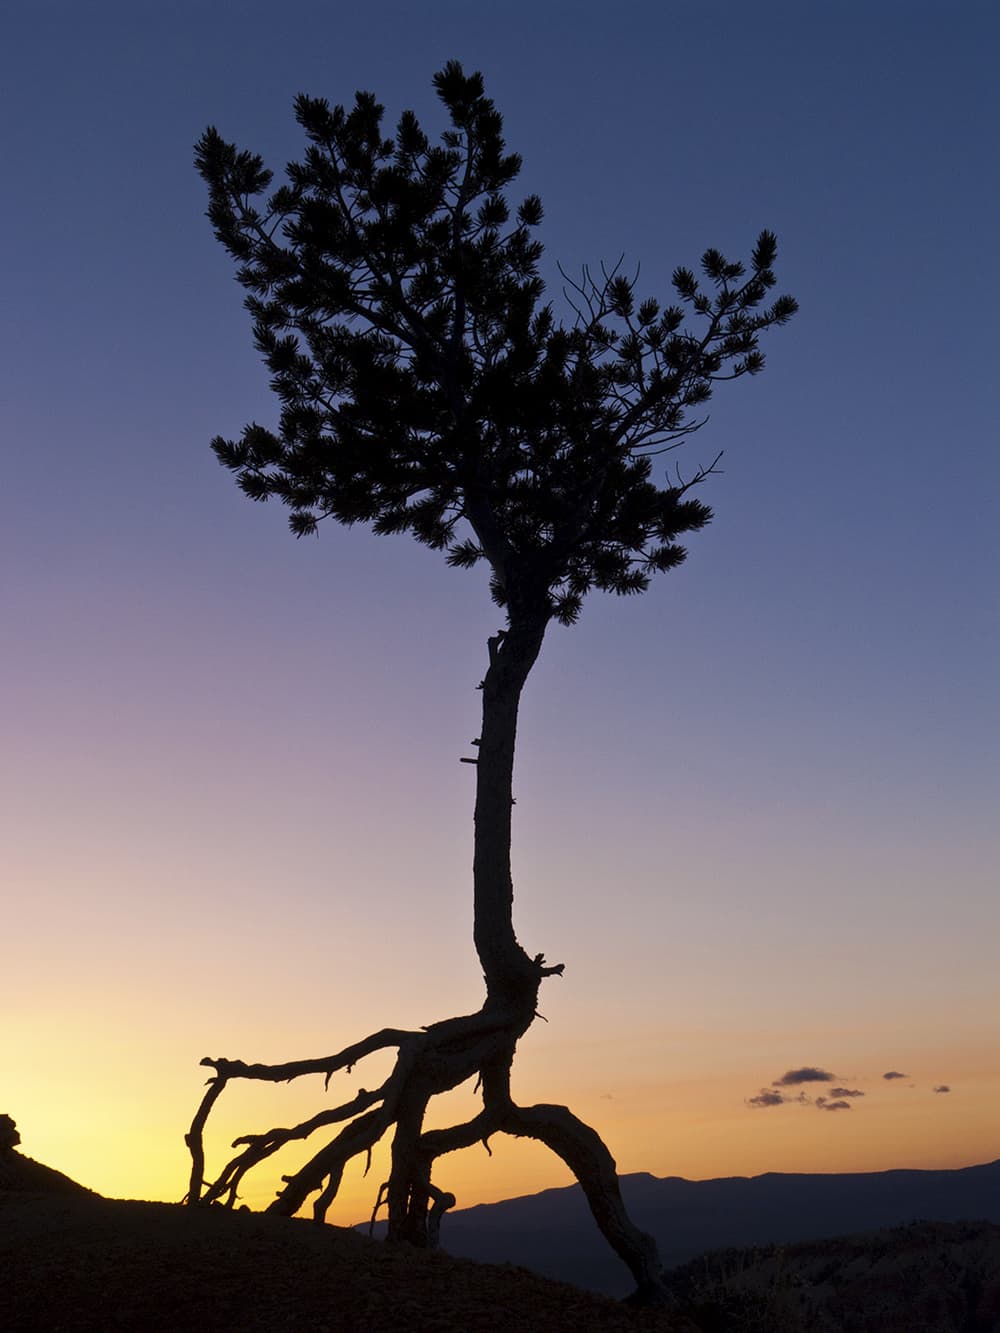
This tree, with its exposed roots, made for a great sunrise silhouette at Bryce Canyon National Park in Utah, USA. Image by Tom Dempsey
Tom’s top tips
- Expose for the background.
- Focus on the edge of the silhouette.
- Experiment with different points of view.
________________________________________________________________________________________________________
Laurent Baheux: Wildlife silhouettes
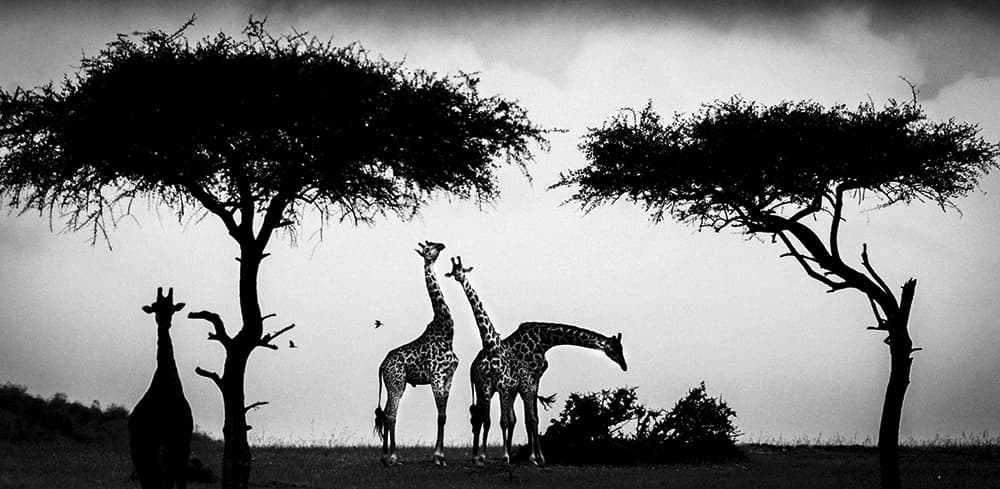
Successful silhouettes require subjects with distinctive outlines, like trees and giraffes. Image by Laurent Baheux
Laurent has travelled the world shooting some of the planet’s last remaining protected areas. Laurent is a UNEP Goodwill Ambassador, and also a supporter of WWF and the GoodPlanet Foundation. You can see more of his photography at www.laurentbaheux.com
‘Most of my work captures simple, everyday scenes shot in atmospheric locations,’ says Laurent. ‘I enjoy shooting silhouettes because they allow me to focus purely on light, contrast and shadow – the very essence of black & white photography. Big mammals, such as elephants and giraffes, make perfect subjects because their shapes are so distinctive. In my line of work I have to be an opportunist – every safari is seen as a new adventure, even if I have been to the same location many times.
‘One thing that remains the same is my approach: I keep at least 20 metres from most of my subjects to avoid any disturbance. I like to have complete control over my pictures, so I tend to shoot in manual mode and use manual focus – autofocus can be a bit hit and miss with silhouettes anyway. I take a spot-meter reading from an especially light part of the scene, lock it in and turn my attention to composition.
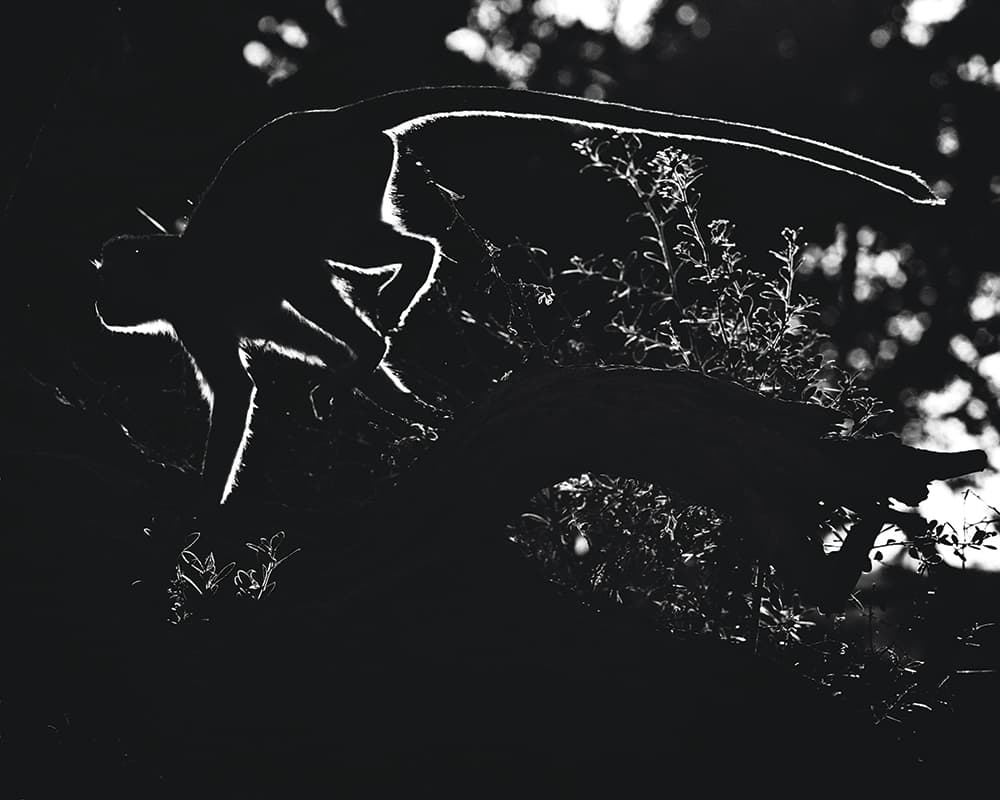
The sun created perfect rim lighting in this baboon portrait, bringing out the texture of its fur. Image by Laurent Baheux
‘All my wildlife work is shot using a Nikon D4 or a D800, and my favourite lens is an AF-S Nikkor 800mm f/5.6 VR. I like high contrast and deep blacks (I’m inspired by Sebastião Salgado), so I carry out quite a bit of work in Adobe Lightroom – mainly boosting contrast and counteracting the effects of fog or glare.’
Laurent’s top tips
- Shoot early in the morning for fog and sweet light.
- Ignore details and colours, and concentrate on forms.
- Where possible, include trees in your silhouettes; they almost always improve the composition.
________________________________________________________________________________________________________
Erwin Vindl: Street silhouettes
Getting down low can increase the separation between the background and the subject. Image by Erwin Vindl
Based in the city of Innsbruck, Austria, Erwin has plenty of raw material on his doorstep, but he also likes to travel to gain fresh inspiration and meet other photographers. If you’d like to see more of Erwin’s photography, visit www.whynotart.at
‘The technique of creating silhouettes in an image appeals to me because I know that the viewer’s attention will be taken directly to the main subject,’ says Erwin. ‘Of all the things you can shoot, my preferred subjects tend to be people, but I believe that every photograph should tell a necessary story. With that in mind, I try to put people into some sort of context. Sometimes I will find the perfect location but there are too many people milling about, so I have to wait for things to settle. Patience is incredibly important in this respect. I’d say the main thing is to make sure that the background is uncluttered as this will help to create separation between the two elements.
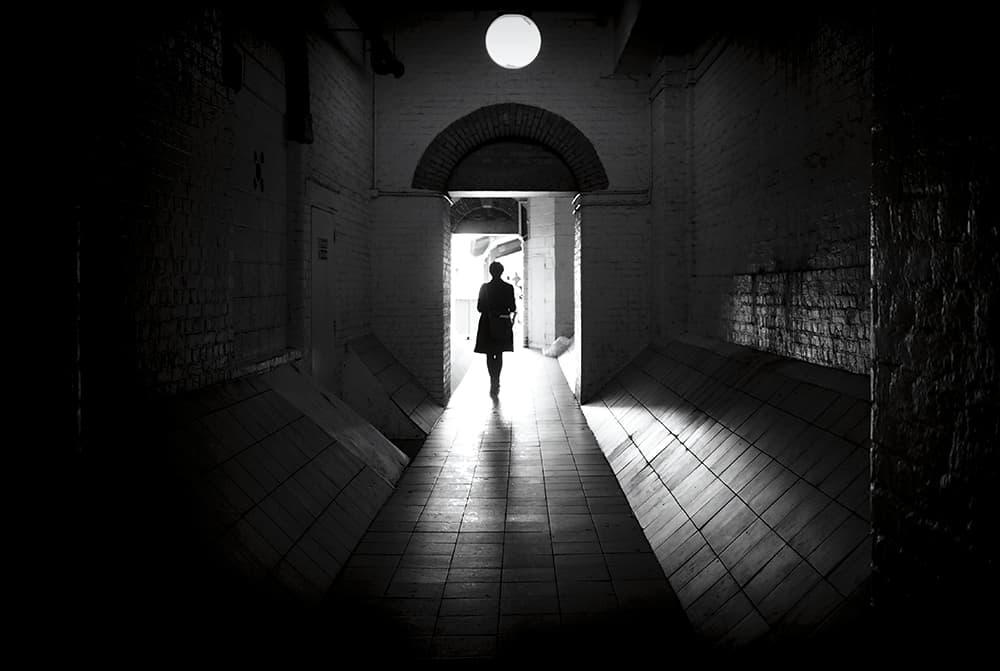
Passageways make excellent framing devices, and the light entering them can highlight architectural details. Image by Erwin Vindl
‘I’m a big fan of passages as they make excellent framing devices, and I often get down low for maximum impact. It’s also important to remember that you don’t have to limit yourself to shooting in daylight; you can use streetlights and shop windows as your main source of light. To obtain a dark silhouette I take a meter reading from the brightest part of the background but, for me, it’s more important to catch the moment than to worry about settings, so I tend to use program mode – as a result, I will often need to dial in a few stops of exposure compensation.
‘Personally, I don’t find the act of focusing to be a problem, because there is plenty of contrast in my shots. My camera of choice is an Olympus OM-D E-M10 Mark II with an M.Zuiko 17mm f/1.8 lens. I crop, adjust contrast and increase sharpness in post-production.’
Pictures should tell a story, so I try to give my subjects some sort of context. Image by Erwin Vindl
Erwin’s top tips
- Find a good location and wait for an interesting subject to enter the scene.
- Get down low, as it can often help to separate the subject from the background.
- Keep it simple – less is sometimes more.
________________________________________________________________________________________________________
Chris Thompson: Portrait silhouettes

The human form, and bare trees, make ideal subjects due to their distinctive shapes. Image by Chris Thompson
Chris can often be found in abandoned buildings and tunnels in the middle of the night. When he’s not waving lights around in the dark he works as a self-employed interior design consultant in Nottinghamshire. Visit www.flickr.com/people/fastchris
‘For me, silhouettes provide a frame to fill with other lighting effects,’ says Chris. ‘The human form makes ideal subject matter, but I’m also a fan of sculptures – although it can be hard to access these at night. First I work out what I want to place inside the silhouette, then I decide how to pose the main subject. As with traditional silhouettes, I expose for the background, but this is where the similarities end. For one, I have my camera in manual mode, but with the shutter speed set to bulb. I control the exposure for the different intensities of light using the aperture and, sometimes the ISO value. Once I have captured enough light in the background I replace the lens cap without ending the exposure, and prepare for the next part of the shot – this is called the “lens-cap trick”. What’s more, my main light source is not the sun: I use torches, flashguns with coloured gels and lasers.
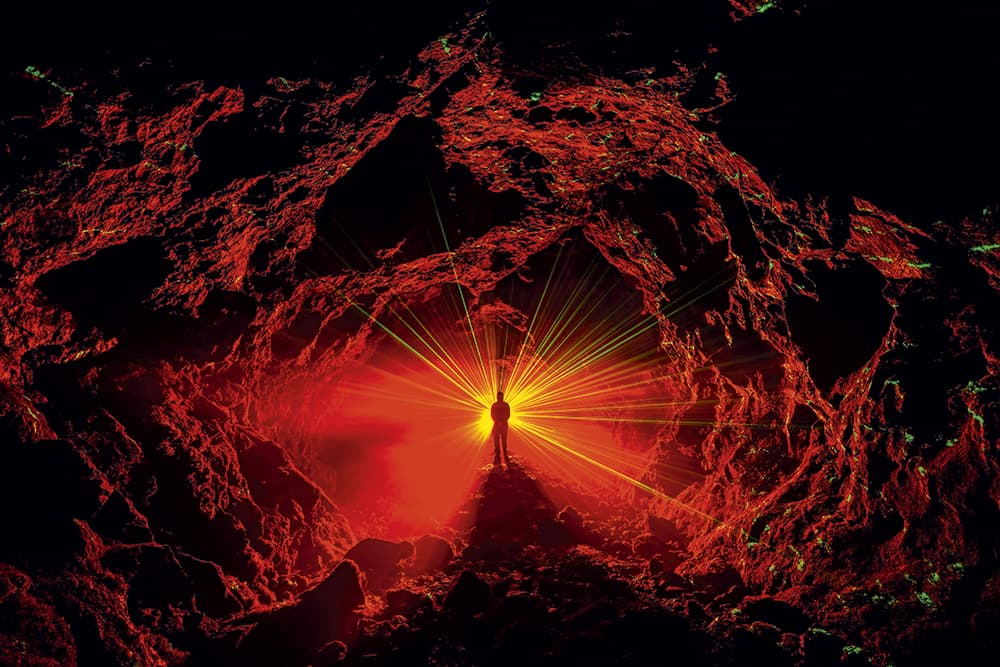
The light spilling onto the roof and sides of the cave picks up the texture of the rock. Image by Chris Thompson
‘I use a Sony Alpha 7 with a Zeiss 16-35mm lens and various old Nikon full-frame lenses, but my rucksack is packed with light-painting tools – most of them handmade. My torch of choice is the LED Lenser X21R.2. Like most light painters, I aim to get everything right in-camera, so my post-processing is usually limited to cropping, basic adjustments to levels and sharpening.’
Chris’s top tips
- Use a flashgun to freeze the silhouette.
- Always use a tripod for light-painting portraits.
- Ask your model to try a few different poses.
________________________________________________________________________________________________________
Enhancing silhouettes with Lightroom
Wildlife photographer Ben Hall shows how to edit your silhouettes
1. Colour balance
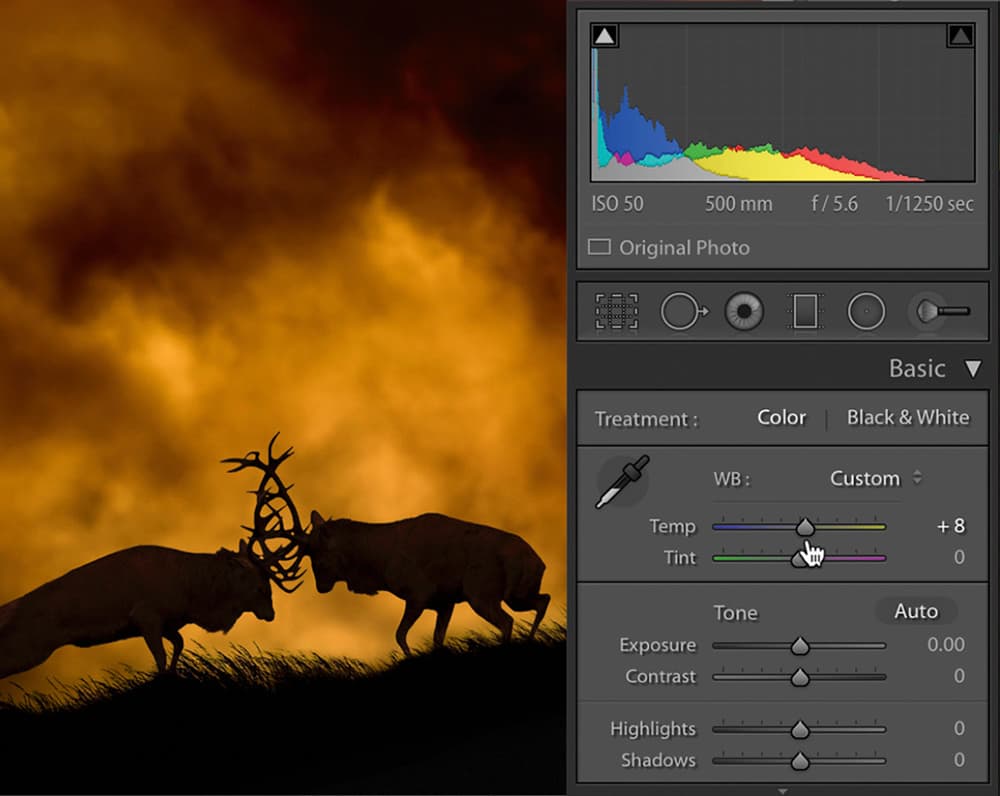
First, set the white balance. For precise control, use the Colour Temperature slider to make the colours in the image appear warmer or cooler. It is also possible to alter the amount of green and magenta in the image by using the tint slider.
2. Setting the white point
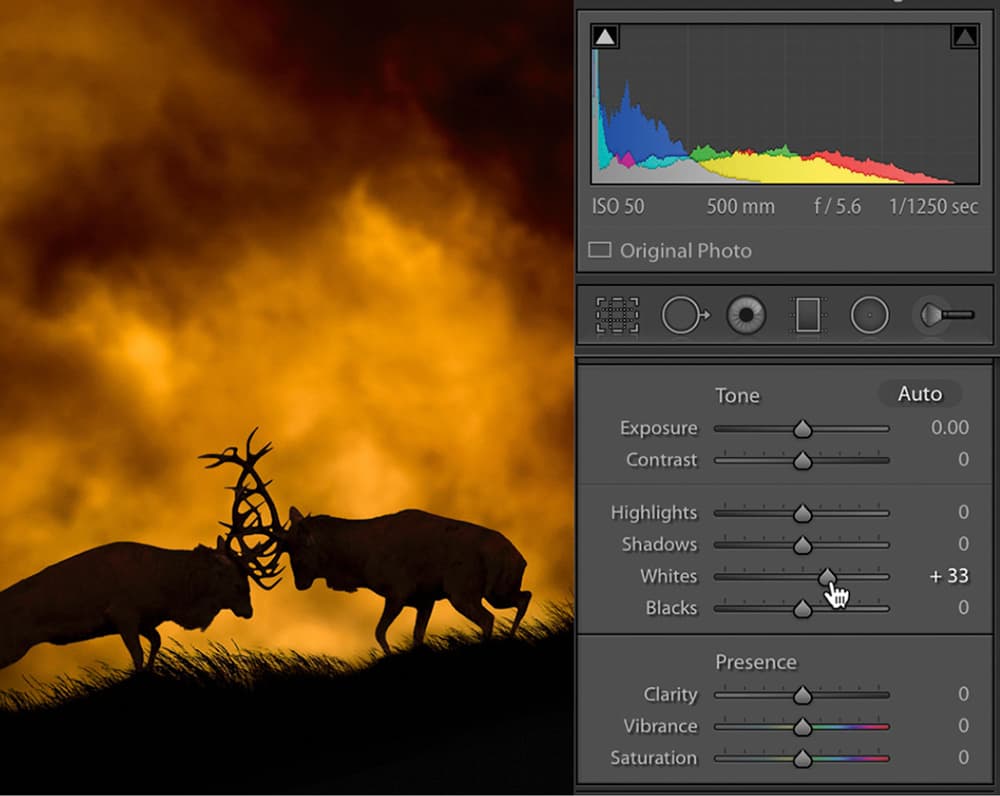
To set the white point, drag the slider named White to the right. For best results, hold down the Alt key as you adjust the slider – you’ll see the image turn black. Continue dragging and stop just before you see the first sign of colour appearing (this indicates loss of detail).
3. Setting the black point
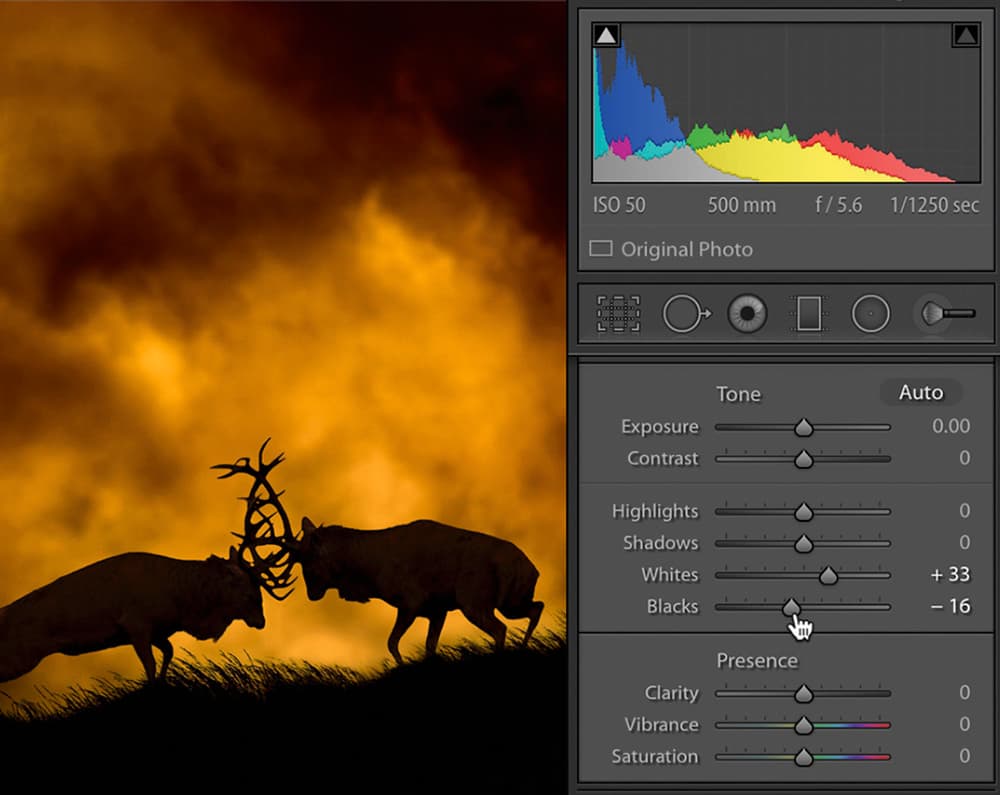
Perform exactly the same action as above, this time using the Black slider and sliding it to the left. Loss of shadow detail is not as important when it comes to silhouettes, and in most cases a jet-black silhouette is preferable. With this in mind, holding the Alt key down is not always necessary.
4. Adjusting midtones
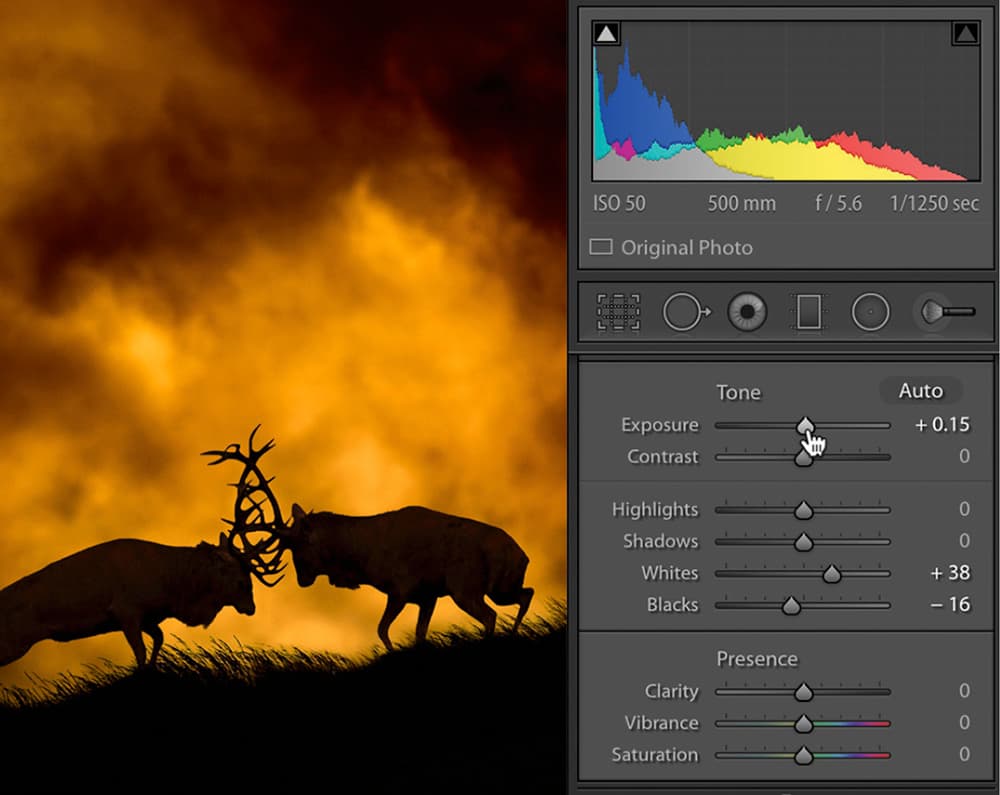
Once you have set the white and black points it’s now time to judge the brightness of your image. At this point it may look correct, but if the overall image appears too light or dark, you can just use the Exposure slider to adjust the midtones and tinker until you’re satisfied with the results.
5. Colour saturation
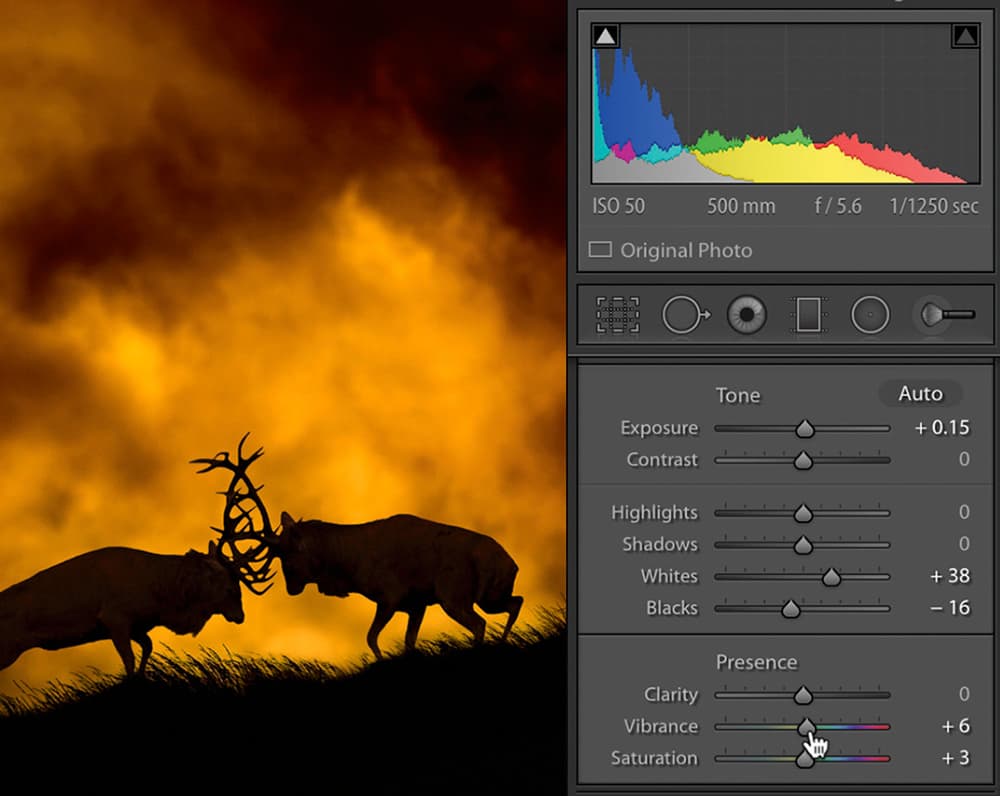
There are two sliders that can help to bring the colours to life – Saturation and Vibrance. Saturation increases the intensity of all the colours by an equal amount, while Vibrance only affects the more muted colours. But make sure you don’t overdo it!
6. Target adjustments

The Targeted Adjustment tool lets you alter specific tones and colours. Click on the small circle in the top left window of the Develop module, then Saturation. Now, click on the tone you would like to edit and drag up or down to change the intensity of that colour.
________________________________________________________________________________________________________
Kit list
Nikon D810
With a 36.3MP FX-format sensor and an ultra-wide ISO range (64-12,800), the Nikon D810 is a great DSLR for silhouettes. Make sure the Active D-Lighting is switched off before you start shooting silhouettes.
Nikon 800mm f/5.6E FL ED VR
When you’re shooting silhouettes of skittish (and sometimes dangerous) wildlife, it’s a good idea to keep your distance. The AF-S Nikkor 800mm f/5.6E FL ED VR lens includes a 1.25x teleconverter that extends the focal length to 1000mm.
Sony A7R II
A palm-sized camera such as the Sony Alpha 7R II, with its high sensitivity and 42.4MP sensor, is ideal for night shoots.Oneofthemain benefits is that you can attach a huge range of Canon and Nikon lenses to the camera using lens-mount adapters.
LED Lenser torch
The LED Lenser X21 R.2 torch features seven LEDs, making it a bright, consistent light source for nocturnal photography. The beam provides an intense spotlight (from a distance) and a flawless flood light (up close). It’s also robust and rechargeable.