
If you’ve ever watched Spielberg’s 1975 blockbuster Jaws you’ll know that the greatest shark presence in the movie is not the 25ft fibreglass fish surfacing from the water, but the film score by John Williams. Watch the movie with your hands over your ears and it’s hard to forgive the cartoon-like teeth, dodgy paintwork and laughingly bloated body.
The point being, when it comes to shooting movies, it doesn’t matter whether it’s a Hollywood blockbuster or a friend’s wedding, sound has a crucial role to play in building suspense and delivering narrative. Naturally, the movies you shoot with your DSLR won’t require an epic soundtrack, but they may require the recording of dialogue, music, or the general ambience of a scene. The harsh reality is this: most viewers will forgive poor visuals, but they won’t forgive poor sound quality.
Built-in microphones
Recording crisp, clear sound requires commitment and, occasionally, a few extra pieces of kit, but the end result is well worth the outlay. While it might seem a little daunting at first, achieving good sound quality is often just a case of choosing the right tools for the job.
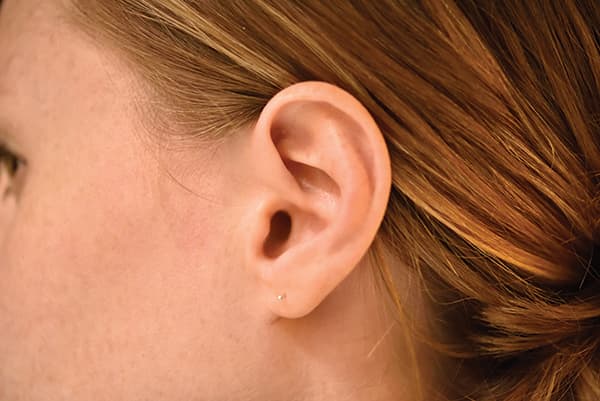
Let’s start by looking at the basics of achieving a decent quality of sound. Any Nikon DSLR that can record video footage comes with a built-in microphone. This device takes the form of a series of holes in the front of the camera. Older DSLRs have one set of holes, which means they record in mono, while more recent models have two sets of holes, which means they record in stereo. There’s nothing wrong with mono as such, but stereo is considered superior because it’s closer to what we hear with our own ears. Basically, if you have a choice, make sure you buy a camera with a stereo microphone.
The built-in microphone has a few drawbacks, but the greatest one is that it can’t be separated from the camera and positioned more closely to the subject. In addition, it will pick up ambient noise, but it can’t isolate individual sounds in the way a dedicated external microphone can.
Another downside is that as the microphone is situated inside the camera it will pick up mechanical noises made by the lens zooming, or trying to achieve focus. (For this reason you need to get everything prepped before you press the record button, and then rely on manual focus during the clip.) Much like the pop-up flash, the built-in microphone is good for occasional use, but for truly professional results you need to buy a dedicated external microphone.
External microphones
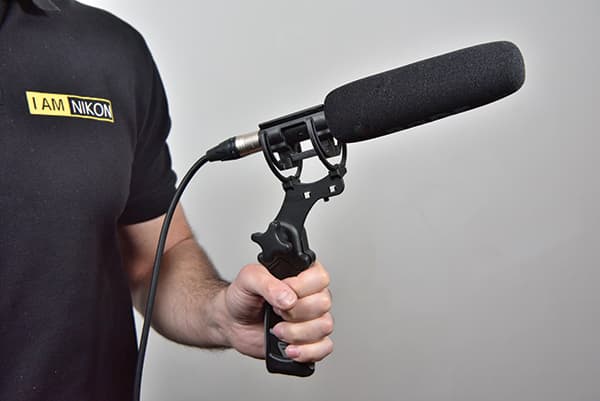
Shotgun microphone
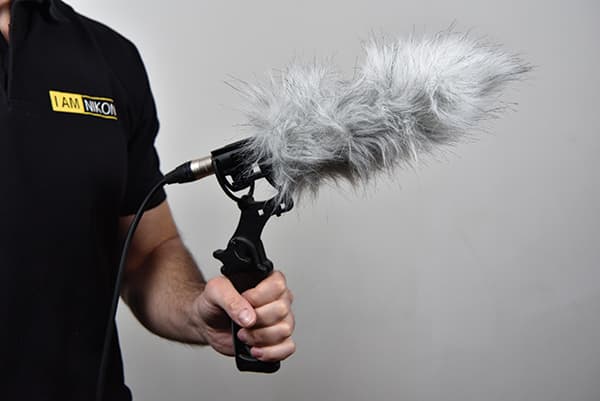
Wind screen
The pick-up pattern of a shotgun microphone is like a long tube extending in front of it. Wind screens are made of foam or fake fur
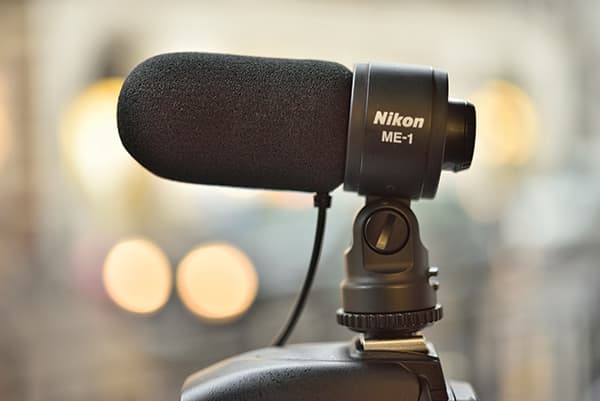
If you’re looking for better sound in general (rather than something more specific), take a look at the Nikon ME-1. This neat dedicated stereo microphone fits into the hotshoe of a DSLR and connects to the camera via a 3.5mm stereo mini plug. The ME-1 features a low-cut filter, which reduces low-frequency noise (such as the hum of traffic), lessens the sound of mechanical vibrations inside the camera (including those created by autofocusing), and comes complete with a wind screen (see above) to reduce the sound of wind blowing over the microphone. It’s a great all-rounder, and can be used on or off camera. You can buy similar products from the likes of RODE (en.rode.com) and Sennheiser (en-us.sennheiser.com).
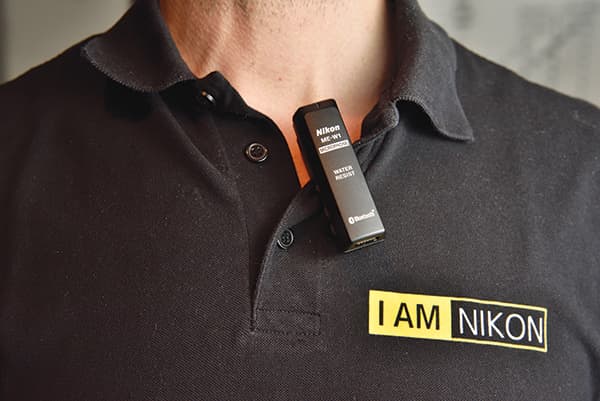
The Nikon MEW-1 wireless microphone is compatible with the Nikon ME-1 dedicated stereo microphone
There are three things you need to look for when buying an on-camera microphone: a built-in shock mount, a low-cut filter switch, and the ability for the microphone to be active. The built-in shock mount resembles a spider’s web made out of elastic bands, and helps to prevent vibrations caused by people walking past the camera, traffic etc from being translated into unwelcome sound. When you start using high-quality equipment you realise just how much our ears and brains actually filter out. Just like a camera, the microphone will record everything faithfully, so you need to let it know exactly what to prioritise.
We’ve touched on the low-cut filter already (it cuts out the lower end of the audio range) but it’s worth mentioning that just as we shoot Raw to give us greater control during post-production, it’s worth turning the low-cut filter off occasionally and fine-tuning the clip using editing software such as Final Cut Pro X. This will enable you to be more selective. Finally, an active microphone is a device that has a small amount of power running through it, which makes it more sensitive and better at picking up sound in general. It might be tempting to forgo a few of these features to save a little bit of cash, but doing so will result in extra work.
Pick-up patterns
If you decide to take things further and choose a microphone for a specific purpose, such as recording an interview, you need to go off-camera, and consider the pick-up patterns of individual devices. Each microphone has a direction from which it picks up the clearest sound (this is known as its pick-up pattern).
There are three main types of pick-up pattern: unidirectional (or cardioid), bidirectional, and omnidirectional. Let’s look at each of these in turn. Cardiod microphones pick up sound from the front (which is perfect for singers). Bidirectional microphones pick up sound from both the front and the rear (perfect for two people in conversation). Omnidirectional microphones pick up sound from all around (perfect for recording groups of people).
As you can see, it’s vital that you consider which pick-up pattern will best suit your subject. By way of an example, if you decide to use a lavalier (or tie) microphone with an omnidirectional pattern you can attach it to your subject safe in the knowledge that you don’t need to point it directly at their mouth because the sound will be picked up from all around. Naturally, the downside of this is that the microphone may pick up unwanted sounds from elsewhere. Compromises have to be made, but a good rule of thumb is to buy the best you can afford, and get as close to the sound source as you possibly can.
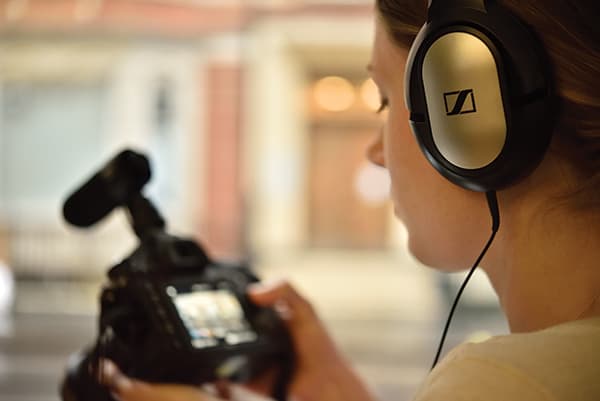
Headphones
It’s essential to wear a set of headphones to monitor the sound during and after the recording. (If you own a DSLR without a headphone socket you’ll have to make a judgement based purely on the audio input levels). It can be tempting to buy an expensive set, but hold back because some of these are designed specifically to enhance the bass, which is great for music lovers but not so good if you want an honest account of how your clip will sound. What you need is a set of entry-level headphones (around the £20 mark) with a flat profile, which allows you to hear what’s going on – warts and all.
The headphones should cover your ears entirely in order to isolate the sound, so in-ear types are out. Of course, you could invest in a set of seriously high-end studio headphones, but it’s really not worth the extra outlay. You don’t need to spend a fortune to get professional quality sound, but you do need to use the right tools, and approach the job in a professional manner.
Wind reduction
Recording an audio clip outside presents a number of challenges, but the most obvious is wind noise. Some DSLRs (such as the Nikon D750) come with a Wind Noise Reduction setting, activated via the Movie Shooting Menu, which deadens the sound of wind. But this feature only works on the built-in microphone – external microphones have low-cut filters to help them deal with the problem.
If you’re using an off-camera microphone outside it’s worth slipping a windshield or wind screen over the end. These devices are made of foam or fake fur and work by isolating wind noise, while (in many cases) preserving high frequency. They are also known, rather charmingly, as dead kittens. A good rule of thumb is the more wind you encounter the more fluff you will require.
Audio input levels
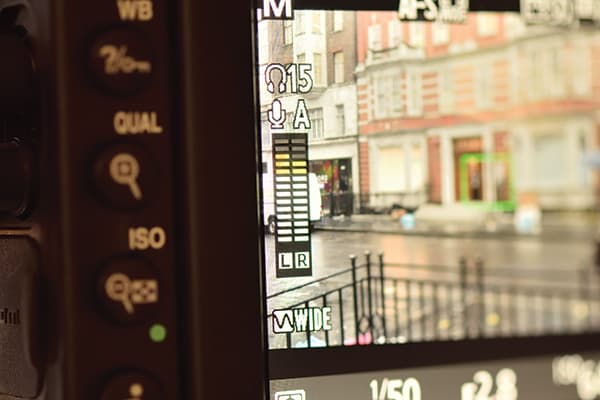
When you shoot a video clip in live view, the LCD screen displays two audio input levels that change from white to yellow to red. Listen using headphones while observing these input levels, and adjust accordingly. Try to keep the indicators in the white zone; if they stray into the red zone the sound is pretty much unrecoverable. Turn the input higher or lower until the loudest thing you can hear just about touches the yellow zone. Make sure the in-camera audio is clear, because if you’re using an off-camera microphone you’ll need to use this information later to sync the files.
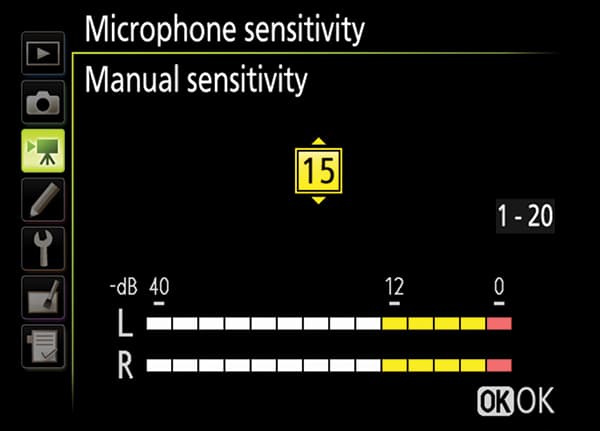
Adjust the sensitivity of the audio input until the loudest thing you can hear just about touches the yellow zone

If the indicators stray into the red then the sound will be clipped
Step by step: Setting up your Nikon DSLR to record high-quality sound
Step 1
Listen carefully to assess the audio situation. Pay attention to background noises such as traffic, machinery and aeroplanes, as well as primary sources.
Step 2
Use the right microphone for the job. Consider how far away the subject is from the microphone, and bear in mind that different mics have different pick-up patterns.
Step 3
Put on your headphones. Ask the subject to speak, and check the audio input levels on your camera. Adjust them until the markers are consistently in the white zone.
Step 4
Press Record. Remember that any mechanical sounds made by the camera will be heard on the audio clip, so make as many adjustments as you can before shooting.
Step 5
Review the audio clip using headphones. Check none of the audio input levels has strayed into the red zone where the sound will be clipped.
Words and pictures by Mark Higgins


