Adobe Lightroom Classic is the go-to image organisation and editing software for many photographers. It combines an excellent cataloguing system with what many regard as industry-standard image editing controls, drawing on the same raw-file processing engine as Adobe Camera Raw.
DxO, meanwhile, has a background in analysing lenses and cameras to enable it the correct their flaws. This information feeds into DxO PhotoLab 4 in the form of correction modules that are downloaded and installed for each camera and lens combination used to create images. DxO PhotoLab 4 is compatible with raw files from over 400 digital cameras and there are modules available for over 60,000 camera and lens combinations. You can try PhotoLab 4 for free.
However, it’s worth mentioning at this point that Fujifilm cameras with X-Trans CMOS sensors are a notable exception as the software is currently not compatible with their raw files. As well being able to correct optical flaws such as vignetting, lack of sharpness, chromatic aberration and distortion automatically, and giving you control to increase or reduce those corrections if you want, DxO PhotoLab 4 has a collection of controls for making global and local adjustments to the exposure, contrast and colour of images. It also introduces the latest incarnation of DxO’s denoising technology, DeepPRIME. DeepPRIME is powered by artificial intelligence and ‘deep learning’ to inform its ability to reduce the amount of noise visible in images without the smoothing and loss of detail that’s seen with some other noise reduction systems.
It builds on DxO’s previous system, PRIME, which together with an even older noise reduction method (HQ), is still available in PhotoLab 4. Even a quick comparison is enough to see that DeepPRIME is a better noise reduction method that PRIME and HQ, but how does it compare against Lightroom’s noise reduction algorithm?

Adobe Lightroom noise reduction
Lightroom Classic’s noise reduction tools are located along with the Sharpening controls in the Detail section of the Develop control panel. The latest version of Lightroom Classic has six sliding controls over noise reduction, as a rule, it’s best to use the Color control first to remove the chroma noise (coloured speckling). By default, this set to 25. If you drag the sliding control to the left, reducing the value to 0, you’ll see the image with no noise reduction applied.
Gradually move the Color control to the right to conceal the noise, but keep an eye on the detail level and don’t overdo it. The main image preview shows the impact of these settings, but there’s also a small preview window just above the controls that shows a section of the image at 100%. You can click and drag on this to select a different area to preview, or click on the selection icon at the top left of the preview, then click on the part of the image that you want to see.
You can also use the Detail and Smoothness controls to refine the colour noise reduction. By default, these are both set to 50. The Detail slider controls the colour threshold and is useful for retaining colourful edges. Meanwhile, the Smoothness control is helpful when you have large areas of uniform colour – or large areas that SHOULD be a uniform colour. Next, tackle the luminance noise using the Luminance slider. Moving it to the right to increase the level of noise reduction conceals the granular texture that’s a feature of high-ISO raw images.
However, if you push it too far, the image starts to look too smooth and detail is lost. You can counter this to an extent with the Detail slider, which adjusts the threshold and reduces the degree of noise reduction that’s applied as you increase its value. Use the Contrast control to restore some of the contrast that is lost as a result of the noise reduction. Applying noise reduction in Lightroom is a balancing act. Aim to set the Color noise reduction to a point just after the coloured speckling disappears, don’t push it any further than it needs to go. Be even more conservative with the Luminance control as generally, a little texture is more acceptable than a smooth image.
DxO PhotoLab 4 DeepPRIME noise reduction
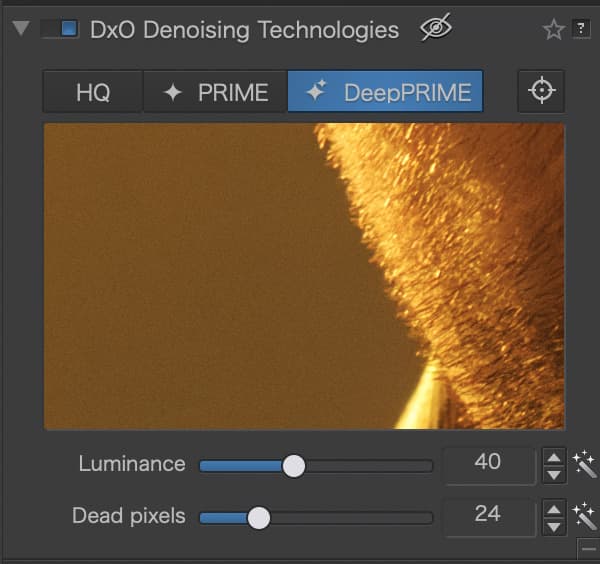
DeepPRIME is located in the Detail section of DxO’s PhotoLab 4. It’s not activated by default, but all you have to do is click on the DeepPRIME button and the noise reduction is fired-up. By default, the Luminance slider which governs how much luminance noise reduction is applied is set to 40 and the Dead pixels slider is set to 24. These settings work well for the images I’ve tested DeepPRIME with, but it’s worth experimenting and having a look around the image to be sure that you’re happy.
DxO applies the noise reduction at the export stage and you can’t preview its impact in the main image preview at the centre of the screen, but there’s a small preview window in the DxO Denoising Technologies panel. There’s crosshair type icon just to the right of the DeepPRIME button. If you tap on this to turn it blue, you can then click on the main image to select the area to preview.
Head to head comparison
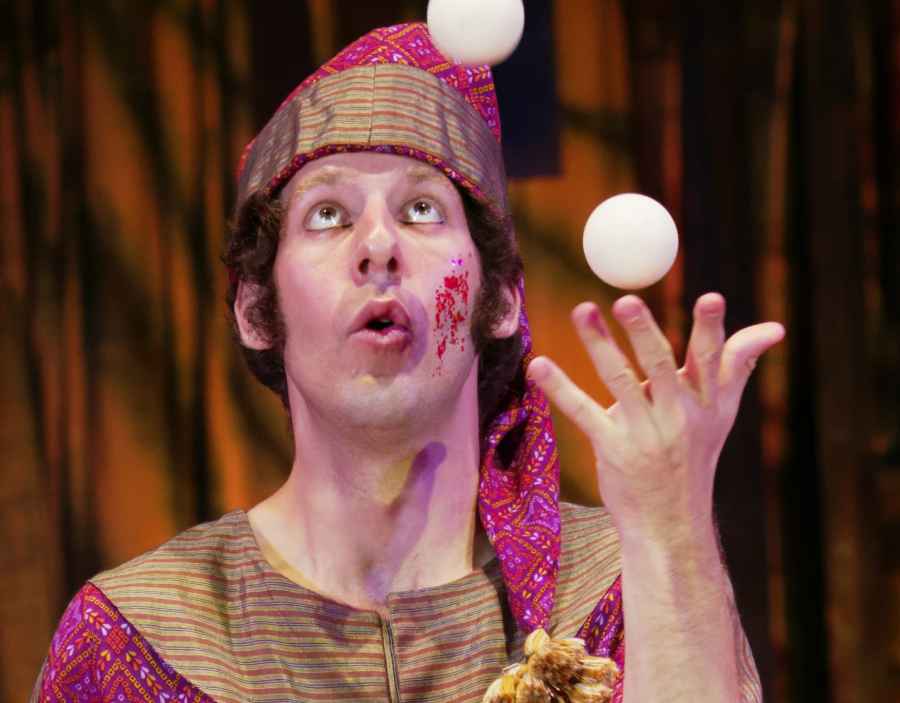
This image was shot on the Olympus OM-D E-M1 Mark II at ISO 3200 in very testing conditions. (You can click on any of the images to open a full-size version for detailed examination.)

PhotoLab 4
Although the results are fairly similar, a close look at the subject’s chin and the hairs on his forearm reveal that DxO PhotoLab 4 has retained more fine detail.

Lightroom
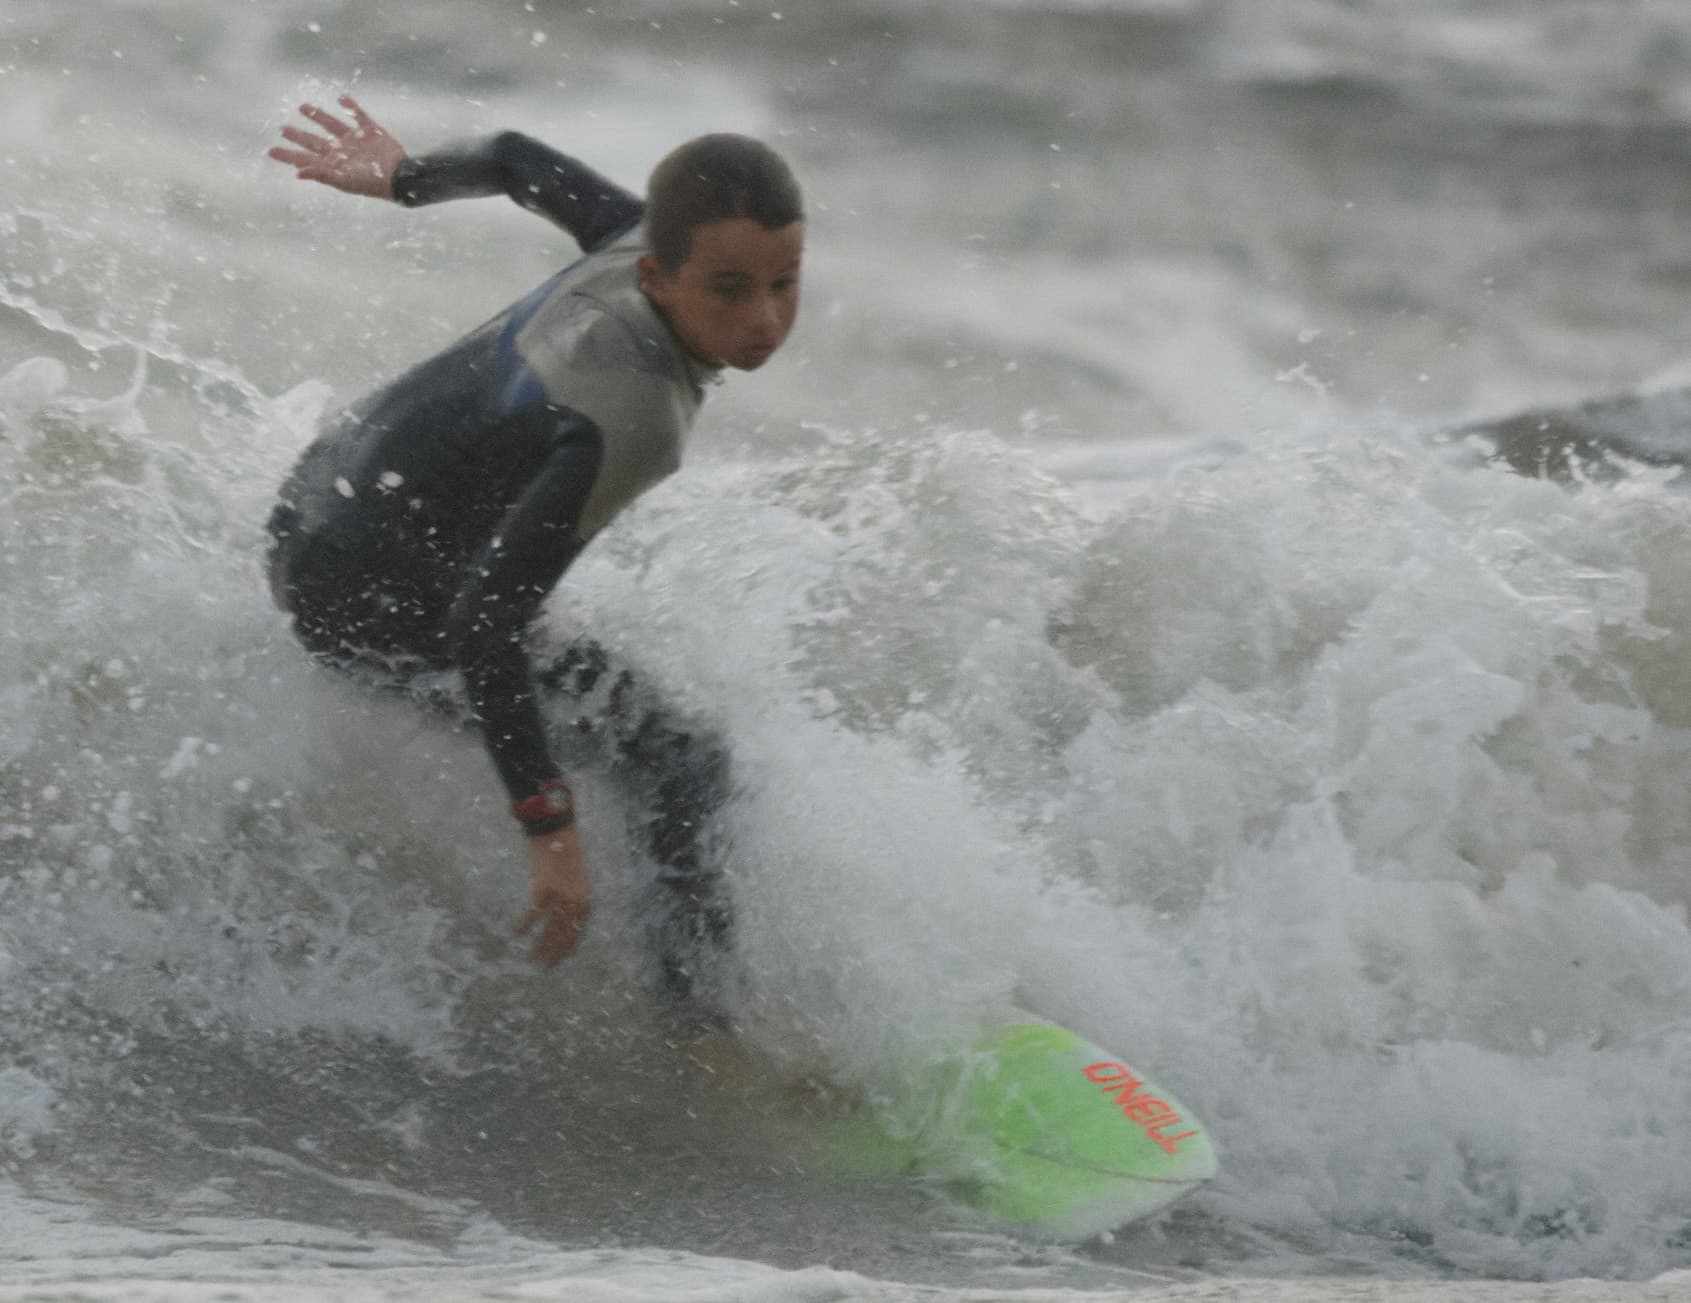
This surfer image below was shot on the Canon EOS 5D Mark III at ISO 10,000.
PhotoLab 4
Although the white balance was set to the same value in both softwares, these two images have slight different colours. Apart from the white balance, the only adjustment applied to this image is the noise reduction. There’s not much detail in the boy’s face and Lightroom’s noise reduction settings took some balancing, but the result produced in a matter of a few seconds in DxO PhotoLab 4 is better. There’s less noise and more detail visible – even the logo on the surfboard is clearer.

Lightroom
This final image was shot on the Canon EOS-1D Mark IV at ISO 4000.
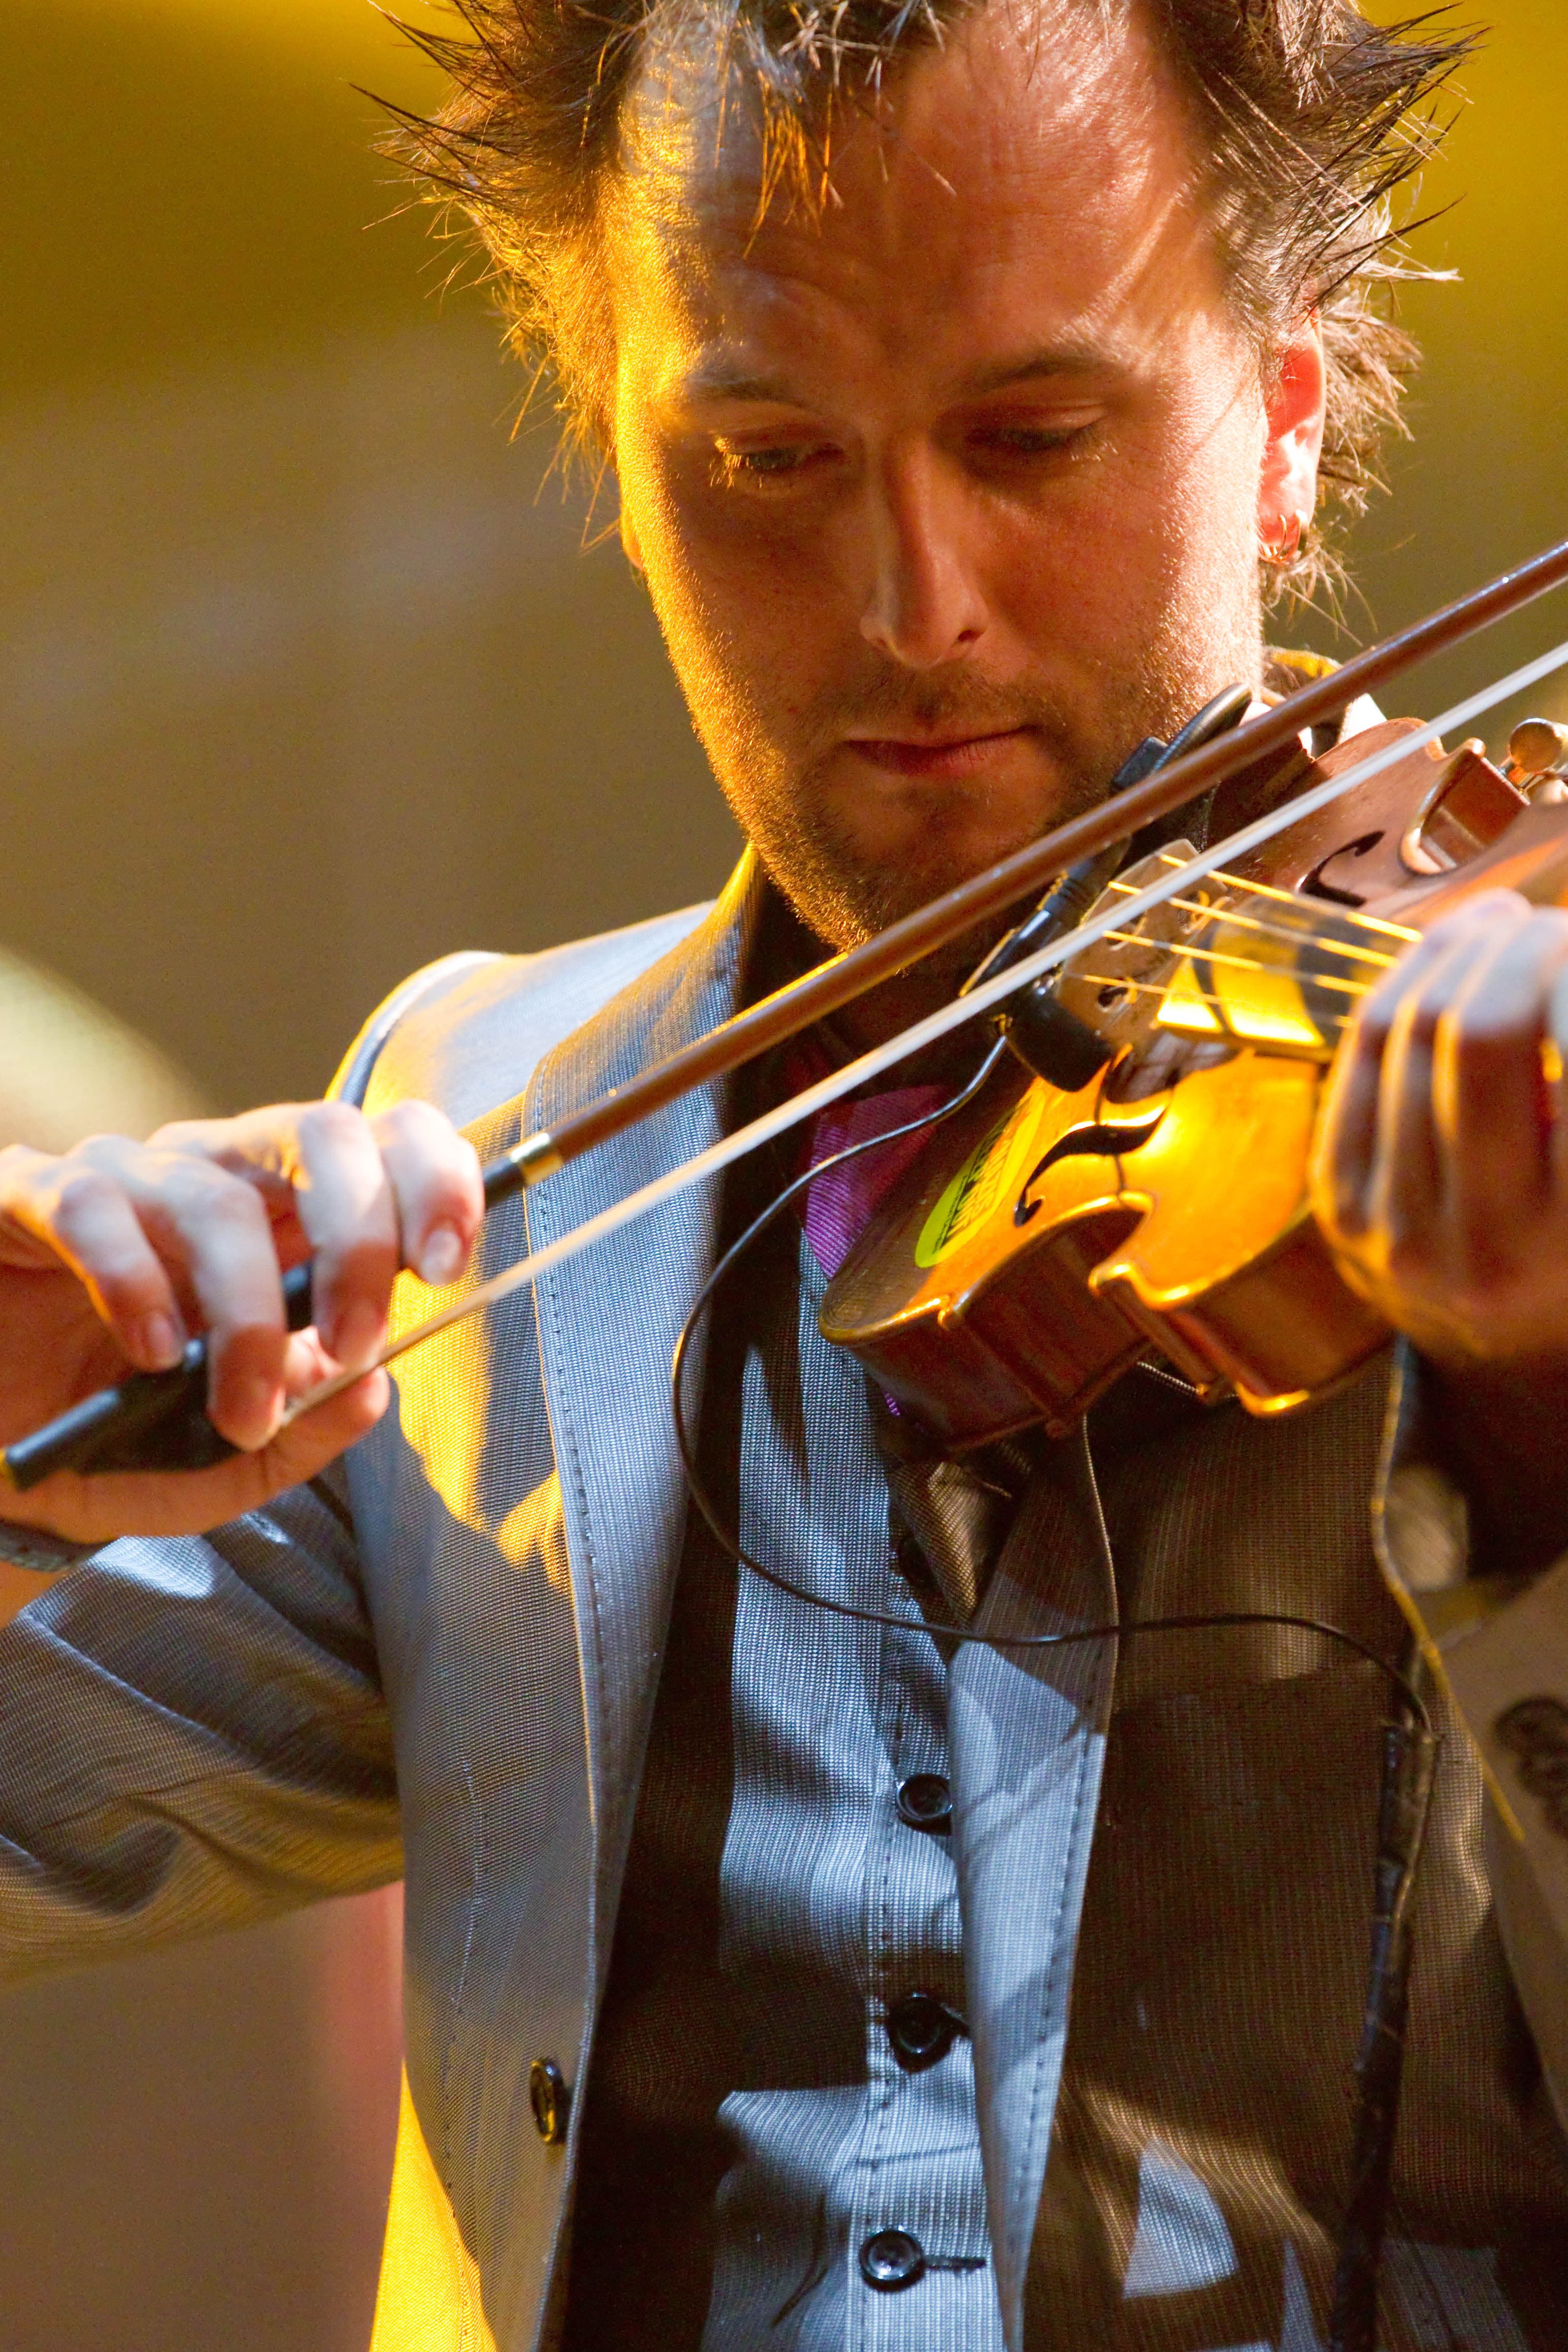
Lightroom…
Lightroom’s colour detail, colour contrast, luminance detail and luminance smoothness controls weren’t available for this image dating from 2010. I pushed the Luminance and Color sliders to their maximum value (100), but there’s still some noise visible in the background and on the musician’s face. The result from PhotoLab 4 with DeepPRIME in its default settings is better, the background is almost grain-free there’s less chroma noise on the face.

PhotoLab 4
Verdict
While it’s often nice to have control, part of the joy of using DxO DeepPRIME is that it’s largely automated. With Lightroom you can get good results, but you find yourself adjusting the sliders backwards and forwards, and some controls seem to undo what you’ve achieved with another, so you have to find a balance that you’re happy with. After using the noise reduction controls in Lightroom Classic and DxO PhotoLab, I can get results from Lightroom that I’m pleased with, but the results from DxO DeepPRIME are just a bit better. In some cases DxO’s software does a better job of removing the noise, and in others Lightroom hides the noise effectively but the image doesn’t have quite the same amount of detail as the images after processing in DxO PhotoLab 4. It’s a win for DxO PhotoLap 4 and DxO DeepPRIME.
Further reading
Spectacular noise reduction with new software, says DXO
What is the best software for reducing noise?