1. Abstract architecture
A creative eye is the most important tool for this kind of image. Photo by Phil Hall
Abstract architectural photography may seem like an esoteric art involving lots of specialist knowledge and expensive tilt-and-shift lenses, but with a bit of lateral thinking you can get good results with everyday gear.
Rather than equipment, the biggest requirement is an ability to see shapes and perspectives creatively. You don’t need to live next door to an amazing example of modern architecture, either. Most town centres have at least one or two interesting and striking buildings, while larger cities almost certainly will – be it the new Bullring in Birmingham or the redeveloped docks in Liverpool. As with landscapes, it’s important to spend some time investigating the building from different perspectives before setting up your tripod and blasting away.
- A telephoto lens can make otherwise mundane parts of a building look unusual Wideangle lenses are great for getting in as much of the scene as possible, but ensure background clutter doesn’t detract from your main subject.
- Break the rules and don’t worry about converging verticals. Spirals and other classic compositional devices can also work, so watch out for staircases, fire escapes and other features that create interesting graphic shapes.
- However dramatic your building, the impact of the image will be reduced by a bland grey sky. Consider using an ND filter to bring out a bit of shape in the clouds, or beef up the skies in software, but don’t overdo it.
- While it’s normally OK to photograph privately owned buildings from a public place in the UK, such as the street, you may get challenged if you stray onto land owned by the building. It may be worth asking permission first.
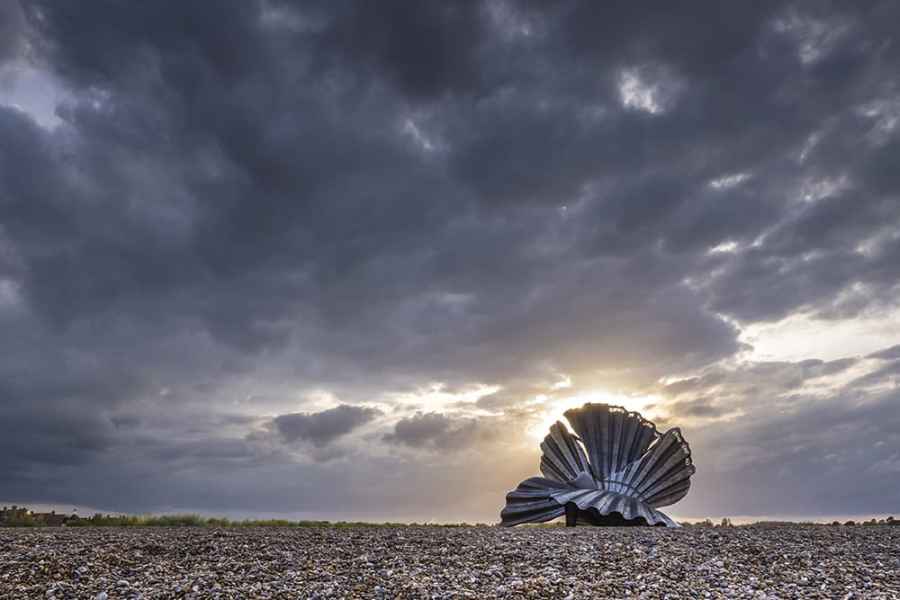
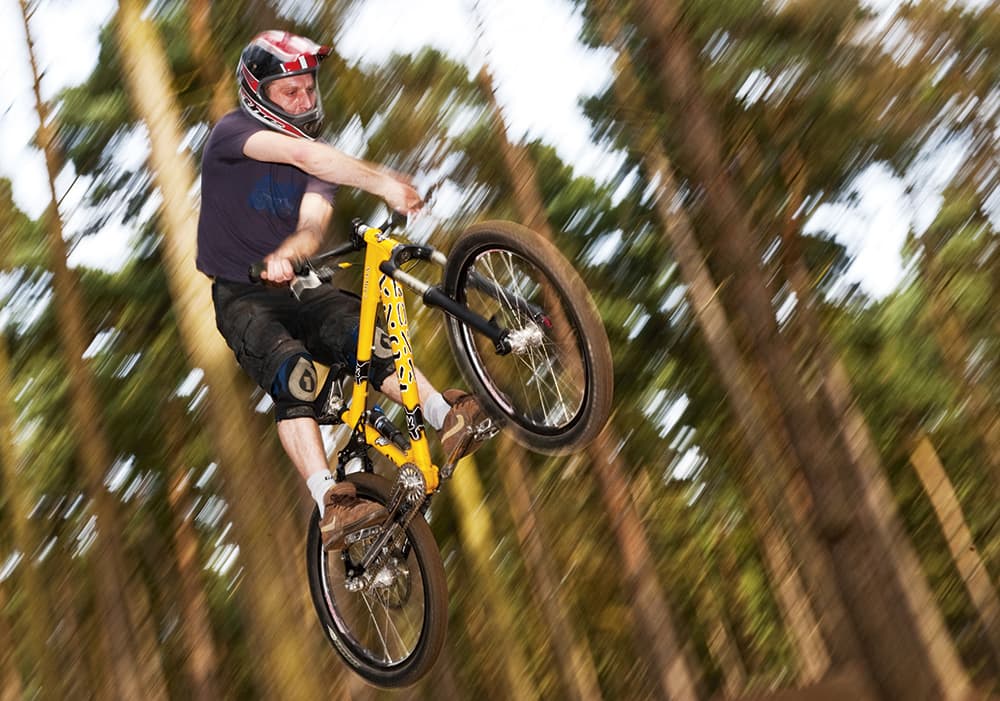
2. Outdoor sculpture

Try shooting from a low vantage point so as to isolate your subject. Photo by Phil Hall
Whether it’s a large contemporary structure or a classical piece that’s a focal point in a public garden, there’s bound to be a striking outdoor sculpture near you and often these pieces of art will make fantastic photo subjects. However, rather than settling for a simple snapshot of the sculpture, why not challenge yourself to come up with something a little different?
Spend time studying the piece and get an understanding of the concept or intention behind it. How it sits in the landscape will affect how you take the shot. If it’s positioned in a built-up area, you may want to wait until it’s floodlit and the surrounding buildings become less of a distraction, while a sculpture in a more natural setting may need subtle backlighting to really highlight its forms.
- Think about your background. Ideally, you want it uncluttered so as not to distract from the sculpture you’re shooting. You may need to look for a low vantage point from which to shoot, to isolate your subject.
- While the artist may have had a vision of how the piece would sit in the landscape, try to put your own personal stamp on the image. Think about how you frame the sculpture or how you’ll process it.
- Sculpture by its very nature is three-dimensional, so lighting is incredibly important. Look at how the light hits it, where the shadows are cast, the best time of day to shoot and try to visit the location regularly.
- Don’t just think of the bigger picture. Rather than trying to fit the entire sculpture in the frame, look a little closer and see if you can pick out any interesting details – focus on interesting shapes or textures.
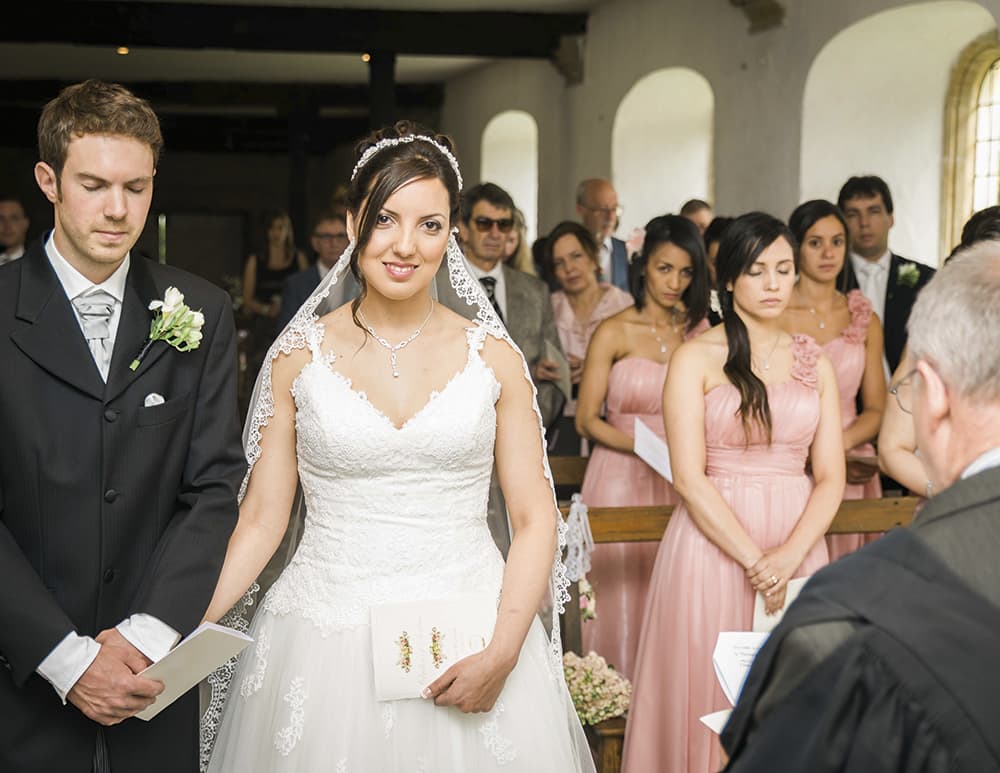
3. Shoot a family gathering or event
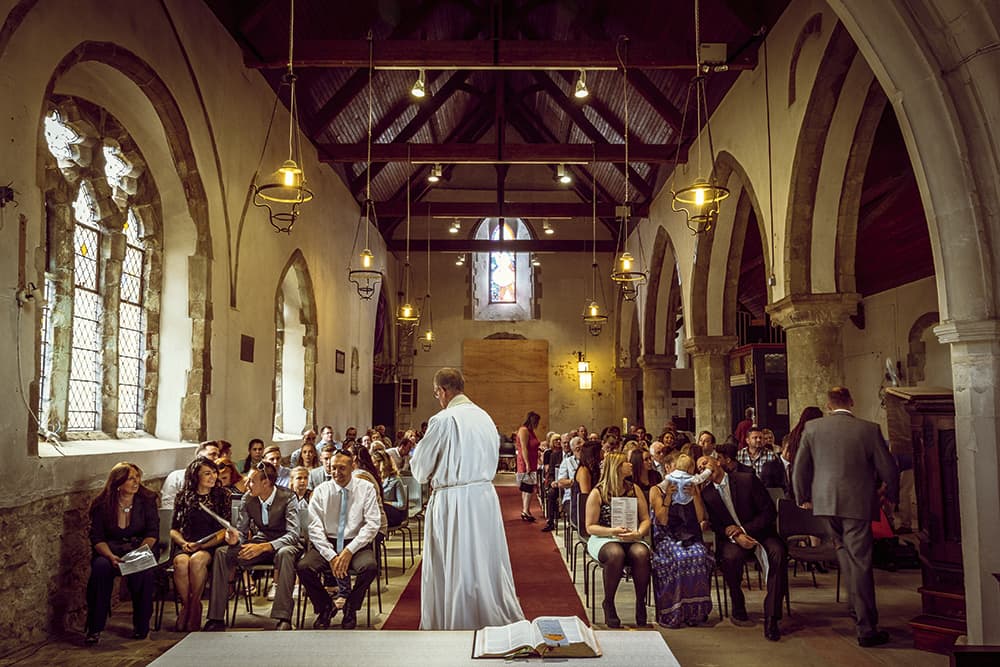
Candid Shots often capture memorable moments better than posed settings. Photo by Callum McInerney-Riley
All professional events photographers have to start somewhere. No one wakes up one day and instantly becomes an in-demand wedding photographer – it takes practice.
A great way to gain experience is to photograph an event for family or friends, whether it’s a birthday bash, an engagement party or christening. As long as it’s an occasion where everyone is together and there’s something happening throughout, you’ll be able to tell a story with a series of pictures. However, we’d advise against putting yourself forward as the ‘official’ photographer – you’ll likely add unnecessary pressure to taking photos and may end up with compromised results. Just stay back, enjoy yourself and take the best photographs you can.
- Set your camera’s clock right. If you’re going to shoot with multiple cameras or plan to edit images in chronological order, setting the clock on your camera will allow images to display correctly on your computer.
- Often, the difference between an average portrait and a special moment is just a split second. Holding back your shutter finger and waiting for a laugh, smile or even eye contact will result in more exciting images.
- Shoot in raw and use auto white balance to take the stress out of altering the white balance for changes of lighting. It’s best to worry about this in post-production and concentrate on getting the best shots.
- Remember you’re a guest. Don’t hide behind your LCD, or obsess over checking your focusing and that you’ve nailed every shot. Instead, engage with your subjects and enjoy being social at this important occasion.
4. Capture your Town

You don’t need to travel far to tell a story with your images
Sometimes just one photograph isn’t enough to truly capture the feel of your surroundings. Whether you live in a quiet rural village or you’re situated right in the heart of a busy city, there will be a host of buildings and landmarks that help to make your home town what it is. So this weekend, why not try to capture this in a series of images, that when placed together demonstrate what it is that really makes your town stand out. This could be its collection of great historical buildings, its lush and vibrant parks, or even the hustle of the business district. Once you’ve captured a series of images, merge them into a multi-image montage using Photoshop to really give the project its full effect.
- Before heading out to shoot, make a list of iconic buildings that you feel help to make your town or city important. This could be a historic site like a cathedral, or even a modern building, such as a football ground.
- Add variety to your montage by taking a mixture of close-up detail shots of things such as signs, monuments and statues, as well as a host of wideangle photos of buildings, scenic parks and important roadways.
- Your final montage can be constructed from as many photos as you like, although we would suggest that a minimum of three and a maximum of eight images will be just right for achieving the desired effect.
- Once you’ve collected your photos, import them into your computer and assemble the montage onto a new A4-sized document by going to File>New in Photoshop, and choosing the A4 paper preset under International Paper.
5. Panning landscapes

You don’t have to miss out on a shot if you’re travelling in a car. Photo by Phil Hall
We’ve probably all been in the position where we’re travelling along, whether in a car or on a train, gazing out of the window, only to come across a brilliant scene that would make a stunning image.
More often than not, though, it’s impractical to stop, and if you’re on a train it’s impossible. But rather than miss out on what could potentially be a great shot because you can’t get out and shoot it in the way you would normally like to, why not have a go at shooting as you’re moving?
You’ll be surprised how effective the results can be, with the blurred foreground adding a highly distinctive look to your photographs.
To get a successful shot this weekend as you’re travelling, see our tips.
- If you’re shooting through glass (which is more than likely if you’re on a train), swap to manual focus and lock your focus on the background. This will prevent your camera from hunting and inadvertently focusing on the glass.
- You’ll also need to keep your reflection from appearing in the image when shooting through glass. Try putting your hand up to the lens or lifting your jacket over you and your camera to combat this.
- Don’t be afraid to use a slow shutter speed. Hold the camera as still as possible and, with it focused on the distance, fire the shutter. The movement from the train or car will blur the foreground for you.
- For the best results, you’ll understandably want to shoot with your dedicated photo kit. However, you may not always have it with you at the right time, so don’t discount using a smartphone instead.
6. Master bounce flash
Picture by Tom Smallwood
If you are put off by using flash indoors because you’re worried about getting that amateurish ‘custard-pie lighting’ look, where the flash hits the subject full in the face but leaves the background underexposed, then bounce flash will be a revelation to you. Used properly, many viewers won’t even notice that flash has been used, but bounced flash can make colours that much richer, details appear sharper, add a nice catchlight to eyes, and generally lift the image to give it a more three-dimensional feel.
By ‘bounced’, we simply mean you are bouncing the flash light off a wall or ceiling rather than it hitting your subject straight on. By angling or bouncing the light, you are effectively softening it. This technique is often used by wedding photographers, as it’s much more flattering to the couple than straight-on flash, but this can be applied to a range of subjects.
- You usually bounce flash off a white or pale-coloured wall or ceiling. It’s best to avoid bouncing flash off coloured surfaces, as your images will take on that particular colour cast – not great in a room with red walls, so consider your surroundings before you shoot.
- There is no strict rule for which direction to bounce your flash as this will depend on the colours and proximity of the walls or ceiling, but a good tip is to bounce the flash off a wall to give more directional lighting. Angle the flash in the same direction as the subject’s nose.
- Whatever metering mode you use, err on the cautious side and start with lower flash-power settings so you don’t overpower your subject. Subtlety is the key. If you need to illuminate the background, try increasing the ISO, widening the aperture or reducing the shutter speed.
- Your flashgun may have a white bounce card built in, so pulling it out can also help to reduce the effect of colour casts when you are bouncing flash. There are also lots of larger bounce cards you can buy that attach to your flashgun – the Honl Barndoor is a great example.
7. Slow-sync flash
In the frame: slow-sync flash yields a well-lit yet dramatic image effect. Photo by Phil Hall
You probably think of flash as a way of freezing your subject so it removes all sense of movement. However, using slow-sync flash is a great way to creatively light your subject, while still retaining plenty of drama in the image. So why not try shooting an action shot using slow-sync flash this weekend? It’s easier than you think.
Start by trying a panning technique. You’ll need to be fairly close to your subject, and should ensure a slow enough shutter speed is in place to record blur in the background. Then, when your subject comes past, fire the shutter at the desired moment and the flash will add an almost three-dimensional look to your shot. This, of course, works well with fast-moving objects. Here are a few things to consider when giving it a go.
- Simply being in slow-sync mode won’t give the best results because the flash will fire at the beginning of the exposure, making your subject look like it’s moving backwards by the time the exposure is complete.
- To avoid this ‘backwards’ effect, select rear curtain-sync mode. This will fire the flash at the end of the exposure. It requires a bit more practice, but produces a much more pleasing, natural result, since the blur from the ambient exposure looks like it’s trailing the subject.
- Once you become competent, you can try the technique with multiple flashguns positioned remotely around your subject to create even more dramatic results. But make sure you’ve got the basics right first.
- Some subjects lend themselves more to slow-sync flash than others, so take this into consideration when seeking out shots. For striking results, try to get as close as you can with a wideangle lens and shoot from a low vantage point.
8. Child’s Portrait

A local park provides an ideal venue when photographing children. Photo by Tom Calton
If you’ve got young children in your family, then you’ll appreciate the truth behind the saying, ‘They grow up so fast.’ That’s why capturing stunning photos of them while they’re still young is incredibly rewarding.
Whether it’s your own children, grandchildren or a relative’s child, capturing child portraits is a fantastic way to sharpen your core photography skills, as it requires speed, dexterity and a watchful eye to snap the right moment. Let’s face it, children (especially younger ones) won’t want to sit nicely for very long, so it’s important to ensure that you stay alert with your camera in hand, ready to snap that all-important shot whenever the opportunity arises.
- Prime lenses are great for portrait photography as they offer a wide maximum aperture that allows you to blur the background and isolate the subject. If you’re photographing babies, use a 50mm lens wide open and focus on the eyes.
- If you’re photographing a child that is old enough to walk or run, then it’s vital that you switch your camera’s drive mode to continuous, as this will allow you to rattle off multiple shots and keep up with the action.
- Children have a much shorter attention span than adults, so it’s important to keep them entertained throughout the shoot. Try getting them to pull funny faces at the camera and then showing them the results.
- For older children, invite the family to go for a walk around a park and photograph the children as they play. You can always ask them to climb trees, play or kick up fallen leaves to keep them entertained.
9. Keep it simple
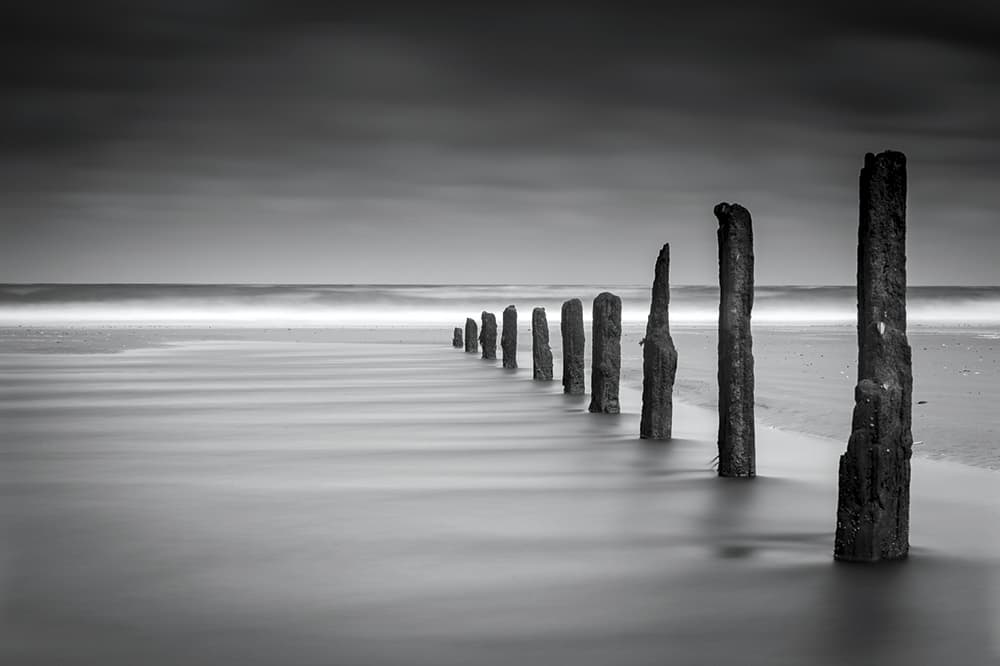
A minimal landscape can convey as powerful a message as one that contains many elements. Photo by Phil Hall
Complex compositions with many elements all fighting for your attention can often make a shot unsuccessful, as the eye doesn’t have anywhere to rest, and the overall feel can be rather chaotic.
With this in mind, why not shoot an image that has been stripped back to the bare bones, keeping your composition as simple as possible? By adopting the philosophy of less is more, your images can take on a much more tranquil, reflective mood thanks to the pared-back arrangement of elements.
It goes without saying that this method requires a considered approach. You’ll have to survey the scene to exclude the elements that will clutter your shot. Head out with a clear mind and a fresh pair of eyes and you’ll be surprised what you can achieve.
- A wideangle lens isn’t necessarily your best option here. A telephoto lens is often a better bet as it will allow you to isolate your desired subject much more easily and maintain the purity of the composition.
- Be bold with your framing. You don’t have to fill the frame with foreground interest or follow the rule of thirds. Position the point of interest in the centre of the frame, for example, to break the classic rule.
- Long exposures automatically lend themselves to minimalist scenes, with the extended exposure forcing clouds and water into blurred streaks of movement if the conditions are right.
- Some scenes are naturally suited to this style of photography, but the weather is just as important. Overcast, misty conditions can be ideal for stripping back elements of a composition to the minimum.
Whatever project take on, don’t forget to share your best results with us, on our Facebook page, or in our gallery.


