Wildlife
Whether you have a penchant for puffins or pike, photographing wildlife requires understanding, planning and quick reactions
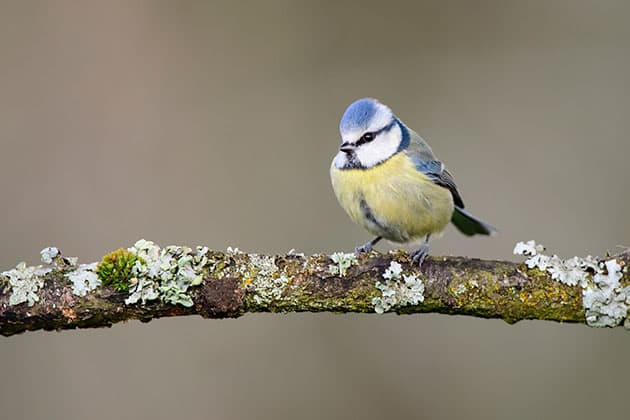
Credit: Mark Sisson
Get down low
Unless you’re working from a considerable distance away and the angle is in your favour, all wildlife images are best taken at the same height as your subject: nothing is more effective than being at eye level, and conversely nothing looks less so than an image taken from a steep downwards angle. For birds on the water, a lower level makes the water more mirror-like in terms of reflections, and on land it creates the opportunity for some ‘mush’ at the bottom of the shot (out-of-focus foreground) which is creative, too. Mark Sisson, www.marksissonphoto.co.uk
Find your favourite combination
For most wildlife photography, I use aperture priority, my fastest frame rate and single spot autofocus. I have found this combination works best for me, but others will have their own preferences. Oscar Dewhurst, www.oscardewhurst.com
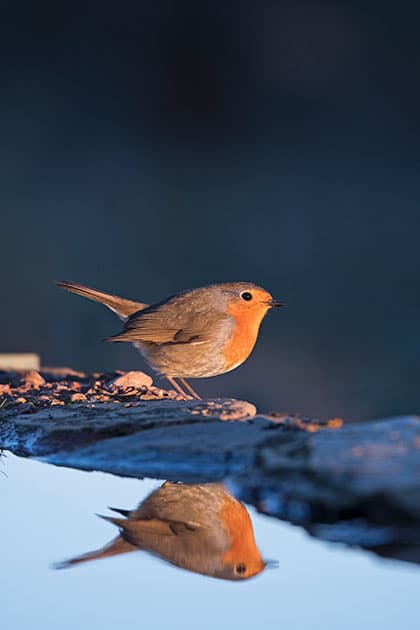
Credit: David Tipling
Create a pool
Garden birds like to drink and bathe, so try to create a natural-looking pool. A shallow tray from a garden centre sunk in the ground close to cover and decorated with moss and stones will make a photogenic set-up. But beware of attracting local cats that may try to make a kill. David Tipling, www.davidtipling.com
Check wind direction
Depending on its direction, a strong wind can give rise to some great bird pictures. In summer, seabird colonies bustle with life, but trying to capture a puffin coming towards you at 30mph on a tailwind can be frustrating. On the other hand, give that same puffin a decent headwind to fly into and, if the light is right, flight photography can become a breeze. David Tipling, www.davidtipling.com
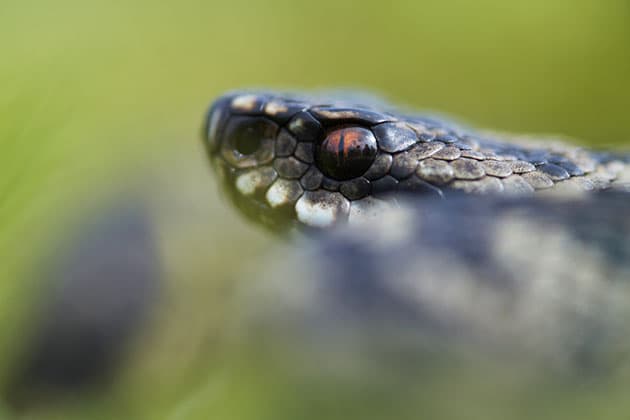
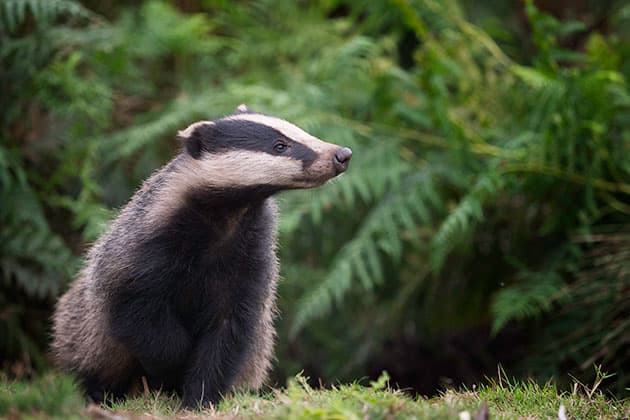
Credit: Paul Hobson
Read the signs
Learning good field skills, such as stalking, and being able to read an animal’s body language should be your starting point, and always, if you’re not sure, stay further away and use a longer lens. Paul Hobson, www.paulhobson.co.uk
Pre-visualise your image
Give the project enough time. When working with outdoor elements and wild animals, tight schedules will work against you. Markus Varesvuo
Credit: Oscar Dewhurst
Think about the background
When positioning perches for garden birds, think about the kind of background you want, and adjust accordingly. If you cannot get a clear background, you could consider using an artificial background such as a print of muted green or other colours. Oscar Dewhurst, www.oscardewhurst.com
Back-button focus
Using back-button focus can greatly increase the chance of capturing sharp images. Switching to back-button focus means I can keep my camera in predictive focus mode at all times. As soon as I release the focus button, the focus is locked, so it can be used for both static and moving subjects. Ben Hall, www.benhallphotography.com
Credit: Tesni Ward
Focus on one species
Start a project that involves photographing just one species. It can be a great way to develop your portfolio beyond standard images. Whether it’s a specific bird, mammal or even just an area, focusing your time will stack the odds in your favour. Tesni Ward, www.tesniward.co.uk
Show gratitude
It’s important to show gratitude and respect for your subject. If you feel connected to your subject, it will show. Johan Carlberg
Stay out there
Photographing during bad weather adds atmosphere to an image, particularly rain, snow, low light or fog. Ellie Rothnie, www.ellierothnie.com
Stick with it
The longer you stay with a single individual, the more likely you are to record different aspects of its behaviour. Don’t be tempted to search for alternative subjects too early as you may sacrifice quality for quantity. John and Tracy Langley, www.ourwildlifephotography.com
Hideaway
Freestanding, self-supporting hides are ideal for photographing shore birds. Conventional hides often require pegs and guy lines, which means they can’t be set up easily on rock, shingle, soft sand or muddy surfaces. Laurie Campbell, www.lauriecampbell.com
Do not intrude
The most natural picture, without disturbing the animal or being intrusive, is always going to be the best picture. Salvador Colvee
Don’t allow animals to become dependent
Animals that are fed regularly may become habituated to the feeding, which may cause problems for them, so only leave small amounts of food out. For example, I only feed the badgers a few peanuts when I photograph them. Paul Hobson, www.paulhobson.co.uk
Shoot what you love
I limit my goals to species I want to learn more about. This means that I can concentrate on what I feel is important, not what I think may be the best-selling print. Ashleigh Scully, www.ashleighscullyphotography.com
Be patient
Any wildlife photographer can attest to the fact that wildlife will push your patience to its limits. Whether it’s a few days, weeks or even months and years, it can take time to merely find the wildlife, let alone photograph it. Perseverance will see your patience rewarded. Tesni Ward, www.tesniward.co.uk
Slow down
Take your time when reviewing images – it’s just as important as shooting the pictures. Alejandro Prieto Rojas, www.alejandroprietophotography.com
Travel
From what to pack to approaching strangers and buying insurance, we have a whole host of tips

Credit: Claire Gillo
Approach people for portraits
You’ll meet some interesting characters on your journey but many travellers are shy about asking them for a picture. Most people are flattered to be asked and say yes to such requests, especially if you have taken an interest in what they are doing or selling. In some touristy places locals will want to charge for photos, and you may consider a modest payment to be a fair trade. Alternatively, if the subject is a trader, buying something from their stall or shop may be preferable. AP
Go at the right time of day
Wherever you go during your travels will look completely different depending on the time of day that you visit and the direction that the light is coming from. If you’re taking the trouble to make a special visit to a major landmark look on Google Maps to work out whether it is best visited in the morning or afternoon. Otherwise be sure to explore your subject from a variety of angles to capture the way the light falls on it. Don’t be afraid to shoot into the light too – you can get some very atmospheric images this way – while side-lighting is great for revealing texture and casting long shadows. AP
Juxtapositions
Look for interesting juxtapositions that show contrasting sides to a culture. For example an old building next to a modern one, or someone in traditional dress using a mobile phone. Keep an eye out for interesting signs, billboards and posters that are incongruous or add humour to what is happening in front of them. You may have to wait for the right person to step into the scene to make the image work. AP

Credit: Claire Gillo
Local knowledge
Although guide books are great for advice there is nothing quite like a local’s knowledge for getting the best locations and viewpoints when it comes to landscapes. This volcano shot in Ecuador Baños was taken early one morning on the roadside with the help of a local tour guide to offer advice on the best spot. AP
Photograph the details
To tell the story of a destination and hold people’s attention you need a varied set of pictures. Don’t forget to intersperse your wide shots and landscapes with close-up details of buildings, food, jewellery and trinkets, interesting signs and anything else that catches your eye. These help to build up a picture of a culture that you don’t get from just the scenic shots. AP
Get insured!
Skipping insurance is just not worth the risk. Make sure you have good camera insurance when you go abroad and look into the terms and conditions. Have a good shop around. If you’re worried beforehand, contact the company by phone and discuss your particular needs. AP
Research beforehand
The internet is a great research tool for travellers. Whether for reading up on the main sights and attractions you wish to see, or knowing when is the best time to go. You can also look at the photos that other photographers have taken to give you an idea of what to expect and where the best viewpoints may be. But don’t overplan to the point that you lose the spontaneity and forget to follow your nose, and don’t set out to simply duplicate the images you have already seen. AP
Pack wisely
Depending on the kind of trip you’re on, choose your kit accordingly. If you have a base such as a hotel you can pack more gear knowing you don’t always have to carry it with you all of the time. If you don’t mind the hassle of switching lenses, three or four fast prime lenses will give you more creative options than a single zoom. A good walkabout zoom such as a 24-105mm offers more convenience (though may not save much weight). But if you choose this option try to also take one small fast prime lens such as a 50mm f/1.4 which will come into its own for low-light photography and shallow-depth-of-field portraits. AP
Take a shoulder bag
While backpacks are ideal for carrying kit from A to B they aren’t great for accessing your kit in a hurry and are also more vulnerable to theft in busy urban environments. Shoulder bags are easier to keep an eye on and offer quick access to your kit so you can quickly grab your camera or switch lenses as opportunities present themselves. AP
Look for a high viewpoint
When visiting a new city for the first time try to find a high viewpoint from which to get an overview of the surroundings. Observatory towers and rooftop bars and restaurants are ideal places, but try to pick open-air spots with no glass in the way that would cause unsightly reflections. Try to go first thing in the morning or late in the afternoon to get the best light. AP
Shoot portraits in shade or against the light
If shooting portraits of the local characters try to photograph them in the shade, to avoid ugly shadows and squinting. Failing that, turn the subject so that the sun is behind them. AP
Macro & close-up
Faking rain, focusing accurately, and being observant all help to increase your hit rate when it comes to shooting plants and bugs
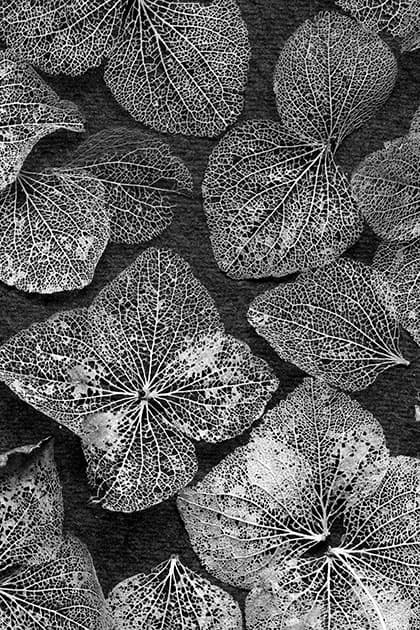
Credit: Tracy Calder
Look for skeletons
If you slow down and look around, you might notice some skeleton leaves or petals. These delicate structures have veins resembling road maps and rivers and they make attractive compositions. Think about the background behind the leaves; go for something plain or lightly textured. This type of subject often suits the black & white treatment. Tracy Calder, www.cupoty.com
Fake morning dew
Flowers look so much better when captured in the morning light, with a dusting of dew droplets clinging to the petals. However, you can bypass the early alarm wake-up call by using a standard garden atomiser bottle, which can be picked up for a couple of pounds, to create the look of morning dew. Matty Graham, www.pixel-click.com
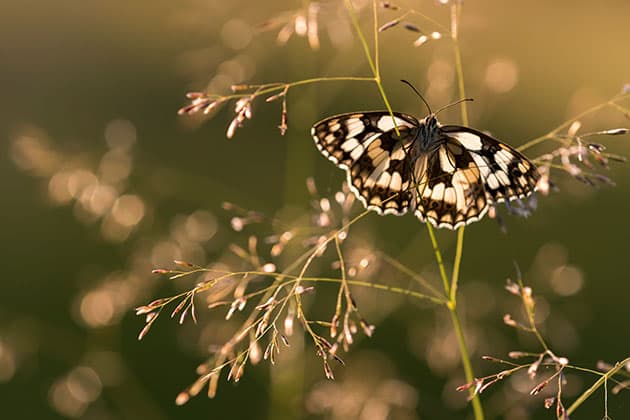
Credit: Ross Hoddinott
Use backlight
Backlighting really suits insects, as it tends to highlight their form, detail and intricacy. It particularly suits the translucency of butterflies. Low early-morning or late-evening light is perfect for shooting backlit subjects – the quality of the light is warmer and softer too. Position yourself carefully, so you sandwich your subject between the light and your camera. TTL metering can be fooled in tricky light, so check the histogram and apply positive exposure compensation if your images are underexposed. Ross Hoddinott, www.rosshoddinott.co.uk
Get a beanbag
When you’re shooting subjects close to the ground a beanbag can provide great support. Bags can be purchased filled or unfilled, with lining or without. You can fill a bag with dried beans, rice or corn, but if you want to avoid the contents rotting when damp then opt for plastic pellets. AP
Credit: Tracy Calder
Check the edges
Grass, twigs and leaves can sneak into the frame when you’re concentrating on the main subject. Most of the time you can crop these out later, but it’s good practice to get things right in-camera. Use live view and magnify the focus area. Pan around the frame, paying particular attention to the edges. Tracy Calder, www.cupoty.com
Follow the rules
The basic ‘rules’ of composition – such as directing the eye using lead-in lines and positioning key elements according to the rule of thirds – still apply to close-up photography, so compose your pictures with care. AP
Credit: Annette Lepple
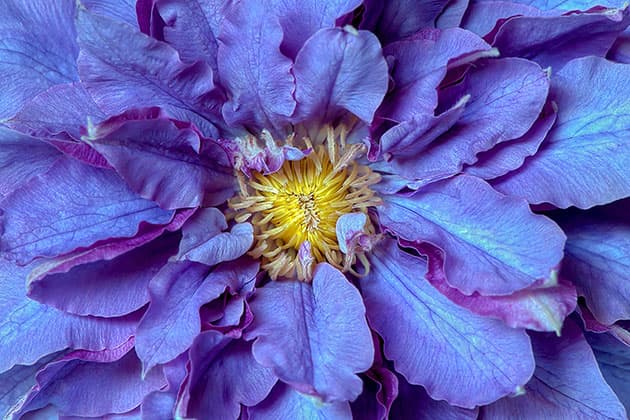
Be observant
Pay attention to the background and surroundings of your subject and make sure you isolate it well, so that you don’t end up with distractions. The closer the background is to the subject, the more it will stand out in the picture, so to achieve a pleasing background choose a subject that is already isolated. Make sure the image isn’t too busy and keep things simple. Be respectful, don’t pull up or trample on flowers, but removing twigs or a blade of grass is acceptable. Annette Lepple, www.personal-eden.com
Focus manually
Autofocus can struggle to lock-on to small, nearby objects and miniature detail – particularly in low light or if the subject is low contrast. Therefore, assuming your eyesight allows it, focus manually instead. You will find this a far more reliable method, particularly when combined with live view. This allows you to zoom in to your point of focus for unrivalled precision. Ross Hoddinott, www.rosshoddinott.co.uk
Credit: Jacky Parker
Try focus stacking
Rather than closing down the aperture, focus tracking is a great technique to achieve a macro image with a large depth of field. Mount the camera to a tripod and take several images on a wide aperture, altering the point of focus slightly each time and merging them into one image using software such as Helicon Focus. Jacky Parker, www.jackyparker.com
Make tiny adjustments
If you would like to make tiny alterations to a close-up composition consider using a positioning plate or focusing rails. These devices sit between your camera and tripod and allow you to make minute adjustments by moving the camera, which is the preferred method of focusing when shooting at such high magnifications. Tracy Calder, www.cupoty.com
Consider negative space
Ask yourself how the negative space in a picture relates to the area containing the subject. Try to find a good balance between the two. AP
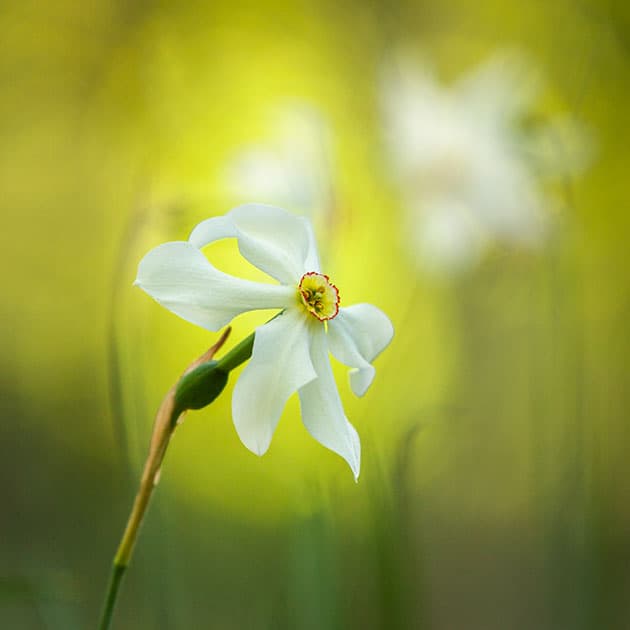
Be aware of the light
Very often the best light for photographing flowers is bright and overcast. Because the light is diffused by high white cloud, it doesn’t create any shadows. If you do photograph on a sunny day, however, using a reflector will help boost the light on the shadowed side of the flower. Sue Bishop, www.suebishop.co.uk
Check the forecast
Keep an eye on the local forecast. Many flowers are tall and delicate and will be greatly affected by wind movement. Still days (when the wind is less than 5mph) are best for flower photography. Ross Hoddinott, www.rosshoddinott.co.uk
Experiment with a lightbox
If you still have a lightbox lying around, put it to good use by arranging leaves or other translucent objects on it. For striking results, select specimens with clear, well-defined shapes and good venation. Tracy Calder, www.cupoty.com
Accessorise
Tweezers, paintbrushes and fishing line might seem like strange objects to pack in your kit bag, but each one has its purpose. Tweezers can be used to remove dead leaves or stray debris; paintbrushes are ideal for removing stray pollen, and fishing line is great for holding distracting foliage out of the frame. AP
Think backdrops
Build up a store of attractive backdrops. Visit car boot sales, ask friends for bits of old wood, metal etc. For a great range of lightweight, realistic-looking backdrops take a look at the Photo Boards series. AP
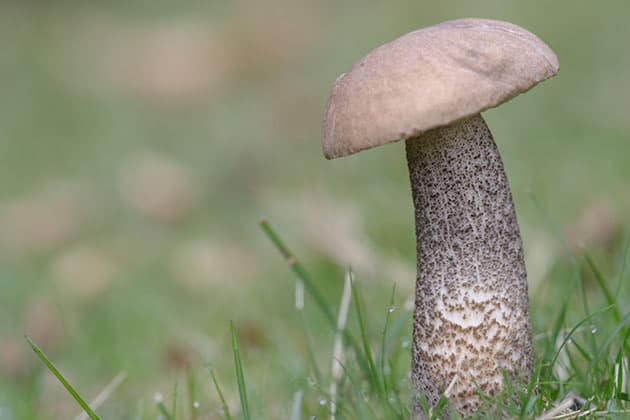
Lift the shadows
I like to use available natural light where possible, but when I want to lift the shadows, or perhaps reveal detail on the underside of a mushroom, I use a Manfrotto Lumimuse. This pocket-sized tool is a continuous LED light source, which allows you to see the effects in real time. Tracy Calder, www.cupoty.com
Stay dry
Waterproof trousers are a must when you’re lying on the ground shooting fungi or leaf details. Over the years I have used bin bags, ground mats and picnic rugs to lay on, but you really can’t beat a good pair of waterproof strides. For total protection I like Páramo – the Cascada II trousers, which are durable and well-ventilated – and they often find a place in my bag. Tracy Calder, www.cupoty.com