What is the Loupedeck?
Loupedeck is an editing console designed for photographers who’d like to make light work of tweaking their photographs in Adobe Lightroom. It’s targeted not only at professional photographers, but also hobbyists and amateurs.
The main purpose of the Loupedeck is to make the process of editing quicker, but it should also be looked at as a way of maximising the potential of your editing skills and the fine level of control that’s made available at your fingertips.
Loupedeck – Features
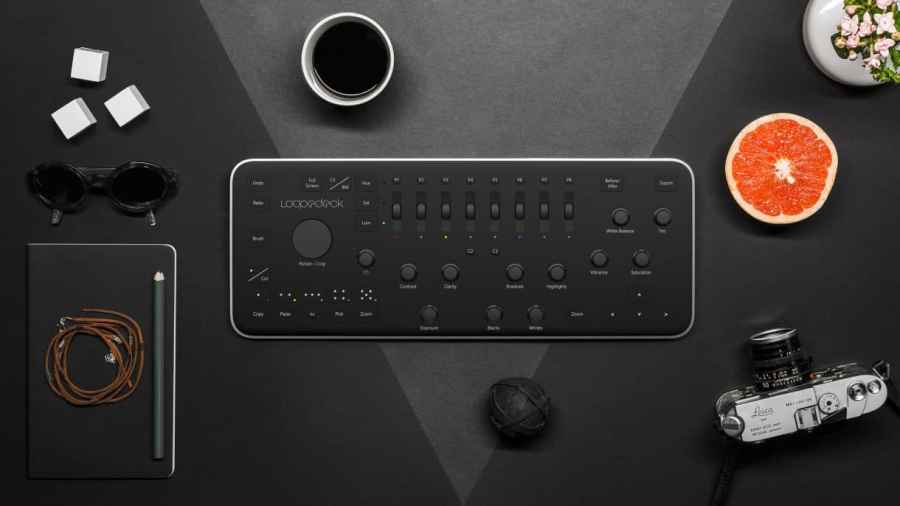
Loupedeck was created off the back of a successful Indiegogo fundraising campaign, where more than 1400 backers pledged €366,361 to bring the project to life. It’s fundamentally a rectangular board that’s around the same length as an average keyboard. It features a plethora of buttons, dials and and knobs that are used to take control of the most important and regularly used functions in Lightroom.

Working from left to right, you’ll find the undo/redo buttons up at the top left, with a brush button below that’s used to toggle between the adjustment brush and general settings in the develop module. To the right of this is a circular rotate/crop wheel, with star rating buttons beneath to select favourites from a batch. There’s no dedicated button to remove a rating, however, so if you assign a five-star rating then you’ll need to use the five-star button again to remove it.
If you prefer to filter your favourite images from a batch based on colour, there’s the option to toggle between star ratings and colour ratings with a separate button. Under the rating buttons sit copy and paste buttons to reapply identical settings to another image, including any localised adjustments.

The customisable Fn button between the copy and paste and pick and zoom buttons works in tandem with the custom C1 knob and C2/C3 buttons. When depressed it performs the secondary functions to which the C1 knob and C2/C3 buttons are assigned. In the centre of the board, towards the bottom, you get two rows of knobs to control frequently used Lightroom sliders such as exposure, contrast, shadows, highlights and clarity.
Above these are eight vertical scroll wheels, which are used to tweak the Hue, Saturation and Luminance of colour in an image. These are entirely separate to the eight programmable preset buttons positioned above that are used to apply user- or ready-made Lightroom presets.

Elsewhere, there are two zoom buttons that can be used to inspect an image at 100%, plus a useful convert to black-and-white button too. On the far right you’ll find a further four knobs to tweak white balance, tint, vibrance and saturation settings.
In addition to all the controls mentioned above there’s a before/after button to compare an edited image with the original, as well as directional buttons that are useful for quickly navigating images in the grid and loupe views within Lightroom’s Library module.
Continues below…
[collection name=”small”]
Loupedeck – Build and design
In total there are no fewer than 36 buttons, 12 knobs, eight dials and one Rotate/Crop wheel scattered across the surface of the deck. Although it’s a little overwhelming at first, you’ll find the controls are well laid out and don’t feel too cramped.
The most frequently used buttons and dials are prioritised at the bottom, and the shallow angle at which it lies on the desk makes it comfortable to operate either single-handedly, or with your left hand occupying the left side of the board and your right hand controlling the buttons, dials and knobs to the right.

Although the Loupedeck is mostly made of plastic, it’s finished to a high standard and features rubber feet on its underside to prevent it sliding on smooth desk surfaces. The intent of each button and dial is clearly marked, and the printing is permanent enough that you don’t need to worry about regular button presses wearing away the labelling too quickly.
Beside the Hue, Saturation and Luminance buttons are white LEDs that provide a clue that the board is powered on as well as offering a visual reference of which colour setting is currently selected. This is helpful in use, but I’d have also liked to see an LED added alongside the brush button to clearly indicate when the adjustment brush is active and when it’s not.

Dimples on the rating buttons is another idea that could potentially help users locate the rating buttons they want without having to pull their eyes away from the screen.
As for the knobs and dials, they’re all nicely finished in rubber and offer a very satisfying feel when they’re turned. They offer extremely precise control of the Lightroom sliders, but the same can’t be said for the Rotate/Crop wheel, which rotates images by 0.40 degrees with the smallest possible turn. For finer control of rotating an image, I found myself depressing the Rotate/Crop wheel to enter crop overlay mode before using my graphics tablet to rotate and crop with better precision in the usual way.
Loupedeck – Customisation
The Loupedeck has only one customisable knob and two customisable buttons, so you’ll want to carefully think about what you’re going to set these to at the outset.
The C1 knob can be customised to any one of six options that include vignette, noise reduction, dehaze, sharpness, vertical transform or horizontal transform. You also get the option of setting up a secondary control (from the same six options above), which is performed by holding the Fn button at the same time as turning the C1 knob.

The C2/C3 buttons in the centre of the deck can be setup to one of eight different functions. You can toggle between the Library/Develop module, open a browser, open the configuration window, cycle info display, show clipping or toggle between the spot removal, graduated filter and radial filter tools. Like the C1 knob, the C1/C2 buttons can also be setup to perform secondary controls in combination with the Fn button.

As for the P1-P8 buttons, these can also be customised – but only to apply Lightroom or user presets.
Loupedeck – Performance
Just like learning how to type without looking at the keyboard, the ultimate goal is to be able to navigate the Loupedeck without taking your eyes off the screen.
It took a few days of regular use to get the hang of using it, but after a week or so, I found I was starting to use it more instinctively and much faster than I was able to edit images using my graphics tablet alone.

It’s important to note the Loupedeck doesn’t make your mouse or graphics tablet redundant – you’ll still need to use one or the other to apply localised adjustments and to access other settings for which there are no buttons or dials. It’s good to have your keyboard close by, too, so you can quickly apply any regularly used keyboard shortcuts.
I opted to have the Loupedeck positioned centrally in front of the computer, with my graphics tablet positioned to the right and the keyboard to the left. You may of course prefer a different working arrangement, so I’d advise experimenting with the position of the Loupedeck on your desk.
The way you can tweak knobs and dials simultaneously, such as dialling in more exposure at the same time as increasing the contrast or clarity, is just one of the perks of using the Loupedeck. Users will also appreciate the way dials can be depressed to reset a setting to its default value.

The way the dials, knobs and sliders synchronise with the scroll bar and the various tabs you get on the far right of Lightroom’s interface is highly intuitive. To give you an example, let’s say I tweaked a few settings in the basic tab and then wanted to apply some noise reduction to an image. Doing so using a mouse or graphics tablet would require the scroll bar to be moved down and the Detail tab to be opened if it wasn’t already.
The Loupedeck is intuitive enough to do this for you as soon as control of a different setting is taken. What this means in practice is that you always get to view the level of adjustment you’re making without the hassle of manually scrolling up and down through the various tabs in the Develop module. What’s more, if an adjustment is made in a tab that’s closed, Loupedeck will automatically open and display it for you.

Little has yet been said about the speed and response of operating the dials, knobs and buttons. I tested the Loupedeck with a 27-inch iMac (3.2 GHz Intel Core i3) running Adobe Lightroom CC and found all adjustments occurred in real-time. You won’t need to worry about your workflow being disrupted by any unwelcome lag.
The only thing I’d say is that the buttons are fairly noisy when they’re depressed, especially the Rotate/Crop wheel. No matter how softly you press it to enter crop overlay mode, or use it to apply a rotate/crop adjustment, it makes quite a loud click and could benefit from being slightly better damped.
Should I buy the Loupedeck?
Persevere with the Loupedeck over a period of time and you’ll start to reap the reward of editing images faster in Lightroom. The placement of the buttons and dials has been carefully thought through and, as I discovered, the more you use it the better your muscle memory becomes.
Out of the box it takes less than five minutes to setup, and the good news is that Loupedeck is committed to adding new functions and customisation options in the form of monthly/bi-monthly software updates.
There are areas for improvement, however. A couple more customisable buttons and dials wouldn’t have gone amiss, and an LED alongside the brush button would have been a useful visual aid. On the whole, though, the Loupedeck does what it sets out to do very well.

There will be some who would have liked the option to connect it to a computer without the use of a USB cable for times when working on the move. The only issue with this is that it would necessitate a rechargeable battery and wireless accessory kit rather like Wacom offers for its graphics tablets. This would have likely pushed up the price; however, it could have been made available as an optional extra.
Splashing out over £300 for the Loupedeck is more than most amateurs who dabble in Lightroom will be prepared to pay. However, for those who use Lightroom on an almost daily basis, the price is much better justified for the amount of time it saves. It doesn’t replace a keyboard, mouse or graphics tablet outright, but when used alongside these other devices the right way, you’ll start to wonder how you ever used to edit in Lightroom without it.