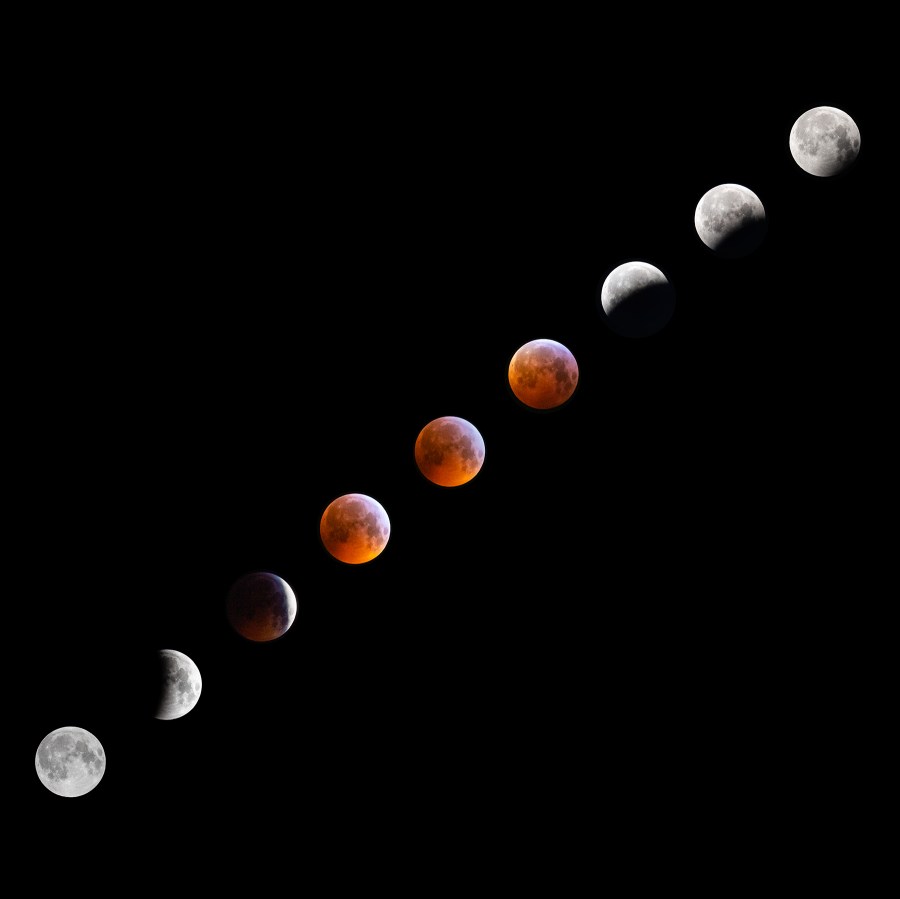
How did you prepare for the super blood moon?
The weather was going to be a critical factor here. It really needed to be totally clear for at least five hours to capture the full cycle of the eclipse, which was my plan all along. I had also considered some locations to maybe get some foreground interest, but given that it was going to be a 5-6 hour process, and because clear weather was forecast, it was going to be really cold, so I decided to take the images from home. I had monitored the moon trajectory across the sky for the previous few nights, so I had a pretty good idea where it would be during the critical stages. Usually, for moonlit and landscape shots, I use The Photographers Ephemeris (TPE) to plan locations, sunrise/ sunset, moonrise and moonset times. I also use a useful paid app called PhotoPills, which has lots of other useful info to help with exposures, depth of field and many other planning tools. I use this a lot for calculating exposure times when using ND filters.
Where did you set up your camera?
Just in the garden at home. I have an uninterrupted view of the sky from there, and it also meant I could head back inside between shots to keep warm and look at the images on my computer as I took them, as manually focusing on the moon can be tricky. It’s surprising how fast it moves when you are looking through a long lens!
 What kit did you use?
A Canon EOS R, coupled with a Canon EF 100-400mm f/4.5-5.6 L IS II USM, which I zoomed to 400mm. Minimum aperture was therefore f/5.6, but I like to try and shoot at f/11 for maximum sharpness. These images were all taken with this combination. Additionally, I also have a 2x converter, so between shots, I also added the converter, and took the same series of images with this attached, too, so that has given me a second set of images at 800mm. In for a penny in for a pound, I also used a small Canon M6 mirrorless camera, which has a x1.6 crop sensor. I continually swapped the two bodies on to this lens combination and took the same images on this, too. The M6 shares the same sensor as the EOS 7D Mark II, so is a great little camera and produces some cracking images.
I therefore have four full sets at 400mm, 640mm, 800mm and 1280mm. With hindsight, this was total overkill, and I really wouldn’t recommend it. Keeping both myself and my gear warm was really important too; I put a little cloth over the barrel of the lens and the camera body just to keep any ice off.
What settings did you use?
Shooting the moon itself can be a challenge. If you want any foreground interest, and you expose for that, then the moon is nearly always blown out. Either that, or you have to produce a composite, and I prefer to try and produce single images in camera if I can. So I took the decision that this was all about the moon, and so planned to expose just for that. For the initial full moon, the correct exposure settings were 1/100sec at f/11, ISO 100. At the height of the full eclipse, when the moon was red and fully in the Earth’s shadow, the required exposure was 1/3sec at f/5.6, ISO 6400. This is an incredible 14 stops difference between the two images. The more difficult images to take were those where the moon was half in shadow, because for these, the difference in exposure between the two halves is significant. I decided to expose for the ‘white’ side of the moon, so as to retain some detail. With around half the moon showing, the settings were 1/30sec at f/5.6, ISO 100. In terms of focusing, I turned off autofocus, and the image stabiliser on the lens. If your camera has a mirror, it is also good to set this to ‘mirror up’ or ‘mirror lock’. I also used a 10-second self-timer for each shot. All focusing was manual, and was done using the live view function, zoomed in x10 to look at one particular crater on the moon, so I could be sure it was as sharp as possible. Finally, I shot in raw, as this gives the most opportunity to recover shadows/ highlights in post production.
What time did you take the first and last pictures?
The first image in this sequence was taken at 1.38am, and the last at 6.53am, so just over five hours from start to finish. I tracked the moon just by moving the tripod head and using the viewfinder. In total, I took around 45 images for each of the four camera/ lens combinations described above, so around 200 in total.
What did you do in post production to create the montage?
I usually exclusively use Adobe Lightroom with just the occasional venture into Photoshop. I took all images into Lightroom and made some adjustments that enhanced the pictures just a little to improve them. A little sharpening, contrast, clarity, highlight reduction and shadow recovery. This helped enhance the detail on the surface of the moon. For the red moons, I also slightly boosted the saturation, but only a little. I was then able to copy this profile onto every picture as imported them, which worked really well and gave great consistency across all the images. I then referred to a YouTube tutorial to create the montage, which was simple to follow, and has taught me some new skills which hopefully I will be able to use again on another project. The final image is 100cm square and close to 600MB. So will print nicely – that’s my next step, as a few people have asked for copies.
What advice would you give to someone who was trying this for the first time?
Start with a full moon. If you have access to a lens that is 300mm or longer, then that will give you some great images and detail, particularly if you have a crop-sensor camera. Definitely try to use a tripod, as it makes it easier to concentrate on focusing. Turn off autofocus and any image stabilisation, and focus manually using live view – zoom right in to get the best chance of pin-sharp focus. Ideally, put your camera on manual, and if it is a full moon, then ISO 100, f/11 and 1/100sec are a good starting point.
All images copyright Neale Thibaut 2019
Instagram: @nealethibaut; visit www.prism-photographic.com