Credit: James Paterson
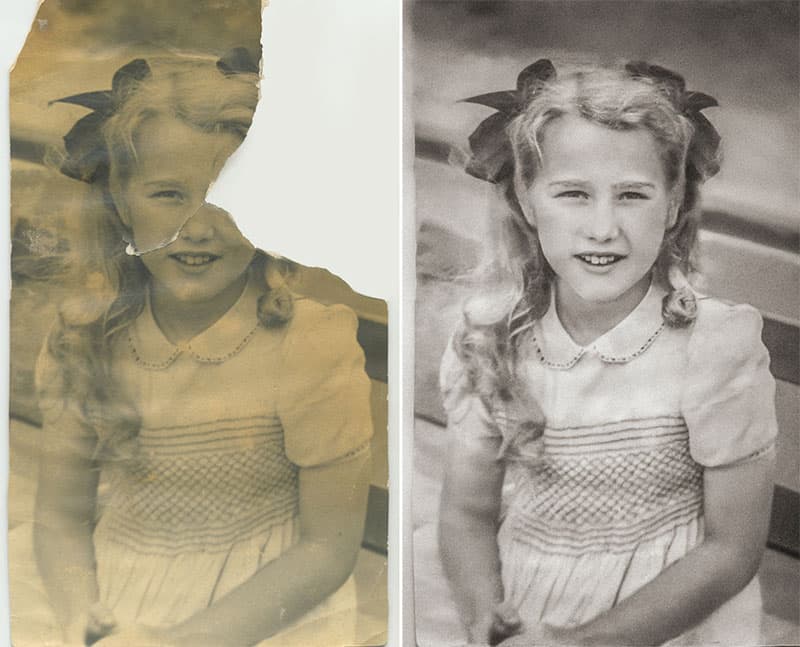
Few Photoshop tasks are as rewarding as restoring an old photo. There’s something deeply satisfying about breathing new life into damaged prints, so that they can be cherished for years to come. Whether you’re restoring snaps from your own family album or as a favour for someone else, it leaves you with a glow as warm as the gorgeous sepia tones in these treasured old mementos.
For users of Photoshop Elements, there are a host of powerful restoration tools on offer. Retouching tools like the Healing brushes and Clone tool are ideal for fixing marks and scratches, and the tonal commands make it easy to enhance and sharpen faded old details. Even heavy-duty restoration work such as repairing ripped prints is possible with simple layer and masking skills. We’ll explore a few typical problems and how to fix them.
Tips for digitising your prints
The first task is to transform your old prints into ones and zeros. If the photo is in a frame then take care removing it, as the emulsion may stick to the glass and come away when it’s pulled out. It’s best to use a flatbed scanner to digitise the print – set the scanning resolution to 300 pixels per inch or more. If you can’t use a scanner then a camera will do the job. The key thing is to light the print evenly with two lamps (you can use either flashes or constant lighting) on either side of the print. It can be helpful to stick the print to a wall, as it makes it easier to position the lights on either side, each angled at 45°. As for camera settings, it’s best to use ISO 100 for maximum image quality, and set a mid-range aperture like f/5.6 or f/8, as this is typically the sweet spot where most lenses are at their sharpest.
Credit: James Paterson
Miraculous restorations
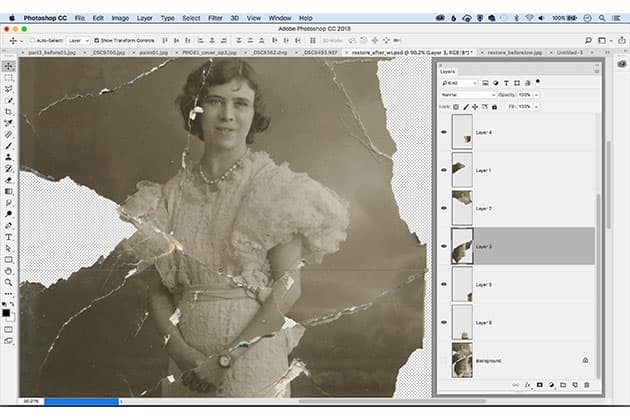
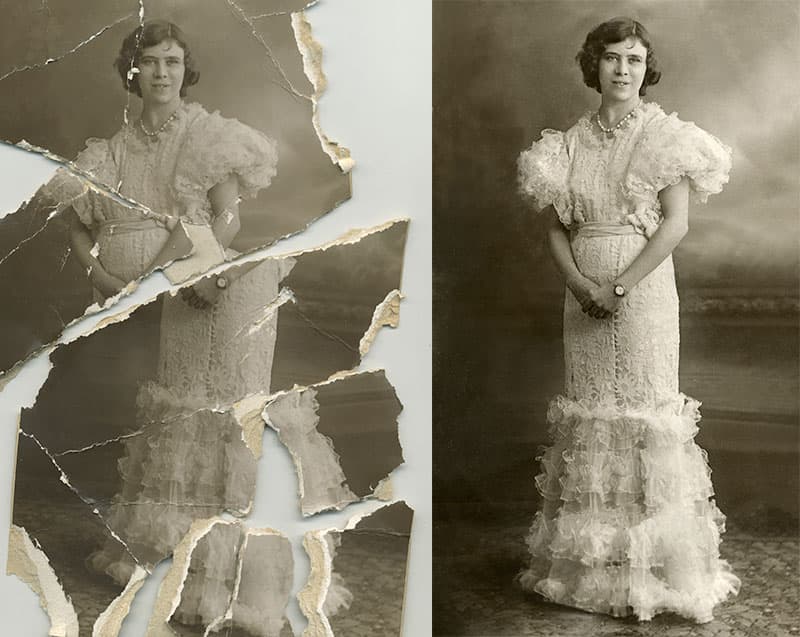
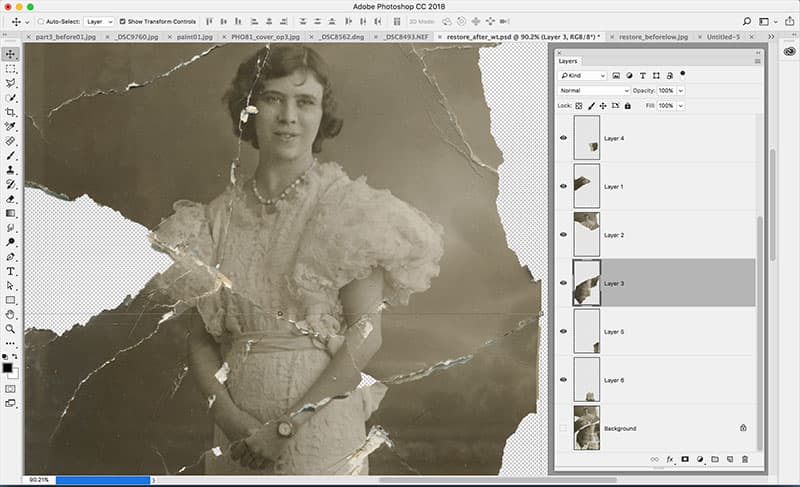
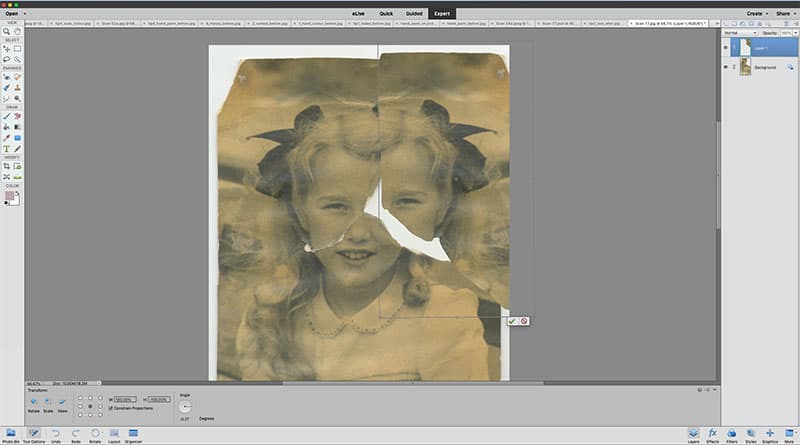
Even very badly damaged prints can be restored. As long as enough detail remains, it doesn’t matter if that detail is in several pieces. We begin by selecting each individual piece with the Quick Selection tool, then copy each to a new layer (Cmd/ Ctrl+J). Once done, the Move tool and Transform command (Cmd/Ctrl+T) can be used to reposition the broken pieces, shifting them back into place like a jigsaw. When all the pieces are lined up, finish off by retouching the seams using the Spot Healing Brush and Clone tool. To do so, make a new layer and set both tools to ‘Sample All Layers’ so that they sample from the combined details; then paint to fill in the gaps.
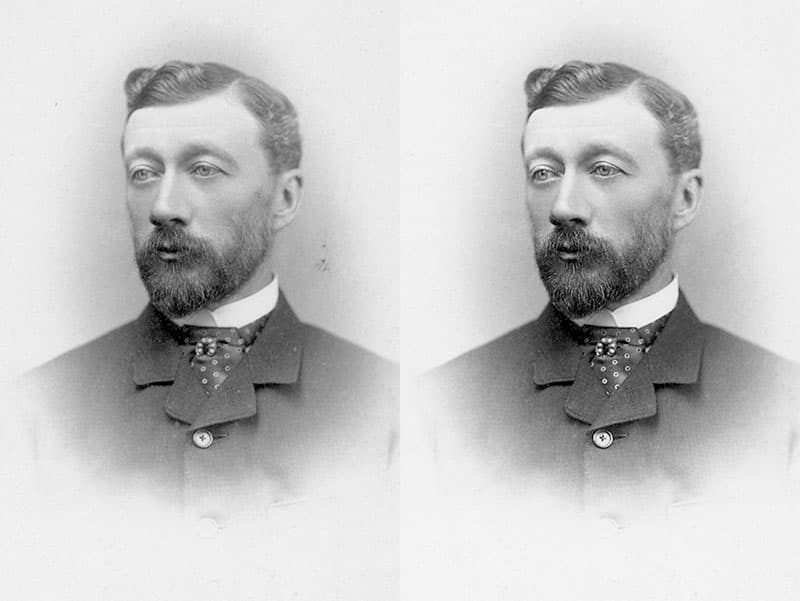
Before (left), After (right). The Spot Healing Brush is ideal for removing little scratches and marks quickly. Credit: James Paterson
Master the Healing and Clone tools
The Clone Stamp tool and Healing brushes are the go-to tools for much restoration work – or indeed all kinds of retouching tasks. There are two healing tools to choose from: the Spot Healing Brush and Healing brush. The Spot Healing Brush is usually the one to start with. It works by automatically sampling from the surrounding image in order to x the area being painted. As such, it’s brilliant for removing the little spots, marks, dirt, scratches and wrinkles that inevitably appear in old prints. Simply paint over them and let the tool do the work (for long scratches, shift-click between two points to paint a straight line).
As with all automated tools the Spot Healing Brush can occasionally go wrong, but this is when you can switch to either the Clone tool or Healing Brush to tidy up. Both of these other tools require you to Alt-click to sample a source – usually a clean area nearby. The Clone tool simply copies pixels from the source area to the painted area. It’s often most effective when used at a low opacity, as this allows you to gradually smooth out rough areas (to set a brush opacity quickly hit 1 for 10%, 2 for 20% and so on).
All these tools can be set to ‘Sample All Layers’. This is handy, as it means we can create a new empty layer above our original image then retouch on this layer, thereby preserving the original image on the layer below if we ever need to go back to it.
Credit: James Paterson
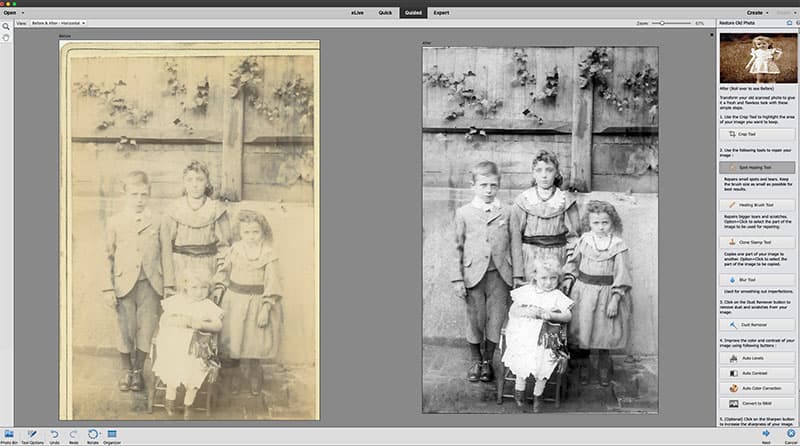
Use the ‘Restore Old Photos’ Guided Edit
The Guided workspace in Elements offers a wide range of techniques, each laid out like a tutorial with all the tools you’ll need at hand. Found under ‘Special Edits’, the dedicated ‘Restore Old Photos’ guided edit is a great place to start, especially if you’re a beginner. It guides you through cropping and retouching the print, then gives you the option to apply the Dust and Scratches filter and sharpening, as well as auto tonal fixes or a black & white conversion. It doesn’t give you the same control as doing things manually in the Expert Mode, but it’s quick and easy.
Credit: James Paterson
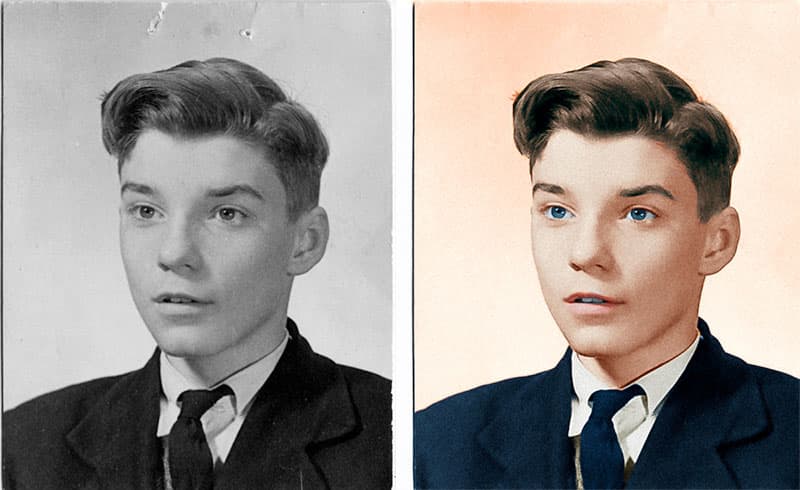
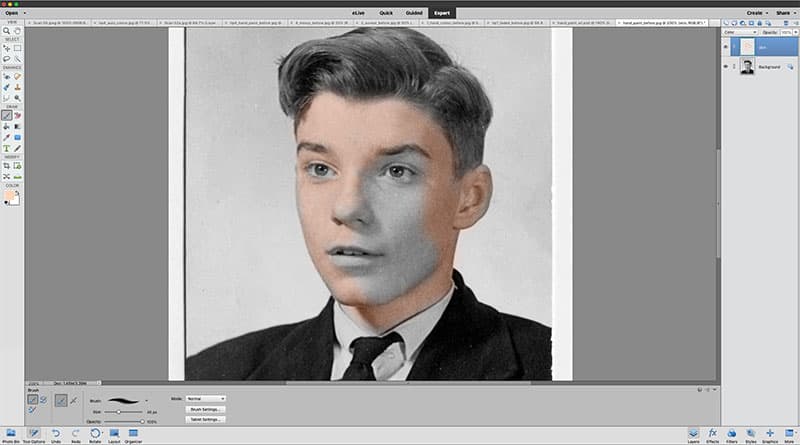
Get the hand-painted look
Why not add colour to old photos to give them a hand-painted treatment? The technique is very easy. Simply go to the Layers panel and make a new empty layer, then change the Blend Mode to Color. The Color Blend Mode allows you to apply the colour while still keeping the details visible from below. Next grab the Brush tool, choose a colour and begin painting. Once done, make other layers for different colours. Often the colour can initially look too strong, but it’s easy enough to tone it down by lowering the layer opacity. And if it doesn’t look like the right shade, you can always tweak the colour afterwards by adjusting the Hue (hit Cmd/Ctrl+U for the Hue/Saturation command).
Credit: James Paterson
Replace missing details
If part of a photo is missing or badly damaged so as to be unrecognisable, you might be able to mirror the details from elsewhere to fix the problem. To do this, make a loose selection of the area you want to copy using the Lasso tool, then hit Cmd/Ctrl+J to copy it to a new layer and Cmd/Ctrl+T to transform. Right-click and choose Flip Horizontal to flip it and drag it into position to fill in the missing details. Once done, we usually need to soften the edges of the piece so that it blends in with everything else. To do this, we add a layer mask, grab the Brush tool and – using a soft-edged brush tip – paint with black around the edges for a smoother transition.

Credit: James Paterson
Get creative
Instead of doing a straightforward restoration, why not use old photos as material for creative artwork? There’s something about the authenticity of vintage prints that makes them ripe material for a surreal makeover like this. You can create all kinds of wonderful collage effects using selections, layer and masks. Here – after removing the facial features – we’ve duplicated our original layer several times, making each one slightly smaller, then used a layer mask to hide the central portion of the face, revealing the smaller head on the layer below.
Five commands to speed up your restoration
Credit: James Paterson
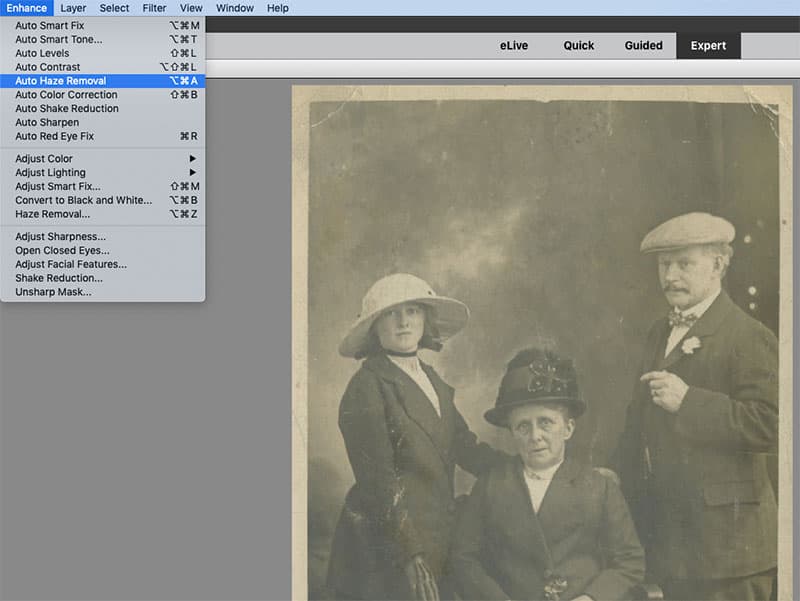
1. Auto-haze removal
This automatically boosts washed-out blacks and enhances detail. Go to Enhance>Auto Haze Removal to apply.
Credit: James Paterson
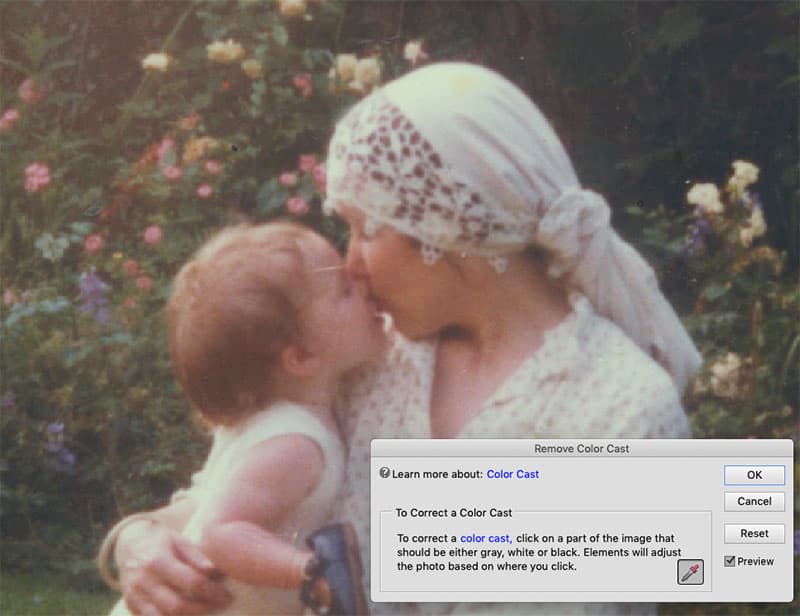
2. Remove a colour cast
For colour prints go to Enhance>Adjust Color >Remove Color Cast then click on a point that should be neutral, like the headscarf here.
Credit: James Paterson
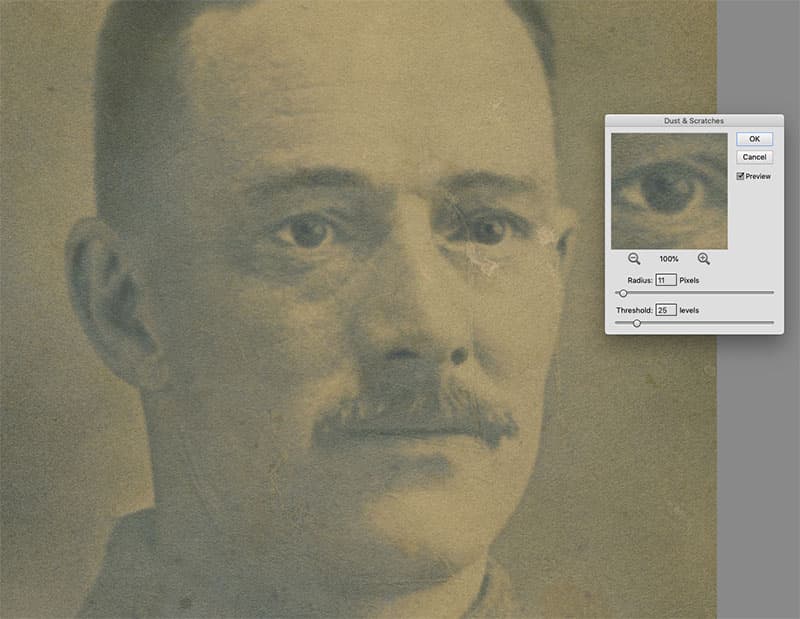
3. Dust and Scratches filter
Found in Filter>Noise, this applies an automatic fix across the image to remove small dust spots and can halve your retouching time.
Credit: James Paterson
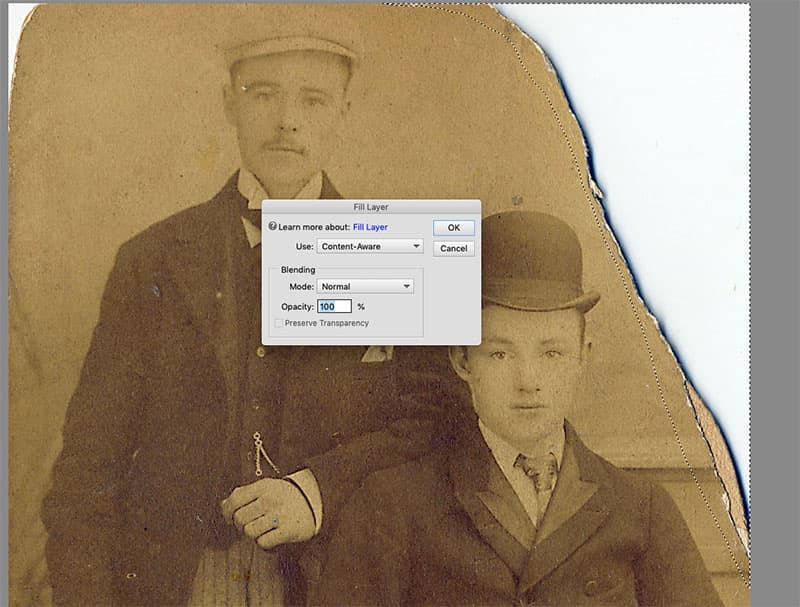
4. Content-Aware Fill
This fills in missing areas. Select the problem area with the Lasso tool then go to Edit>Fill Selection and choose Use: Content-Aware.
Credit: James Paterson
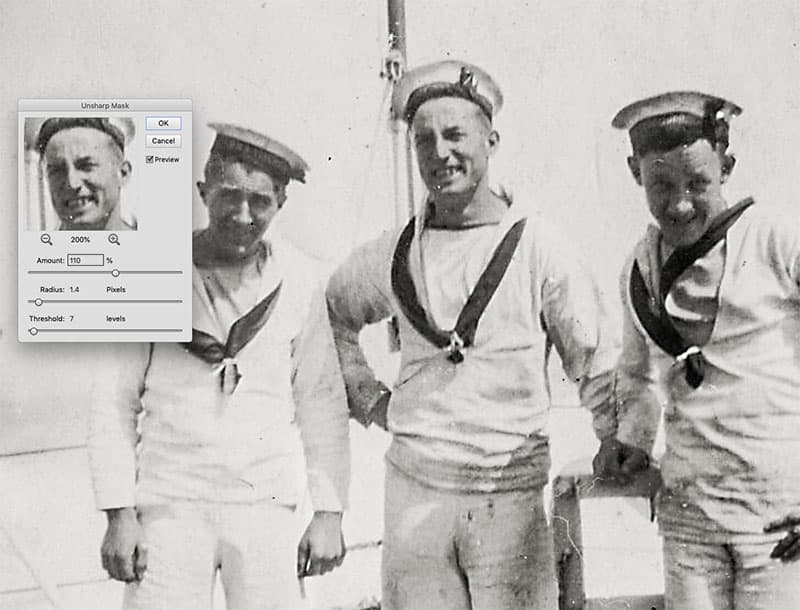
5. Unsharp Mask
Use Enhance>Unsharp Mask to sharpen soft details. Adjusting the Threshold will exclude grain from the effects of the sharpening.