One of the joys of close-up photography is the way that it enables you to see the world anew. When viewed up close, dandelion seeds can take on the appearance of ballerinas and walls can be transformed into expressionist paintings. ‘The real voyage of discovery consists not in seeking new landscapes, but in having new eyes,’ to summarise a Marcel Proust quote. As co-founder of Close-up Photographer of the Year (CUPOTY), I am inclined to agree.
Many wonderful pictures were taken in back gardens, the result of keen observation and a willingness to explore familiar surroundings with what Zen Buddhists call a Beginner’s Mind.
Choosing a shortlist was harder than I anticipated (I have included a selection of my favourite pictures here), but with the help of the expert judges – Sue Bishop, Ross Hoddinott, David Maitland, Robert Thompson, and Keith Wilson – we’ve succeeded!
There were five categories: Animals, Plants & fungi, Intimate landscape, Manmade and Micro, as well as Young CUPOTY. The competition was open to all, and photographers were welcome to submit work created on any device. Aside from being a celebration of close-up, macro and micro photography, I hope this annual competition will encourage photographers to slow down, enjoy their craft and make connections with the world around them.
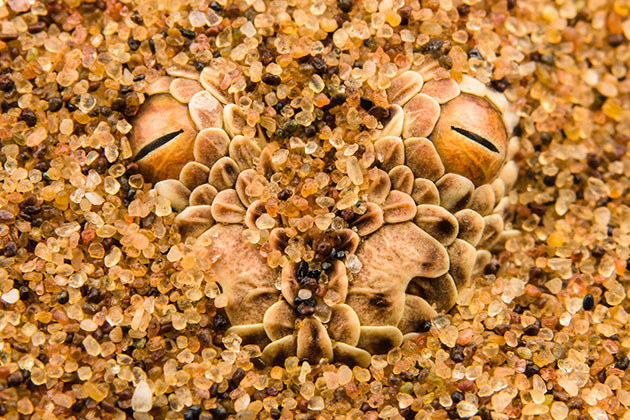
Nikon D810, Nikon AF-S 60mm f/2.8 Macro, ISO 100, 1/250sec at f/16. Accessories: Flashes with custom-made diffusers, flash bracket. Post processing: Lightroom, light cropping of the image. Credit: Emanuele Biggi
Namib’s Gaze – Emanuele Biggi
Overall winner Close-up Photographer of the Year Winner Animals
Occupation Naturalist and conservation photographer, Italian TV presenter
Website anura.it Instagram emanuele_biggi
‘Finding a Peringuey’s adder in the Namib Desert isn’t easy. I followed its tracks during the early morning, and eventually found one under a shrub with its eyes poking out. This adder is small – the diameter of each eye is about 2-3mm, so even though I knew it was there, it was still hard to spot! This species relies on camouflage to hunt and uses a sit-and-wait technique, leaving its nostrils and eyes above ground for breathing and scanning around. When prey comes near, the snake strikes and delivers a venomous bite.’
Emanuele’s top tips
- Research your subject, and go out with an expert guide.
- Use a macro lens to focus close to your subject.
- Use flashes, or shade the animal to get nice soft light.
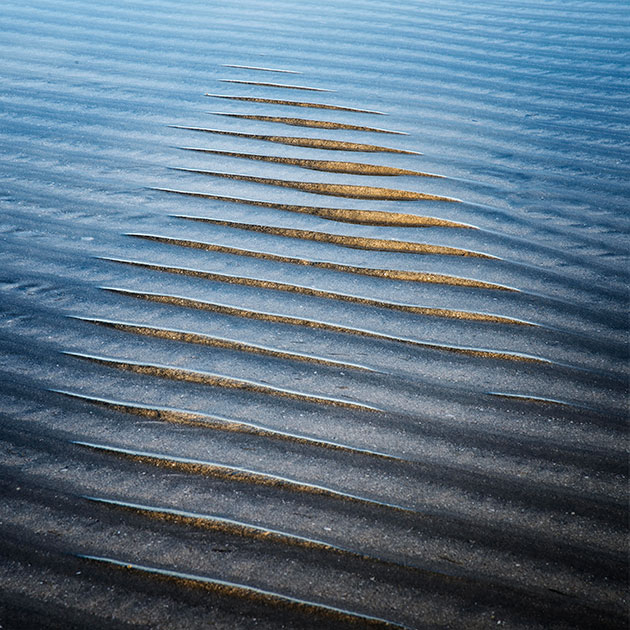
Nikon D800, AF-S Nikkor 24-85mm, 1/8sec at f/22, ISO 100. Accessories: tripod, plastic bags, wellies. Post processing: Camera Raw and Photoshop for sharpening, adjusting levels and balancing light and dark. Credit: Nora Kirkbak
Winter Sun – Nora Kirkbak
Highly commended Intimate Landscape
Occupation Retired graphic designer
Instagram nora.kirkbak
‘When it comes to photography I have two main interests: sand patterns and macro (especially flies). To indulge the first I visit beaches on the island of Vigra outside Alesund on the west coast of Norway where I live. This photograph was taken in January some years ago on a beach called Roaldsanden. A picture like this depends on the light, how low the sun is, the angle you choose, the reflections from the sky, and so on. I love the light during winter, but we only get a few hours of daylight during the darkest period of the year, and the tide has to correspond with the lightest hours.’
Nora’s top tips
- Study the tide tables.
- Layer up with extra clothing.
- Wear your ‘sand pattern glasses’!
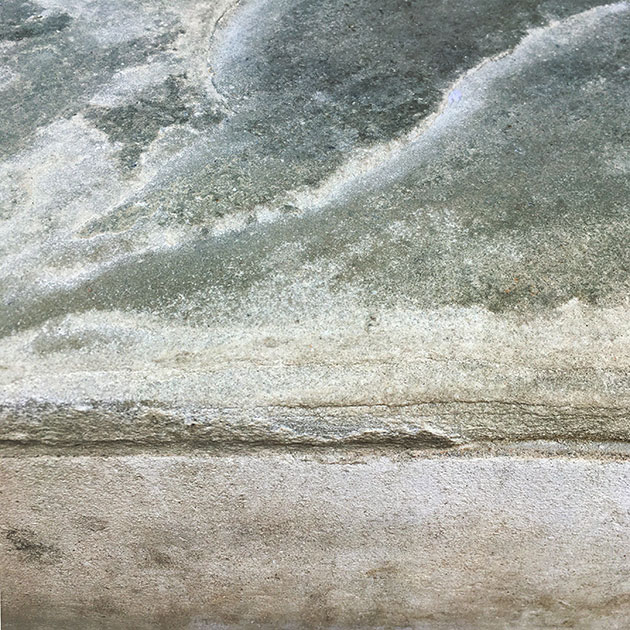
iPhone SE, 1/200sec at f/2.2, ISO 25, iPhone photo-editing software. Credit: Richard Mills
Moonlit Shore – Richard Mills
Second place Manmade
Occupation Learning disabilities support worker
Instagram richiemills70
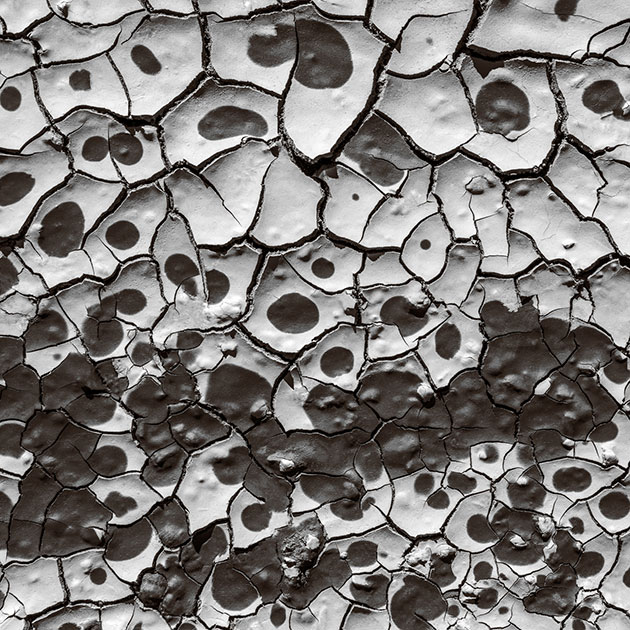
‘I made this image in a place that mostly goes unnoticed – a textured surface at ground level, out of general view. This was my starting point, but my aim was to source and create an abstraction from this. I wanted to encourage the eye to see land, sky and sea. Cracks and scratches became horizon lines, while staining and weathering mimicked clouds. With a shift in perspective, and no reference point to suggest scale, the image appears to show a distant view, and is more suggestive of a painting than a photograph.’
Richard’s top tip
- Look down; shoot in places you would never normally look.
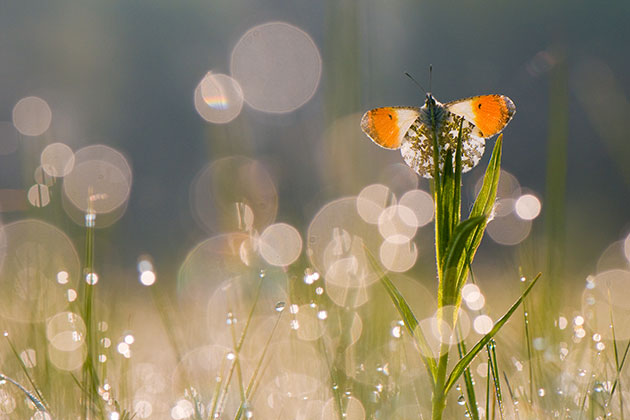
Nikon D300, Tamron 90mm Macro, 1/1000sec at f/6.3, ISO 250. Post processing: Photoshop, slight correction to white balance. Credit: Edwin Giesbers
Wake Up (with First Light) – Edwin Giesbers
Highly commended Animals
Occupation Professional nature photographer
Website edwingiesbers.com Facebook Giesbers.Photography Instagram edwin_giesbers
‘This image of an orange tip butterfly was made in the grasslands of De Bruuk nature reserve in the Netherlands. In April you will find many orange tips here and, later in the year, some rare small pearl-bordered fritillaries. The butterflies sleep at night amongst the vegetation with their wings closed. As soon as the morning sun hits the wet grassland they open their wings to warm up. At this point you can see the orange spots on the male butterfly. When this happens they fly away looking for females. For me, the butterfly is the bringer of spring. When the plants start to flower and the trees and shrubs turn green, this butterfly is one of the first to appear. To photograph them, well you need to know where they sleep. It’s best to look for them before sunrise and photograph them as soon as it becomes light. If it gets hot quickly you have to work fast because the butterflies will disappear earlier.’
Edwin’s top tips
- Find out where particular butterfly species sleep.
- Visit a location when you expect dew to be on the vegetation to enhance the bokeh bubbles.
- Shoot into the light to see bokeh bubbles.
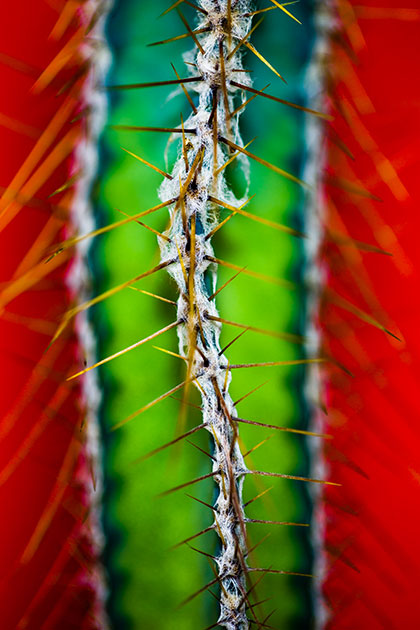
Canon EOS 5D Mark III, Canon EF 100mm Macro, 1/13sec at f/2.8, ISO 100. Accessories: tripod, Joby Gorillatorch, greaseproof paper. Post processing: Lightroom, tonal adjustments to overall image and local adjustments with grad filter and brush tools. Credit: Andrew Wilson
Cactus Ridge – Andrew Wilson
Highly commended Plants
Occupation Compliance QA games tester
Website awilsonphotography.com Facebook andrewwilsonphoto Twitter And_rew_Wilson
‘This photo of my girlfriend’s cactus was taken in our living room nearly two years ago. I was experimenting with macro, and this was the first time I had really considered using a background to complement the subject. We were in the middle of securing a mortgage and a red folder from a banking company was lying around – this did the job perfectly! I used an aperture of f/2.8 to isolate the ridge of the cactus from its main body. To get most of the ridge sharp I had to get the plane of focus as parallel as possible to it. To light the cactus I used a Joby Gorillatorch and wrapped the legs around my lens. I wouldn’t normally light a subject from such a direct angle relative to the camera, but I liked the uniform look – it illuminated the ridge and body of the cactus without casting shadows, especially when diffused with greaseproof paper!’
Andrew’s top tips
- Visualise how you want to frame the image before taking any pictures.
- Consider using additional lights or reflective materials.
- Think about the background.
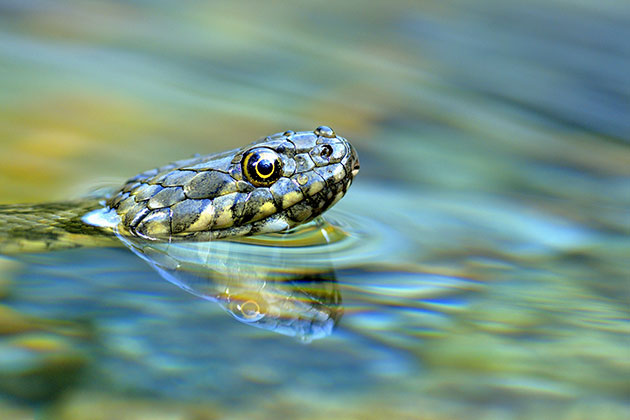
Nikon D7200, Tokina 100mm Macro, 1/125sec at f/8, ISO 1000. Post processing: Nikon Capture NX-D, contrast, brightness, saturation tweaked, unsharp mask applied, white-balance and colour balance adjusted. Credit: Vittorio Ricci
Dice Snake – Vittorio Ricci
Highly commended Animals
Occupation Traffic warden
Flickr flickr.com/photos/vricci63
‘In order to photograph this dice snake I had to lay on the ground with parts of my body in the cold water of a mountain creek. I took the shot during the summer while on a photo session in Beigua UNESCO Global Geopark in Italy. As a wild animal, the snake is totally free to roam everywhere and anywhere, which made it challenging to photograph! It wasn’t a very cooperative subject, but I persevered. I wanted to avoid disturbing the animal in any way, so I got down to its eye level and adopted my awkward position half in the creek and half resting on stones of various heights, shapes and sizes.’
Vittorio’s top tips
- Be patient.
- Persevere and you will often be rewarded.
- Don’t be scared of snakes, especially when they slither towards you!
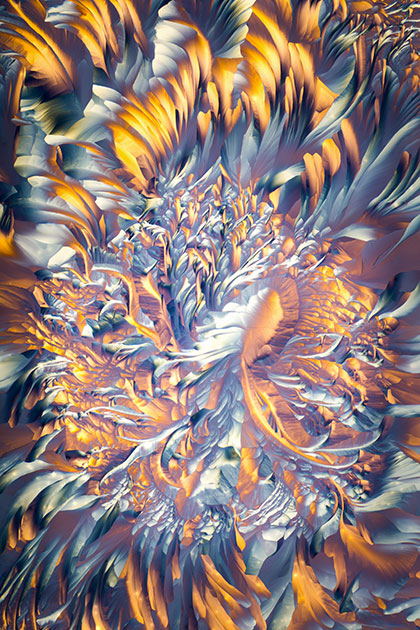
Canon EOS 5D Mark III, Nikon 4x Plan Apo objective and 10x projection eyepiece, 1/20sec, ISO 100. Accessories: Olympus BH2 microscope. Post processing: Lightroom, minor adjustments, cropping. Credit: Justin Zoll
L-glutamine and Beta Alanine 25 – Justin Zoll
Highly commended Micro
Occupation Bartender/photographer
Website justinzoll.com Instagram justinzoll
‘This is an image of crystallised amino acids L-glutamine and Beta Alanine photographed at around 40x magnification using a microscope and a DSLR. I do all of my experimentation and work in my bedroom. In this case, roughly equal amounts of both amino acids were dissolved in high-proof vodka before being distributed onto a glass slide and allowed to evaporate. The colours in the resulting crystals are due to the interaction of polarised light and the birefringent properties of the crystals. One of my polarising filters is the lens from an old pair of sunglasses! This type of work takes a lot of patience and experimentation. The overall image is a panorama of many individual frames allowing for a wider field of view.’
Justin’s top tips
- Find yourself a solid trinocular microscope and ensure you have the proper attachment for your DSLR or other digital camera.
- Make use of polarising filters.
- Experiment with lots of different (safe) chemicals to see what crystal forms each produces (if any).
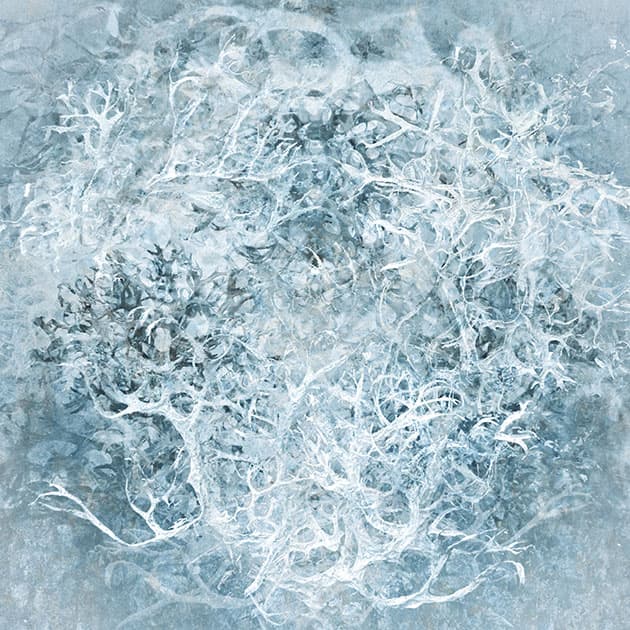
iPhone 7 Plus, 1/17sec at f/1.8, ISO 100. Post processing: Lightroom where small adjustments were made to white balance to give wintry feel, and tweaks made to highlights/shadows. Credit: Jane Simmonds
Winter Oakmoss – Jane Simmonds
Highly commended Plants
Occupation Web administrator
Website janesimmonds.co.uk Flickr flickr.com/photos/39655925@N00 Instagram janesimmonds31 Twitter JaneESimmonds
‘I enjoy using my phone to make abstract images of the things I collect on my daily walks in the Forest of Dean. Back in January, on a dreary winter’s day, I was drawn to the delicate, branched shapes and silvery colour of the oakmoss lichen I saw on the twigs and branches. I picked up a few pieces that had been blown to the ground and took them home. I normally use a light pad to photograph the things I collect, but this approach didn’t work with the lichen so I placed it on a piece of slate tile (which produced a nice textured background) instead. I made a series of images using my iPhone and then experimented with blending them “in-camera” using the PhotoSplit app, which has a multiple exposure mode. I tried various blending modes before achieving this look.’
Jane’s top tips
- Be patient: multiple exposures are unpredictable, and it takes time to get a pleasing result.
- Forget the ‘rules’ of photography and have fun experimenting.
- Remember there is always something interesting to photograph no matter what time of the year or how dull the weather seems – sometimes you just need to look.
Sony RX100, 28-100mm (effective focal length), shutter speed unknown, f/11, ISO 100. Accessories: tripod, remote release. Post processing: Lightroom and Photoshop tweaks. Credit: Hal Gage
Cracked Mud – Hal Gage
Highly commended Intimate Landscape
Occupation Graphic designer
Website halgage.com Twitter halgage
‘While out walking in my downtown Anchorage neighbourhood I have a tendency to stroll down dirt alleyways, which often feature mud puddles. On this occasion I found a few with interesting spotted patterns. In order to get a square composition (which is my preferred format), I made two images: one slightly above centre and one slightly below centre and I stitched them together later using software. In this instance, I worked the dried mud for about an hour before coming up with the image shown here. The gradual increase in the size and frequency of the cracked “cells”, and the decrease in the “spots” is what really made it for me. Thefinal step was the making of the print le. I use software to create a type of split toning to give my black & white images a feeling of increased depth and separation. This is why the b&w image has a slight brown tone, in this case to the darkest values, leaving the mid and high values neutral.’
Hal’s top tips
- Buy a tripod. Use the tripod!
- When composing over the top of a subject it’s hard to get everything completely level, which can make the picture look like it’s never right-side up. To overcome this, try shooting at a very slight angle to give the final image a feeling of top to bottom.
- Use a macro lens to ensure edge-to-edge sharpness. Experiment with focus stacking.
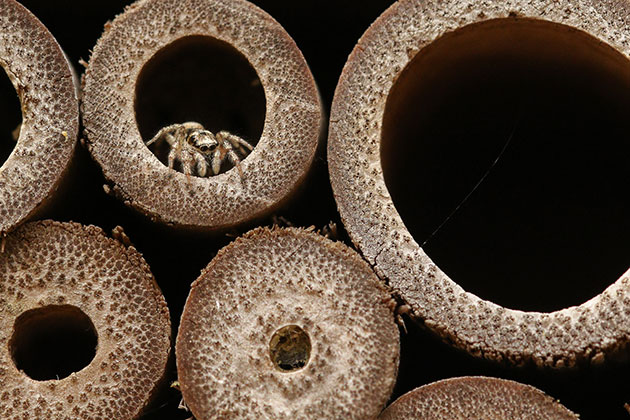
Canon EOS 7D Mark II , Sigma 105mm f/2.8 EX DG OS HSM Macro, 1/1000sec at f/7.1, ISO 2500. Post processing: Lightroom, image cropped and small adjustment made to exposure. Credit: Jo Angell
Inquisitive Zebra Spider – Jo Angell
Third place Animals
Occupation Early Years pre-school practitioner
Facebook Jo Angell Photography Twitter joangell5
‘It was a warm day and I’d noticed how active the bees were around the bug house in my back garden. I had some spare time on my hands so I positioned a chair in line with the house and sat and watched the bees for a while. Some of them were in the bamboo sticks, and I had several little faces staring right back at me. I took some pictures, but as I watched I noticed a zebra spider moving in and out of the different areas of the bug house. Zebra spiders are quite small (around 7mm), so getting them in focus can be quite tricky. When they move they can be too quick to follow with the camera, so I find waiting until they pause to be the best option. However, more often than not they turn, or I am at the wrong angle! This is where the three Ps come in. I watched as the zebra spider made its way down the bamboo stick and finally paused, in a wonderful position just looking out of the hole.’
Jo’s top tips
- Check out brick walls, fences, etc in your garden – you will be amazed by what you can find!
- Sit and watch your subject to learn more about its behaviour.
- Use the three Ps: patience, persistence and practice.
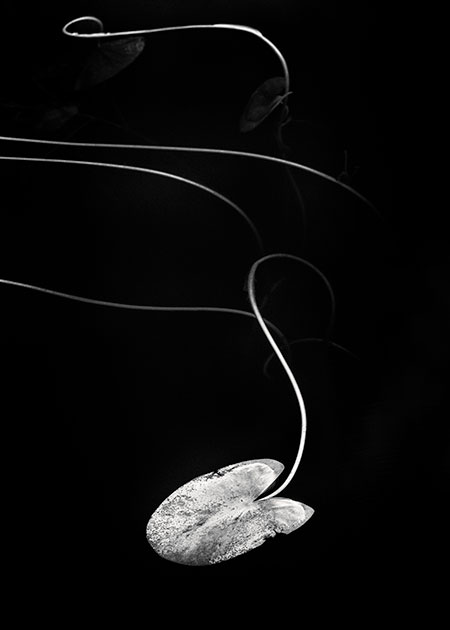
Sony Alpha 7R II, Zeiss Batis 135mm f/2.8, 1/125sec at f/10, ISO 1000. Post processing: Lightroom, Photoshop and converted to black & white using a preset created in Silver Efex Pro. Clone tool to remove a few flecks and a couple of strands from the water. Credit: Lizzie Sheppard
Lochan Lily, Isle of Harris – Lizzie Shepherd
Highly commended Plants
Occupation Professional photographer
Website lizzieshepherd.com Facebook LizzieShepherdPhotography Twitter LShepherdPhoto Instagram lshepherdphoto
‘An intricate network of lochans intersperses the rocky, lunar landscape on the east coast of the Isle of Harris. These provide the perfect habitat for aquatic plants, such as water lilies, reeds and bog bean. A week here or there, can make such a difference to the form and colour of the plants. My preference is for a still day – on this occasion, there was a fair bit of sun. The water reflected the blue of the sky and the lily was golden in hue. I chose to discard the colours, focusing on the form of the lily and strands, with a black & white conversion.’
Lizzie’s top tips
- Look for repetition of shapes – echoes and mimicry can help you to make sense of a complex scene.
- Check for unsightly blemishes on your plant. This lily was past its best, but I liked the symmetry of the nibbles on the leaf.
- When using a longer lens, keep an eye on depth of field.
Canon EOS 5D Mark II, Canon EF 100mm f/2.8 L IS USM Macro, plus 2x Kenko Teleconverter, 1/2sec at f/9, ISO 200. Accessories: tripod, polariser, remote shooting software (Helicon Remote). Edited with Helicon Filter. Credit: Henri Koskinen
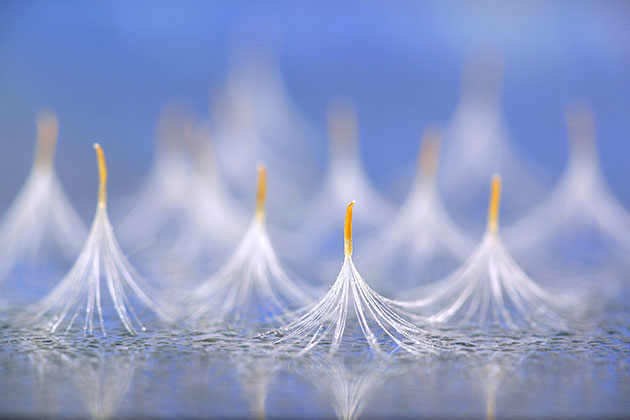
Seeds on Stage – Henri Koskinen
Winner Plants
Occupation Biologist
Flickr flickr.com/photos/aarnijaheka
‘I tried a number of compositions of seeds hoping to create the impression of ballerinas on a stage, but coltsfoot proved to be the most effective. The seeds of this plant are so delicate and light that I had to spray them with water to keep them still and stop them from flying away! I shot them on a semi-reflective surface as I wanted to create an airy feeling, and I used a background of blue sky and white clouds that I painted myself using thin, transparent watercolours. The colours reflect softly off the surface creating an illusion of cool freshness, while the sprayed water reminds me of morning dew. This was a planned shot – I have taken similar pictures before – but I like it because it asks the viewers to question whether they are looking at ballerinas on a stage or seeds covered with dew.’
Henri’s top tips
- Tame highlights and reflections with a polariser.
- Don’t breathe while shooting as even the tiniest breeze will make the seeds fly away!
- Spray the seeds with water to keep things still.