

These perspective-correction tools can also be found in Lightroom. Credit: Martin Evening
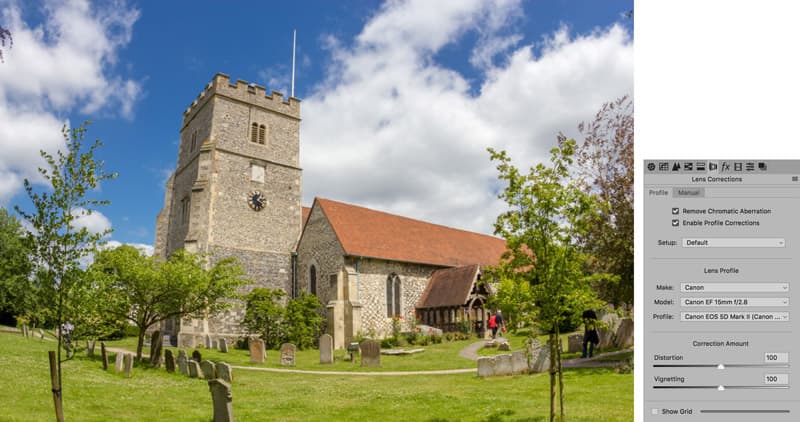
There are a number of ways in which Photoshop can be used to correct lens geometry and perspective, some of which I have described in a previous article. But there are also some useful tools in Camera Raw and Lightroom, where it makes sense to apply these adjustments first, at the raw-processing stage. Even photographs captured using the best lenses can benefit from a Camera Raw Lens Profile correction. This consists of two components: a Distortion correction to correct for the barrel or pincushion geometric distortion, along with a Vignetting correction. The Correction Amount sliders allow you to fine-tune a Lens Profi le correction. So, for example, if you believe a Lens Profile geometric correction to be too strong or not strong enough, you can easily apply compensation to the correction amount by dragging either of these sliders to the left or right.
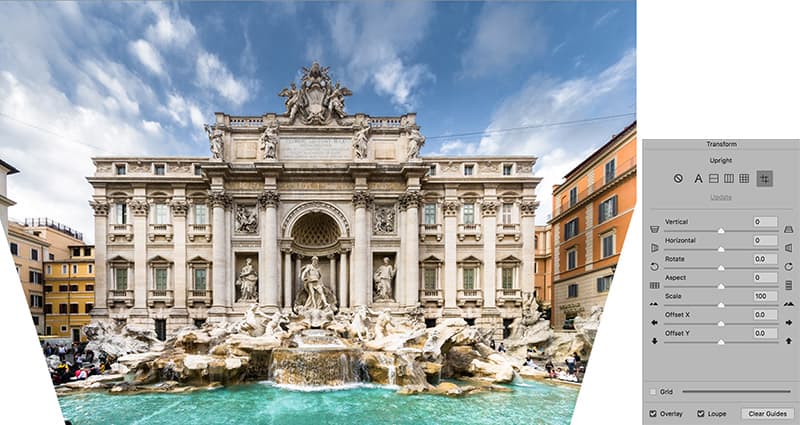
You can also apply Upright perspective corrections at the Camera Raw editing stage. These can be either auto-calculated or, for ultimate precision, applied manually using the Guided Upright option. To apply an Upright adjustment, click on the Transform option in the Camera Raw toolbar. This opens the Transform panel on the right, containing the Upright buttons and Manual slider controls. When you click on one of the Upright buttons, Camera Raw first analyses the image for straight-line edges and, from this, is able to estimate a perspective transform adjustment (to get the best Upright correction results, it is recommended you apply a lens profile correction first). There are several Upright options for you to choose from because no single type of adjustment will work perfectly for every image, so it is always worth clicking on each button to see which adjustment works best for an individual photo. It is important to understand that the underlying math behind Upright adjustments is doing more than auto-applying vertical and horizontal adjustments. Upright adjustments are more advanced than that, and the vertical and horizontal adjustments involved in the Upright process are actually quite sophisticated. Behind the scenes, there are angle of view and centre of projection adjustments taking place. This all has to do with the fact that the interaction of one rotation movement can have an effect on another, and such interactions can be quite complex. For example, think about what happens when you adjust the tilt and yaw on a camera tripod head, and you may get some idea of the calculations that have to take place here.

You can apply lens and perspective corrections to batches of images. Credit: Martin Evening
Some of the manual Transform sliders are partly included for legacy compatibility, but they also provide a useful way to tame the outcome from an Upright adjustment. In one of the examples I’ve included here, I describe how it can sometimes help to dial back in a little Vertical convergence to make an architectural subject look more natural. When applying extreme perspective corrections and particularly with Photomerge panoramas, it can often be necessary to adjust the Transform sliders to improve the perspective appearance. For example, using the Aspect slider, you can control how much the image is stretched vertically and horizontally so that the image view looks more natural. Another advantage of applying lens and perspective corrections via Camera Raw is that you can quickly apply these to batches of images. For example, it makes sense to apply lens profile corrections to all your images, which you can save as a default setting for every time Camera Raw encounters a new file. To do this, apply a Lens Correction only to a sample image. Then, go to the Camera Raw right-hand panel fly-out menu and select ‘Save New Camera Raw Defaults’. If you have a series of photographs taken of architectural subjects, you can sync the Transform settings across all the images you have selected in Camera Raw. What this does is syncs the Upright method and/or Manual Transform slider adjustments across all selected photos. The Lightroom synchronise settings have an option that lets you also sync the precise Upright transformation, rather than the Upright mode only.
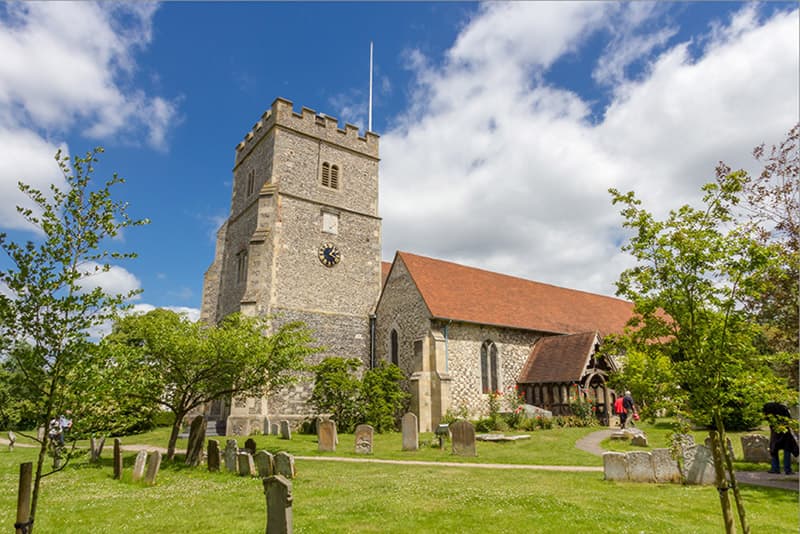
Before (above) and After (below): Activate the auto lens profile correction adjustment. Credit: Martin Evening
Profiled Lens Corrections
Selecting the Enable Profile Corrections box in the Lens Corrections panel applies an auto lens profile correction adjustment. This can be done for any image, provided that it contains the lens information in the EXIF data and there is a matching lens profile in the Lightroom Lens Profile database. When you do this, you should see the make of the lens manufacturer, the specific lens model, and the lens profile (which will most likely be the installed Adobe profile) in the boxes below. In this example you can see how in the corrected image the footpath that appeared curved in the ‘Before’ version is straightened in the lens corrected version.

Credit: Martin Evening
Manual Transform adjustments
The Transform sliders in the Transform panel can be used to apply manual transform adjustments, either in place of or in addition to an Upright adjustment. For example, the Vertical slider can be used to apply a keystone correction to the converging verticals in a photograph, such as those produced when pointing the camera upward to photograph a tall building – although sometimes an architectural photo can look a bit odd if you apply too perfect a correction. In the example shown here, I first applied a Guided Upright adjustment to perfectly align the vertical and horizontal lines. But I followed this by applying a +20 manual Vertical transform to make the verticals evenly converge slightly.
Upright adjustments

Credit: Martin Evening
1. Lens Profile correction
Here I applied a Lens Profile correction to the image to remove any geometric distortion. This resulted in a photo with perfectly straight edges, but because I had photographed the building from a slight angle, the lines converged both horizontally and vertically.
Credit: Martin Evening
2. Transform panel
To improve the perspective I selected the Transform panel and experimented with different Upright correction methods to see which worked best. Usually the Auto option is the best compromise. In this example I applied a Full Upright correction, but this was unable to perfectly correct the perspective.
Credit: Martin Evening
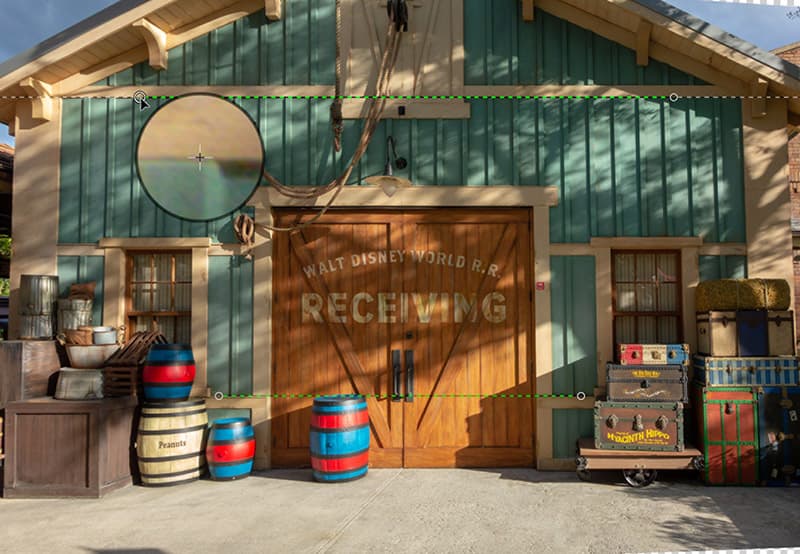
3. Guided Upright option
Instead, I selected the Guided Upright option (Shift + T), which automatically selected the Guide Line tool. With the Loupe box selected in the Transform panel, I added two guides to define the horizontal edges. The Guided Upright adjustment had so far corrected the horizontal perspective only.
Credit: Martin Evening
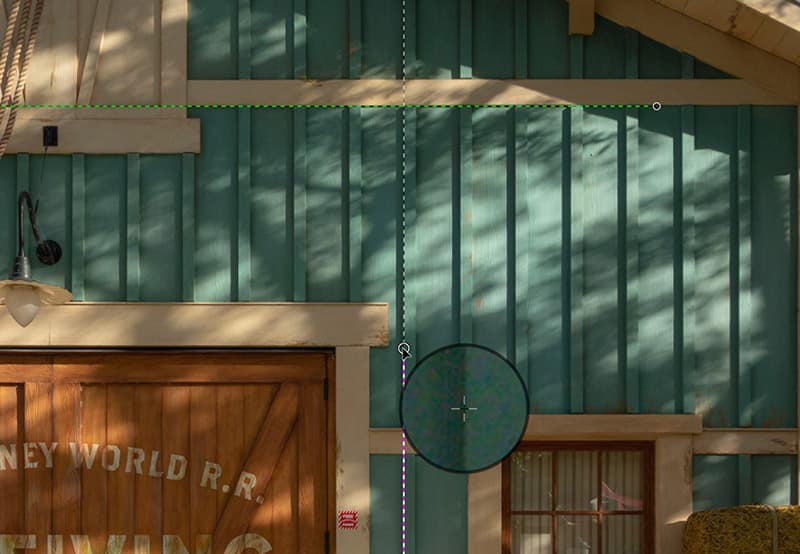
4. Add more guides
With the Guide Line tool still active I clicked to add two more guides, this time to define the vertical edges of the building. You will notice here how useful it is to have the Loupe option selected, as the Loupe window can help you place the guides precisely.
Credit: Martin Evening
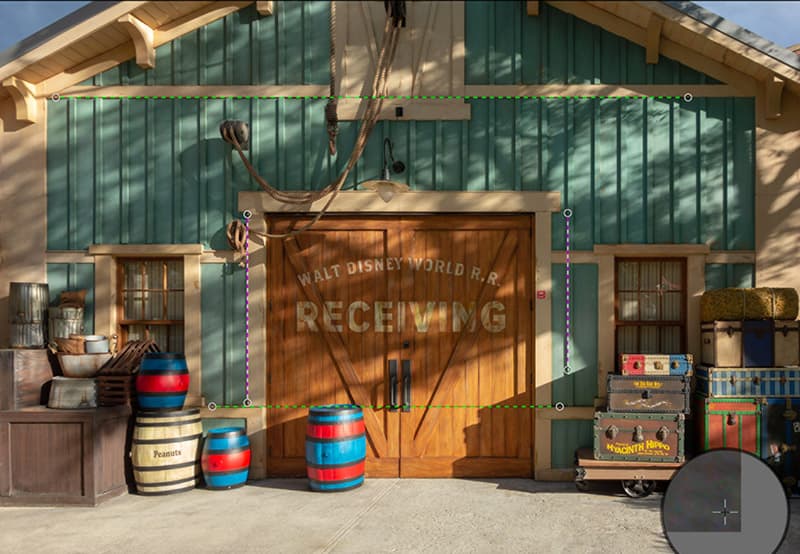
5. Final touches
This is the final version in which both the horizontal and vertical planes were fully corrected, a much-improved result compared to using any of the Upright button options. At this stage it was possible to click on any of the guide handles to fine-tune the Guided Upright adjustment.