Photo Insight Bringing You Essential Expert Advice Every Week
Andrew Sanderson – The Dip

A renowned photographer, tutor, author and Ilford Master Printer, Andrew Sanderson offers practical tips on working with film and traditional darkroom techniques
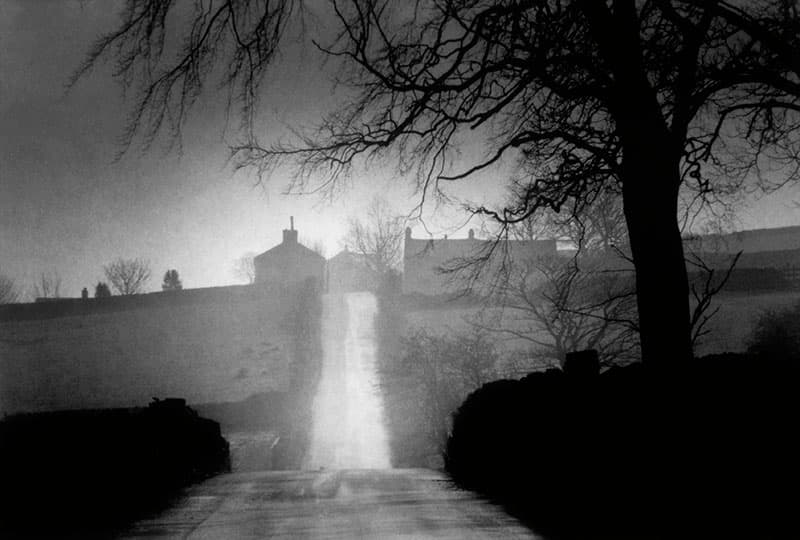
This shot is called ‘The dip‘. It was taken in the late 1990s in Meltham, West Yorkshire. I was out on a walk that day, exploring the local area where I had recently bought a house. Meltham is a small town and you don’t have to walk far before you are in open farming country. I wandered up Mill Moor Road and soon found myself at Leygards Lane, looking south-west. I set up my camera on a tripod, and decided on a suitable composition using a Pentax ME Super and an 80-200mm zoom lens set at the long end of its range.
Shooting a landscape, or any other subject for that matter, with a long focal length allows me to compress the perspective, in this case bringing the distant farmhouses and the trees on the right nearer together. It can be a good idea to try shooting the same scene with a wide and a telephoto-length lens, just to see what difference there is in the perspective.
While composing this scene, I was metering carefully with a Pentax Spotmeter to get the tones just how I wanted them. I had previsualised the image with heavy blacks in the nearest walls to the right, as well as the overhanging tree, and in my mind this would stand out well against the lighter grey of the hazy distance, giving good aerial perspective. The sky was rather bright, but this wasn’t something I could do anything about, as a graduated filter is useless on a telephoto lens. I knew I could burn this in later in the darkroom, so I was unconcerned that it was a little bright.
When I had taken the meter reading and set the appropriate shutter speed and aperture, I looked through the camera again to check everything was how I wanted it to be. It wasn’t. A horse and rider were coming down the hill in the distance and I could see that they would be a big distraction in the picture. Instead of the viewer looking at the elements of composition I had carefully placed, they would just look at the rider. With the distance involved, I could have been waiting quite a while before they got past me, and I would probably have had to move out of the road because of the cars. I was anxious to get the shot as soon as I could, so I was relieved to see that as they reached the bottom of the dip they dropped so low that only the top of the rider’s hard hat was visible. If you look closely you can just see it. I took one shot and a second later the rider began to rise into view again.

While working on this image in the darkroom later, I found the negative easy to print, apart from the sky. I knew at the time of taking the image that the sky had been overly bright, so it wasn’t a surprise. The bright sky area was a bit dense on the negative, requiring quite a long second exposure to burn it in, as I had suspected.
I was printing to 10x8in, as I always do, to assess how well the image is going to print. I then decide which images deserve to be printed to 20x16in and scale up my exposure times accordingly. I could tell that a scaled-up time for the long burning in I needed for this image would mean an uncomfortably long lean over the enlarger baseboard, with my arms extended. Having had experience of this kind of arm and backache from a couple of past negatives, I didn’t relish the idea. After the printing session, I looked through the various prints I had made from different negatives and this one stood out. When I revisited the negative to print it to the larger size later, it did indeed need an arm-aching length of exposure. Looking at the finished print, I had reassessed how it should look and decided it needed even more density at the top than the 10x8in test print, so I knew this was going to involve doubling the burn in time!
The solution was to make another small print with the required burning in and then make a paper copy negative from it. This meant that I could enlarge the image to any size I required and it would need only one exposure. The version you see here is from the paper negative and has the characteristic texture of that process, although the texture is not as pronounced as it can be because this is dependent on the paper chosen.
Andrew Sanderson was talking to Debbi Allen

If you would like to read more about paper negatives, Andrew’s book, Paper Negative Photography, is available from www.blurb.com, price £15