Do you remember when you were young and the first fall of snow had you dashing outside to build a snowman or go sledging with your friends? The onset of winter is still an exciting time, only by now many of us have swapped our sledges for cameras. As the cold of winter sets in, a covering of frost or a blanket of snow can transform the landscape. Capturing images of our native wildlife during this time can be a challenge, but it’s a rewarding one.
There are some advantages to winter photography, especially for those who find early rising difficult, as sunrise happens much later than in summer. Winter days with clear skies allow plenty of high-quality light for shooting, and the low aspect of the sun at this time of year means you can shoot all day without the harsh shadows we encounter at midday in the summer. During winter it’s interesting to concentrate on animals that exhibit a difference in behaviour, pelage or plumage from the rest of the seasons. For example, species that change colour in the winter, or those who who become more confiding due to pressures for survival.
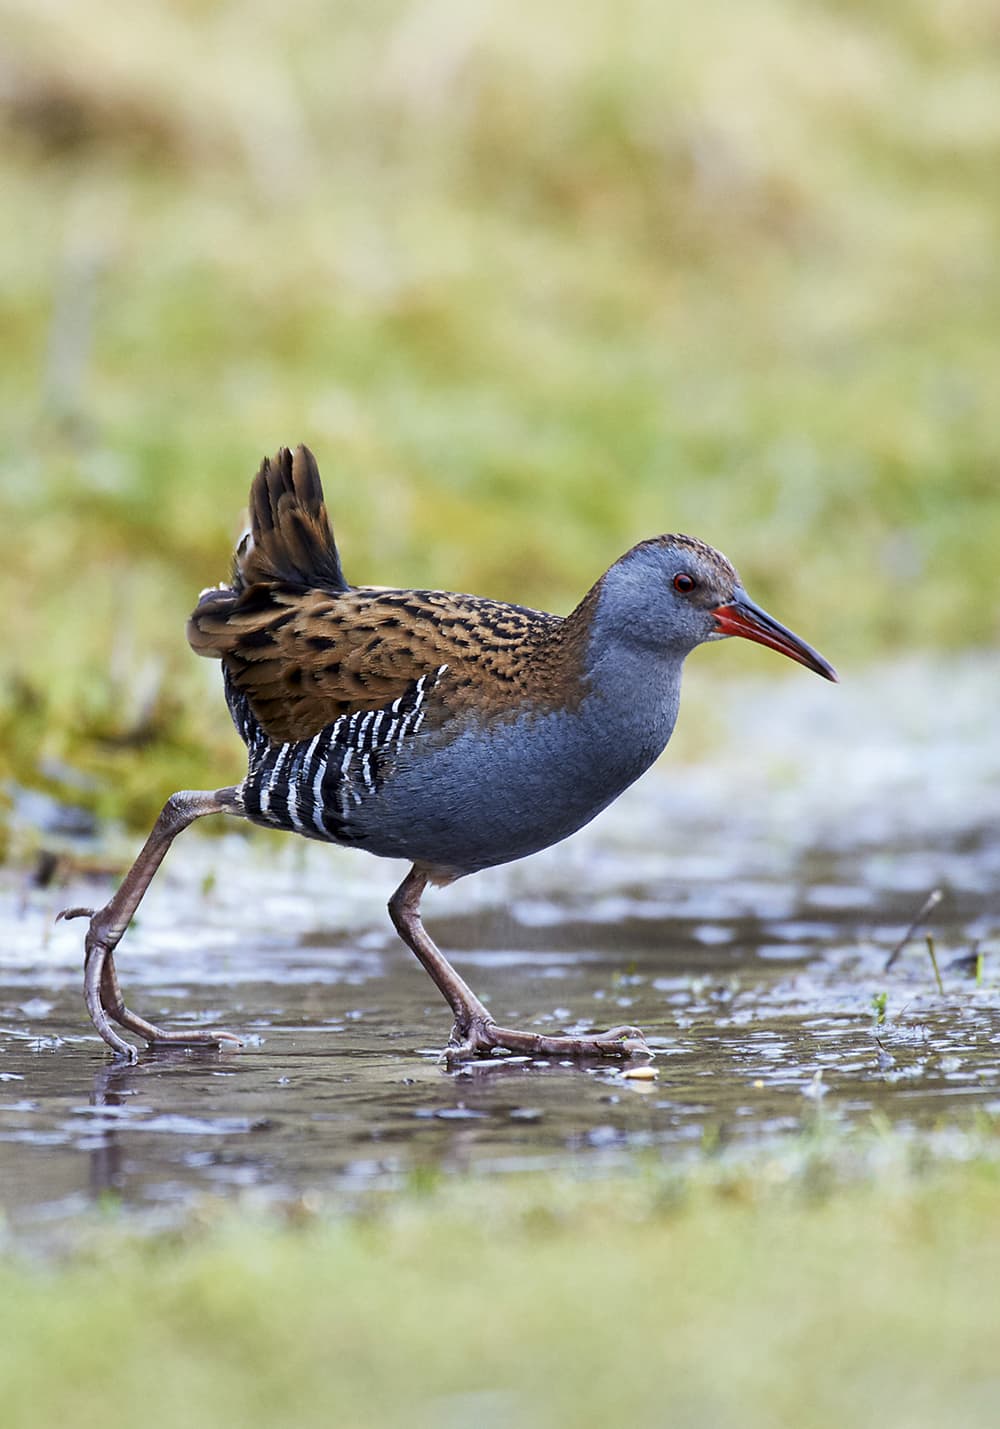
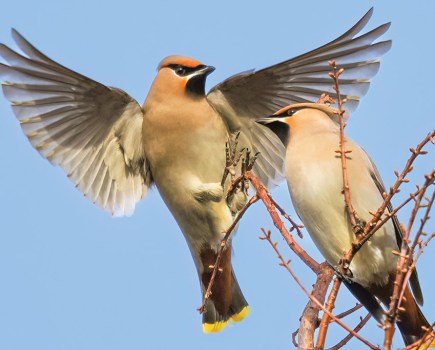
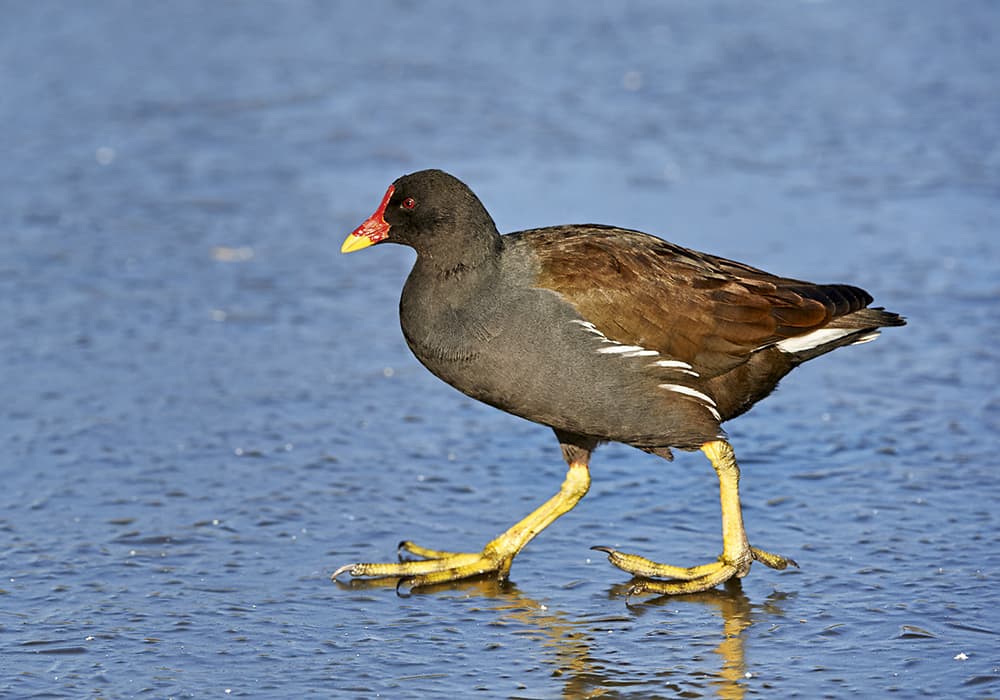
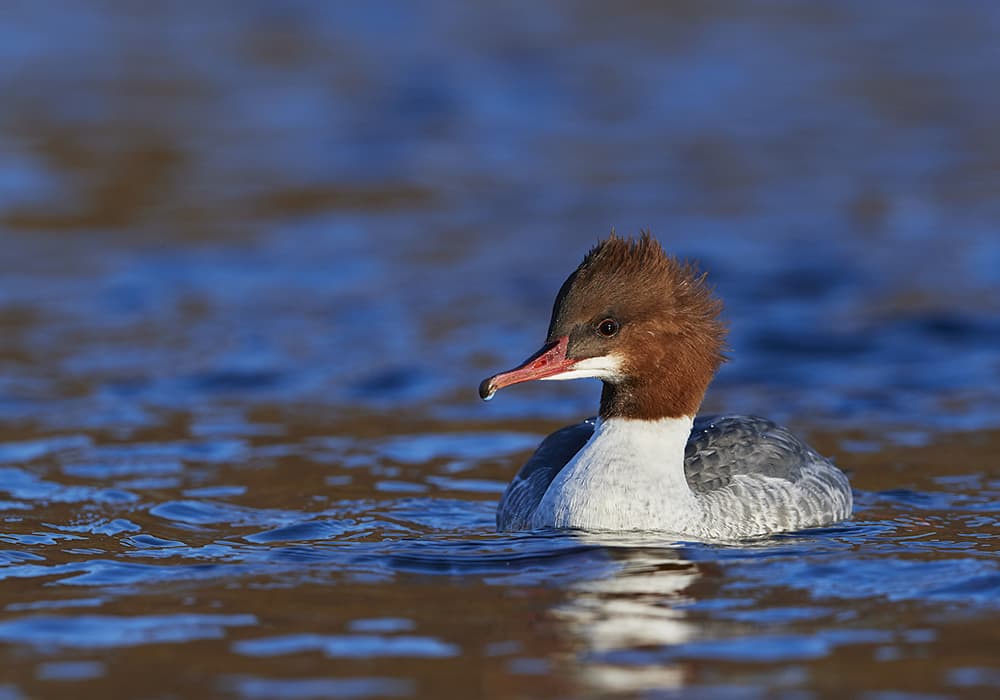
Even shy birds, such as water rail, can be tempted out when food is scarce. Nikon D3, 500mm (with 1.4 teleconverter), 1/400sec at f/6.3, ISO 1000
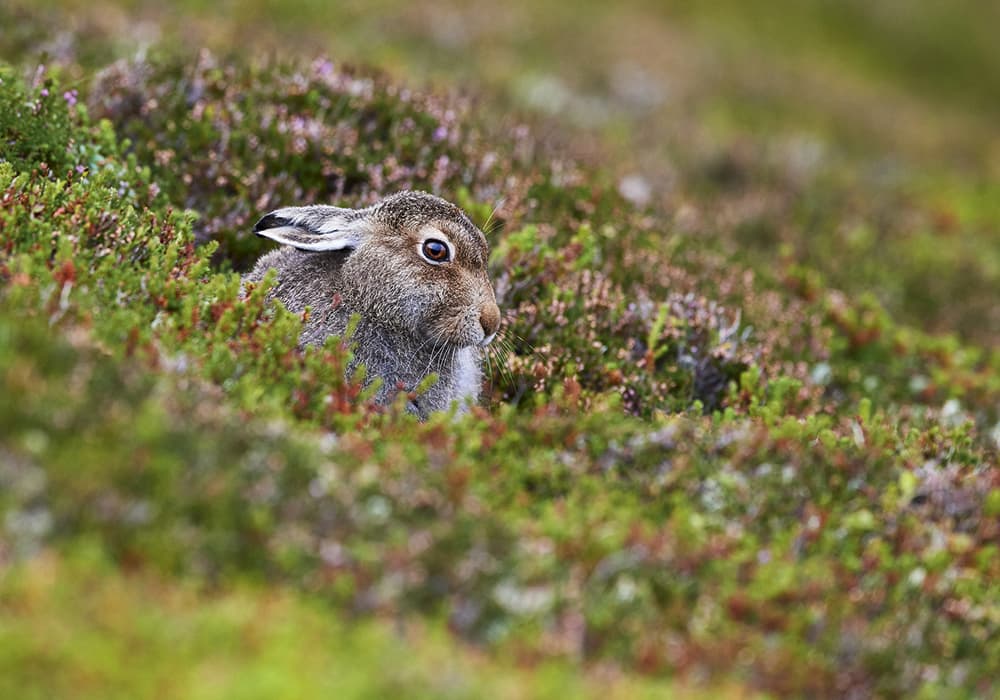
Mountain hares
One of the most striking seasonal changes can be seen in mountain hare populations. In the summer months they have a greyish-brown coat, which moults out to a white or grey winter coat. One of the first things to do when planning a photo shoot is to research your quarry. You can use books, the internet, television documentaries or just spend some time watching them in the field. The knowledge gained from these sources will help you to anticipate their behaviour and allow you to pre- visualise some of the images you’d like to capture. A good exercise is to create a wish list of shots, either written down or carried in your head. This will help you to structure your time with the subject, rather than ambling about aimlessly and failing to achieve your goals.
In the UK mountain hares are found throughout Scotland and in the Peak District. Generally they live above 500 metres and will often rest on the lea side of hills, with their backs to slopes or rocks for protection from the wind. This type of information gives a good starting point as to where to begin your search. The hares feed mostly at night and rest during the day. They sleep for short intervals of a few minutes at a time, but spend long periods sitting in depressions, or forms. By observing these animals in the field we have found that many individuals have favourite places that they return to regularly. This has allowed us to find the same individuals on several visits.
Our strategy when photographing mountain hares is to try and spot them a fair way off. We use binoculars to distinguish between distant snowy lumps and hares. These also enable us to see which way the animal is facing in order to plan our approach. As with many animals, some hares will have a wider circle of confidence than others. This means that for certain individuals only distant shots are possible. However, don’t ignore the opportunities for such shots to show the animal in its environment.
Photographers use several different methods for stalking, sometimes varying the method according to the species being approached. With mountain hares it is best to move very slowly (sometimes it may take up to half an hour to close in on an individual). It is not always necessary to hide your presence – there’s usually not much to hide behind on an open snowy hillside anyway. We have found from experience that hares that turn out to be ‘sitters’ will tolerate fairly close approaches as long as they are not surprised. Take the view that they are aware you are there but don’t think of you as a threat. They will be relaxed and will exhibit normal behaviour without being stressed.
As you approach, walk maybe 10 paces then stop and watch the hare. If its behaviour changes, such as suddenly sitting up from a lying position or flicking its ears up to an alert state, freeze and wait for it to relax before approaching again. Always remember that the subject’s welfare is paramount. If the animal appears increasingly alert as you approach it’s best to back off a little and stop at this distance to avoid stressing the hare.
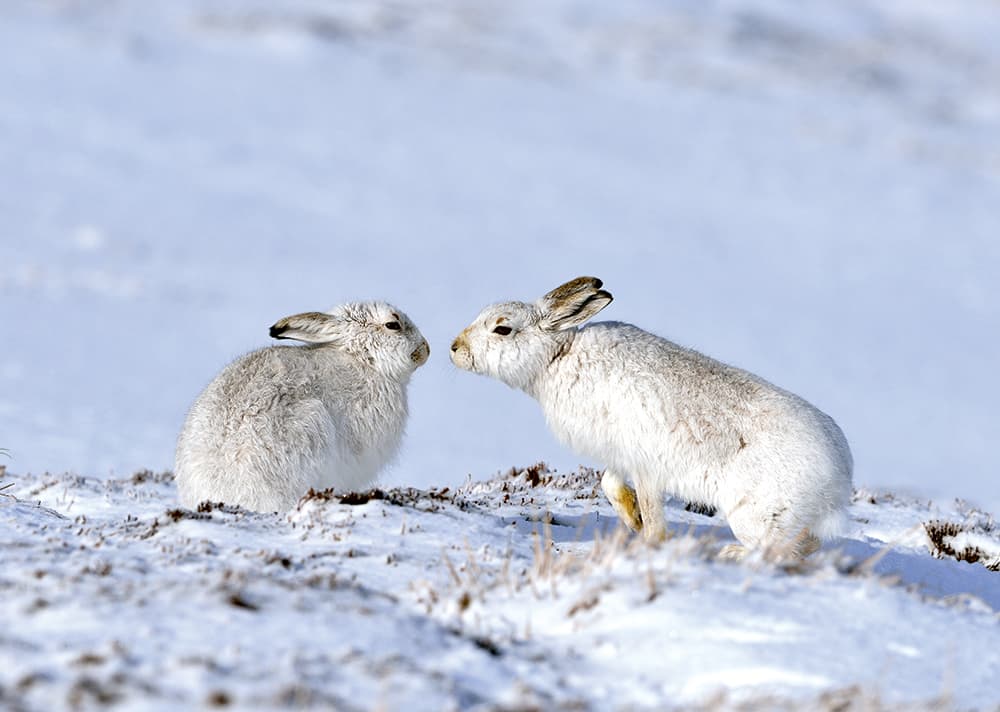
By spending time with your subject you’re more likely to witness interesting behaviour. Nikon D4, 500mm, 1/5000sec at f/7.1, ISO 800
Birds and feeders
If you like to take photographs closer to home one idea is to set up a winter feeding station. This can range from a simple bird feeder to a dedicated area with a variety of feeders and props. In the cold of winter this is an advantage as you can pop indoors for a quick cuppa to warm yourself up now and again.
We only have a small garden, but we live out in the country, so we have a healthy variety of visiting birds. To encourage good numbers of birds hang feeders up in several locations. When you want to photograph them take some of the feeders down to limit the food to one specific area and put out one prop at a time. This way you can predict where the bird will land and have your lens pre-focused on that spot. The usual caveats apply regarding bird feeding and welfare: don’t put food on the ground or allow feeders to clog up. Clean feeders frequently and move them around your garden regularly.
Depending on the siting of your garden you can sometimes shoot from a doorway, a window or a shed. If shooting outside many birds will tolerate close distances if you keep fairly still and quiet. Alternatively you could use a camouflaged bag hide or a pop-up hide. A cheaper alternative is to shoot over or through a blanket or duvet cover on an airing maiden or buy a throw-up festival tent.
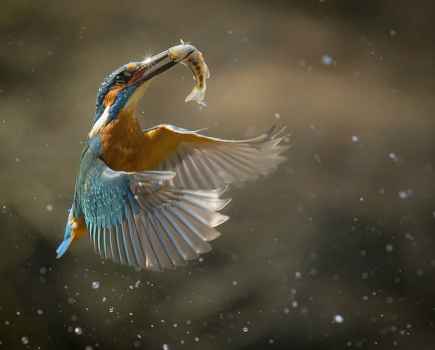
If you don’t have a garden you could visit your local nature reserve, where bird feeders are often kept stocked up to encourage wildlife. Alternatively there are several commercial enterprises that feed wildlife and have temporary or permanent viewing/photography facilities for paying guests. Species on offer in the winter include garden birds, woodland birds, kingfishers, birds of prey and red squirrels.
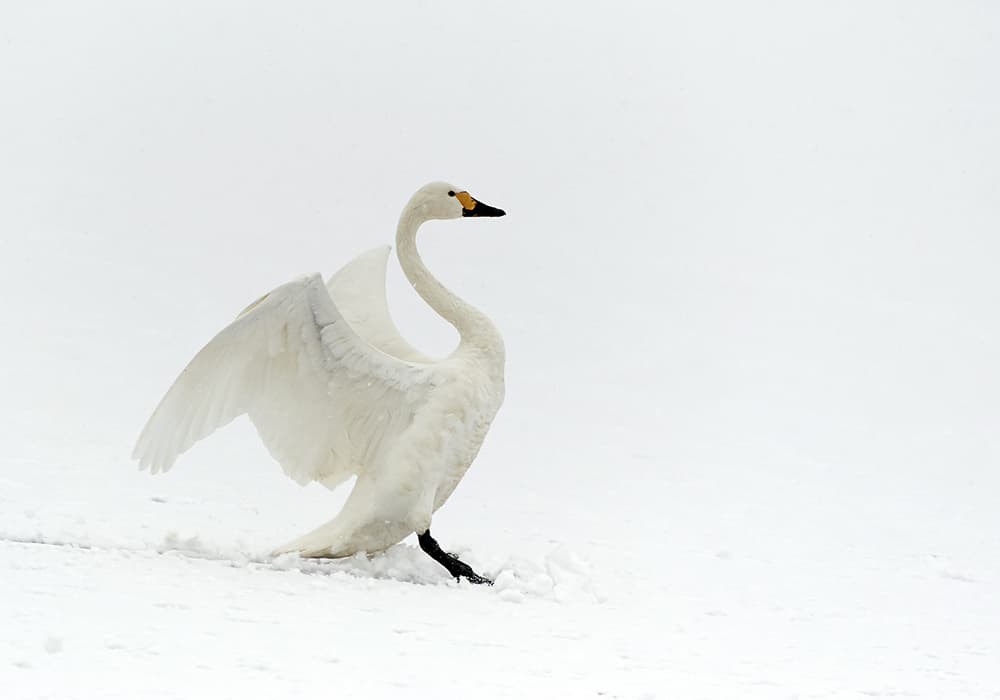
A visit to a red kite feeding station is thrilling at any time of the year and several sites offer good photo opportunities. In winter if there is snow lying on the ground there may be more birds coming in to the site because of difficulties finding natural food under the snow. Also the snow can act as a reflector, bouncing light back under the wings of flying birds, helping to alleviate any shadows and lifting the brightness of the image. It’s a chance to obtain images with a different ‘feel’.
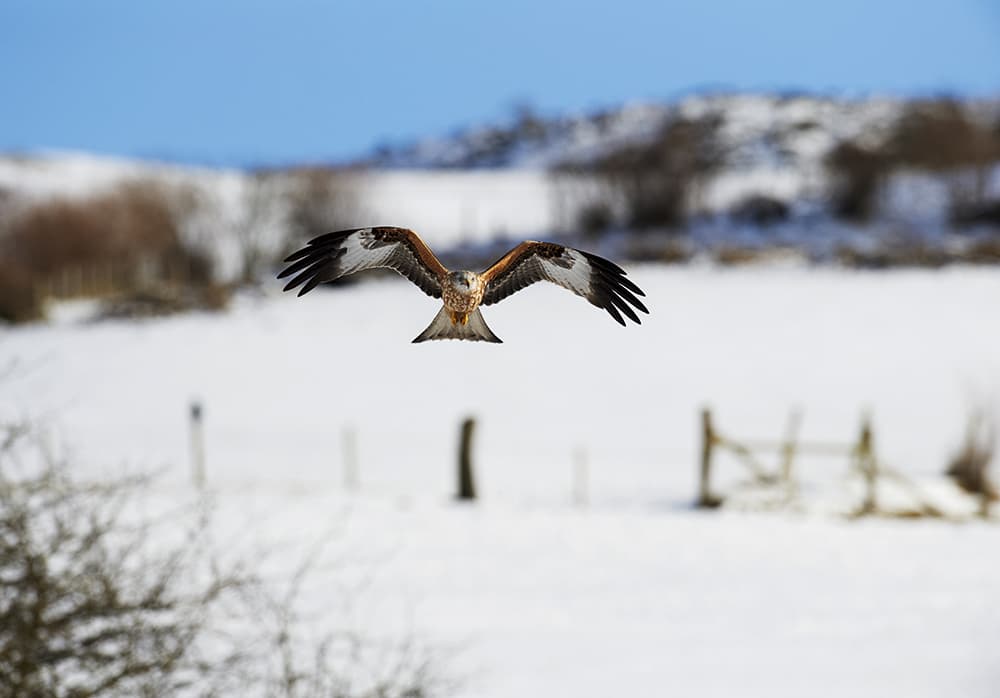
During winter the number of red kites around feeding sites increases. If there is snow on the ground this acts as a natural reflector. Nikon D3, 500mm, 1/5000sec at f/7.1, ISO 640
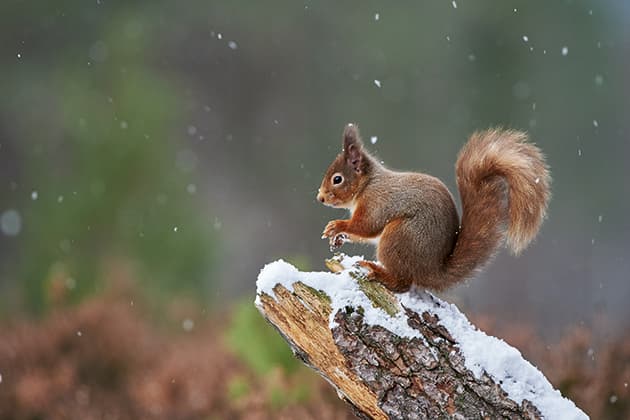
Red squirrels
The red squirrel is another species that is easily coaxed towards the camera with the promise of extra food. The added benefit to photographing them in the winter months is that their ear tufts are most prominent at this time of year (the ear tufts are moulted in late summer then regrow in early autumn). Again if there is frost on the ground or snow this adds a definite winter feel to the images.
With supplementary feeding of any species it is important to provide only small amounts of food. The food should not take the place of their natural food otherwise they may become dependent upon it and suffer if you stop feeding. If you put out too much this may raise the total population artificially within your local area to a point that is not sustainable when you stop feeding (e.g. whilst away on holiday or if you move house). This will cause hardship to the animals.
Other winter opportunities
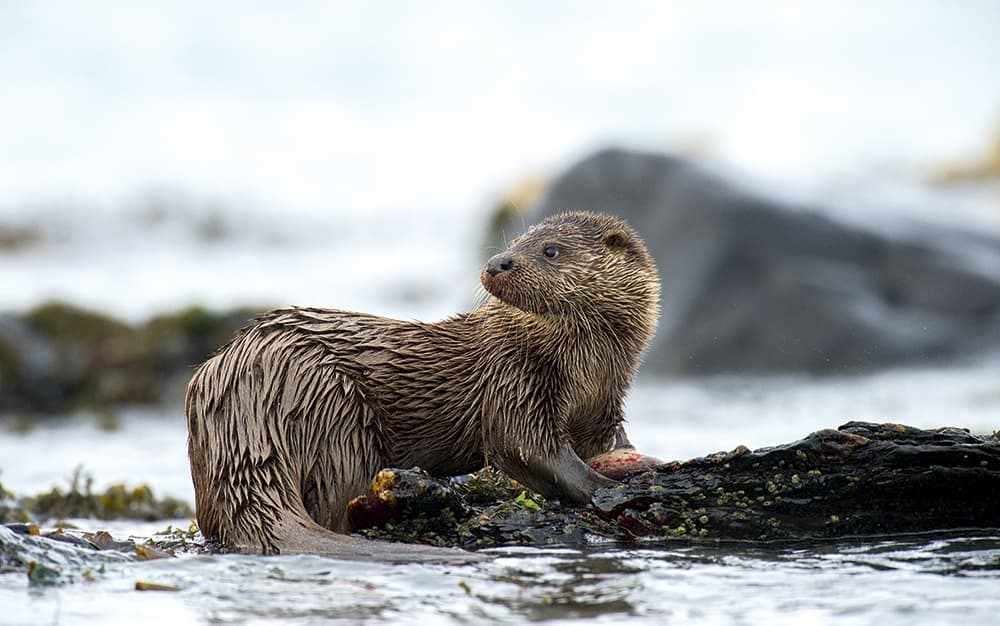
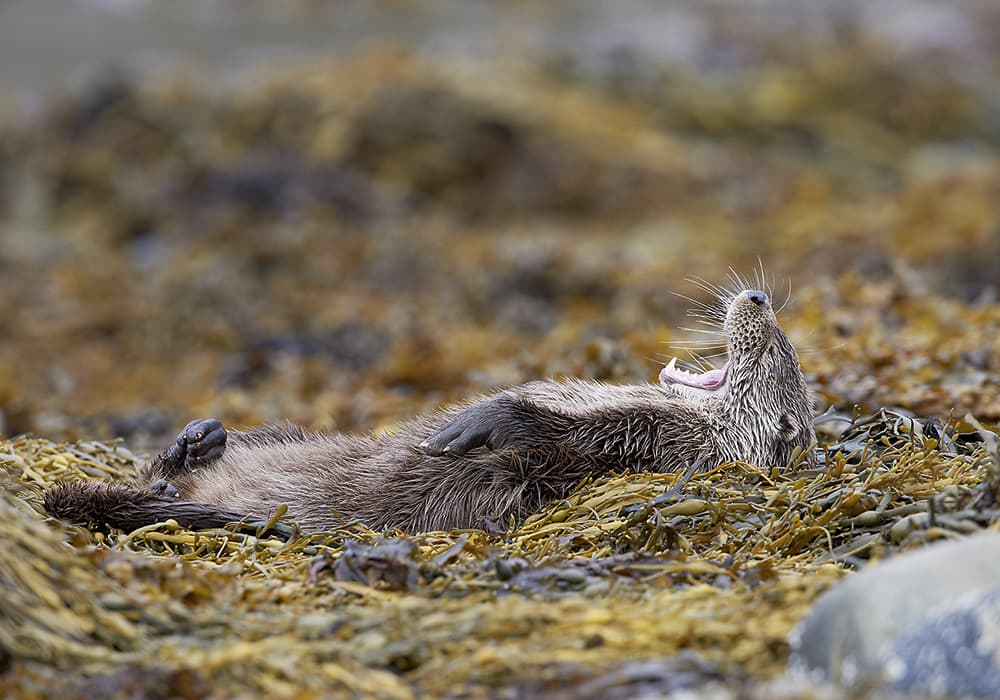
Coastal otters can be easier to find during the shorter days of winter. Nikon D3S, 500mm (with1.4 teleconverter),1/400sec at f/7.1, ISO 2000
Every winter the UK coastline sees a large influx of wading birds as they leave their summer breeding grounds to over-winter in this country. They are most active when feeding on an incoming tide, so knowledge of the tide times is important. It is best to go to the beach after low tide and set up, waiting for the tide to push the birds closer. Don’t be too anxious to approach the birds. With patience they will come closer to your lens. It is important that they are not disturbed as it is a vital refuelling time for them.
When watching coastal otters we have found that they tend to go out fishing for long periods (sometimes as long as four or five hours). From our experience they often avoid high tide but can be seen at any other state of tide. In the summer this means very long days if you are trying to find otters, from around 4am to 11pm. However, in winter the shorter days mean that they have less time to fish and will usually be out sometime between 8am and 5pm. For this reason we have experienced a higher success rate in finding otters on winter trips.
Whatever this winter brings, make sure that you wrap up warm and get out there. Hopefully if we get a dose of the white stuff you’ll have a choice to make: will you grab your sledge or your camera?
Why it works
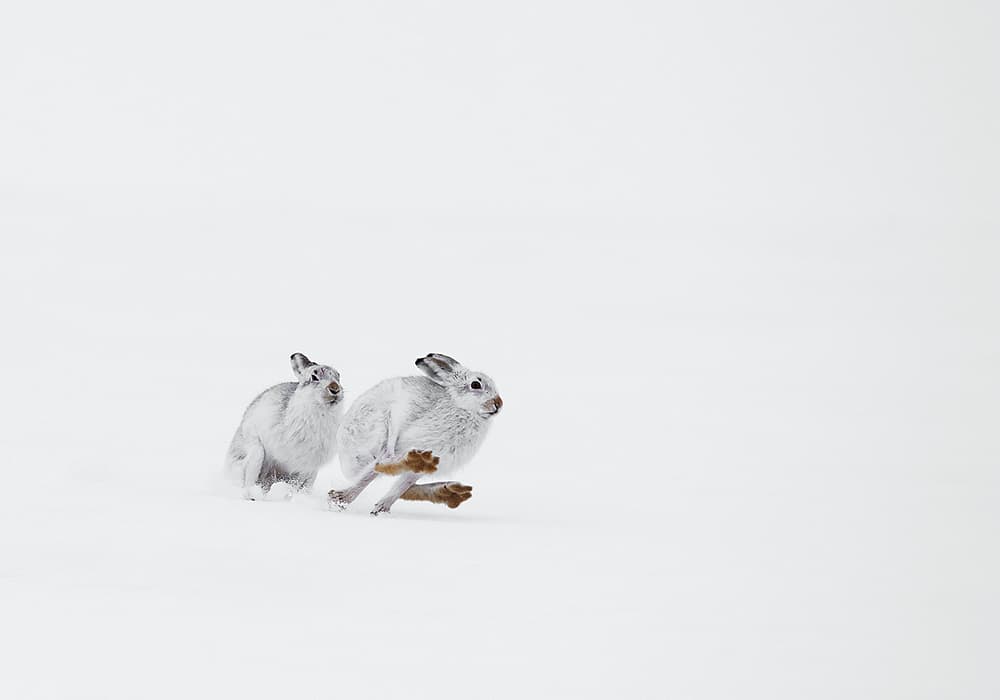
This image, taken by John, was highly commended in this year’s British Wildlife Photographer of the Year competition. It was one of our favourites from a two-week shoot. It conforms to the rule of thirds, with the gap between the two hares being on an intersection. The simplicity of the white background is contrasted with a small element of warm colour on the feet of the front hare. This is striking in the primarily monochromatic image. The snow puffing up around their feet gives a sense of movement and action. Finally there is a storytelling element of mountain- hare behaviour, allowing the viewer to wonder what caused the chase and what happened next.
Step-by-step: Photographing winter wildlife
Photo shoots at any time of year can be approached in a similar way. If you develop a general routine this helps to improve the hit rate of each of your outings. It is always a good idea to research your subject fully to understand where you might find it and the behaviour it might exhibit.
Once you are aware of the traits of the species, you can put together ideas of the types of shots you’d like to achieve. this pre-visualisation technique can improve your chances of spotting opportunities when they arise and ensure that you don’t miss out on any potential images. It may sound a bit like a military exercise, but it’s not so regimented, and a lot of the process is very enjoyable. Another helpful tip is to bounce ideas around with other photographers – this will broaden your outlook and give you new insights.
1. Prepare your gear
The night before a shoot review your goals and decide which lens will be your main workhorse for the day. then maybe add one more lens to widen your options. Ensure your batteries are fully charged and, especially in winter, pack a spare one.
2. Get out there
Although winter days are shorter there is still plenty of scope for sunrise and sunset shots. try to get to a location before the sun is fully out. Keep an eye on weather forecasts, but don’t be put off if conditions aren’t perfect – forecasts are not always correct.
3. Stay out there
The longer you stay with a single individual, the more likely you are to record different aspects of its behaviour. Don’t be tempted to search for alternative subjects too early as you may sacrifice quality for quantity. Stay alert for possibilities.
4. Highlight the winter theme
In addition to frost, ice or snow, it pays to always be on the look out for other things that define the cold season. Telltale signs of winter include frozen ponds, bare trees, breath vapours and long shadows from the low angle of the sun.
5. Protect your equipment

Dramatic changes in temperature or humidity can cause condensation. Water and cameras full of electric wizardry don’t mix, so after spending time out in the cold leave your camera gear zipped up in the camera bag for at least an hour when you bring it indoors.
John and Tracy’s top tips
1. Recce in summer
Arriving at an unfamiliar location in the depths of winter can be daunting. If at all possible try to visit potential winter locations in the summer. Good weather and long days enable you to familiarise yourself with the area in comfort and safety.
2. Be aware of your tracks
Footsteps in the snow are very photogenic, but only when they are made by your subject and not by you. When searching for wildlife keep disturbance to a minimum and ensure you leave enough pristine snow for your subject to move in to.
3. Exposing for snow
Camera meters aim to achieve mid-tone grey. In snowy conditions this renders the scene dull. To ensure snow appears bright and white you need to add extra exposure time. Use exposure compensation (typically around +1 to +2) or increase exposure in manual mode.
4. Go low
If you always use a tripod fully extended you’re showing people a view they could easily see themselves. Placing your camera very low to the ground gives you a different perspective. This will often hold the viewers’ interest for longer.
5. Use props
Make sure you always keep an eye on the weather forecast. If frost or snow is due overnight it’s best to put your props out the night before so that they get covered in a layer of the white stuff and don’t look out of place in your shot.
Kit list
Telephoto lens
Long telephoto lenses are very useful for wildlife photography – they allow a good working distance between you and your subject whilst still offering the opportunity for intimate portraits.
Waterproof cover
Consider buying a Neoprene cover to protect your gear from the elements. A fully waterproof cover that goes over the whole of the lens and camera is essential in bad weather.
Tripod
Wherever possible mount your camera on a stable support to avoid shaky shots. If you can’t physically take one (when hiking in the mountains, for example) use your camera bag to rest on.
Map and compass
To ensure that you know exactly where you’re heading, and to record where you’ve found photogenic subjects, carry a map of the local area.
Clothing
In cold conditions use a layered system of clothing, which allows easy regulation of body temperature. Warm footwear and gloves are essential to keep your extremities functioning.
Binoculars
Binoculars are helpful for spotting distant wildlife and for determining angles to stalk. Remember to put down your camera occasionally and take a close look at your subject.
Hide seed, nuts or fat in the crevices of bark. Nikon D3S, 200-400mm,1/200sec at f/6.3, ISO1000
Nature photographers John and Tracy Langley have been passionate about wildlife and wild places for as long as they can remember. In 2010 they were both awarded an Associateship Distinction by the RPS. www.ourwildlifephotography.com