Photo Insight with Andrew Sanderson
 A renowned photographer, tutor, author and Ilford Master Printer, Andrew Sanderson offers practical tips on working with film and traditional darkroom techniques
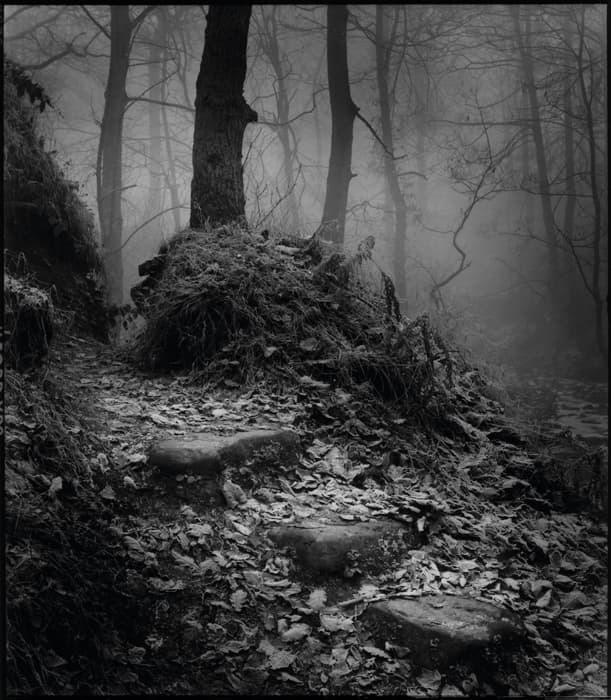
This shot is called ‘Fairy Woods’. I like to think that it’s obvious why this photograph has such a title. It’s an incredibly atmospheric image and one that brings to mind the stories of the Brothers Grimm and Hans Christian Andersen. The location is Dean Bride Lane in Hepworth, West Yorkshire, and I found this track one day while I was walking through the woods. It is an area that I have explored before, but this was the first time I had walked along it in cold conditions.
The nature of an environment changes with the seasons and the weather conditions. A location that you may be familiar with on a sunny day can become something else entirely as soon as the skies cloud over and the rain and mist descend. In this location, it took a combination of the elements you see here to really bring out the best of the scene. The frost and mist came together to give the ground a sense of definition, and the background receding into the mist is particularly effective. The steps and path leading around the mound of foliage are a nice way to draw the viewer’s eye through the picture. But more than that, it works on a narrative level. It inspires your mind to wander the path into the background and the mystery that lies beyond. Mist is a kind of curtain; you always want to know what’s behind it. The mound in the centre also works in this way – what is it hiding?
The image was taken using my battered old Mamiya RB67 and, most importantly, Ilford XP2 Super ISO 400 – a black & white film that really suits a certain type of image. XP2 is a great film to use when faced with a location that has varied lighting conditions. Crucially, the film displays a creamy rendition of highlights, and if you’re working with misty conditions that’s a great advantage. I always rate XP2 film at ISO 200 by setting my lightmeter to ISO 200. What that effectively means is that I’m overexposing each frame by 1 stop (doubling the exposure), but the film is processed as normal. This produces a much creamier negative with more shadow detail and a finer grain. It’s also interesting to note that the film is processed using the C-41 process, the same one used to process colour film.

The negative was printed onto Ilford Multigrade FB Warmtone paper in a conventional darkroom. You’ll notice that there’s a border around the edge of my image, and while there are some people who believe that a border can make any average image look good, I don’t think that’s true. I think an average shot will always look average. My reason for using a border is simply that it helps to frame the image. It holds the picture in place. On a practical level, it keeps the image clear of fingerprints.
Adding a border in the darkroom is a simple process. You expose your image as normal and then obscure the larger part with an opaque material, such as card. The material should be the same shape, but slightly smaller than the final image. Place it on top of your photograph and then expose again until the edges at the top, sides and bottom are overexposed and black.
You may also notice the subtle vignetting effect. This links back to the creating of the border and is a process known as ‘burning in’. The image is exposed as normal and then exposed again for less time while obscuring the central part so that it creates a gradient tone around the edges. It’s a way of leading the viewer’s eye into the area of interest.
I don’t keep a record of the shutter speed and aperture used because I don’t believe these settings will be of use to other photographers. If anyone else visits the location the lighting will be totally different. The viewer may be interested to know whether full depth of field was intended, or if shallow focus was the aim, but details such as f/5.6 or f/11 will tell you very little.
I don’t need the information for my own purposes. I judge each location and shot on its own merits. As this image was taken with a Mamiya RB67 I had no internal meter, so relied – as I often do – on my Gossen Lunasix F hand meter. I feel this is the best handheld meter available and much better at reading low-light conditions than digital meters. The process for metering here was quite simple in that I metered the shadows and then exposed as if the midtone were 2 stops above that. This meant I got a nice moody exposure that didn’t overwhelm the scene with highlights. I firmly believe that learning how to meter properly is essential to good negative and print quality.
To see more of Andrew’s images, visit www.andrewsanderson.com. Andrew regularly conducts one-to-one workshops, where attendees can learn a variety of advanced printing techniques. See his website for details.
Andrew Sanderson was talking to Oliver Atwell