
A renowned photographer, tutor, author and Ilford Master Printer, Andrew Sanderson offers practical tips on working with film and traditional darkroom techniques
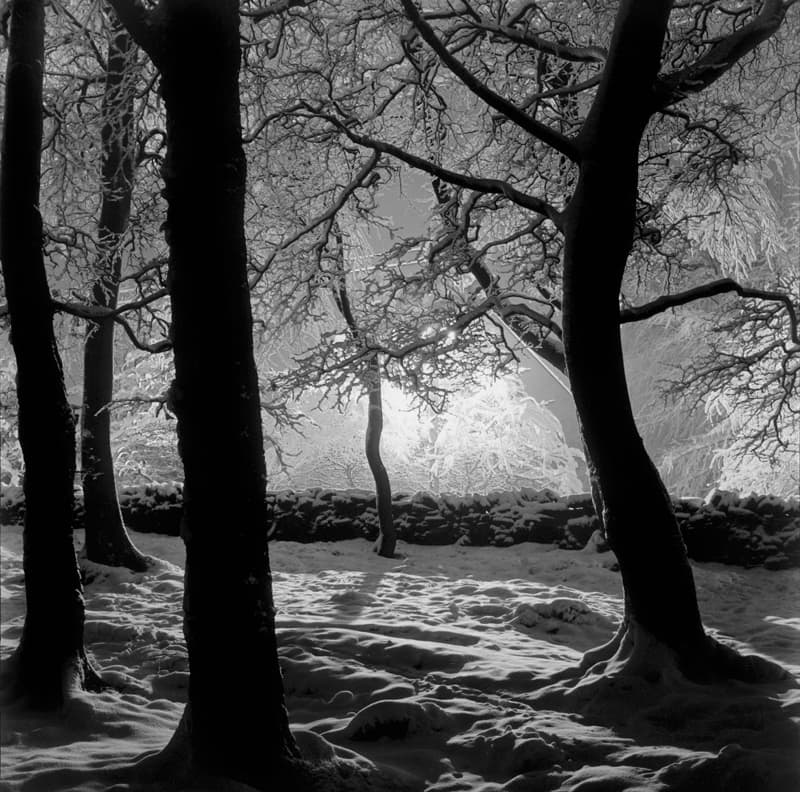
This photograph was taken very close to where I used to live – a small town called Meltham in West Yorkshire. I do a lot of night photography and have found that one of the best times to do this is when there has been a fresh fall of snow, as there are no cars on the road and the snow clings to everything. It was exactly like this the night I took this photograph.
I set out with a Yashica Mat-124G using Ilford HP5 film, which gives 12 exposures. As it turned out, 12 exposures were all I had, as the air was too wet to allow me to change the film. I think this restriction really focuses your mind and helps to ensure that you make every single image count.
It seemed as though there was a great picture everywhere I looked that night – it was so eerie and magical. I got quite a few good shots as a result, but this was the strongest.
To take the photo, I positioned myself in the woodland looking out through the trees towards a small wall, behind which was a road. I saw the spot as I was walking up the road. I spotted the trees first and thought how interesting the shapes were, and it got me thinking about how the scene in front of me would look from their perspective. So I jumped over the wall into the woods and found that the view was amazing. I took one shot and knew it would be the best of the night.
The light source in the photograph is a street light. When shooting at night in the snow, every bit of light is magnified through reflections. If there had been no snow that night, the street light would have given me only a pocket of light, but because of the snow on the ground and the snow still falling from the sky, the light bounced everywhere, lighting up the sky and my surroundings.
I used no additional lighting to take the photograph other than what was provided by the street light. I used a tripod and the exposure would have been in the region of 11⁄2mins. The aperture was f/11.
In terms of framing, it is vital to remember that night photography is about dramatic lighting. I therefore place the silhouetted trees in the foreground, to give really strong shapes with a real sense of drama.

That said, I had to be quite careful about where I positioned the street light. With night photography you do not want a glaring highlight, and if I had shot directly into the light this is what would have happened. What you want to do is hide the light behind something so you get the effect of the light without the direct intensity of the light itself. In this photo, the street light is hidden behind a branch. However, the light was still very intense on the branches in the centre of the picture and that gave me some problems when printing due to the strong changes in contrast.
The problems occurred in the difference in contrast from the central area where the snow is catching the intensity of the light to the area of shade in the foreground. I had to use a combination of darkroom techniques, including pre-flashing, split-grade printing and burning-in using a
high-contrast film mask to control the contrast. The trick is to make the burning-in look natural, not clumsy, and that takes practice. I am an Ilford Master Printer so I know what I am doing, but it still took a lot of testing and trying out of techniques. I think the print had around ten different stages of darkroom process to get it to the point you can see here. It is not something you can rattle off quickly – it was around five hours of really hard work to get the print right. You do get a bit sick of it after that long, and you don’t go near it for a while afterwards!
I much prefer to use the darkroom than the scanner and editing software, as it gives me much more satisfying control over the image. Likewise, film is much better at compressing tonality than digital imaging. You would not be able to shoot this image digitally, as the highlights would blow out. You would have to do a number of exposures and overlay them, but then you have the difficulty of branches moving.
I think the definition is also a really strong element of the photograph, and while that is down predominantly to the Yashinon 80mm f/3.5 lens on the camera, I also think you can’t beat medium-format film for the sharpness of the image.
Overall, it was magical scene that evening and I was really pleased to capture it – despite getting a bit cold!
Andrew Sanderson was talking to Jon Severs

If you would like to read more about paper negatives, Andrew’s book Paper Negative Photography is available from www.blurb.com, price £15