How to Replace Sky in Photoshop – Requirements:
Software: Adobe Photoshop, Photoshop Elements or similar software
System requirements: Windows PC or Mac
Skill required: Medium
Time to complete: 30 minutes

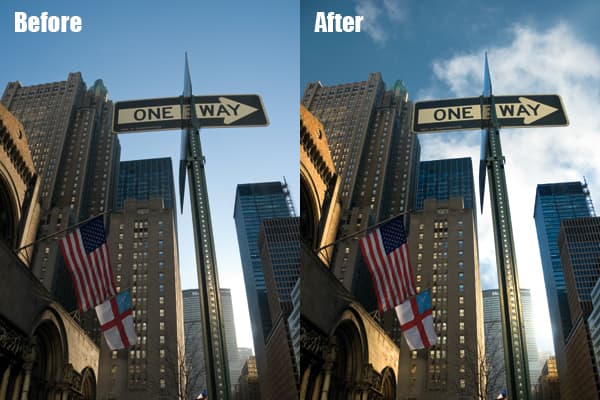
We previously explained how it was possible to use a Levels adjustment layer to mask an image so that only the foreground could be lightened. This time, I’m going to show how the same technique can be used to create a cutout so that a new sky can be inserted into an image.
I took the original image (above) at the beginning of 2009 in New York; in fact, it was the very first picture I took as I left the hotel. As much as I like it, though, I feel it lacks a little impact. While the sky is a fantastic shade of blue, the lack of clouds creates a void at the top of the image.
However, it is a fairly simple task to cut out the buildings and replace the sky with a more interesting one. The key, though, is to find a sympathetic sky image to use as a replacement. Some skies just won’t work if they don’t match the way the rest of the image is lit.
The replacement sky I have used was in fact photographed in Malta a few months previously. I remember thinking that it might come in handy to have a nice image of a blue sky with some fluffy white clouds. So the next time you’re out with your camera, look up and photograph the sky from a few different angles. You never know when it might come in useful.
How to Replace Sky in Photoshop
How to use an adjustment layer mask to cut and paste background skies

Step 1. The first step is to create a new Levels adjustment layer by selecting Layer>New Adjustment Layer>Levels.

Step 2. I have used the Levels adjustment to create as much separation between the sky and the buildings as I can. To do this I moved the shadows slider to the right to make the buildings as dark as possible.

Step 3. Next, I used the Magic Wand tool to select the sky. If you find there is an area of sky surrounded by other objects that hasn’t been selected, you can add it to the selection by holding down Shift and clicking the Magic Wand tool in this area.

Step 4. We no longer need the adjustment layer so it can be deleted. Then, with the Magic Wand tool selected, click on Refine Edge and adjust the edge of the selection so that it follows the edge between the buildings and sky as closely as possible. Use the Feather tool to create a slightly soft edge.

Step 5. With the selection complete, choose Select>Inverse and then Layer>New>Layer Via Copy. Doing this selects the buildings rather than the sky and copies the selection to a new layer. By turning the original layer’s visibility off (click on the eye symbol) you can see the cutout.

Step 6. I opened my sky photograph and selected the entire image (Select>All). I then copied and pasted it behind the cutout layer. By using the Transform tool (Edit>Transform), it is possible to rotate, scale and position the image so that it looks as natural as possible.

Step 7. The problem with the replacement sky is that the sun is in a slightly different position. To rectify this I have used the Dodge tool – set to a very large brush – to lighten the sky around the middle of the image.

Step 8. All that is left to do is adjust the Levels of the cutout and cloud layers to help them match each other a little better.

Final image: Adding a more interesting sky helps lift the image and add impact, and better still the technique is fairly simple to do. The key to success is making sure you choose a suitable sky.


