Here we’ll show you how to make a basic raw conversion with Adobe Camera Raw, which is built into Photoshop and Photoshop Elements. If you’re using another raw converter, you’ll be able to transfer most of the controls covered here to your own converter.
Step 1: Setting the correct White Balance

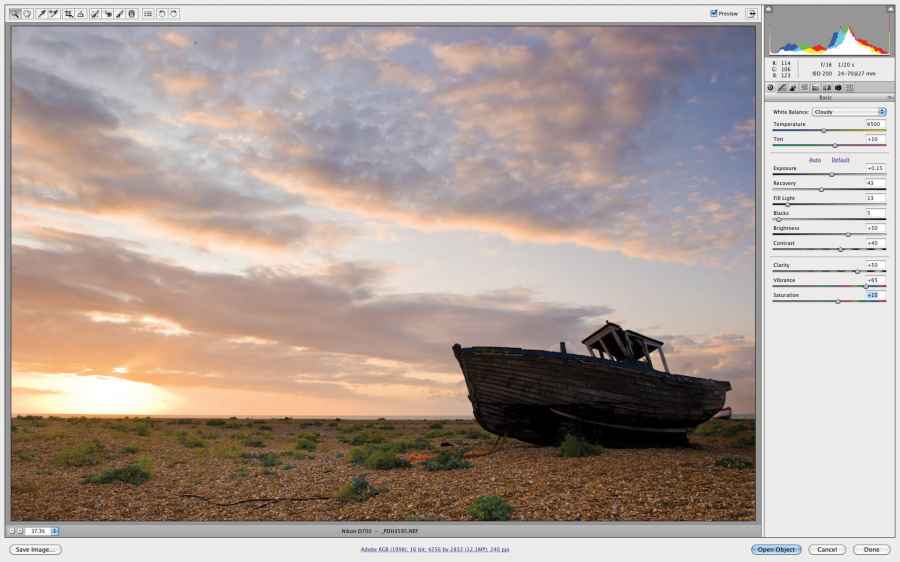
Our image is looking a little too cool for a sunrise shot, so we’ve got a couple of options available to us to help warm the scene up. To start with, we’ll select one of Camera Raw’s white balance presets. In this case, we’ve opted for cloudy, which has warmed the shot up nicely.
For even greater control, you can use the Temperature slider just below the presets to set the white balance manually – or to apply a preset first and then adjust if necessary. The further you move the slider to the right, the warmer the image gets.
The Tint slider offers even more control, allowing you to compensate for a magenta or green cast, In this example, we’ll leave it at +10.
Step 2: Correcting the exposure

While the exposure is pretty good, the highicontrast scene means we risk loosing detail in the shadows and highlights.
First, though, we’ll just adjust the exposure ever so slightly by moving the slider to +0.15. If your image is really under or overexposed, it is possible, thanks to the latitude of a raw file, to rescue images by really pushing the Exposure slider, though we wouldn’t recommend going beyond ±2.
Moving onto the Recovery slider, this is where we can recover lost highlight detail. Hit ‘O’ on your keyboard (or click on the highlight clipping warning icon) and any data that has been ‘clipped’ will be shown in red, such as the sunrise in this shot. Moving the slider to the right will recover some of this lost detai, but try not to push it all the way to the right-hand side as this will reduce the image’s ‘bite’. Here, we’ve set it to 43.
Now to recover the shadows – hit ‘U’ on your keyboard (or click on the shadow clipping warning icon) and any areas of detail that has turned to black will display as bright blue. To recover some of this lost detail, move the Fill Light slider to the right. Again, try not to push it all the way as this can produce unnatural-looking results. Here, we’ve set it to 13.
The Blacks slider has the opposite effect to the Fill Light slider – increase the slider to expand more areas that are mapped to black. This will boost contrast and can add more punch.
Step 3: Adding ‘bite’ to your image

Brightness is very similar to the Exposure slider, in the effect it has on your image, but the difference is that it compresses highlights and expands shadows, so it is best used once you’ve already adjusted the Recovery and Fill Light sliders. Here, we’ll leave it on +50.
We can add a bit more punch to the shot with the Contrast slider, which will boost the midtones in the image. We can be fairly aggressive with it, but for this shot we’ll subtly increase it to +40.
Step 4: Colour

Even though we’ve corrected the white balance, the image can do with having its colour altered even further. First, we’ll increase the Clarity, which restores detail and sharpness that might otherwise have been lost via other tonal adjustments. For our shot, we’ve increased it to +50.
Vibrance boosts saturation in the least saturated colours of the image, with minimal effect on the punchier colours in the scene. Here, we’ll increase it to +65. Finally, we have Saturation, which has a global effect on colour intensity. Don’t push the slider too far, as it can make the image look unnatural. Increasing it to +15 is enough for this shot.
Step 5: Sharpening

With our main adjustments completed, we’ll now add some sharpening – all images can benefit from this, no matter how expensive your camera kit. Click on the Detail tab along from the Basic tab, and you’ll find four sliders that will control the image’s sharpness.
To see the effects of sharpening in Camera Raw, you’ll need to zoom in to 100%. The Amount sets the edge sharpness, with 0 meaning no sharpening. Here, we’ve set it to 85.
The Radius slider sets the amount of sharpening applied. More detailed images should use a lower Radius, while pushing the Radius too far to the right can make the image look plasticky and oversharpened. A Radius of 1.0 is recommended in most cases.
We can use the Detail slider to fine-tune the sharpening. For portraits, a low setting is recommended, while for images with plenty of detail, a higher setting is called for. The default setting is 25, but here we’ve increased it to 50.
The Masking slider controls what is actually sharpened in the image. A setting of 0 means everything’s affected, while 100 means only the very edges are sharpened. To see the sliders effects, hold down the Alt key while moving it. We’ve set it to 19. Once you’ve done that, hit Open Image to load the picture directly into Photoshop.


