Amateur Photographer Masterclass with Tom Mackie
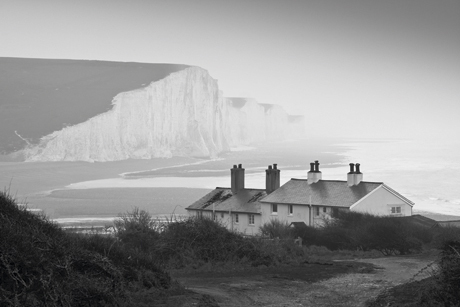 Photo by Tom Mackie
Seaford
Seaford is a peaceful seaside town in East Sussex, located at the base of the South Downs. A popular destination for landscape photographers, it offers stunning views across the Seven Sisters cliff range. Seaford is surrounded by beautiful countryside and from here it is a short drive to other photographic locations, such as Birling Gap and Seven Sisters Country Park. The famous Long Man of Wilmington, a huge figure carved into the hillside, is worth a look if you are in the area.
There are times when you pray that the weather forecasters have got it wrong. Unfortunately, most of the time the Met Office gets it right, and if rain is forecast you can pretty much guarantee that there will be a torrential downpour or, at best, light showers and flat skies. However, as any landscape photographer knows, you have two choices: you can either give up before you?ve even started or muster some courage and brave the elements.
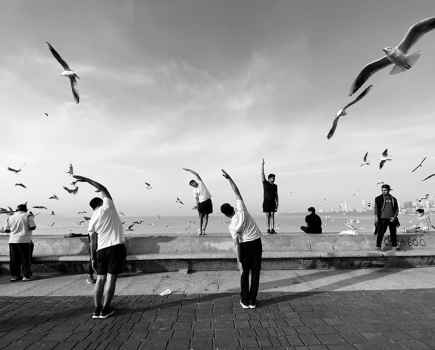
For this month?s Masterclass, Tom Mackie and three AP readers refused to let the rain, wind and mist dampen their spirits as they photographed coastal landscapes such as the Seven Sisters cliff range in the South Downs National Park around Seaford in East Sussex. Their task was to create striking black & white images, a job made especially difficult by the overcast cloud-laden skies and flat light. Tom met the readers the night before to discuss the following morning?s shoot.
?Seaford is a great location for photographers,? says Tom. ?The white chalky cliffs cut an impressive scene against the sky and sea, and there are many other attractive viewpoints close by, such as Birling Gap and Hope Gap. The weather looks like it might be against us, but on a day with more desirable shooting conditions it?s possible to capture a huge variety of tones in the cliffs. Shafts of light across the cliffs can look exquisite. Even if the weather isn?t good there are still compositions to be made,? he says. ?We?ll just have to work even harder to create our images!?
The main subjects Tom and the readers would cover on the day included how to pre-visualise a scene in black & white, look for suitable subjects and balance tone in the frame. ?In this Masterclass we?ll discuss how to ?see? the landscape in black & white tones, and talk about how to set the camera to shoot and view black & white images in the field,? he says. ?I?ll explain how to control tones in the scene using ND grad filters and in post-processing, and demonstrate ways to convert raw files to black & white in Photoshop CS5 and Lightroom 3 to capture the most amount of information, showing the best methods and the ones to avoid.?
Denied a beautiful sunrise and instead confronted by heavy skies, Tom and the readers set off the following morning with tripods and cameras in hand. The readers brought their own cameras and lenses with them, including wideangle and telephoto optics. As the rain came down, plastic bags to cover cameras came into their own and waterproof clothing was put to the test. Working with their cameras on tripods at an ISO of 100 or 200, Tom advised using an aperture of f/14 or f/18 to allow a good depth of field. ?Don?t feel that you have to stick to one area or vantage point,? says Tom. ?Wander around and see if you can find a variety of viewpoints to create compositions with impact.?
Your AP Master?
 Tom Mackie
Tom Mackie, a former contributor to AP?s Photo Insight series, is one of the world?s leading photographers. He has spent many years as an architectural, industrial and landscape photographer, and has a penchant for panoramic photography. Tom has published several books and written numerous articles for photography magazines. He also lectures on photography and regularly holds workshops in the UK and abroad. To find out more visit www.tommackie.com
The AP readers?
 Ray Hems
Ray, 66, is retired and lives in Newbury, Berkshire. He uses a Nikon D3 with 14-24mm, 24-70mm and 70-200mm lenses. ?Tom explained how to look at a scene and to visualise it in black & white while taking the picture,? says Ray. ?I found this very helpful when composing my images. The afternoon session on post-processing and editing was also very useful.?
 Mark Streeter
Mark, who is 44, is a college lecturer and lives in Uckfield, East Sussex. He uses a Nikon D300 with 18-200mm and 10-20mm lenses and a 10mm fisheye lens. ?I wanted to learn about composition and Tom?s advice was invaluable,? says Mark. ?With Tom?s help I realised it is possible to create interesting images even on a bad-weather day. I love shooting landscapes, so to spend the day with Tom, who has so much experience in landscape photography, was fantastic.?
 Steve Wares
Steve, 56, lives in Seaford, East Sussex, and is a member of Seaford Photographic Society (www.seafordphotosoc.co.uk). He uses a Canon EOS 30D and EOS 40D with 17-70mm and 70-300mm lenses. ?I really enjoyed today, despite the weather,? says Steve. ?I came away with lots of knowledge.? To see more of Steve?s images visit flickr.com/people/woolyman.

Would you like to take part?
Every month we will invite three to five AP readers to join one of our experts on an assignment over the course of a day. The experts are Tom Mackie (landscapes), Paul Hobson (wildlife) and Cathal McNaughton (street photograhy). There is no cost for the Masterclass and lunch is provided on the day. This is Tom?s first landscape Masterclass this year and he will also be running masterclasses in May, August and November. Paul will be holding masterclasses in April, July and October, with Cathal in March, June and September.
If you would like to take part, visit transport.kelsey.host/amateurphotographer/masterclass for details of how to apply. Please remember to state which Masterclass you would like to attend and make sure you include your name, address, email address and daytime telephone number in your application. Each participant will be able to use his or her own camera, lenses and other equipment.
Seeing in black & white
 Photo by Mark Streeter
Seeing in black & white
When we look through the viewfinder, we see the scene in colour. Understanding how colour translates to tone and how the different tones can work together in the frame is the key to successful black & white images. It?s all too easy to shoot in colour and convert the file to black & white because the exposure didn?t quite work, but shooting mindfully to create the best possible black & white image is another matter. Every scene has dark areas of tone, light areas and many tones of grey in between. A low-contrast scene has a smaller dynamic range and is much softer in appearance. A high-contrast scene has a far greater range between the lightest and darkest areas.
Try to imagine how your final scene will look when the colour has been removed. Think about the ratio of darker areas to lighter areas and how you can incorporate shadows into your image. Strong contrasting areas often work well in black & white, although on a day like today the readers were working with a limited colour palette as the sky was grey and flat. You could try changing your camera angle or focal length while in the field to see how framing the shot differently will impact upon the balance of tone ? to give emphasis to different parts of the scene depending on what you want the viewer to look at.
?Our aim is to concentrate on creating images with a variety of tones,? says Tom. ?This is tricky on a day like today, but it?s not impossible.? The readers were shooting in raw and Tom suggested they switch their cameras to display the image in black & white on their screens. They did this by changing the picture style to black & white. ?Using this setting doesn?t affect the actual raw file,? says Tom. ?The colour information is retained and when you come to open the raw file in Photoshop you can then convert it to black & white and edit it as you want.?
Composition
 Photo by Ray Hems
Composition
In black & white photography, composition plays an especially vital role. The choice and combination of subjects, their position in the frame and overall framing come into their own since these are the things the viewer will notice once the colour has been removed.
Finding a suitable subject
The first thing to do is find a suitable subject that lends itself to black & white. Strong shapes can work well when balanced carefully in the frame. Contrasting textures are also a useful compositional device. The smoothness of a still sky combined with a jagged cliff edge and pebbly beach, for example, might create an interesting composition. ?The views from Seaford offer a whole range of black & white shooting opportunities,? says Tom. ?It?s a question of ?reading? the scene in front of you. You may be able to use the texture of the rocks and pebbles on the beach to add interest or curving lines in the landscape to create a sense of movement. Look out, too, for interesting foreground details.?
Shooting Angle
 Photo by Ray Hems
Shooting Angle
Identifying a suitable subject is the first step, but choosing a shooting angle to complement the scene in front of you is key. The readers tried shooting across the dramatic cliff tops from a high vantage point in a bid to capture a sense of scale (see above).
 Photo by Steve Wares
A lighthouse in the distance provided the perfect subject to draw the eye. They also tried shooting from the beach looking up to the cliffs (see above) and using the groynes to add structure and a layered affect to their composition.
Framing
 Photo by Steve Wares
Framing
When the light is flat and there is little texture in the sky, cropping out the sky completely is often the best option. Tom encouraged the readers to frame their images to limit the amount of sky in the frame.
 Photo by Mark Streeter
  Photo by Ray Hems
Exposure
Photo by Tom MackieExposure
A dull overcast day doesn?t have to spell disaster in terms of your exposure. It?s possible to create a well-exposed image even if the light is flat. ?Aim for an exposure that creates balance between the shadows and highlights,? says Tom, ?although your exposure will, of course, differ depending on your subject, the available light and what you want your final image to look like. For the view of the cottages, for example, I took an initial exposure and used my histogram to judge whether it was a balanced exposure. Because the contrast between the foreground and the sky was too great, it caused the foreground to go too dark so I used a 3-stop hard grad filter and angled it down across the coastline to help balance my exposure. Using a filter in this way will give you a lot more information to work with when editing your raw file. In a flat-light situation I find a hard grad often more effective than a soft grad?.
Tom also suggested that the readers try ?exposing to the right?, a widely practised technique used by landscape photographers that involves slightly increasing the exposure to allow detail to be recovered from the raw file during post-processing. ?You have to be careful not to overexpose the image, otherwise you run the risk of blowing your highlights,? he adds.
 Photo by Steve Ware
Filters
Filters can be an effective way of controlling tone in a scene, but bear in mind that coloured filters will affect the length of your exposure. A red filter is a common choice for landscape photography as it will darken the sky, which can look dramatic in a black & white image, while a yellow filter will brighten any green areas in the scene. Using an ND grad filter on a sunny day will help to bring out detail in the sky. ?Even on a dull day like today, an ND grad can add mood and atmosphere to a flat sky,? says Tom. ?But this should be used carefully as it can cause parts of your image to become underexposed. Of course, you can use the Channel Mixer afterwards in Photoshop to adjust the colours in your image, but it is worth experimenting with different filters while shooting to familiarise yourself with the different ways of controlling tone.?

Post-processing
After a difficult morning shooting in challenging conditions, Tom and the readers stopped for lunch and spent a couple of hours discussing some of the editing options in Lightroom 3 and Photoshop CS5. ?I don?t like spending a lot of time processing my images, so when I?m shooting I?ll have a good idea of what I need to do afterwards in terms of editing,? says Tom. ?I try to keep things as simple as possible, but that doesn?t mean taking shortcuts. In black & white photography, the editing process is just as important as for a colour image. There is much you can do to bring out tone using simple Curves adjustments, but first you have to convert the image to black & white.?
Converting an image to black & white
?Using the desaturate method or converting to greyscale are not the best ways to convert to black & white,? says Tom. ?They discard valuable information and don?t give enough control over the various tones in the image. A far more effective way is to use the colour channels to adjust the tonal contrast. Editing doesn?t have to involve ?rescuing? an image, although it can help to correct something you couldn?t do at the time. Think about what you are trying to get out of the scene and be selective in the areas that you work on.?
 Controlling contrast using sliders in Photoshop
?In Photoshop CS5, I converted the colour image to black & white (Image>Adjustments>Black & White), then used the sliders of the various colours to make selective adjustments to different parts of the scene, depending on the colour content of the image. How you adjust the sliders is up to you and will depend on how you want your final image to look. A degree of trial and error is necessary.?
Using presets in Lightroom

?In Lightroom 3 there is a large range of black & white and colour presets that you can choose from to obtain the look you want to achieve,? continues Tom. ?I start by choosing a preset to get close to what I want my image to look like, then make fine-tuned adjustments to the image using the various tools that Lightroom offers. Here I decided to use the B&W High Contrast preset.?
Some suggestions for editing an image in Lightroom

- ?The Grad tool is a quick and easy way to bring the tone of the sky down so it holds the viewer?s eye within the frame,? says Tom. ?As there wasn?t any texture to the cloudy sky, I darkened it slightly by dragging the cursor across the image
- ?Here, I used the Brush tool to selectively lighten and add contrast to the cliffs so they don?t look as dull as the conditions we had,? says Tom. ?Remember to tick the Auto Mask box so it makes it easier to mask around the edges of your selection.?
- Tom adds: ?Lightroom?s Crop tool makes it easy to straighten horizons and crop images quickly. I decided this image would look better in a square format as the right side of the frame wasn?t adding anything to the scene, so the tighter crop helped to strengthen the composition.?