One of the most fascinating aspects of photography is that it can open the door to worlds we can’t see with the naked eye. Capturing this hidden world has its share of challenges and requires a far more systematic approach than other areas of photography, but the results are fascinating and rewarding. Capturing macro images of the most populous but least-seen creatures on our planet – insects – is a great example of this.
For best results, you’ll need to use a technique known as stacking – shooting multiple images of the same thing at slightly different points of focus before blending them together to create a highly detailed final image.
To find out more about macro photography, check out our hub page – featuring more top advice like these twelve tips.
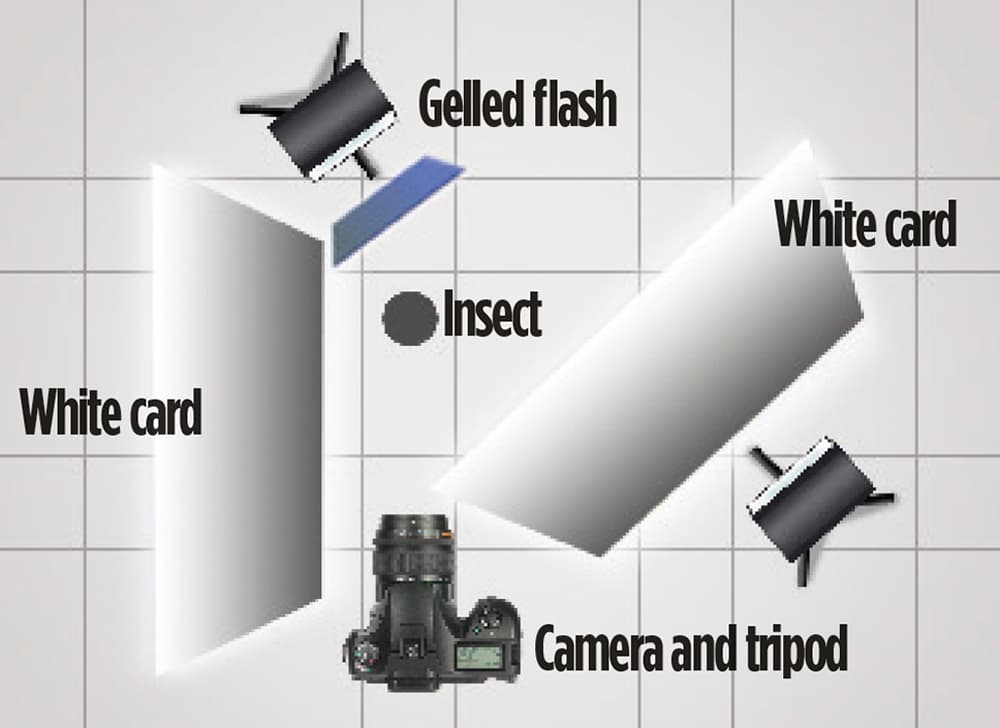
The set-up
A mock-up of camera and flash positioning
What’s important to keep in mind is that your composition and exposure for every image in the series need to be consistent, so when you come to post-production the software will seamlessly create the final image. To achieve this, you need to make sure you take care to set things up properly.
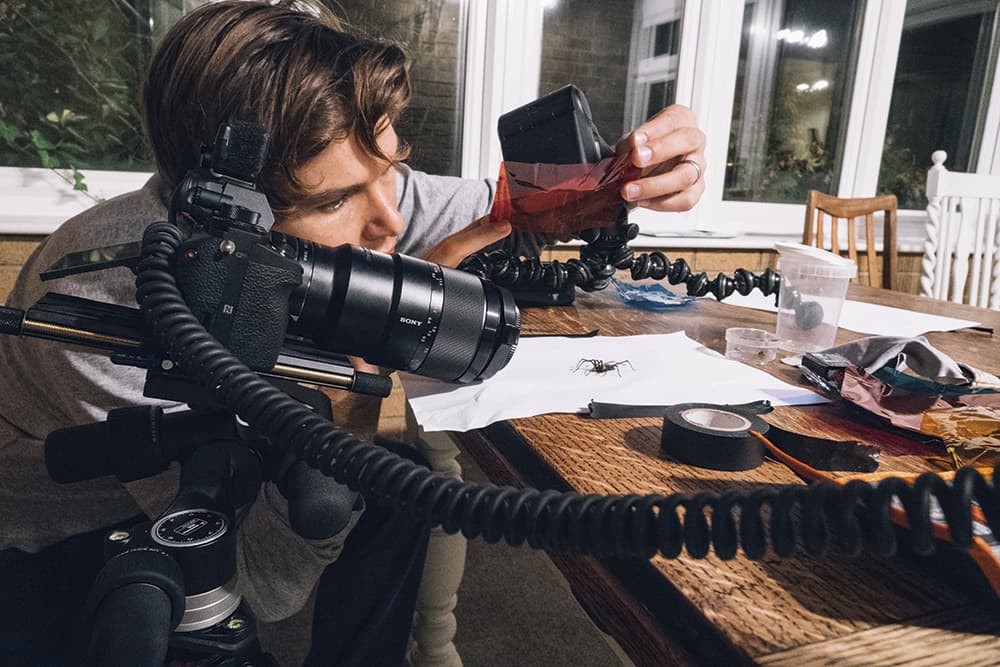
You’ll need a spacious work area, where no one will disturb your equipment, and you’ll need space to move around without accidentally hitting anything. At the very least, you’ll want a heavy tripod and a sturdy table that won’t move. I highly recommend using a geared tripod head that allows you to make small and accurate adjustments to the camera position, as this will save you time when it comes to composition. Tape everything you can down: I stress-test my kit set-up before I begin, so if I do knock something I know everything will stay in place. To achieve the incredible close focusing, you’ll want to use a series of extension tubes to sit between your lens and camera. These can be picked up reasonably cheaply, while a simple 50mm prime is a good starting point as your lens.
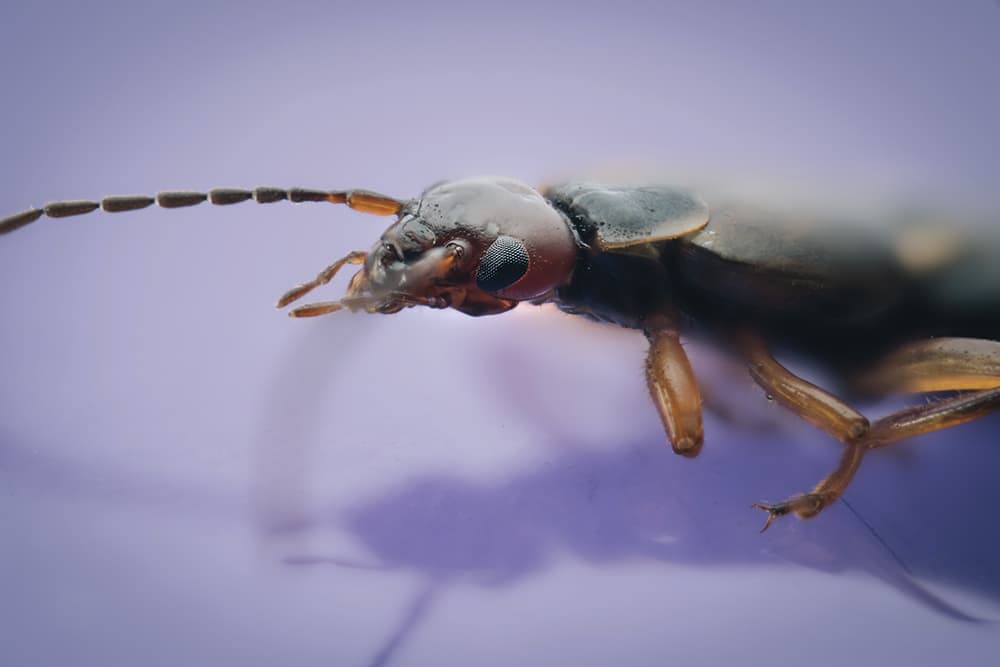
Composition
Good composition can be the difference between the image being just a scientific record and something wholly more engaging and more aesthetically pleasing.
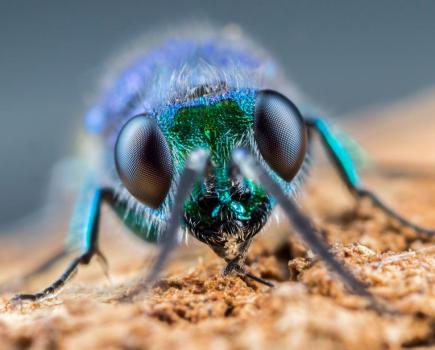
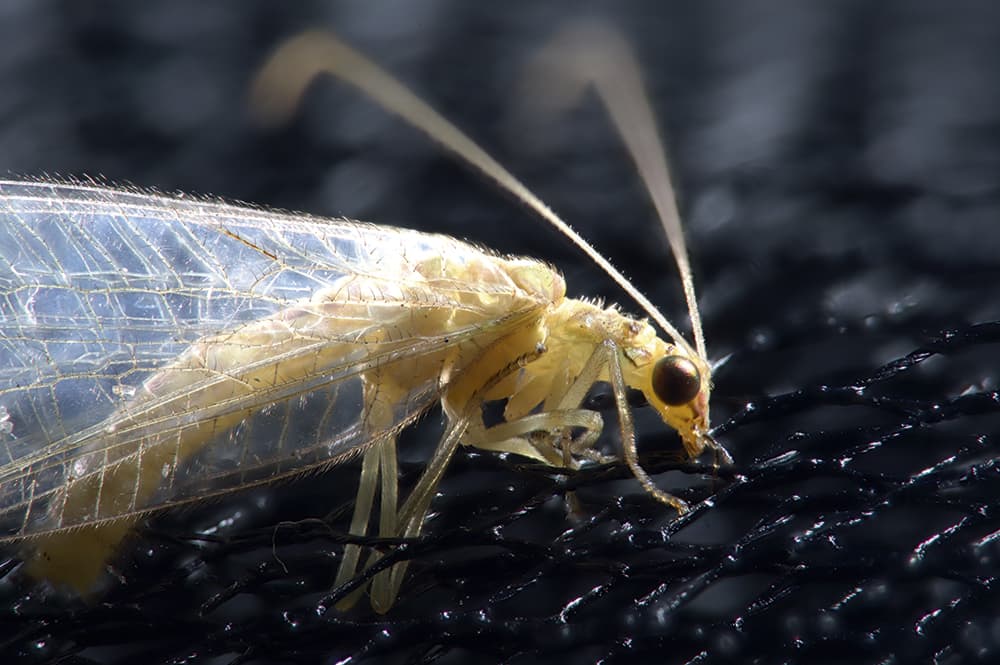
For insects, use low angles looking up at the subject and it will appear more dynamic. Think about how the frame will be read. The eyes and mouths of insects are fantastic focal points, but claws, mandibles and hair can all be used as powerful reference points.
When setting up the shot, leave as much space as possible around the subject. Be aware that you’ll need to use quite a heavy crop on the images because the extension tubes will protrude into your frame.
You’ll find that stitching may adjust your crop as well, so the more room you leave yourself, the more flexibility you’ll have to create a pleasing final composition. This is where a camera with a large megapixel count, like my 42.4-million-pixel Sony Alpha 7R II, comes in handy.
Technique
A micro-adjustment plate will allow you to adjust focus precisely
Consistency is key. The aim of stacking is to create a series of almost identical images, where you move the focus in tiny increments across the image to give you enough material to stitch together in the computer to achieve enough depth of field in your image. Do this by moving the camera a tiny amount either towards or away from the subject using a micro-adjustment plate. Manually adjusting focus in small enough increments using the focus barrel on the lens is almost impossible.
Set up the camera as close as possible to the subject so you can withdraw from it, rather than approach. In this way you don’t have to worry about accidentally bumping into equipment, disturbing the insect and ruining the shot. Use a cable release or the timer setting on your camera to ensure there’s no movement of the camera itself. Take as many images as you can, while moving as little as possible with your adjustment plate. You might not use all images for your stack, but you want to have as many options as possible. Set your exposure manually, otherwise you risk variation between frames.
To get the depth of field you need it’s important to use flash, as there won’t be enough ambient light to shoot at a smaller aperture. Fortunately, as insects are tiny, ordinary flashguns are just right. Position lights as close to the subject as possible, using a Gorillapod or miniature tripod, and experiment. Give your lights enough time to refresh between each frame. If the lighting is inconsistent, the stitching process won’t work. Keep it simple to begin with and once you are comfortable with the technique you can move on to a bit of experimentation. As with your camera settings, make sure your flash power setting is done manually.
For initial attempts, take 20-30 images at f/11 and ensure you move focus through the frame. You can then start using wider apertures and get sharper images, taking more frames as the depth of field gets smaller. Ultimately, you want to aim to use your lens’s sweet spot of around f/4-f/5.6. This could require you take as many as 100 shots to get an image sharp across the frame.
Editing
I recommend using specialised stacking software so you can focus on your images and experiment as much as possible. Helicon Focus lets you export a raw file of the finished stack. Learning the stacking software can be demanding, so don’t be discouraged if your initial results aren’t as great as you’d hoped. The radius and smoothing settings required for a particular image can vary greatly, and the best setting can often only be found through experimentation.
Over time, though, you’ll develop a knack for it.
Why it works
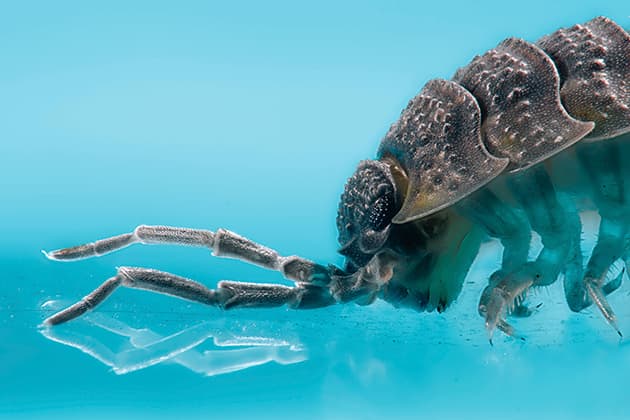
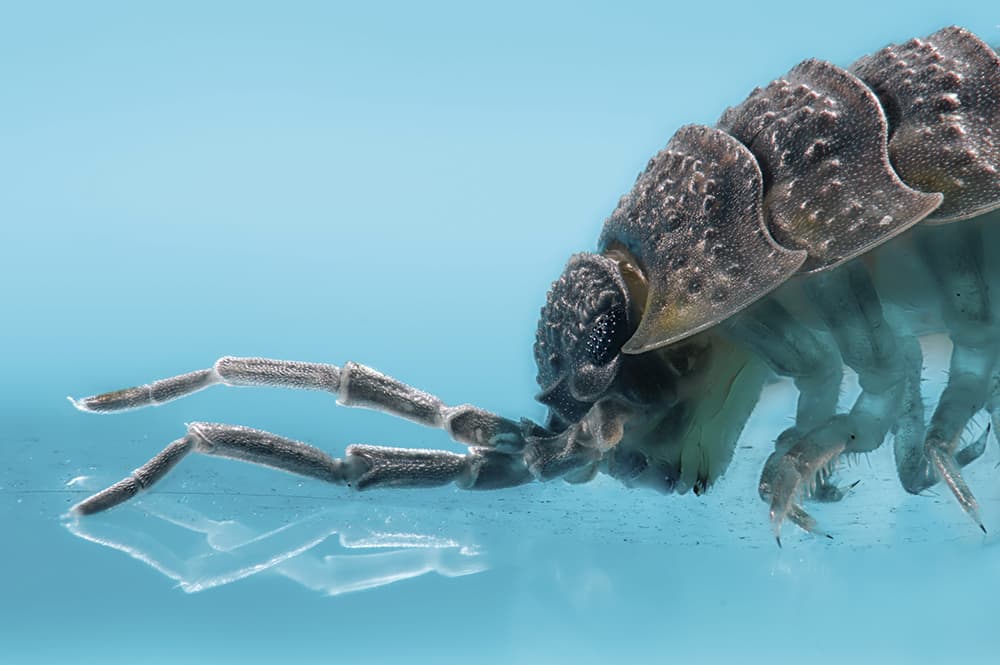
When you are creating imagery using stacking, it can sometimes be very tempting to forget about aesthetics, and just tie up 500 images to achieve perfect sharpness.
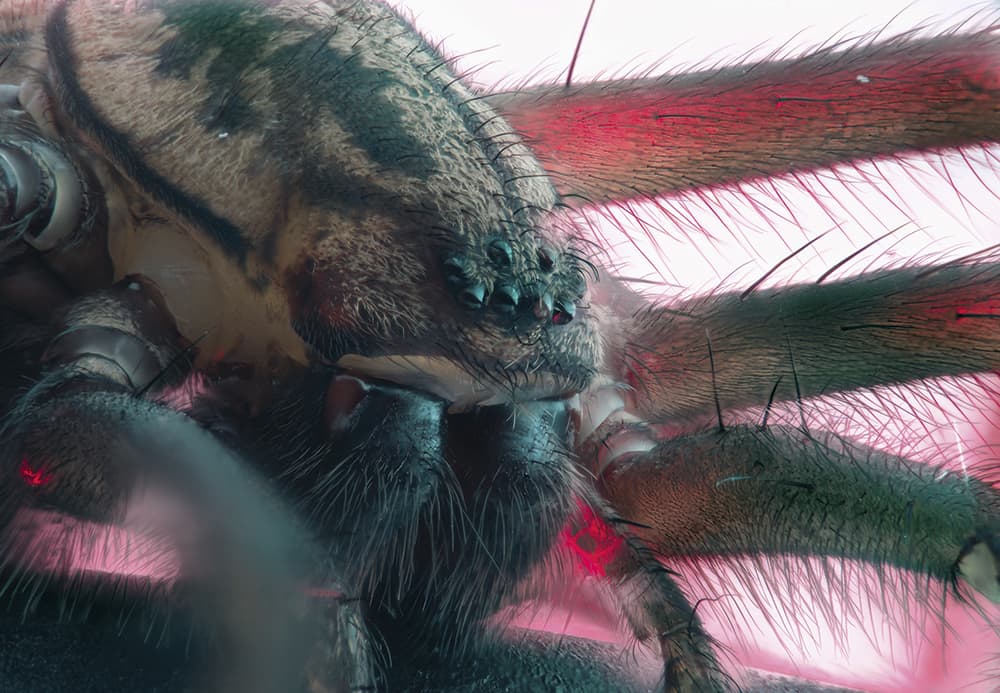
While this method can be impressive, it’s often not the best way to create really arresting shots. Ultimately, you shouldn’t forget that it’s the capturing of a story in images that works really well. In this shot of the common house spider, I chose to keep the focus heavily on the eyes and fans to really bring out the spider’s dynamism and vitality – this shot was a stack of just two frames.
Your eye needs a way through the frame. Think about how you would shoot a person, a larger animal or a car, and then apply the same process to your macro photography.
The lighting set-up
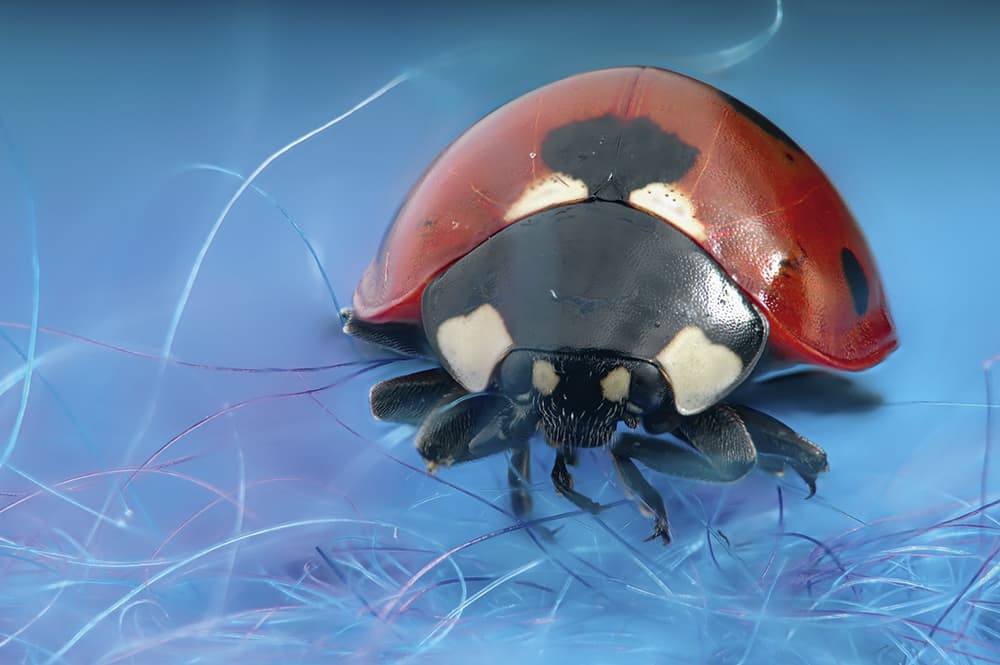
The set-up for this shot of a ladybird was quite straightforward, with the choice of background used being key. The strong colour and textures worked really well against the subject. Two remotely triggered flashguns were used – one gelled and the other firing through white card to soften the key light. Finally, a sheet of white card was positioned to the left of the camera to reflect light back into the shadows.
Top Tips
Experiment with background
As you get more familiar with the stacking technique, you can try using coloured gels or card to really bring your images to life with interesting light and background.
Use a dedicated stacking program
A specialised program like Helicon Focus lets you stitch together raw files, so you have plenty of flexibility when it comes to post-processing. Experiment with your stitches using JPEGs before applying it to raw files.
To blend multiple images together, by Helicon Focus Pro software
Go early
Since your subject needs to be completely still or you’ll ruin your carefully planned shot, you’ll need to find static insects. The best way to do this is to wrap up warm, grab your kit and head out in the early morning, the chillier the better. Insects hibernate in the cold and as their body temperature lowers they slow down to a standstill – letting you carefully get close and take your shots without disturbing them.
Kit list
Sony Alpha 7R II
As stacking requires heavy cropping, a high megapixel count camera will allow you plenty of flexibility to do this and still retain large printable files. The full-frame Alpha 7R II camera can take incredibly sharp and detailed pictures with the right lenses.
Micro-adjustment plate
It’s almost impossible to make adjustments this tiny using just your lens. The adjustment plate lets you move your camera back and forth in small increments, giving you a much better selection for your stack.
Flashguns
Using flashguns will allow you to use a small aperture and low ISO. A low ISO will give you less noise and more room to adjust colours and exposure in post, and you need to keep lighting consistent across all the images for your stitching, which may not be possible with ambient light.
Helicon Focus Pro
While stitching can be done in other software, I highly recommend using this program as it allows you to generate a raw file from the final stack, giving you more flexibility when editing.
Mikael Buck is a London-based editorial and commercial photographer. Having spent more than a decade working as a photojournalist for titles such as The Times, Mail on Sunday and the Metro, Mikael now works on commission for UK national newspapers, high-profile corporations and the country’s biggest brands. www.mikaelbuck.com