
Flowers have always held a fascination for me and they provide endless opportunities for great shots.
When I’m not shooting commissioned work I always try to do some shots that have been filed away in the deep recesses of my mind.
Many of these end up being published in one of my books, or as is the case here, hung in my gallery at London’s Oxo Tower.
Getting Started – Basic Kit for close up flower photography
The advantage of using an SLR is the sheer array of lenses and accessories that are at your disposal, enabling results that are inconceivable with a compact digital camera.
The two lenses that I used for the close up flower photography shots that accompany this feature were the Canon 24-70mm f2.8 and the 70-200mm f2.8 and these were fitted to my EOS 1DS.
Specialist Equipment – Extension Tubes
 For these shots I also used extension tubes. Canon supplies these as a pair, but as an alternative you could use extension bellows.
These accessories fit between the camera body and the lens. Extension tubes are available in various lengths and are usually sold in sets of two or three. The longer the extension tube, the closer you will be able to focus.
You can also join the extension tubes together in various combinations for even greater magnification. However, whatever the combination that you choose, the distance from the lens to the subject is fixed.
Extension bellows, on the other hand, have the advantage of infinite magnification and allow for more precise framing of your subject at closer distances.
Exposure Compensation
When using either of these accessories you will need to make an allowance for exposure as they increase the distance the light has to travel from the front of the lens to the sensor.
Depending on the lighting that you are using this might mean using a slow shutter speed, and therefore a tripod will be essential.
Depth of Field
Depth of field with these pieces of equipment is minimal and becomes even less the closer you go. Although the more you stop down the greater the depth of field becomes, it doesn’t necessarily mean that your shot will be any sharper.
All lenses have an optimum aperture for sharp focus: on a lens with an aperture range of f2.8 to f22, depth of field will be at its greatest when using f22. However, the sharpest shot could be one taken when the lens is set to f11, because diffraction – the bending or spreading out of light as it passes through a narrow aperture – reduces the overall image definition and resolving power.
Although the depth of field at these distances may be minimal, it still exists, so if you stop the lens right down and use the maximum depth of field possible, you must pay attention to the background – even at these distances, unsightly detail can come into focus when you take your shot that wasn’t apparent when you looked through the viewfinder at wide open.
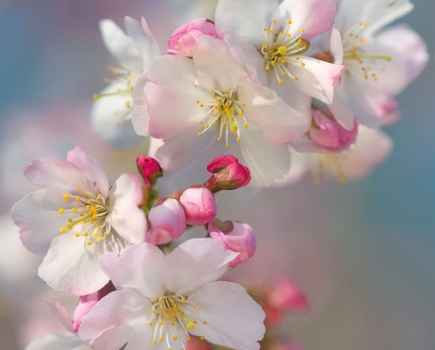
Close up flower photography using the high-key technique

A good photograph is usually judged on its tonal range across the scale. However, striking pictures can be produced without this tonal range as we can see here.
Pictures like these, where the tonal range is taken from the predominantly light end of the scale, are known as ‘high-key’.
They are not to be confused with high-contrast prints, which have extremes of tones with very little in the mid-tone range.
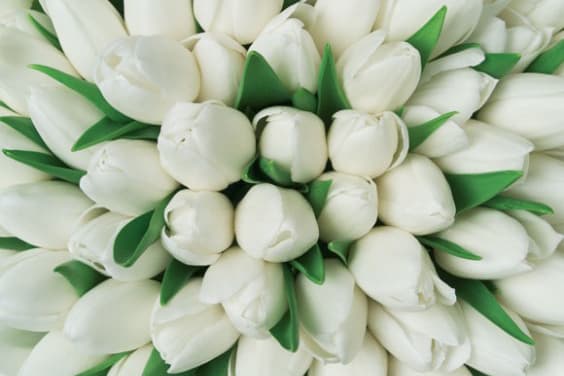
Power of Diffusion
High-key pictures work best when the light is bright but soft. To get this effect, you need to diffuse your light source. In this shot of white orchids (right) the flowers were positioned against a white background.
Having composed the shot, one flash head was placed on a boom and fitted with a soft box. This was positioned above and slightly behind the flowers, pointing a little towards the camera.
Some tracing paper was stretched between the light and the flowers to diffuse the light even more. Two white reflectors were then then positioned to the right and left of the flowers.
Another white reflector was placed underneath the flowers to bounce light upwards. With all this light bouncing around, a lens hood or improvised light shade, is essential to avoid flare.
Focus and Composition
Having got the lighting right, I focussed on the upper flower and chose an aperture of f8. This means that the lower flower is not quite so sharp, but this helps to balance the shot.
I then took my reading from the highlights and checked the exposure on the camera’s LCD by examining the histogram. With a little tweaking I got the flowers at exactly the right angle and took the shot.
I like to think that it is a perfect example of high-key lighting.