Winter landscapes: First Consideration
The alarm has gone off. Glancing outside you see that it is cloudy so, with a mixture of disappointment and relief, you return to bed.
What you didn’t notice was a thin gap between the horizon and the cloud base, just enough to allow the rising sun to gush through and flood the land with full-bodied red light for three or four minutes before ascending into the clouds. The day’s best opportunity for winter landscapes has gone.

Rise early for still condtions
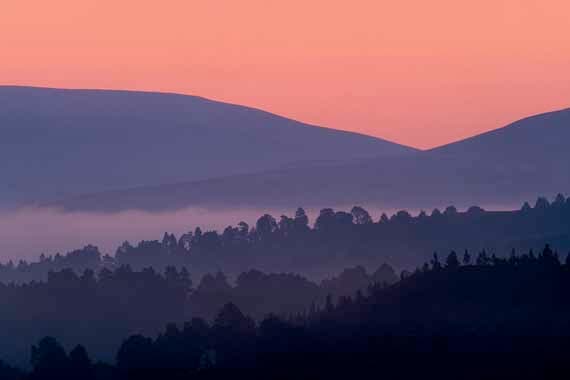
At our northerly latitudes, the sun never rises very high above the horizon in the middle of winter anyway but the light at each end of the day is even sweeter.
Not only does its reddish hue appeal but its low angle flatters even the most banal forms with relief.
If there is snow or frost on the ground, a striking contrast arises between areas in shade – which reflect the sky’s blue- and those lit directly by the warm light.

Flattened by a long telephoto, this picture relied on advancing (red) and receding (blue) hues to create a sence of depth.
Concentrate only on “edge of day” lighting for our winter landscapes, however, and you’ll miss many opportunities for more subtle expression. The choice of lighting should be guided by the subject: the silence and simplicity of a snow-covered landscape may be better conveyed in more muted lighting that minimises contrast
The emotional tone of a landscape is, to a large extent, determined by the sky: if you want to convey a sense of emptiness or desolation, a white sky may be just the thing, especially if you go one stage further and render the whole image in black and white at the post-production stage.
A dark sky, in contrast, hints at something more powerful and sinister and is best suited to subjects whose character reflects this. Or where you want present them as vulnerable: the effect is heightened when the subject is illuminated by direct sunlight.
Winter landscapes: Moonlight Images
Since winter nights are so long, why not try some after-dark winter landscapes, especially around full moon. Water and snow may reflect enough moonlight to permit a long exposure, although if you want to include the moon in the shot too, you’ll need to make a second exposure for it alone since it is much brighter.
Be aware, however, that the camera will take as long to process an image (to reduce the noise associated with long exposures) as the shutter is open for.
The option exists on some cameras to switch this function off but you will have to use a dedicated noise-reduction application such as Noise Ninja, to “clean-up” the image in post-production.
Winter landscapes: Lighting and White Balance

Edge of day meets edge of land meets edge of season.
Here’s some good news: if you are shooting RAW files for your winter landscapes, you can safely leave your camera’s white balance set on Automatic.
Why?
Well, the chances are that if you try to set it manually at dawn or dusk the light’s colour temperature will have changed by the time you complete the process.
Also, there is still no guarantee you’ll be happy with the result once the image is opened in the RAW converter.
An automatic assignment gives a good starting off point for you to refine the colour balance to your memory or taste, later.
There is no “right” colour balance, only that which looks best to you on a calibrated display.
Winter landscapes: Composition
At its most elementary, composition is about organising elements in space to form a pleasing (ie, balanced) arrangement.
The rule of thirds serves this purpose well; follow it faithfully and you’ll end up with safe, predictable images. But a thoughtfully-constructed composition can also add to the emotional impact of the picture and hint at something of the character of the subject.
The rule of thirds is entirely appropriate for compositions where harmony is the theme (although an even division of space works better for symmetrical subjects).
But if theme picture’s theme is marginalisation – a single tree remaining in a deforested landscape, for example, or turmoil – a storm-lashed beach, perhaps – a balanced composition contributes nothing to the viewer’s understanding of that space and what is going on.
So, think about what you want to say about the subject of your winter landscape when you decide where it should go in the frame.
The scope for inclusion of many elements and advent of effective stitching applications has seen a resurgence of interest in panoramas. These are perhaps the trickiest compositions to assemble, if relevance and contribution to the whole remain key criteria when selecting the elements to include.
Is the winter landcape scene before you a natural panorama? Start by looking high above the horizon, then down at your feet. Is there anything you’d want to include in the picture? If not, continue to narrow the band you examine until there are elements that absolutely have to be included.
Then do the same exercise, side to side. What’s the shape of the final view? Many panoramic photographs include parts of a scene that could be shown just as well in a more conventional framing; this routine helps you to identify what is really worth including and what is mere repetition.
Landscape need not necessarily include the sky and by excluding the horizon, you deprive the viewer of the ability easily to construct scale and perspective. In this more more abstract representation of a scene, the aesthetic qualities of the elements become more important than their identity. A telephoto zoom is a great tool in this respect, further distancing subjects from familiarity by flattening perspective.
Conversely, the sky itself may offer up dramatic, albeit transitory, compositions. Without any reference to the land, these too are abstracted images, albeit on a much larger scale. Shoot around dawn and dusk for the most dramatic colours – and the possibility of “crepuscular rays” or “God beams”.

Keep an eye open for subjects whose own colours contrast with their surrounding, and if you are shooting with the light, just watch out for your shadow creeping into view.
Winter landscapes: The 2-D trick
When we look at a scene, the things that catch our attention may be of interest only because we are seeing them in three dimensions.
Close one eye, to mimic the camera, and what looked like a great shot, may now just look like a muddled mess. You can save a lot of time packing and unpacking the camera by doing this, but more importantly, you’ll soon come to recognise how contrasting forms, shapes and colours can create their own apparent perspective, even in a two dimensional picture.

I made some pictures “exposed (fully) to the right” – and could scarcely see a thing on the camera’s display. A more conventional exposure, with the histogram’s bell closer to mid point, yielded a better result.
Winter landscapes: Exposure Matters
One of the greatest advantages of shooting digitally is the ability to confirm the right exposure at the time of shooting rather than days later at a light table. But notions of what is “right” are a little vague. The exposure that looks right on the camera’s monitor is almost certainly not the best one. The “right” exposure for a JPEG file is not necessarily the same as for the RAW version. And as for what the camera’s own meter suggests – that is often little more than a starting off point anyway.

Not only does the surf and spray contrast better with a dark sky emphasises the menace of these enormous waves racing toeards the shore.
A digital camera records light quite differently from film – or our eyes.
In its linear response to light, twice as many photons make the image twice as bright. Since a 12 bit digital camera can record 4096 levels of brightness between pure black (0) and pure white (255), it follows that half the total number of levels (2048) are represented in the brightest stop.
Conversely, the darkest stop has only 64 levels “expressions of difference”.
What this means in practice is that if you underexpose an image, you have many fewer levels to remap over the width of the histogram from highlight to shadow than if you “ expose to the right” of the histogram. Underexposed pictures, once processed, exhibit exaggerated noise and poor tonal gradation.
Expose to the right and your image may look too bright on the camera’s monitor, but you are assured that you are starting off with as much data as possible.
Your guiding principle should be the preservation in at least one colour channel of detail in the most important highlights in the picture. Cameras tend to be conservative and blinking highlights may in fact be fine when the picture is in the RAW converter.
It’s clear that the histogram, rather than the camera meter’s readout, is the point of final reference. For this reason I’d recommend you keep things simple – and exposure more consistent – by using manual exposure mode. Also learn where best to meter the scene in centre-weighted or spot mode, for the best approximation of good exposure.
 Winter landscapes: Blow-out
Worried that you’ve lost vital highlights in your winter landscapes?
Then, if your camera permits, view the individual colour channels; often highly saturated colours will blow out a single channel but detail in one other is all you need.
Be pragmatic, too, about how far you should go to save highlights.
Try to keep detail in sparkling water or a sun-lit ice and you’ll end up underexposing the rest of the picture so severely that you’ll have too little data to map for smooth and detailed shadow areas.
If the highlights are not important – or you are specifically after a “high key” look – then just let them go.
by Niall Benvie