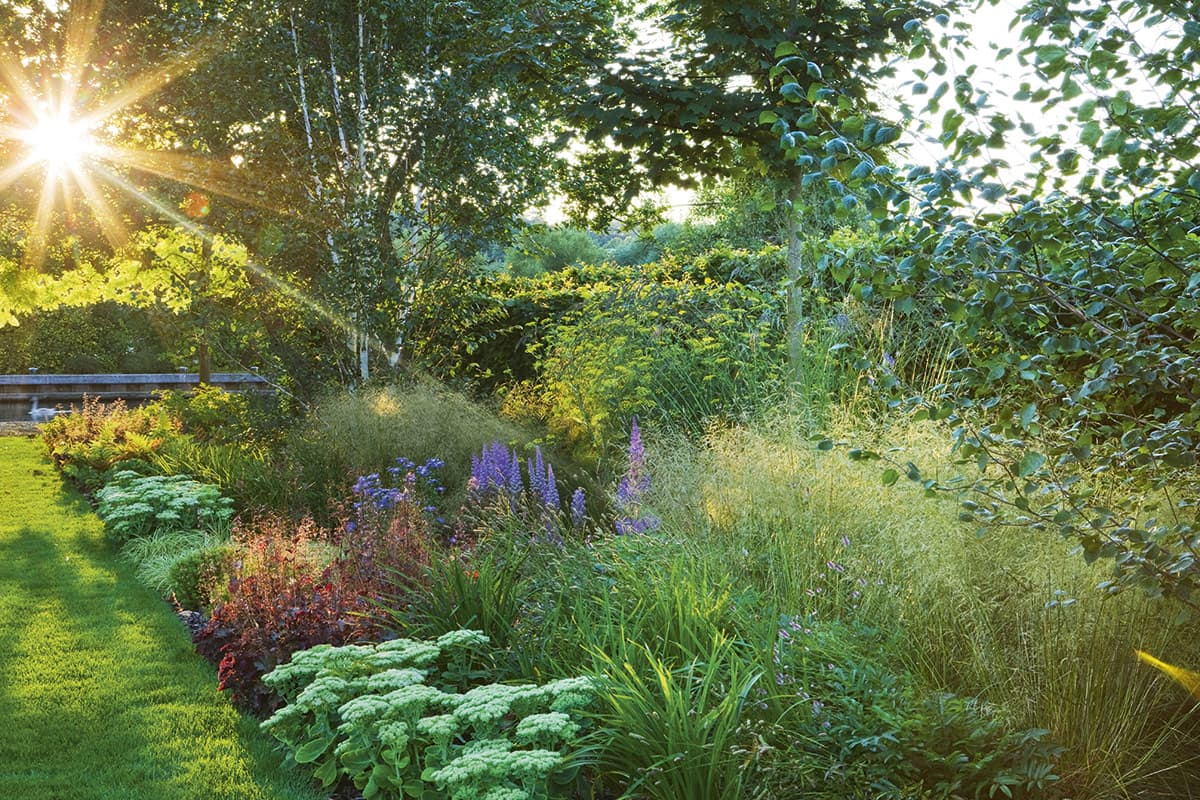
The early morning mist and penetrating rays of sunshine provide an almost magical atmosphere. All images © Clive Nichols
For those people who like their bed, getting up in what is effectively the middle of the night to catch the dawn light is not an attractive proposition. In the summer months this means getting out, travelling to a public garden and being in position to shoot before the sun rises at around 4.30am. However, sometimes you just have to suffer for your art. Those who have never photographed at this time of day don’t know what they are missing.
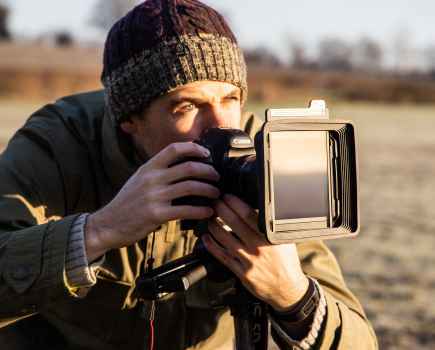
My dedication to getting the best possible garden shots means that I’m prepared to set my alarm clock regularly at an unearthly hour, or sometimes not even go to bed at all. This is because the early morning is my favourite time to take garden pictures. The quality of light at that time of day often gives a unique and almost magical atmosphere, as well as a sense of drama to a garden.
Advantages
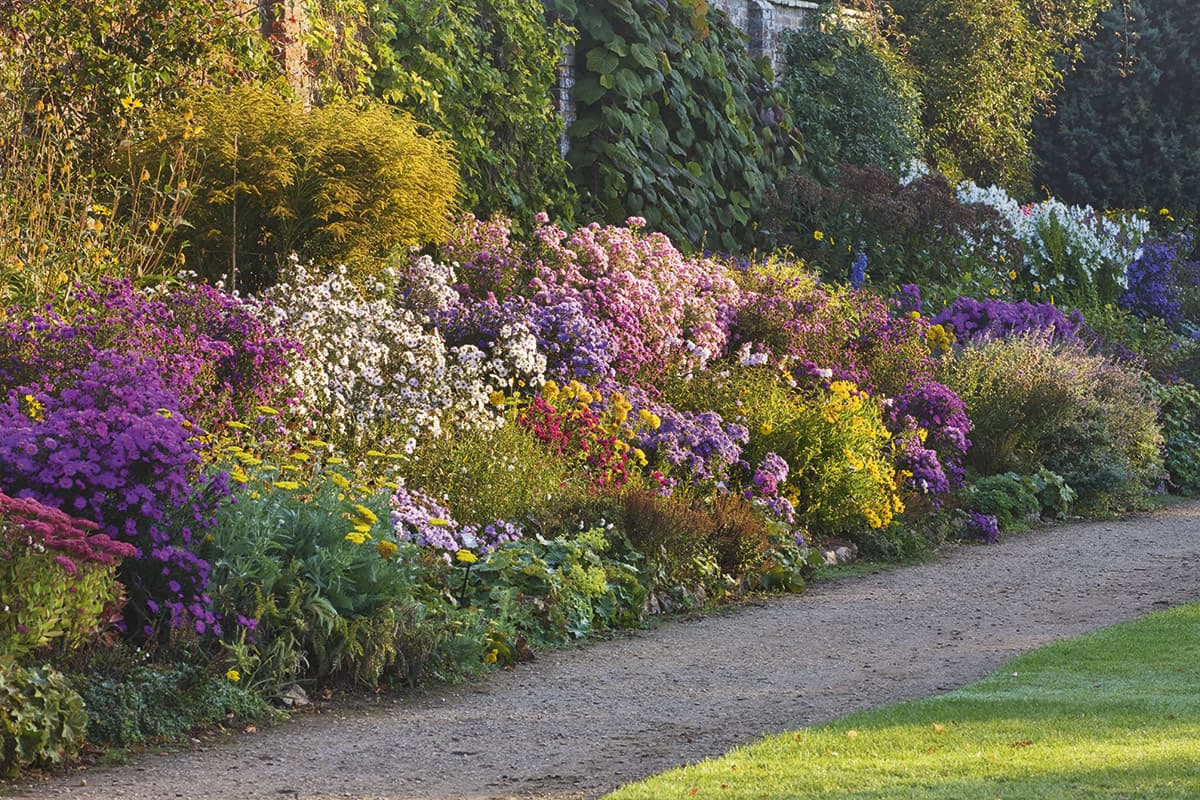
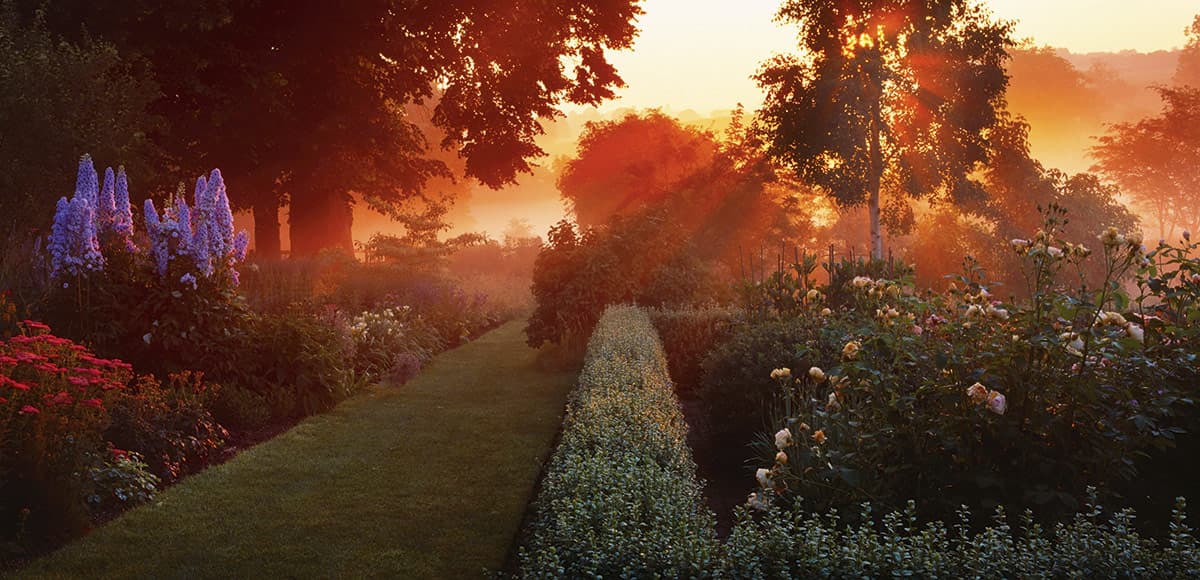
A fantastic display of late-summer colour captured at dawn at Waterperry Gardens in Oxfordshire
Apart from reducing your hours of sleep, there are plenty of advantages to shooting in the early morning. If it’s a sunny day, you have the pleasure of shooting with rich, warm, early morning sunlight. Early morning mist can really add to a shot’s atmosphere, and when the sunlight is passing through it the mist can take on a lovely pale-gold hue. Morning dew is another element to consider, and things such as spider webs are often dripping with moisture.
Another by-product of being up so early is that you’re likely to be the only person in the garden at the time, so you won’t need to worry about other visitors getting in the middle of your shot.
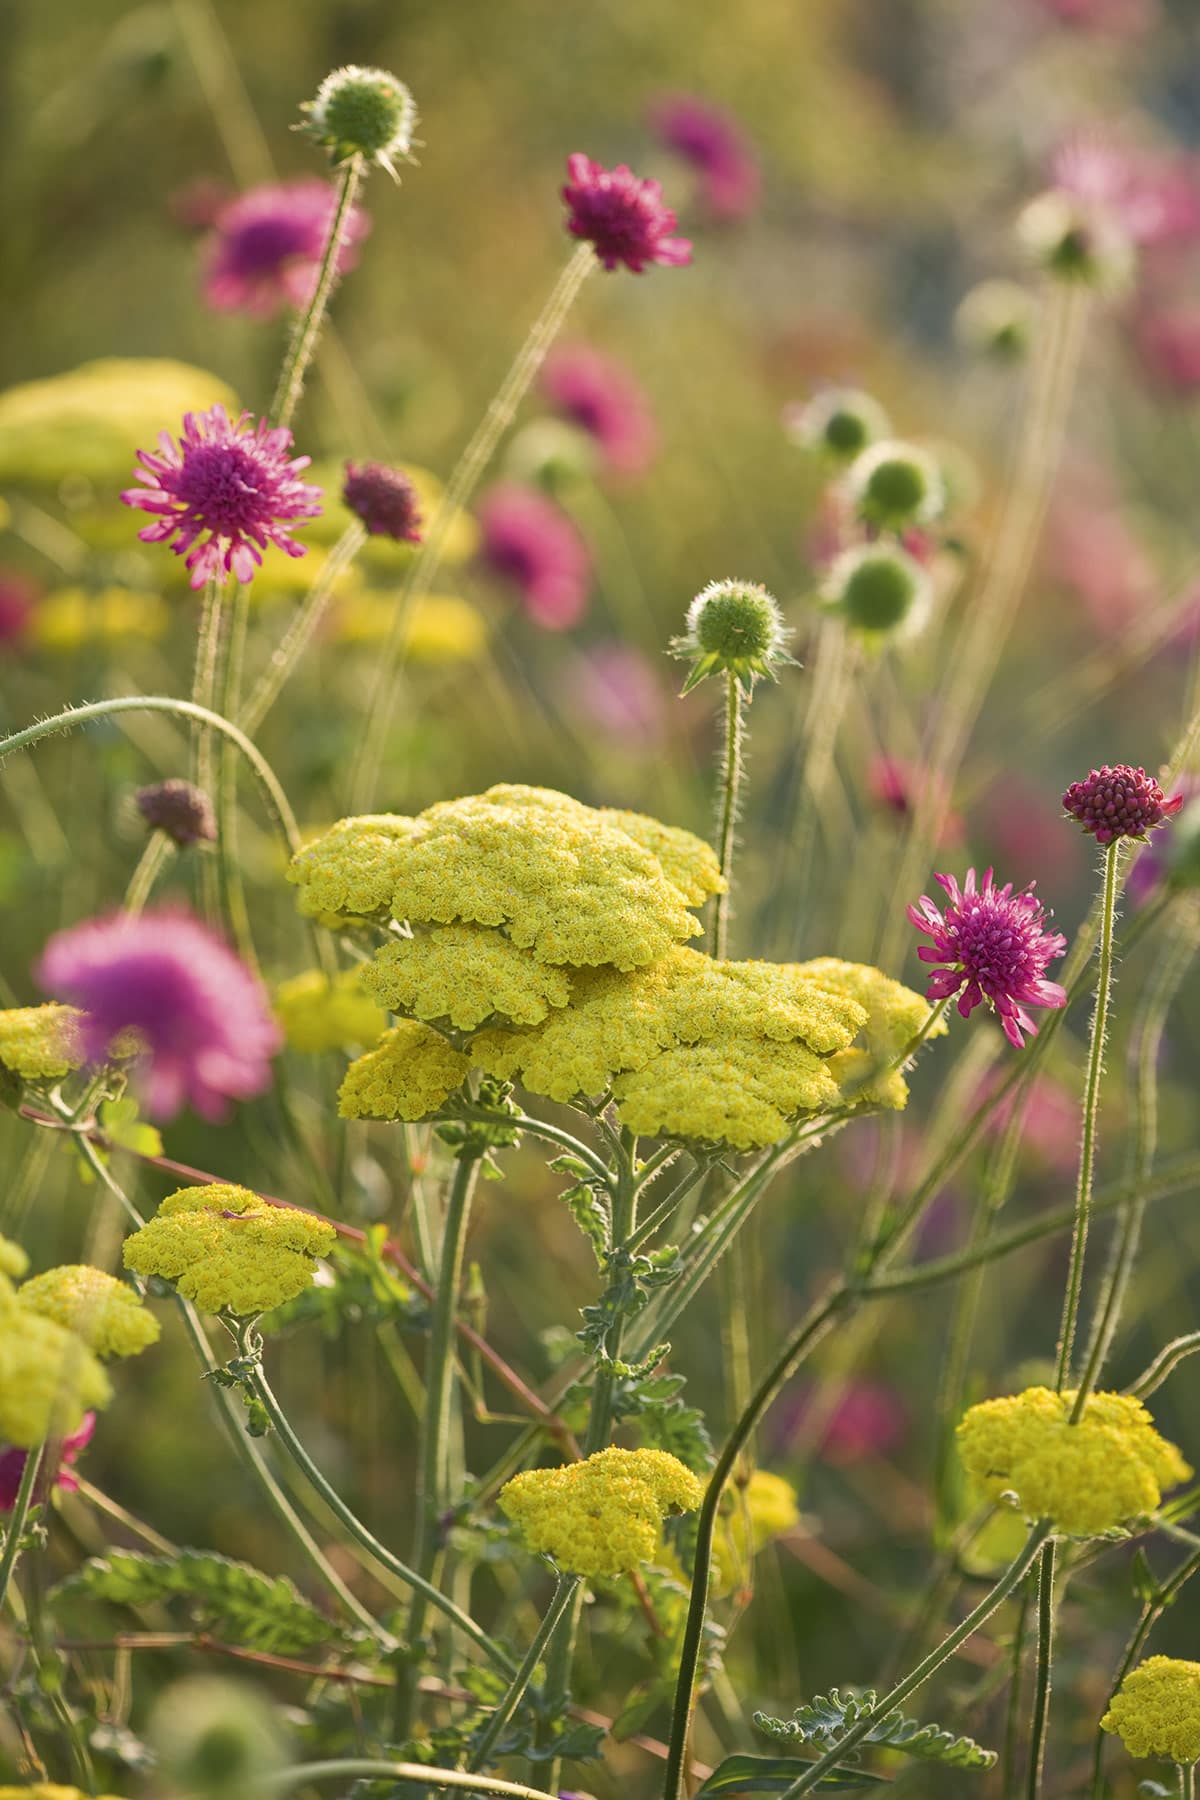
Try using a shallow depth of field to isolate some subjects and throw others in the background out of focus
The main reason I like photographing at this time of day is so that I can shoot towards the sun and backlight the subject – whether that’s a wider garden scene, individual plants or combinations of plants. Subjects really come alive when they are backlit, and the resulting rim lighting on things such as grasses or snowdrops gives them an added sparkle.
The fact that the sun is low in the sky means that you also get long, raking shadows, which you can use to give an enhanced sense of depth and a three-dimensional appearance to garden scenes.
Potential pitfalls
Shooting into the sun does have potential pitfalls. The bright background can result in an underexposed subject in the foreground.
There are various post-capture techniques that you can use to overcome this problem, including Quick Mask and HDR imaging, but I generally prefer to get the image as good as I can in-camera and overexpose the image when shooting.
The other problem with shooting backlit images is that you run the risk of lens flare spoiling your pictures. However, this can easily be avoided by shooting with the sun just outside your frame, or using a lens hood. Another alternative is to adjust your position until you can use foliage to block all, or most of the sunlight hitting your lens.
In any case, there are times when letting a bit of lens flare into your images actually enhances them. Below is a good example:
You can use an app to find out which way the sun will fall on a particular garden at a specific time
Here I was attracted to the way the sunlight was picking out different flowers and plants in the border. The sun was partly obscured by the trees, but the shaft of light that it threw across the frame is an attractive addition to the image, which, I think, contributes to its appeal.
However, if you’re shooting individual plants and want a particularly striking backlighting effect, try shooting with the subject shown against a dark or shadowy background. The rim-lit subject will stand out all the more. Some flowers, such as irises, look particularly good when backlit, but it’s a technique that works well with a range of garden subjects.
Preparation
To make sure that you’re going to get a good dose of sunlight for backlighting, it’s a good idea to check the weather forecast beforehand. I use bbc.co.uk/weather and/or metcheck.com. If you want to check the way the sun is going to fall on a specific garden at a particular time in the morning, there are various Freefone and browser apps that will give you that information. Google ‘sun position app for photographers’ and choose the one that suits you best.
As far as your kit bag is concerned, you won’t need lots of equipment in order to create the perfect backlit garden shot, but there are a few accessories that would be useful. If a clear, bright morning is forecast, the most important thing is to get to the location early enough to catch the kind of beautiful light that can transform your pictures. Remember, you can catch up on your sleep at any time, but the light won’t wait for you.
Framing
Framing a view of a garden with something else, such as leaves or branches, works particularly well when the subject is backlit. Take this image as an example:
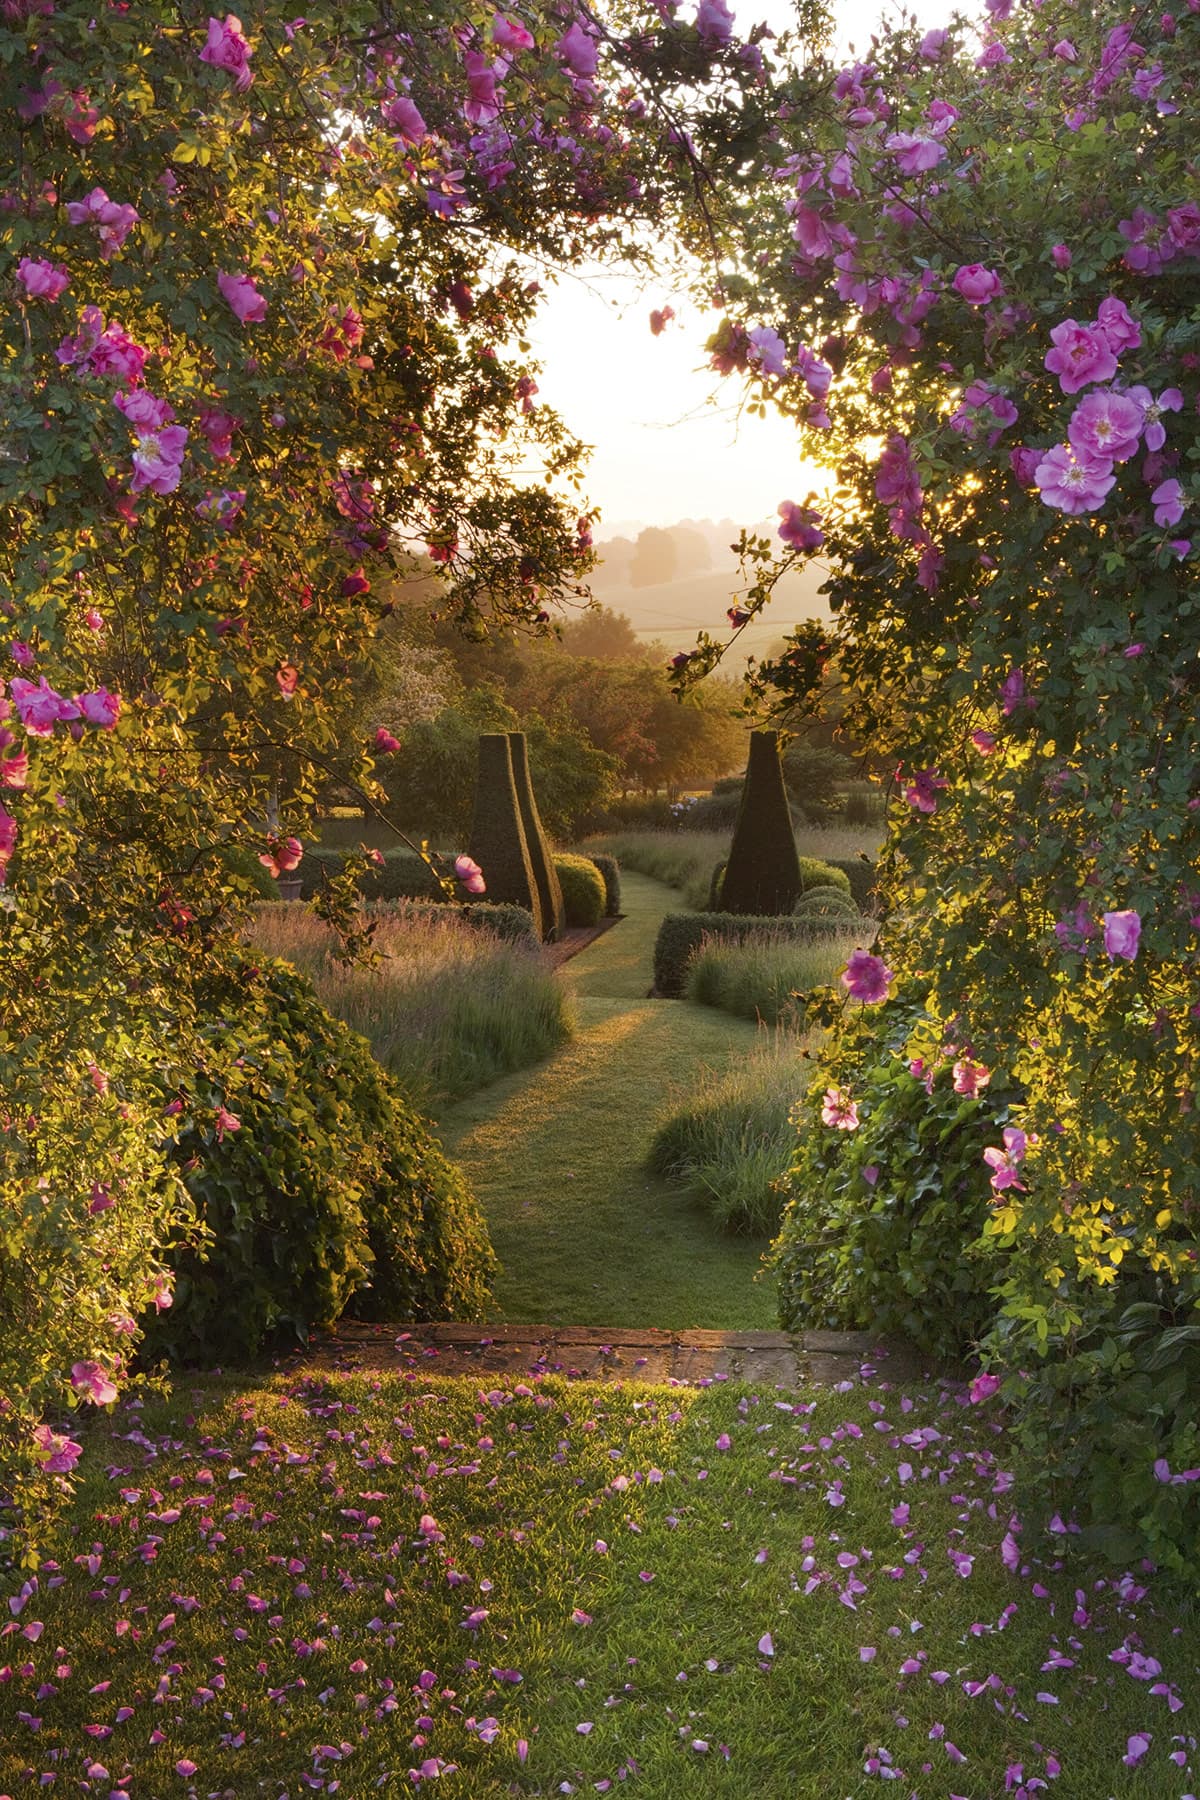
This shot was taken at Pettifers garden in Oxfordshire, where I was able to use the backlit rose arbour to frame a view of the garden beyond. It also had the effect of blocking the sunlight and removing the possibility of lens flare in the picture.
This picture works for a variety of reasons. The early morning light is casting long shadows and picking out textures in the grass. The roses framing the scene (and the falling petals in the foreground) give depth to the picture, as well as some lovely splashes of colour.
The other visual device I’ve used is the pathway, which leads the eye into the picture from the bottom of the frame to the middle distance. It was impossible to expose the whole scene correctly in one frame, so I exposed for the highlights through the gap and used Quick Mask in Photoshop to lighten the foreground.
Overexposure
When your subject is backlit, it’s sometimes necessary to overexpose it so that it’s not too dark.
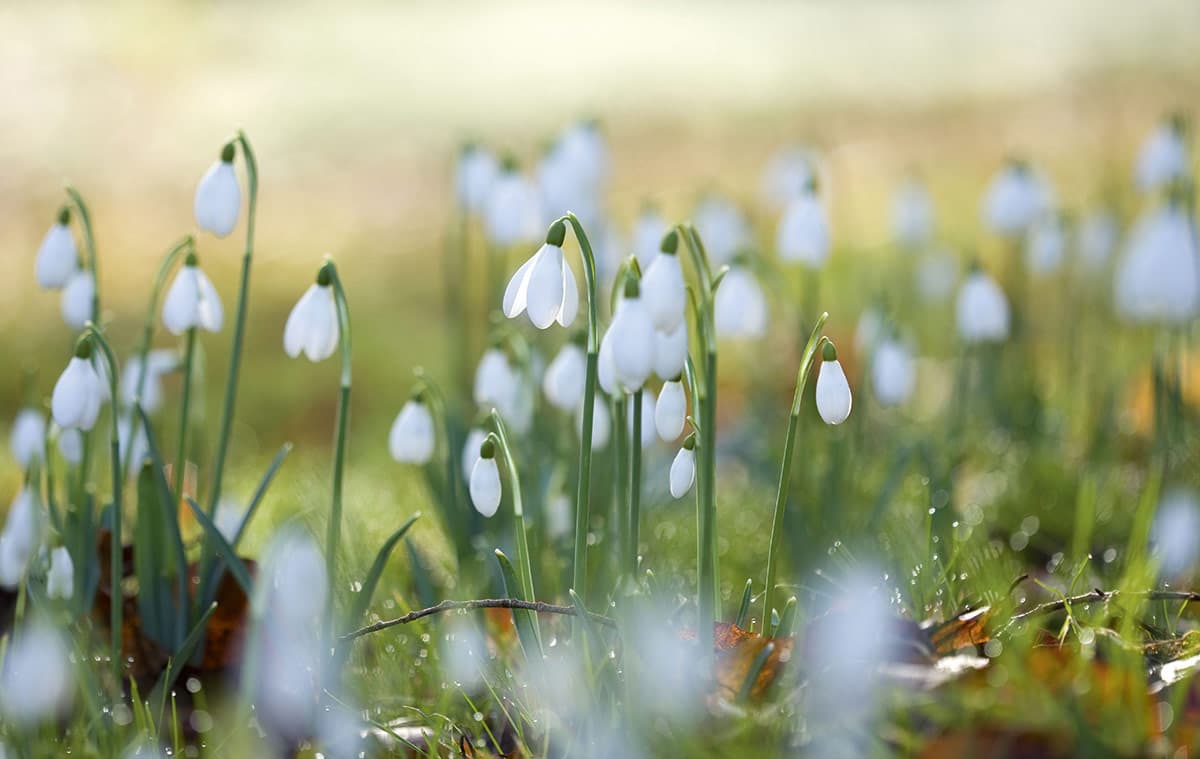
When I was photographing the above snowdrops at Colesbourne Park in Gloucestershire, it was early morning on a bright day. I got down on my front, so I was literally at ground level, and shot towards the light using a 180mm macro lens.The brightness of the background was influencing the camera’s lightmeter, so I overexposed by about 2 stops to keep the snowdrops bright.
How do you decide how much to overexpose? Here, I would advise overexposing by 1 stop – and if you check your screen and it’s not enough, increase it by 1⁄2-stop increments until you get the desired effect. Ideally, you don’t want to clip the highlights so that the whites burn out, so check the histogram. You need to have the curve as far to the right-hand side as possible without clipping.
Kit list
Wideangle lens
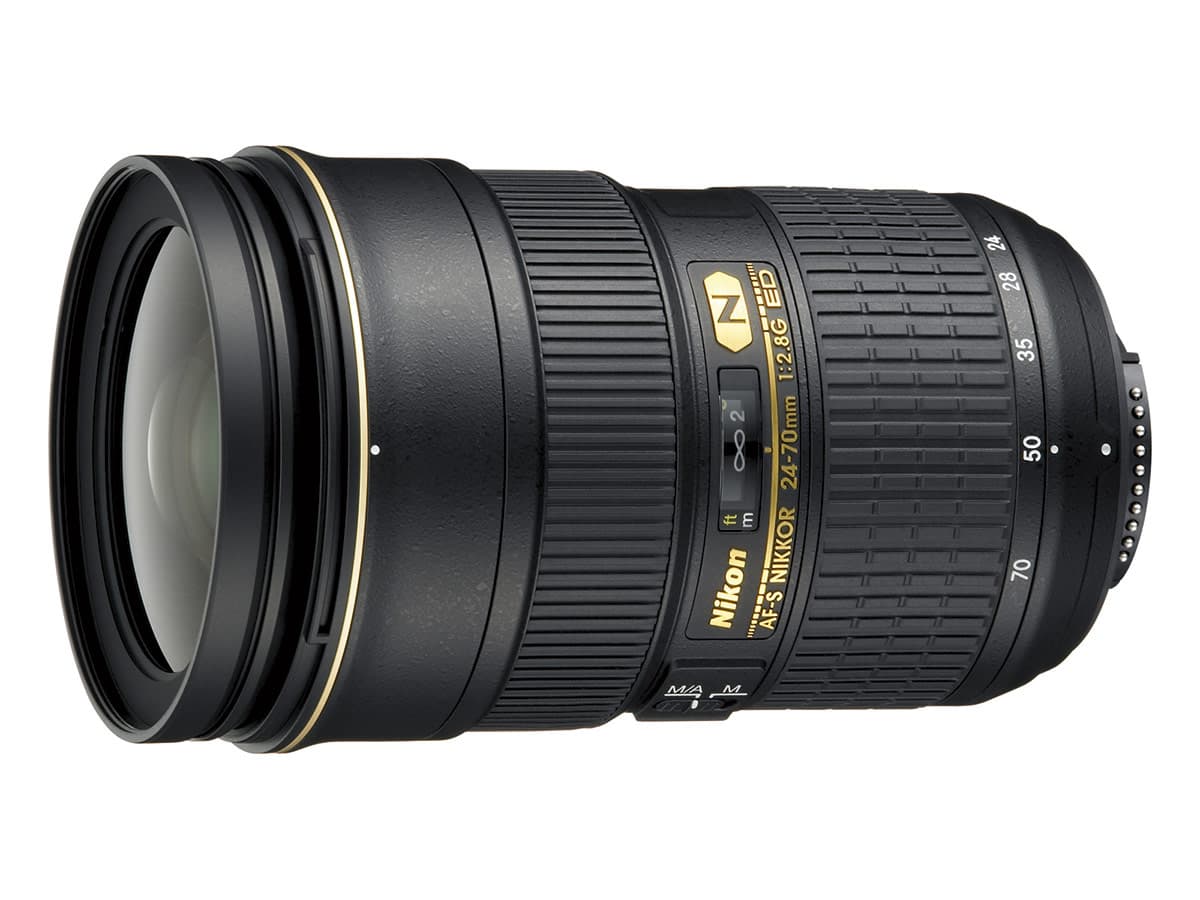
For shooting wider garden scenes or combinations of plants, without too much distortion, a wideangle zoom such as the 24-70mm on full-frame cameras is a suitable choice.
Tripod
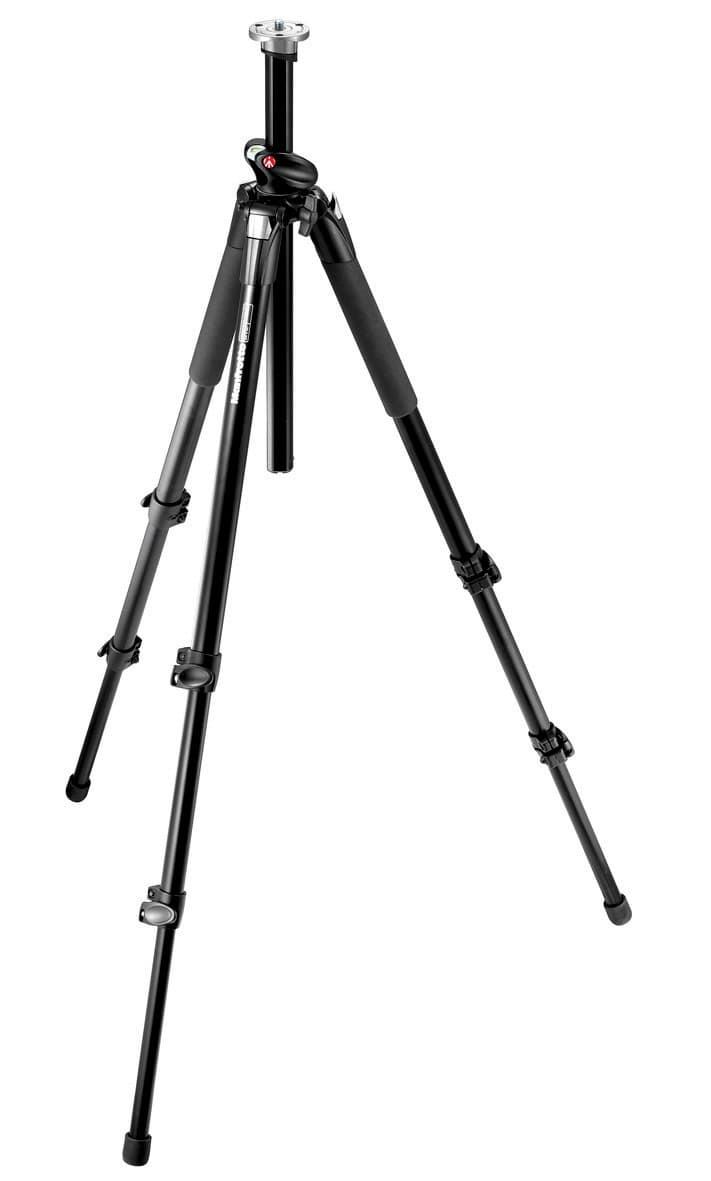
If you’re working in the early morning it usually means shooting in low light, so a solid and dependable tripod is essential. I use a Manfrotto tripod with a Gitzo video head.
Shutter release

Again, if you are using long exposures, a shutter release (combined with the camera’s mirror lock-up facility) will avoid any tiny movements of the camera that would reduce the sharpness of your images
Lens hood
 If you are shooting towards the sun, attaching a hood to your lens will significantly reduce or eliminate flare. By cutting out extraneous light, it will also help you get an accurate exposure reading.
Reflector

If you’re photographing backlit flowers or plants, it can sometimes be useful to knock some light back on the front of the subject and fill in shadows. I use Lastolite reflectors, about a metre across.
Ideas to try
If you pick a good garden that’s well planted, well structured and has plenty of variety, you’re not going to be short of subject matter. Look for features such as summerhouses or sundials being picked out by the morning light, and watch how the sun falls on different areas of the garden as the sun rises. Here are a few suggestions of what you can look for, plus a couple of ideas to try if the hoped-for sunlight doesn’t materialise.
Using water
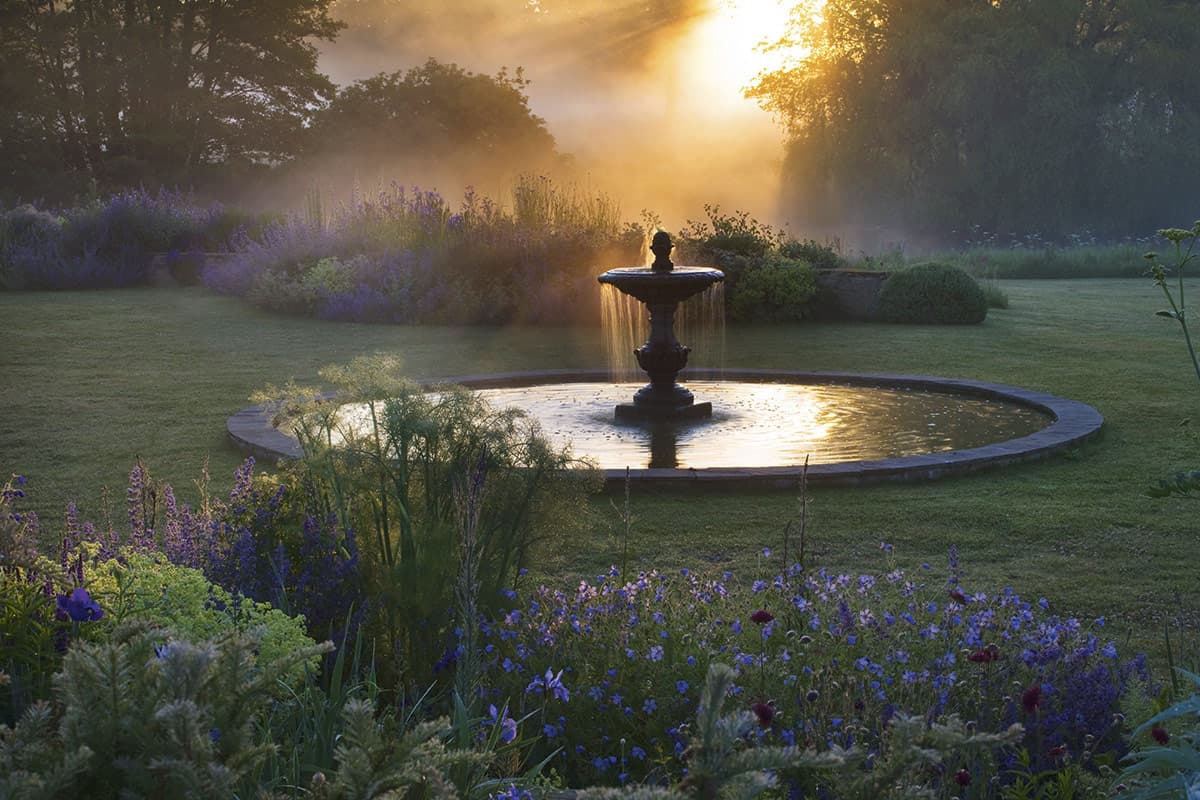
Water features such as fountains look wonderful when they are backlit and the water spray is illuminated against a dark backdrop. In this image, water has also played another role, as the mist in the background comes from water vapour rising off a river that is out of shot.
Subject movement
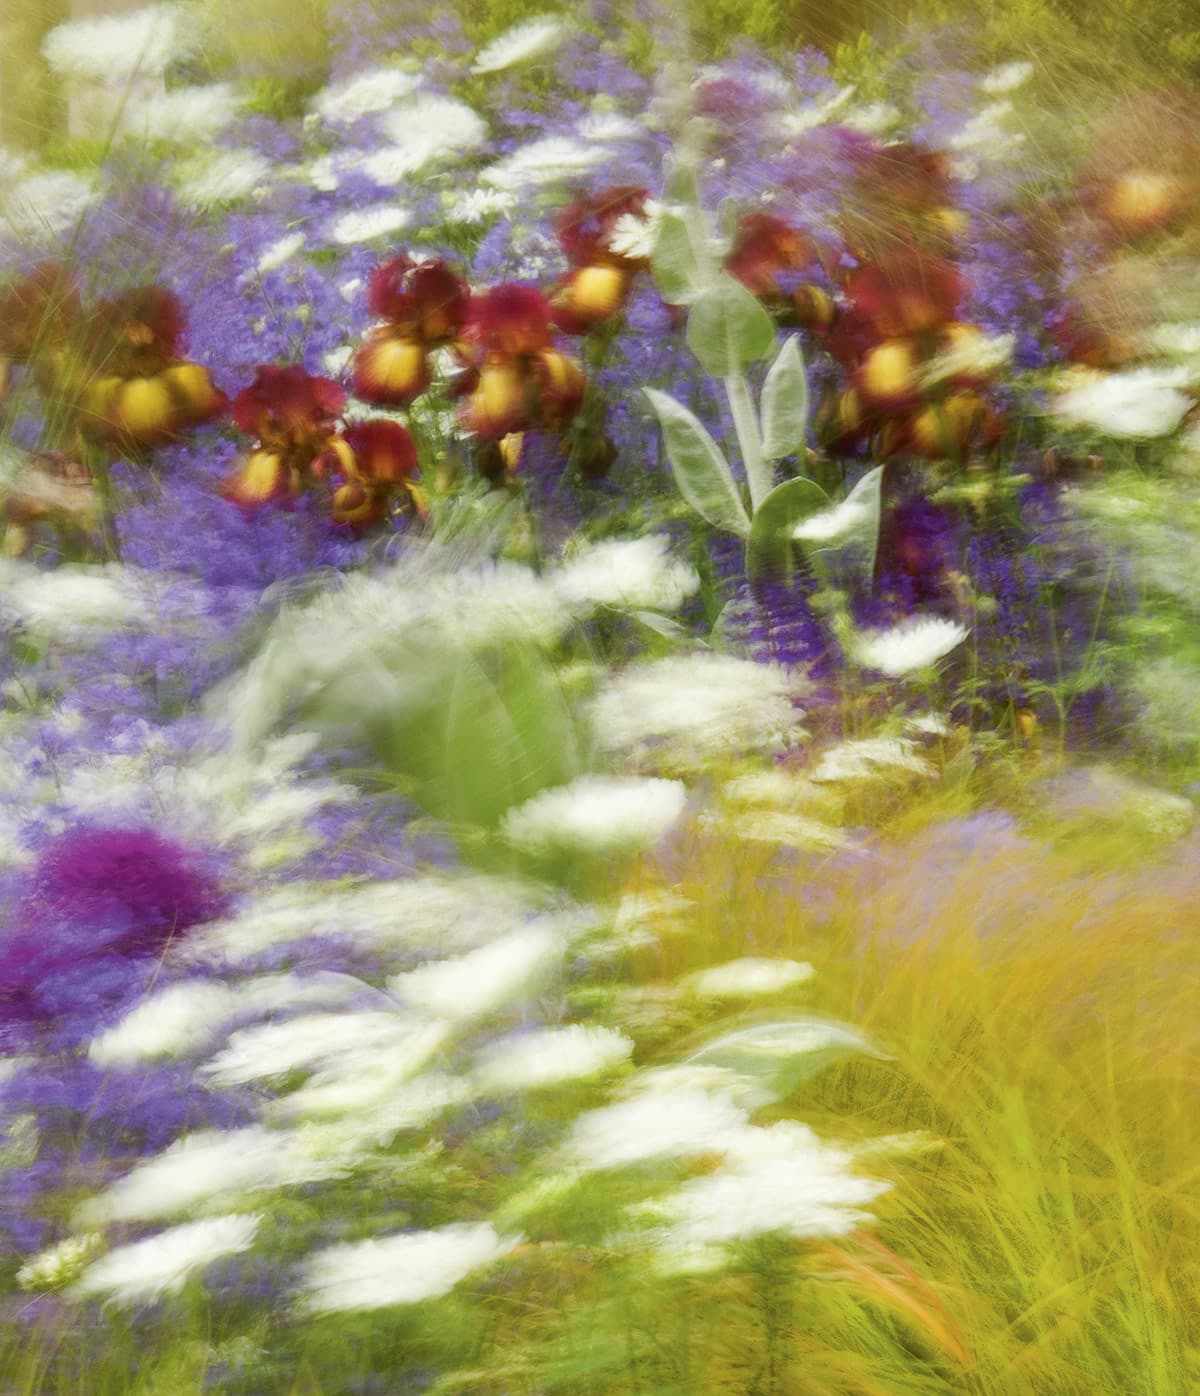
Another approach – when the early morning light isn’t so good and there’s wind blowing the foliage around – is to use a small aperture and a long shutter speed. Here I’ve used the conditions to my advantage by using an exposure of 2secs at f/32 and recorded the movement as an impressionistic blur.
Mist
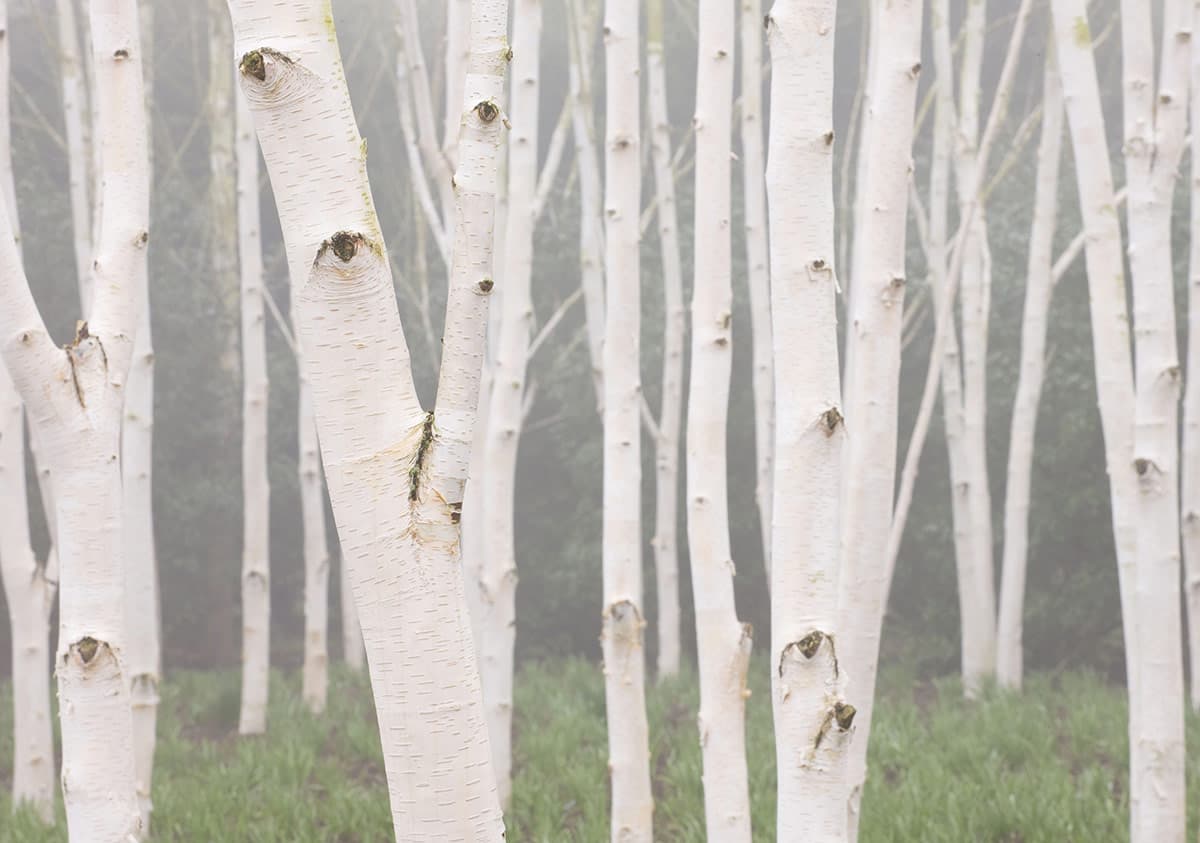
If you get to a location early and the sun isn’t shining, try using muted early morning light to create an atmosphere. Here I cropped in on the trunks in this grove of birch trees with my 70-200mm zoom and used the mist as a backdrop. The soft light has brought out the detail in the bark of the scrubbed white trees.
Highlighting features
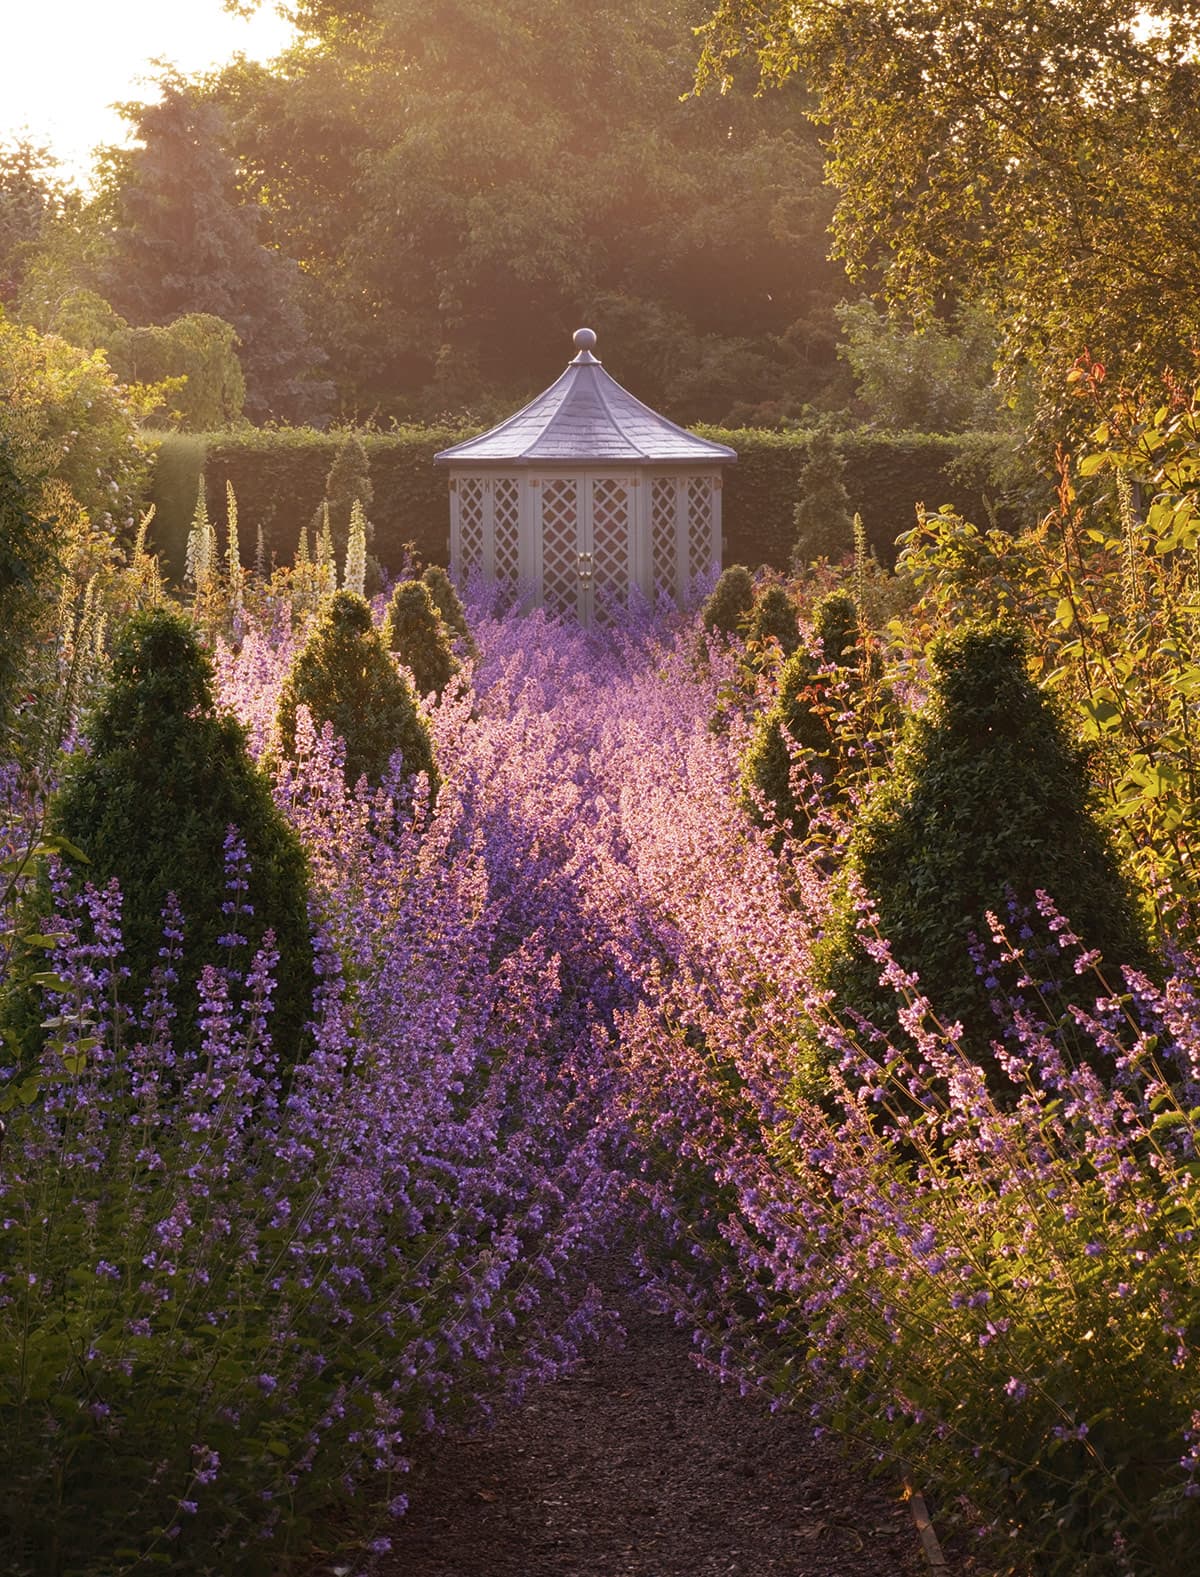
The highlight and shadow areas created by backlight can be used to focus attention on garden features, such as this summerhouse at Wollerton Old Hall Garden in Shropshire. The sunlit, lavender-coloured flowers in the foreground stand out more than they would later in the day, contrasting with the shadow areas.
Borders

Borders are a great subject for backlighting. As you can see in this picture, the sun is highlighting different plants, rimlighting some of the tulips and illuminating parts of the leaves. At the same time, I’ve retained detail in the shadow areas, which gives a rich variation in tones.
About the author
During the past 25 years, Clive Nichols has established a reputation as one of the world’s finest garden photographers and has amassed more than 60,000 images. He gives photography masterclasses for the RHS and is a judge on the International Garden Photographer of the Year contest. Visit his website at www.clivenichols.com