
Black and white photography is all about translating a coloured world into black, white and tones of grey.
There’s something special about a beautifully produced black and white landscape photograph, as the enduring popularity of the work of greats such as Ansel Adams and Edward Weston continue to testify.
The technology may have changed since Ansel’s day, with digital capture and inkjet printing, but the aim is the same: to produce great photographs.
Seeing in black and white

Not all landscapes look as good in mono as they do in colour. This scene looks great in reality, but in black and white those contrasting bands of colour reproduce as the same shade of mid-grey, resulting in a boring image
Few things in photography are as impressive as a great black and white landscape.
But if you want to create masterpieces worthy of hanging on your wall there’s a different mind-set for shooting black and white compared to colour, which you’ll need to key yourself into.
Colour photography relies on how different colours are juxtaposed and complemented by each other. Black and white’s intrinsic nature, which pares every scene down to a palette of shades of grey, lends itself to a different aesthetic – one which is more about tone, form and texture.
You need to be able to see a scene in these terms, and to pre-visualise it as your final black and white print. This will give you a greater chance of success than simply running random images through the desaturate feature of your software to see what happens.
Tonal range
 Black and white landscape photography is composed of a tonal range of greys that fall between black and white.
In general, a well-exposed image will give you the widest possible range of tones between these two extremes. However, it will depend to a great extent on the subject and on the lighting conditions.
In order to record the maximum spread of tones from the darkest to the lightest, without losing the detail in either, you must get your exposure right.
Too much and you’ll lose the highlights; too little and you’ll lose the shadows. Post-production can amend exposure inaccuracies to a degree. However, if you fail to make a good initial exposure you’re restricting the potential quality of your results, as there will be less recorded information to work with.
With digital capture it’s harder to get detail back from overexposed areas than from those that are underexposed. It’s best to expose for the highlights. With landscapes, you do have time to consider your settings and bracket your results.
Shooting in Raw mode will help because it offers a greater range of tones – being 8-bit there are only 256 possible shades of grey with a jpeg, but 12-bit Raw files can record 4096.
Seeing in zones

This picture has been reduced to just black and white, with virtually no shades of grey at all, to striking effect.
Tonal ranges are often referred to as zones or a ‘zone system’. This is a reference to the system devised and mastered by Ansel Adams.
In his system, pure black was represented by zone 0, middle grey (18% grey) at zone 5 and pure white at 10.
Two of the most important zones are zones three and seven – zone three represents a shadow area with texture, and zone seven represents highlight area with detail.
Exposure and composition
It would be difficult to write a feature on metering for black and white landscapes without mentioning Ansel Adams. His methodical way of exposing black and white negative film was designed to allow for a full tonal range to be produced at the printing stage.
The Zone System that Adams and Fred Archer formulated still has a huge influence on landscape photographers today. However, but when it was devised it had as much to do with making sure that every expensive 10x8in plate or negative could be successfully printed as it did with artistic principle.
When shooting on black and white negative film, Adams’ axiom was ‘Expose for the shadows, develop for the highlights’. Adams realised that if only a little light reaches the negative, no detail of that area is recorded and any resulting prints merely show an area of dense black.
Adams’ compromise was to expose the negative so that enough shadow detail could be shown when the image was printed. He could recover highlight detail through selective development and printing of both the negative and print. This allows for a full range of tones to be reproduced, provided the image has been taken with the optimum exposure.
Black and white landscapes: Highlights and shadows
Adams’ system was designed with negative film in mind. However, the principles can be reversed and used for the positive images created by transparency film and digital sensors.
Just as too little exposure creates large black areas when printing from negatives, overexposing digital images can create large white areas with no detail. Therefore, in digital photography, images should be exposed to make sure that little or no highlight areas are completely lost. We need to expose for the highlights and ‘develop’ for the shadows and midtones.
This is particularly important in landscape photography as the contrast in a scene can be high and, unlike in the studio, we have no control over it.
Just as with film, digital cameras have different dynamic ranges. While the dynamic range of digital sensors is gradually improving, the range is still no match for what the human eye can see.
With this in mind, it is important to know exactly when and where your camera’s dynamic range could affect your images. Over time, you should start to develop a feel for the type of scenes and lighting in which your camera will struggle to produce a full range of tones. Thankfully, there are a few in-camera tools that can help.
We are fortunate that, unlike Adams, most of our digital cameras have systems to help us check exposure. Most obvious, perhaps, is the highlight and shadow warnings that are commonly found when images are displayed on a camera’s LCD screen. These ‘blinking’ warnings tell us when shadows are black and highlights are white, allowing us to adjust our exposure to minimise this loss of detail.
Of greater use is a digital camera’s histogram. This shows us the spread of tones across an image, allowing an exposure to be created that captures the maximum amount of detail available in the scene. This may not produce the most flattering image straight from the camera but, critically, it allows more leeway when we later digitally ‘develop’ the image
Black and white landscapes: Making the conversion
 I used the Channel Mixer to convert my image to black and white, using mainly the red and green channels. By not using the blue channel, the sky was kept very dark.
Once in black and white I adjusted the Levels, creating a few more shadow and highlight areas before finally fine-tuning the overall brightness of the image by tweaking the midpoint.
Knowing that nearly a full range of tones is available allows you to maximise the potential of your image, and while you may not be in the darkroom like Ansel Adams, you can still mask, dodge and burn knowing that detail will be revealed in your image.
Black and white landscapes: Tonal areas
It’s important to know how different tones in an image will react to digital processing. Once you know this, it will help you decide how to expose a landscape scene that will later be digitally developed and converted to monochrome.
1. Highlights
It is important to burn out little, if any, highlight detail. Once the brightness hits 255 on the histogram, it is impossible to recover any detail.
Darkening these images will merely render them a shade of grey with no detail, which, unless done with subtlety, will cause blotchy or posterised areas in an image.
2. Midtones
Midtones make up the majority of the image and will cover a wide spread of tones. Ideally, the midtones should be situated in the centre of a histogram.
However, by reducing the exposure to prevent the loss of highlight detail you may find that the midtones become darker and are, in fact, shifted to the left of the histogram.
3. Shadows
To prevent an image looking flat it is important to have both highlights and shadows present. Unfortunately, the dynamic range of most cameras is more compressed in the darker tones.
This often means that there is very little difference between tones in the shadow areas, which can make them difficult to lighten successfully. It is difficult to recover detail once its brightness has gone below about 10 on a 0-255 scale.
Trying to make these dark shadow areas brighter can cause solid blocks of dark grey to appear.

Black and white landscapes: Exposures
There is quite a high level of contrast in this scene due to the strong shadows and bright white snow caused by the early afternoon sun.
Although using the Nikon D300’s sophisticated evaluative metering produced what appears to be a bright, printable JPEG, viewing the histogram shows that some of the snow has been completely burnt out to white.
To help recover some of this detail I made another exposure 1EV darker. The histogram shows that very little, if any, of the snow has been clipped to white. The downside, however, is that the midtones and shadow areas have got darker.
Finally, I exposed the image 2EV darker than the initial image.
While the histogram shows no burnt-out highlights, too much of the shadow areas have now become completely dark and will suffer from posterisationwhen the shadows and midtones are lightened.
In this instance, the second image (-1EV) is the favoured one.
Although the midtones may be slightly too dark, the important thing is that there is enough information within the highlights and shadows that it can be adjusted without affecting the image quality.
Black and white landscape photography composition

This image uses two classic compositonal devices to good effect: useing an element (the fences) as a line to lead the eye into the shot, and a focal point (the tree) placed one-third of the way into the frame (the ‘rule of thirds’). The horizon is also on the lower third
While good exposure is a technical requirement that’s necessary for a good image, composition is a more subjective practice.
Ultimately your aim is to produce something that you enjoy and that hopefully others will too.
Many of the composition guidelines that apply to colour also apply to black and white – using the rule of thirds, looking for symmetry, natural frames, strong diagonal lines and so forth. However, with black and white there’s a greater emphasis on shape, texture, light and the tone of grey that each colour is represented as.
Balance in composition is something that many photographers talk about the relationship between different elements within the frame. There is a pleasure in a well-balanced composition that considers the relationship between the elements within an image, how they work with each other and what (if anything) is given more attention.
What we allow into a picture makes a huge difference to the way it is viewed. Experiment with different crops, and zoom in (literally or figuratively) on interesting details.
Try shooting from low and high viewpoints, and experiment with shooting the same scene with various lenses, to see how this changes the emphasis to different parts of the scene.

Rules are made to be broken. Here the rule of thirds was bypassed in favour of a central, symmetrical subject placement, for a simple but effective result.
Landscapes don’t always have to be about capturing beauty; they can be used to capture a reality, whether a positive or a negative one.
It’s hard in this age of environmental issues to step into a landscape without being conscious of the human impact on it.
Even the shape and boundaries of the landscape are man-made and these can be included in subtle ways to emphasise our relationship with nature, or composed to exclude certain items, depending on your viewpoint.
Mono mode and landscape ingredients
Mono Mode
Colours such as red and green may appear different in colour but may tonally record the same. Think about the elements within your image and whether there is a sufficient degree of contrast between them.
If you’re having difficulty visualising in black and white, try setting your colour mode to mono using the menu. This will give you a black and white image on the LCD.
Mono Filters
Although it’s generally best to shoot in colour and convert to mono later, the mono mode is useful as a visualisation tool (you can go back to colour for the actual shot after viewing) and also for shooting in black and white if you’re planning to go straight to print from the card without your images passing through a PC.
If you prefer this method of shooting you may want to experiment with an ‘old school’ technique used by film photographers – use coloured filters to darken certain areas of the shot while lightening others. Yellow, orange and red filters have a progressively darkening effect on a blue sky, making cloud formations stand out. On a PC a similar tonal manipulation effect can be achieved in Photoshop and Elements using the Channel Mixer.
Landsape Ingredients

Landscapes cover a vast range of subject matter, from expansive views to intimate details/ There are certain key ingredients that occur again and again in the most popular landcape photographs:
Water
The relationship between land and water is a favourite topic for landscape shooting, and black and white photography is no different.
The texture and fluidity of the water against rocks and rugged landscapes contrasts well, as it adds movement to an otherwise static image.
Controlling your shutter speed will accentuate how you want to represent this movement. Using a slow shutter speed will blur the motion of the water, giving the image a peacefully serene quality. A fast shutter speed will freeze the water completely, giving you sharp detail. Reflections in water are another recurring theme offering endless opportunities.
Patterns and Textures

A popular motif in landscape photography is to emphasise patterns. Occurring frequently in nature, the echoes from repeated patterns can make for a strong image when isolated from their surroundings.
Textures, too, offer a rich vein of subject matter for the black and white photographer. Think of tree bark, the roughness of rocks, the texture of grass.
Strong directional side-lighting is best for enhancing texture, such as the kind you get early and late in the day in sunny conditions.
Skies and Cloudscapes

Clouds as an element within your picture can be very subtle in changing the whole mood of an image.
They can add a sense of drama or throw a veil of calmness across a picture. Where the horizon lies within an image will have an effect on the way an image is viewed, with a low horizon accentuating the mood of the sky and clouds and making this a dominating factor.
Sometimes the clouds can become a subject in their own right. However, you would still want to show a slither of land in the bottom of the frame in order to give a point of scale and reference.
Trees

Look for natural elements in the scene-such as a tree-to provide a natural frame around the main focal point, in this case the jetty.
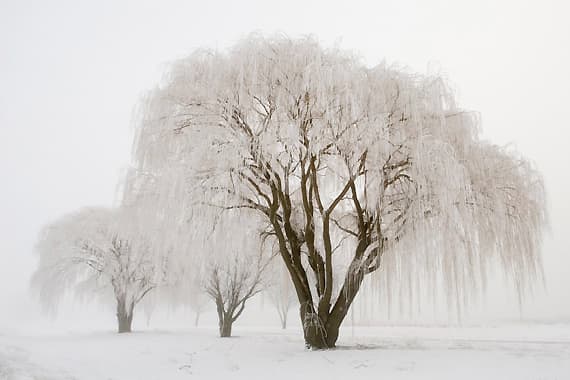
One of the most powerful motifs in landscape photography is that of the lone tree, standing proud and defiant.
Trees are incredibly photogenic, at any time of the year.
The bare twisted branches of winter trees set against a featureless sky can make a great subject for black and white.
Even in the height of summer there are few sights as magnificent as a single mighty oak, beech or cedar tree, especially if you can catch it in the right lighting.
They can either form the entire focus of your image, or – placed at just the right part of the frame – serve as a useful focal point within a wider landscape.
For best results, as always, the beginning and end of the day are the best times to capture them.
Useful equipment for black and white landscape photography
Backpack
There are various types of camera bag but for landscape photography a backpack type is generally the most practical. By carrying your gear on your back the weight will be more evenly distributed, giving you better balance (important when walking over uneven ground), greater comfort over long walks, and it leaves your hands free for climbing over stiles and so forth.
Tripod
A lightweight tripod is a must if walking and if it can fold up small then so much the better. You should keep sturdiness in mind too, so avoid anything too flimsy. The best combination of strength and light weight is a carbon fibre tripod, though of course these are also the most expensive. For landscapes a pan and tilt head is generally more useful than a ball and socket type, as you can level the horizon and lock this off while still maintaining movement in the vertical and lateral planes.
Remote Release
For maxuimum depth of field you’ll want to be using small apertures, and therefore a tripod and slow shutter speeds. You can use the self-timer button to release the shutter, but a remote release offers a greater amount of control and stability.
Grey Card
Being able to get a light reading from a grey card feels almost like cheating, but if it gives you better exposures, the why not take advantage of it? There are a couple of companies that now make fold out versions of these which are light and give you a bigger surface to meter from. Alternatively, you can buy the traditional cardboard targets, which are also very good.
Filters
There’s a small selection of filters that can be very useful in black and white photography. Chief among these is a Neutral Density (grey) graduated filter, which is used for darkening the sky to maintain more detail and introduce a sense of drama. They come in several strengths. A polarising filter is useful for removing unwanted reflections. Finally, if you prefer to shoot b&w in camera, rather than convert to mono later in editing software, consider a set of yellow, orange and red filters. These can boost contrast, darken skies and bring out clouds, with yellow having the mildest effect and red the strongest.
Wideangle Lens
A good wideangle lens will generally be your main stock in trade for landscapes. The 18mm end of your standard zoom lens may be wide enough for your needs but if not, take a look at the selection of superwide zooms on the market, such as Nikon’s excellent 12-24mm lens.