
1. Photograph a Sunrise
This one requires a camera, a tripod, an alarm clock and a healthy dose of will power. Choose a photogenic location within reach (the coast is often a good choice), check up the time of the next sunrise (the BBC website has this information) and set out early enough to enable you to get to your viewpoint half an hour before the sun rises. Once there, set up your camera on a tripod and wait. When the sun starts coming up take plenty of shots and bracket your exposures to increase your chances of success.
2. Buy a Polarising Filter
For the money (around £30-£80) a polariser can make a more dramatic difference to your landscape and nature images than virtually anything else you can buy. In the right light, the boost it gives to colour saturation has to be seen to be appreciated.
3. Add Tags and Ratings
If trying to find specific picture in your archive is like trying to find a needle in a haystack then you need a more organised approach. If, when you download each set of new pictures to your PC you spend a few minutes adding tags and ratings you’ll save yourself a lot of brain-scratching later on. Tagging involves adding keywords to your pictures, such as ‘kids’, ‘badgers’, ‘Cornwall’ etc. You can add as many as required. With ratings you give each shot a number of stars out of five.
It’s a one-click operation and you don’t have to rate every shot‚ just say, your five, four and three-star shots. Then when you need to find your best pictures of Cornwall you simply type ‘Cornwall’ into your search field and sort the results by highest rated first. Most photo-editing software offers this functionality, so check with your manual for guidance if you’re not sure how to do it.
4. Photograph a stranger, (with their permission)
You’ve often admired that stunning girl in the sandwich bar and thought she’d make a great model. Or perhaps you’ve wondered how the craggy face of the old man at the newspaper stand would look through your macro lens. Well, don’t just think about it. Make a resolution to take a portrait of someone you don’t know. They might be flattered, and the worst that can happen is that they say no.

5. Create Scanner Art
You can create some great images using your scanner as a camera, simply by placing some carefully chosen objects on the platen and scanning them.
6. Make a Self- Portrait
We’re getting more portfolio submissions based on self-portraits than ever before, and not just by attractive females. Digital photography has made it easier than ever to experiment with representations of ourselves. Try to shoot a picture of yourself that’s artistic, funny, mysterious or even just plain flattering like this self portrait above by Juicy Carolina.

7. Archive your pictures onto CD/DVD
According to recent statistics, around 22% of PCs break down every year and 15% suffer a core component failure in the first three years. A high percentage of these will cause an irretrievable loss of stored data. Which means that if your pictures of baby’s first steps, or your once-in-a- lifetime holiday, exist only on your PC and youve no back-up, you’re on course for heartbreak. Do yourself a favour: burn them to DVD or get yourself a portable USB hard disc drive – they cost less than – £100. Your photo-editing software may even feature an automatic back-up option, or at least a reminder to do so.
8. Try to replicate a classic photo
One way to improve your photography is to learn from the experts. Try picking a photo you admire from one of the greats of photography, or a contemporary professional, and try to copy it. You could pick one of Edward Weston’s famous still-lifes of peppers, one of Bill Brandt’s distorted nudes or perhaps a favourite landscape by Joe Cornish or Charlie Waite.
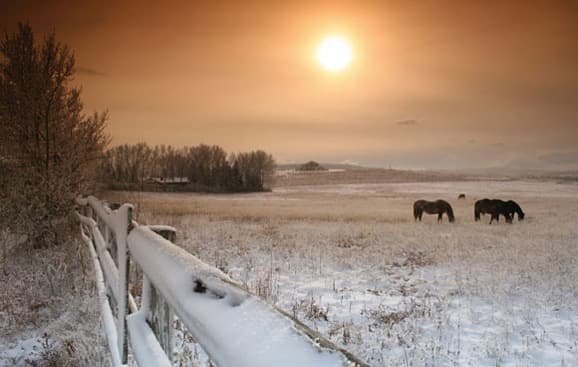
9. Photograph Frost
Unless global warming launches an all-out assault on the UK in the next few weeks it’s a safe bet that we’ll have a few frosty mornings this winter. It may not be great weather for driving in but it can be very photogenic, though you’ll have to get up early to catch it before it burns off. Frost-covered landscapes can look amazing but you don’t have to travel great distances to find subjects. Try frosty windows or garden plants. Cobwebs can look great and you can find these anywhere.
To get a good cobweb shot you’ll need to be able to get close and fill the frame, so a lens with a macro option will be most useful. Try to position yourself so that the light is hitting the front of the cobweb and the background is dark (you may need to move around to achieve this). Alternatively, shoot into the light for an atmospheric contre-jour cobweb. Either way, zoom in to a telephoto setting and shoot at full aperture to blur the background and make the cobweb really stand out.

10. Download Free Software and Learn How to Use it
It’s Winter. You’re broke. Join the club. If your credit card has taken a hammering this month but you still fancy trying some new software take heart, because there’s lots of free stuff online. We don’t just mean trial versions that expire, but fully fledged, permanent imaging applications.
Here’s our top five:
- Google Picasa 2 https://picasa.google.co.uk
- Corel Snapfire www.Snapfire.co.uk
- Adobe Photoshop Album Starter Edition https://www.adobe.com/products/photoshopalbum/starter.html
- Serif PhotoPlus 6 www.freeserifsoftware.com
- Gimp Downloads: https://www.gimp.org/downloads/
11. Visit a Photography Exhibition
There’s nothing like seeing big prints on a wall to get really inspired. There are always lots of photography exhibitions on at any given time, and most towns host them. If you’re in or around London you’re spoiled for choice.
12. Shoot a still Life With your Ornaments, Glasses etc…
Why not try to create an interesting still-life? Ornaments and glasses make ideal subjects, whether you go for the bright colours and shiny surfaces or warm rustic tones of wood and paper ornaments. One popular and effective treatment is to go for a shallow depth of field effect. You’ll need a fairly fast lens set to a wide aperture (or you can simulate the effect on your PC later). Experiment with domestic lighting and your White Balance control to get the mood you’re after.

13. Shoot a Photo Project About Your Local Community
The history of photography is filled with the names of photographers who have created an in-depth, photographic record of a specific geographical area at a moment in time, ad whose work is now considered of great historic value. Why not start your own project, either of your own town or one nearby? You could focus on the buildings the people or a combination of both. There doesn’t need to be a time limit on this project, indeed it could be the start of a life’s work, but its value in years to come could be enormous.

14. Create a Photo With Shallow Depth of Field
As an exercise try to create a photo with really shallow depth of field. You’ll need a lens with a fairly wide maximum aperture, and ideally a telephoto focal length. Getting in close will also narrow your depth of field. Although some would call it cheating you can also exaggerate a blurred background effect using Photoshop or similar software.
15. Go on a shoot using only f/22
You’ll almost certainly need a tripod for this one, because you’ll be forced to use slow shutter speeds, but just think how sharp your pictures will be, from the foreground all the way to the horizon (above).

16. Create a Collage
Photobox is one of several online labs offering an templated collage-creation service, but it really isn’t that difficult to do yourself, using your preferred photo-editing package.
17. Try Time-Lapse Photography
Time-lapse photography is the art of photographing a very slow-moving event (such as the opening of a flower or the passing of clouds over a landscape) in a speeded-up sequence. The trick is to set the camera up on a tripod so it won’t move, then to take a single picture at set intervals (eg every 10 secs, or every 30 minutes, depending on the subject). These can then either be presented as a fast-transition slideshow or, better still, joined together in a video-editing application to make a time-lapse movie.
18. Hire a Model
Bring out your inner Rankin by hiring a professional model and studio for some portrait, fashion or glamour photography. You’ll be amazed at the quality of the results you’ll find yourself achieving with some proper studio lights, a plain background and a trained model who knows how to pose. Some hire studios offer tuition in lighting and posing, while many others have someone on hand to help if you get stuck. Sometimes the models themselves run their own studios and can offer guidance. If the cost is out of your price range, why not club together with a couple of mates to share the cost?

19. Shoot and Stitch a Local View Panorama
Few things impress like a really good panoramic image.
20. Learn a New Photoshop Trick Every Day
Photoshop is far too big a program to digest all at once, but taken in bite-size chunks, over time, you can become an expert. You can do this either by buying a book and reading it a chapter at a time, or by reading the on-screen tips that you can set to come on every time you start up the software. Alternatively watch the videos at www.wikivid.com/index.php/Photoshop
21. Learn a New Way to Convert Your Photos to B&W
There are plenty of ways to get great black & white images from your shots, and here on our web site, we show you one of the best ways to convert your colour pictures to black & white.

22. Buy Some Gear from eBay and Use it
Photography can be an expensive hobby but it doesn’t have to be, especially if you buy second-hand. Why not set yourself a modest budget, say – £20 to – £50, and see what you can find on EBay or at your local car boot fair? You’d be surprised at the quality of the some of the gear you can find. Once you’ve made your purchase you can have hours of fun trying it out. (If you’re buying a flashgun check out www.botzilla.com/photo/strobeVolts.html to ensure that the trigger voltage is compatible with your camera.)
23. Build and Publish a Web Gallery
Share your pictures with the world by getting them online. Most editing software such as Adobe Photoshop Elements make it easy to create a web gallery from your photos, and it takes just a few minutes. All you need is some web space and if you have email then chances are your provider will have already given you some to play with. Alternatively you can join a picture-sharing site such as Flickr (www.flickr.com) which is free to join and gives you some space for free. The benefit of this option is that more people will get to see your work.
24. Scan all Your old Negatives/Prints
You’ve probably got hundreds of packets of prints and negatives from your pre-digital days. Don’t leave them languishing, forgotten, in your drawers. Why not scan them and store them digitally, with your current work? From here you can add them to your web space, make photobooks and slideshows and just generally make them feel more loved.
25. Shoot and Edit a Video Using Your Compact Camera
With all those modes and functions it’s easy to forget that your compact camera has a built-in movie mode that’s ideal for recording those spontaneous moments. Unedited video footage, however, tends to be a bit rough and ready for general consumption, but editing a few clips together into something more viewer-friendly has never been easier. If you have an Apple Mac you can use iMovie. For Windows users there’s Movie Maker. Also see our Complete Guide to Making Movies feature, from our Nov 06 issue.
26. Take a Night Photo by Moonlight
You’ll need a camera with a B setting, a tripod, remote release and plenty of patience for this one. The challenge is to photograph a building, street scene or rural landscape at night, using the moon as your main light source. Set up your shot and stop down to a mid-range aperture such as f/8. The required exposure time will vary depending on the subject and whether or not there’s a full moon but as a starting point try 8 minutes @f/8 for a full moon and increase the times later in the cycle up to 1 hour 30 mins for a quarter moon. By checking the exposure on the LCD you’ll know whether you need to try again, using a longer or shorter exposure time. You’ll need a release that does not require you to keep your finger on the button to eliminate the risk of camera shake.

27. Shoot Using Only Manual Exposure and Focus – Olde Style!
Spend a day experiencing photography the way your grandad did, by doing everything manually. It will hone your skills and you may find yourself enjoying the sense of craftsmanship it will engender.
28. Make your own flash diffuser
Direct flash is harsh and unflattering, which is why there are various devices on the market designed to soften it, either by diffusing or bouncing it. But why not try making your own? A small Tupperware container or small white hanky would make a great diffuser, or you could use a sheet of white card or crumpled tin-foil (mounted on card) to bounce the flash. Use Blu-Tack or tape to fix it to your flashgun or camera.
29. Order a poster print and put it on the wall
Having been inspired by looking at the big pictures in an exhibition why not try making one for your own wall at home, using one of your own shots? You can order poster-sized prints from any online or high street lab.

30. Insure your valuable camera gear
It’s better to be safe than sorry. Keep a record of all your serial numbers, along with your receipts and consider photographing your gear, all of which should help should you ever need to make a claim.
31. Upgrade the RAM on your PC
Adding some more RAM to your PC will pay dividends in speed and performance, and it has never been cheaper.
32. Buy a photography book and read it
Books are a great way to learn tricks of the trade.
33. Learn to use reflectors
You can improve your portrait, macro and still-life photography immeasurably if you learn to use reflectors to creatively direct and channel the light source. There are lots of materials you can use: sheets of white card or polystyrene; metallic surfaces such as foil; even black fabric to block light and create dark edges on your subject. There are plenty of commercially made options too (see www.lastolite.com). Create a small set using an object such as a vase and experiment with different types and sizes of reflector and various positions and angles. Carefully observe how the subject’s appearance changes. It will be a couple of hours well spent.

34. Get your children into photography
It’s never been cheaper to give your children the gift of an appreciation of the world’s greatest hobby. You can now buy a pretty reasonable digital camera for under £70 that may not offer the best performance or image quality in the world but is good enough to spark a passion for picture making in your youngsters that may stay with them for the rest of their lives.
35. Photograph Winter Birds in Your Garden
For a spot of wildlife photography from the comfort of your home, try this. Choose a vantage point from one of your windows that offers a good view of your garden. Set up your camera on a tripod, with a long zoom lens attached, and frame up on a selected area of the garden – preferably one that gives you a natural background such as plants or grass, rather than, say, a brick wall. (For best image quality shoot through a slightly open window, rather than through the glass.)
To maximise your chances of getting good shots set out a bird table with some food on, but for natural-looking shots don’t point your camera at this, but at a nearby tree branch or twig where the birds may stop en route. Now, from your camera position, keep an eye on your chosen spot, but keep very still and avoid sudden movements that may scare the birds away.

36. Shoot a Group Family Photo, Print and Frame it
When was the last time you had a family photograph that was good enough to put on the wall? If the answer is ‘more than a year ago’ then you need to do something about this. Christmas is the ideal time to shoot one. Everyone is all together and off work and school, and you may have extended family round who can either press the button or be in the portrait too. Failing that, there’s always the self-timer.
37. Produce a Slideshow
Use a simple photo-editing suite to create a personalised slideshow of your best pics. Add a music soundtrack and some tasteful transitions for a more professional presentation. Then invite some friends round for a good old-fashioned audio-visual extravaganza. Don’t forget the popcorn!
38. Read Your Instruction Manual Properly
If you’re like most people this is probably something you’ve never done. Even if you have, it was probably a while ago and a refresher may remind you of some feature or function that you’d long forgotten you had.
39. Print a Portfolio
You may well have a great web gallery but unless you carry a laptop around it’s difficult to share it person to person. So set yourself the task of producing a proper portfolio of mounted A4 or A3 prints and put them in one of those nice black portfolio cases that students use.
40. Moo!
Moo cards are small but perfectly formed calling cards featuring your best photos. You can create unique customised stickers, business cards and note cards using your own work. To find out more visit: www.moo.com. They even have a selection of their own images to choose from.
41. Make a Photobook
Shoot or assemble a set of portraits of your family and make a photobook out of them. Photobooks are the Next Big Thing in family albums, and represent the fastest-growing sector of the photo-printing industry, which is why virtually every online lab now offers them.
42. Make Greeting Cards for Friends and Family
There’s nothng like giving your friends and family cards you have made yourself. So why not select a picture of a winter scene, or maybe a home studio shot, open it up in Photoshop Elements, and follow the the step-by-step turorial in the program. You can purchase foldable card, and don’t forget to put a message inside.
43. Try HDR Photography
It seems like the world of photography has gone HDR crazy. HDR involves taking two or more identical frames at different exposures and then combining them using selected software (eg PhotoMatix, or new versions of Photoshop and PaintShop Pro) to create images with an extended dynamic range or, if you really go mad with the sliders, a totally surreal appearance. here’s a quick guide.
Shooting: Minimising camera shake and movement is essential when looking to get a crystal-clear HDR image. Set up your camera on a sturdy tripod and shoot either bracketed images or manually, using a remote, cable release or the self-timer. Where camera settings are concerned, try to shoot in Raw at all times. This will allow you to both perform any minor tweaks needed at a later date and capture the maximum amount of image data for your final image. To determine what range of exposures to use, set the camera to auto and meter for both the lightest and the darkest areas of the proposed shot, then set the camera to the middle of the two and shoot the required images in either AEB or manually.
Combining: For those of you who already have Photoshop CS2 or CS3, it isn’t essential for you to indulge in a specialist item of HDR software just yet, as Photoshop allows you to achieve excellent results with its ‘Merge to HDR’ feature.

44. Take a Pic Every Day
Embark on a project to take a picture of a landscape scene every day for a year and upload your efforts to one of the dozens of online galleries dedicated to ‘365 photography’. Or you could take a picture of a member of your family. To see some examples visit: https://www.flickr.com/groups/365days/
45. Join a Camera Club or Online Photo Community
There’s nothing like the camaraderie and companionship of like-minded people to give your hobby a kick start. The sharing of knowledge, the constructive criticism of each other’s work and the inspiration gained from each other can be a valuable boost to your own photography.
46. Delete 100 Duff Photos & Save Disc Space
Like many people, you save every picture you take, the chances are your hard disc is groaning with the strain. It should be easy to find and dump 100 pictures you’ll never want to print or show the world, and at an average 3MB per file that’s 300MB worth of space you’ll save. When you’ve done that, why not try to find another 100? It will be like buying a new hard disc drive, only cheaper.
47. Clean your sensor and lenses
If you’ve had your DSLR for a few months and have changed the lens a few times, there’s a distinct possibility that you may have some dust on your sensor. You may not have noticed it, but if you enlarge your images quite big on screen you may see out-of-focus dark blobs, formed by dust on the low pass filter in front of your sensor. Here’s a step-by-step guide on how to get rid of the problem.
STEP 1. Choose as clean and dust-free a room as possible. Turn on your camera, go into the set-up menu and select the ‘cleaning mode’ This flips up the mirror and opens the shutter to allow access to the sensor. (Most DSLRs have a cleaning mode. Owners of other cameras should check the manual to see how to do this). If you don’t have this feature, select Mirror Lock, or manual exposure and a shutter speed of 30 seconds. Don’t select the Bulb mode and hold your finger on the button, because if your finger slips and the shutter closes you can damage your sensor, or the shutter).
STEP 2. Pointing the camera face down, blow gently into the opening using a brushless blower (such as the Giottos rocket). Compressed air is not recommended as it can spit liquid propellant, and the high pressure can blast dust into unreachable crevices.
STEP 3. Remove your sensor brush from its protective case, being careful not to touch its bristles. Use the blower to blow a few puffs of air through the bristles. This will increase the static charge on the brush and dislodge dirt.
STEP 4. With the camera still in cleaning mode, gently touch the sensor with the bristles and move across the sensor from side to side. The static charge built up on the bristles will attract the dust particles off the sensor. Repeat if necessary. Shoot another test shot to make sure that all the dust has been removed.
STEP 5. If a dust spot cannot be removed with this method, and doesn’t move from its position, you’ll need to use a ‘Wet Method’ such as a swab designed for this purpose. Take a swab and apply a drop of cleaning fluid (not too much or it will smear). Gently swipe the swab from one side of the sensor to the other.

48. Calibrate Your Monitor and Printer
Okay, it’s a boring job, but if you want good, consistent prints, then it’s something you need to do. And when better than on a dark, rainy night when there’s nothing worth watching on the telly? There are several calibration devices on the market now, notably the Pantone Huey Pro (www.colourconfidence.com) which not only will calibrate your monitor but it will adjust it as the ambient light changes, so your screen will look perfect from dusk till dawn.
For perfect prints, download an ICC profile from your preferred ink and paper manufacturer, or use a professional service specific to your printer (www.pureprofiles.com); it’s easier and cheaper than DIY methods.
49. Sign up for a Course or Photography Talk
Go back to school to improve your photography. There are hundreds of evening classes, held in colleges and adult education centres all over the country, and day or weekend courses aimed at all sub-genres and levels of knowledge. Check out the workshops at www.rps.org/, sign up for some specialised Canon EOS training at: www.experience-seminars.co.uk or visit your library for details of local events.
50. Start a Photo Blog
Blogging, if you haven’t heard, is rather popular on the web these days. Basically it’s an online diary and can be based upon your written observations and words of wisdom, or be based around adding a new photo every day. You’ll need some discipline to keep it going but if you’re good you’ll soon attract a following. Visit: www.photoblogs.org to see some examples.
51. Make a Calendar With Your Pics
Another great way to put your best digital photos to good use is to make your own calendar. There are lots of web sites that offer this, try Photobox at: https://www.photobox.co.uk
52. Enter a photographic competition
You have to be in it to win it, as the saying goes, so why not enter the next photographic competition you come across. There are prestigious international competitions such as Travel Photographer of the Year (www.tpoty.com), Shell Wildlife Photographer of the Year (www.nhm.ac.uk) and Landscape Photographer of the Year (www.take-a-view.co.uk).
53. Produce a photograph lit only by candle
Experience the challenge of ultra low-light photography without leaving your home by using only a candle or open fire as your light source. You’ll need to experiment with your white balance to find the position that gives you the most pleasing results.


