Photography is all about light – without it, we wouldn’t be able to capture images at all! That said, the vast majority of photographs are taken when there’s lots of light around, during the daytime, often in bright sunlight. It’s easier that way. The world looks realistic and we can shoot it using fast shutter speeds – 1/60sec, 1/125sec, and 1/250sec. The shutter opens and closes so quickly you can barely register it with the naked eye, and any movement is stopped in its tracks, frozen solid.
From a convenience point of view, that’s great. But creatively, the same doesn’t always apply. You may assume that lots of it is required to produce successful images, but in many cases, the less there is the better.
Low light not only tends to be far more atmospheric than your bland, lunchtime sunshine, but it also requires you to make much longer exposures in order to record images, and with that comes all kinds of creative consequences.
Long exposures allow you to take photographs in situations that would otherwise be out of bounds because you can open up the shutter and let the sensor suck in as much light as it needs – the sky at night, the urban landscape basking in the colourful glow of manmade illumination. Long exposures allow you to record motion in a scene that would normally be missed – the drifting of clouds across the sky, the ebb and flow of the tide, light trails created by moving traffic, or the earth’s rotation on its polar axis. Open up the shutter for seconds or minutes and you can paint with light – start with a blank canvas and add your own illumination. The possibilities are almost endless.
Long exposure photography also embraces all subjects, from landscapes and architecture to portraits and still-lifes, it can be practised both indoors and out, day and night. These top tips for long exposure photography should give you an idea of what’s possible – so read on and be inspired!
Long exposure photography tips
Tip 1. Cityscapes at night
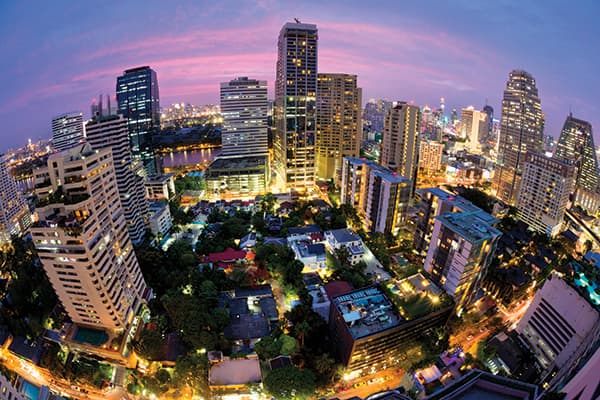
Bangkok, Thailand. At dusk natural and manmade lighting work in harmony.
Canon EOS 5D Mk III, 16mm fisheye, 8 secs @ f/11, ISO 100
Find a high viewpoint over a busy town of city and you can’t fail to take stunning night shots – there’s just so much detail and colour.
Head to the roof of a tall building, shoot from the window of a hotel or drive to the top of a multi-storey car park. Shoot with your camera set to Auto White Balance (AWB) to capture the range of colours in the scene, from the coolness of areas lit by the twilight sky to the warm glow of street lighting and the vivid green of fluorescent. Include some sky, too, if you can – light pollution can create all sorts of weird and wonderful colours in the clouds.
Tip 2. Keep the noise down!
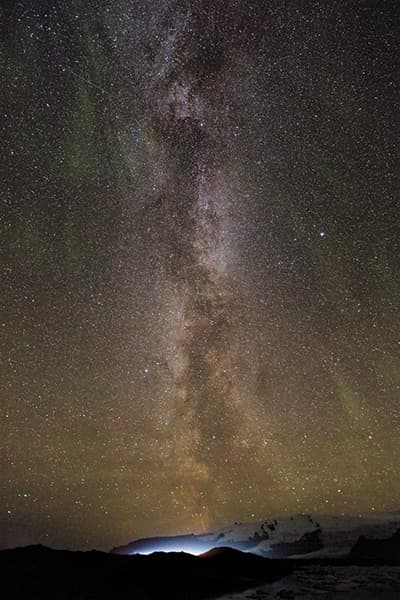
Jokulsarlon, Iceland. A clear night sky reveals the Milky Way. The light in the distance is from a car on the road.
Canon EOS 5D Mk III, Zeiss 21mm, 20 secs @ f/2.8, ISO 1600
When you use long exposures, the camera’s sensor warms up and it’s common to see tiny bright dots in your images because the pixels light up. DSLRs have a long exposure noise reduction feature that gets rid of hot pixels. It makes a second identical exposure to the first with the shutter closed so the camera knows exactly where the hot pixels are and subtracts the dark frame image from the one just made.
However, the second ‘blank’ exposure has to be the same duration as the first, so if you make a five-minute exposure, you’ll have to wait five more minutes for the image to pop up on the preview screen.
If you don’t want to wait, keep long exposure noise reduction turned off and clone out any hot pixels in Photoshop, or use noise reduction software such as Nik Define to get rid of the hot pixels.
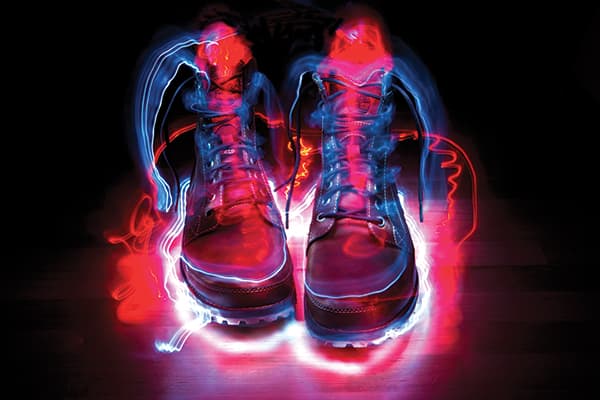
Tip 3. Balls of light
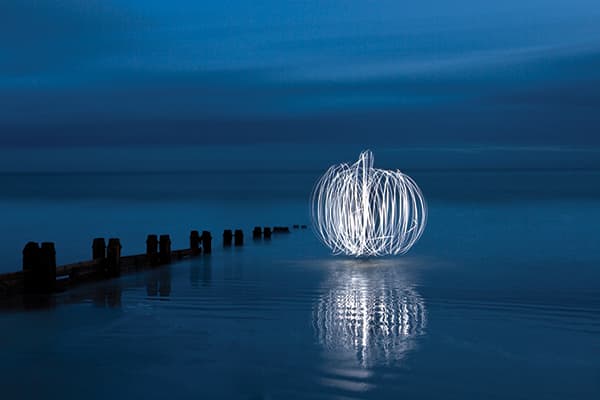
Alnmouth, Northumberland. Spinning a torch with the camera’s shutter open creates weird balls of light.
Canon EOS 5D Mk II, 24-70mm, 60 secs @ f/16, ISO 100
This is a fun technique. Tie a small LED torch to a length of string or chain about 1m long then head outdoors at dusk to a park or beach or your garden, ideally with an assistant to operate the camera. Spin the torch in vertical circles, moving just your wrist to keep the motion as even as possible, then start shuffling your feet to move your body round in a circle while spinning the torch.
As you start moving, ask your assistant to open the shutter on bulb at f/11 or f/16 and ISO 100 and keep it open until you’ve moved through 360° – it should take 90-120 seconds. This is the kind of result you should get. It takes practice to produce neat spheres!
Tip 4. Low light architecture
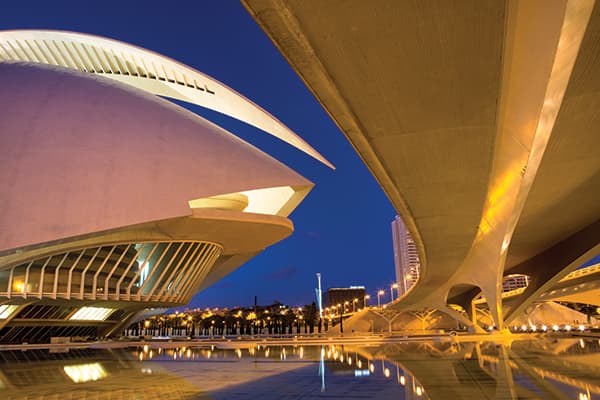
Valencia, Spain. Floodlit architecture is at its best in the ‘blue hour’ between night and day.
Canon EOS 5D Mk III, 16-35mm, 10 secs at f/16, ISO 100
Towns and cities really come to life at twilight, when different types of artificial lighting create a kaleidoscope of vibrant colour. Floodlit buildings glow, streetlamps casts pools of light on wet pavements, neon signs flicker against the darkening sky. All you need to do is mount your camera on a tripod and shoot it! Use a wideangle lens to capture a broad view.
Alternatively, switch to a telezoom and compress perspective so the buildings, streetlamps and traffic appear crowded together. Shoot while there’s colour in the sky and check your histograms as bracketing may be necessary to avoid underexposure. Exposures tend to be in the 10-30 seconds range at f/11 and ISO 200.
Tip 5. Shoot star trails
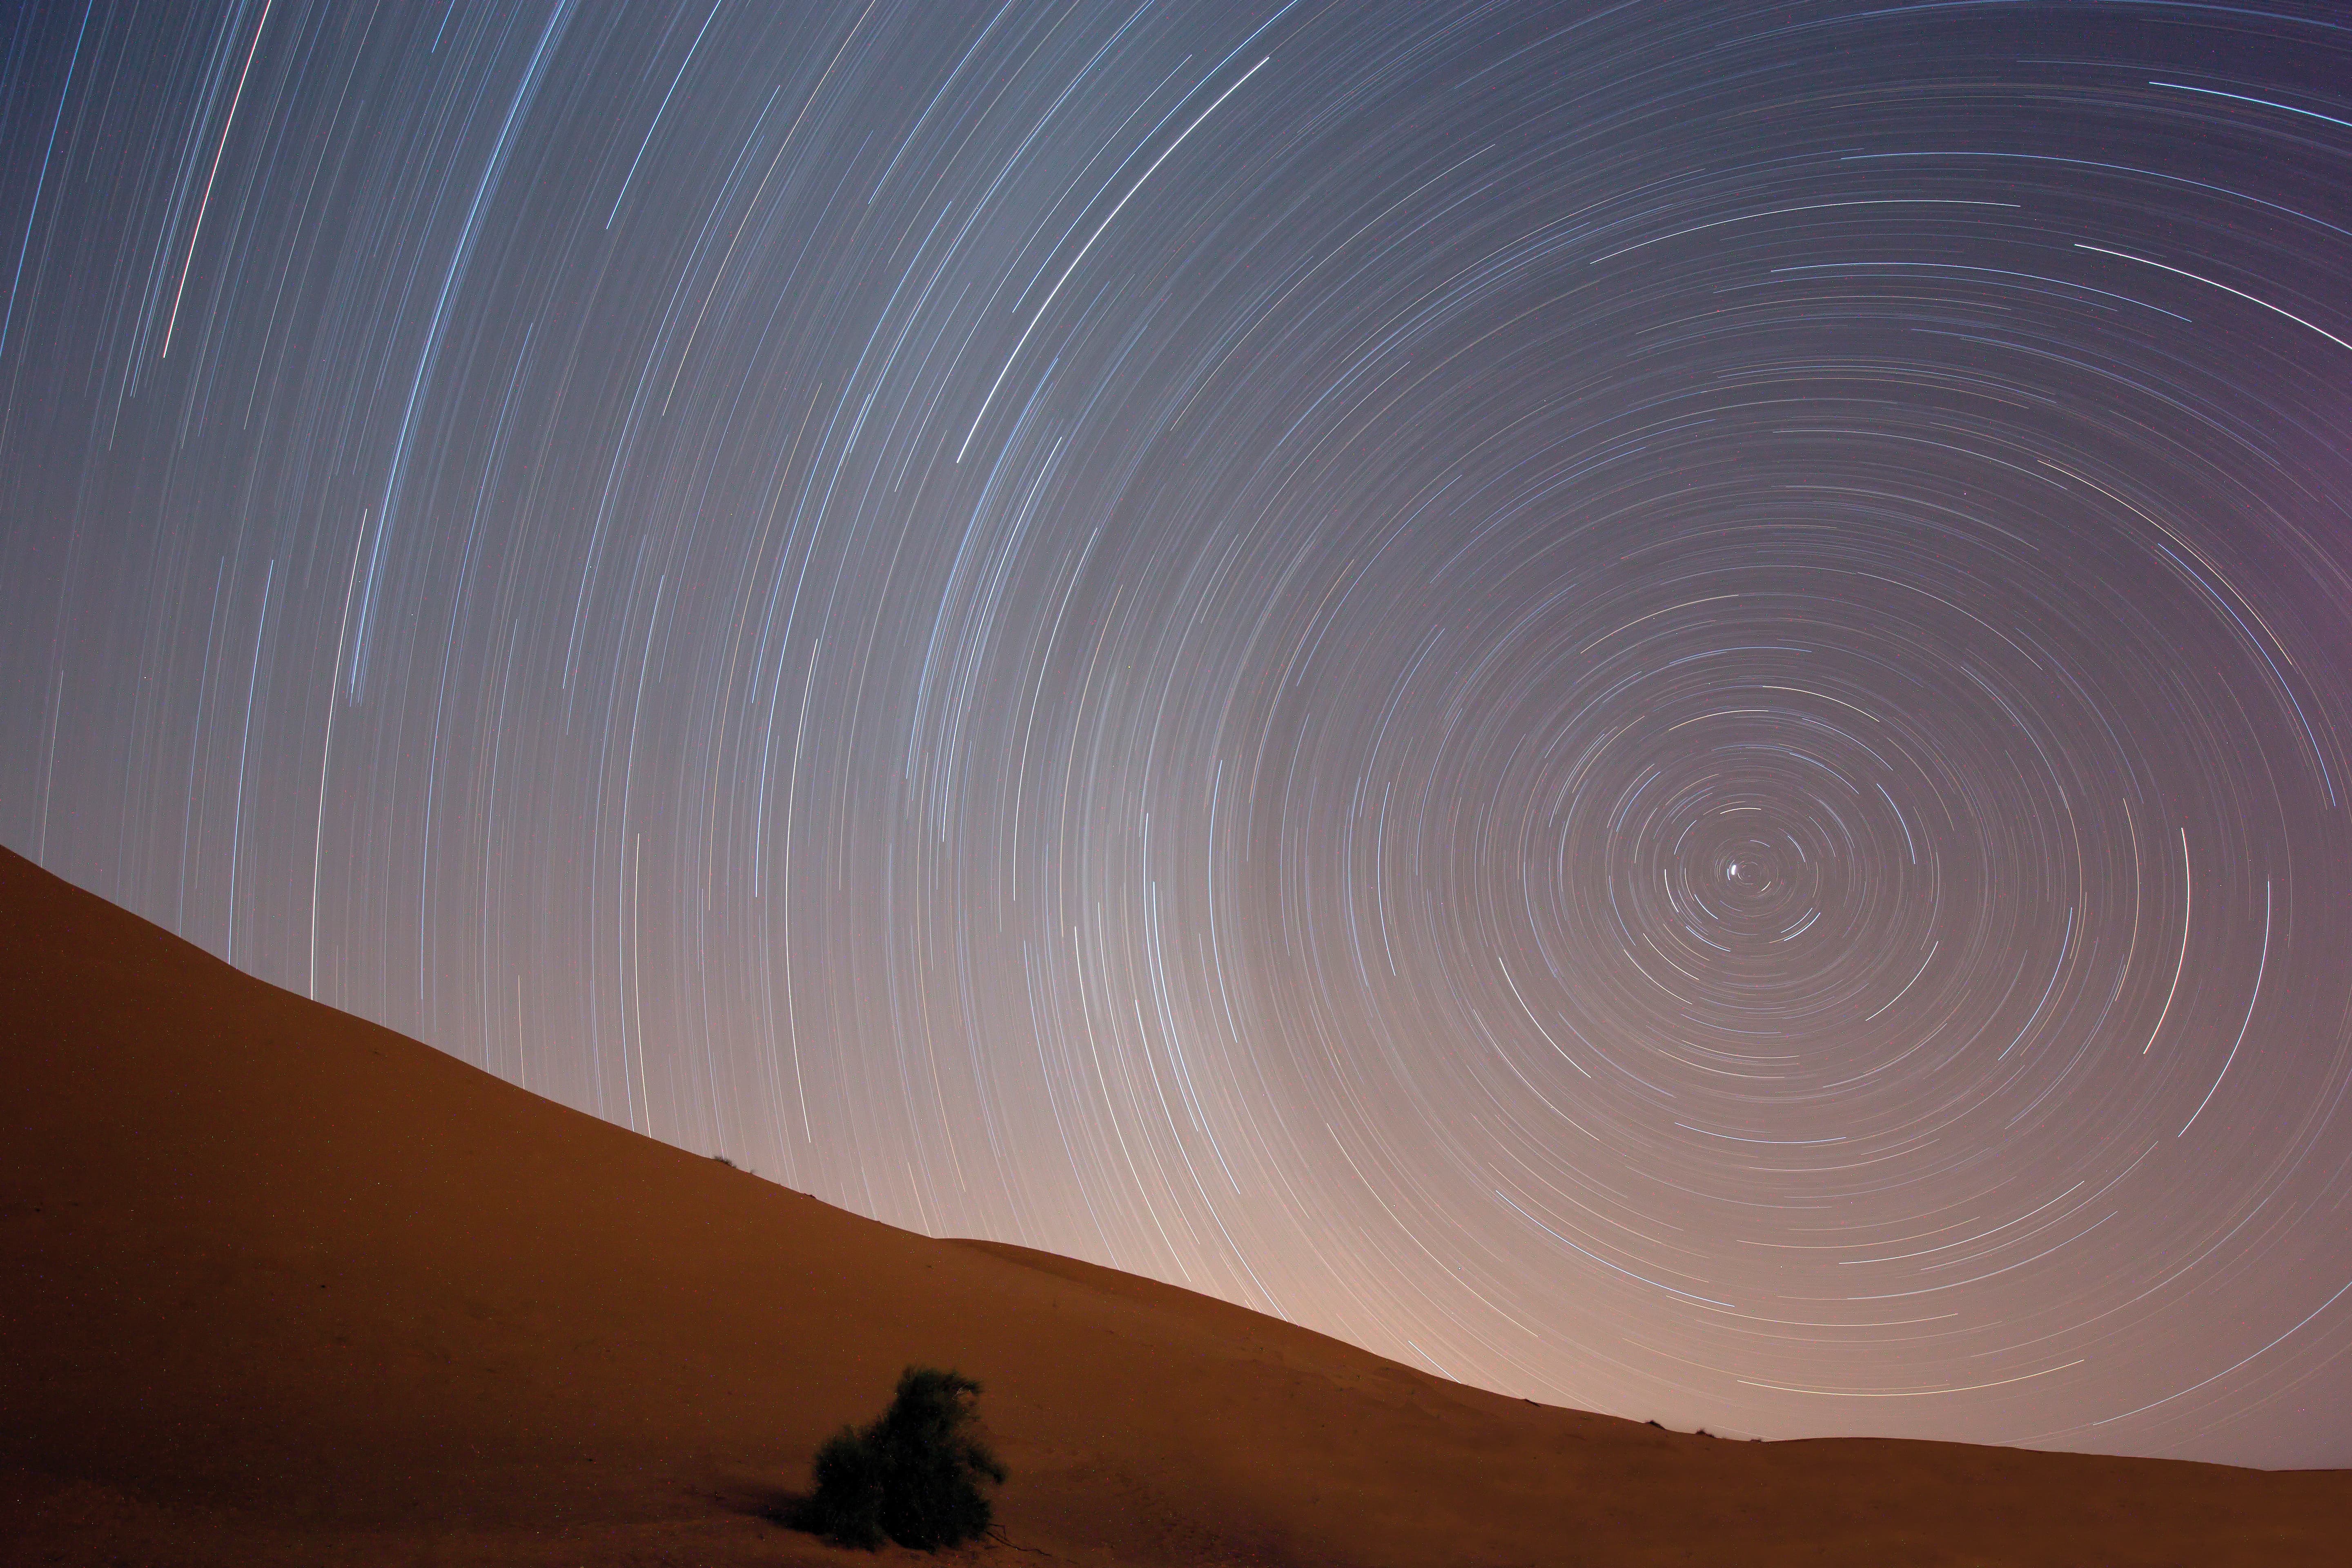
Star trails in the Sahara Desert, Morocco. The white spot in the centre is the Pole Star.
Canon EOS 5D Mk III, 17-40mm, 2 hours @ f/4, ISO 200
Get as far away from civilisation as you can on a clear night and use a long exposure to record stars in the sky as trails of light.
Point your widest lens towards the northern sky so you include the Pole Star (Polaris), lock your camera’s shutter open on bulb for 2 hours at the widest aperture on ISO 200 and see what happens. You’ll be amazed by the results.
Another great way to capture star trails is by shooting a series of shorter exposures – 30 seconds at f/4 and ISO 400 – then ‘stacking’ them. The benefit of this method is that you get far less ‘noise’ in the final image. If you set your camera to manual exposure mode and continuous shooting then open the shutter and lock it with a remote release, it will keep making 30-second exposures until the battery dies or you close the shutter. You need 200-300 frames.
To stack them you can either use Photoshop (lots of tutorials online) or free specialist software such as StarStax (www.markus-enzweiler.de/StarStaX/StarStaX.html) which is compatible with both Mac and Windows computers or Startrails.exe (https://www.startrails.de/html/software.html) which is Windows only.
Tip 6. Shoot moving water
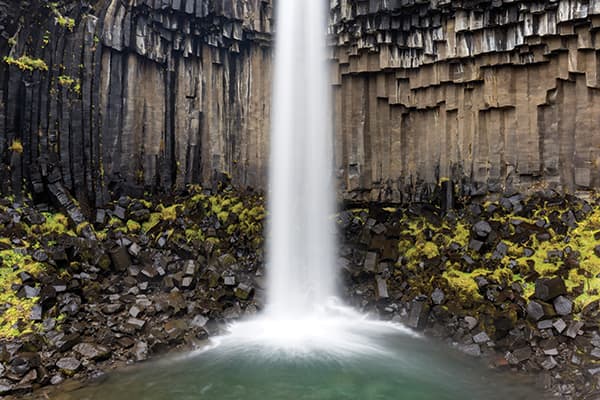
Other than dramatic crashing waves, moving water tends to look more interesting in photographs if you use a long exposure to blur it. How long depends how much water there is, how fast it’s moving and how blurry you want it to look!
For waterfalls an exposure of ½-1sec will record motion and give a nice effect, but equally you can open the shutter for 30 seconds or more if the falls are big and you’re further away.
Tip 7. Torch it
If you find yourself twiddling your thumbs one evening, why not try shooting some torchlit still lifes?
Set up the props on a table, mount your camera on a tripod, compose the shot and focus the lens manually. Next, set the camera’s shutter to bulb and the lens to f/11 or f/16 at ISO100 or 200. Turn off the room lights so you’re in darkness, trip the shutter with a remote release and lock it open, then get to work with small LED torch.
One option is to paint your subject with light and gradually build the light levels over a minute or two. The other is to trace the outline of the props with the torch to add colourful light trails. Light spill from the torch will also illuminate the props.
Tip 8. Capture traffic trails
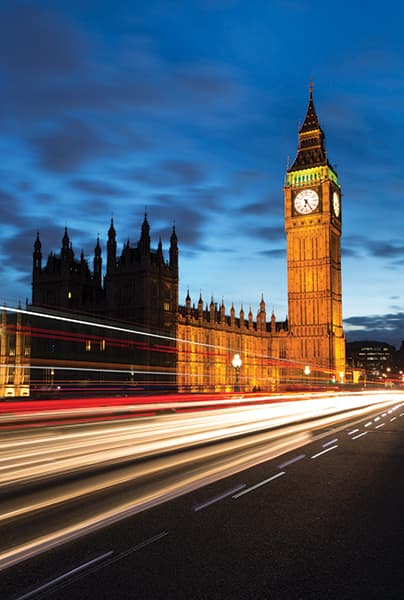
Big Ben, London. Passing traffic adds colourful light trails to night scenes. Busy roads are best.
Canon EOS 5D Mk III, 16-35mm, 30 secs @ f/11, ISO 100Tip 9 The sky at night
Set up your camera and tripod next to a busy road (or find an elevated viewpoint overlooking a road or roundabout) and use an exposure of 20-30 seconds to record moving traffic as colourful light trails. Include floodlit buildings or the dusk sky for added interest. Now is a good time of year to shoot traffic trails, as dusk and rush hour more or less coincide so the roads are busy when the light levels are just right.
Tip 9. The sky at night
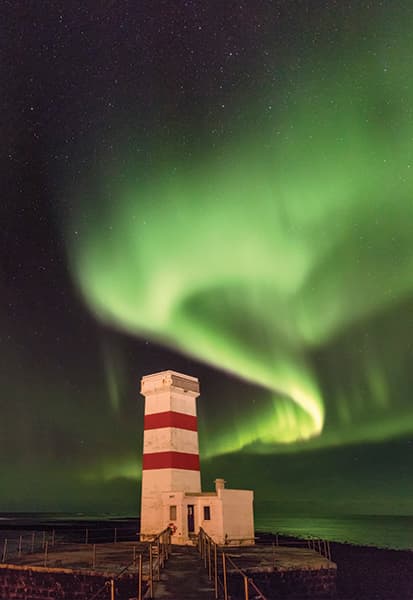
Gardur, Iceland. The Aurora Borealis is amazing and often seen in the northern sky at night.
Canon EOS 5Ds, 16-35mm, 8 secs @ f/4, ISO 1600
There are two amazing subjects worth trying to capture in the night sky – the Milky Way and, in northern locations, the elusive aurora borealis (Northern Lights). Both require the same conditions and approach – a clear night, a wideangle lens set to its widest aperture, a relatively high ISO of 1600-3200 and an exposure of 20 seconds or less.
If the exposure is longer than 20 seconds, stars in the sky start to trail, which you either avoid or exploit (see Tip 5), while the aurora will blur as it moves across the sky.
Tip 10. Abstract seascapes
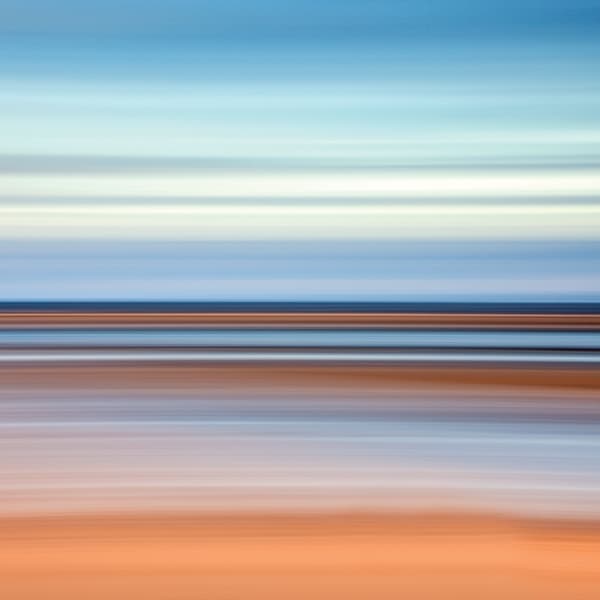
Head to your nearest beach at dawn or dusk, mount your camera on a tripod, level it, stop the lens down to get an exposure of ½-1sec. Loosen the horizontal lock on the tripod head so you can pan the camera freely and smoothly. Swing the camera to the left then start panning to the right. As you start panning, press the shutter release. Keep panning until after the shutter has closed. Repeat until you get a shot you’re happy with – like this!
Tip 11. Create physiograms
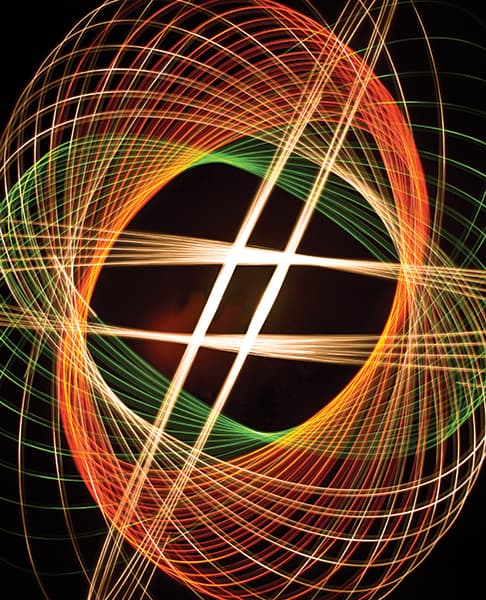
Tie a small LED torch to the end of a 1m piece of string, hang it from a light fitting in the ceiling and set up your camera low to the ground and pointing up. In a dark room, set the torch spinning then lock the shutter open at f/11 for about 30 seconds. The torch will create wacky light trails called physiograms. Close the shutter, then stop the torch.
Placing coloured filters on the lens changes the colour of the trails. Make an exposure, cover the lens with a black card but leave the shutter open, stop the torch and turn it off. Remove the card, put a filter on the lens and cover the lens with the card. Turn the torch on, set it spinning and remove the card to resume the exposure. Repeat a few times.
Tip 12. Use a 10-stop ND filter

Try a 10-stop neutral density filter. These reduce the light entering your lens so you can use exposures that are minutes long in broad daylight.
The Lee Filters Big Stopper is the best known, but Hitech, Hoya, B+W and other manufacturers make them as well. Pop one on your lens and you can record the passing of time. People and traffic moving through a scene vanish into thin air; water turns silky smooth; drifting clouds record as streaks of colour and tone; blowing trees look like ghosts.
You’ll need to mount your camera on a tripod, compose, and focus the lens before fitting the filter as you won’t be able to see through the lens once you do. Find the best exposure by taking test shots. If the correct exposure unfiltered is 1/15sec, with the 10-stop ND it becomes 1 minute; 1/8sec becomes 2 minutes; ¼sec becomes 4 minutes and so on. Set your camera to Bulb (B) to make the final exposure.
Tip 13. Painting with light
Locate an old building, monument, pier or jetty that’s unlit then as darkness falls, use repeated bursts from an electronic flashgun or a powerful torch to illuminate it while your camera’s shutter is open. The duration of the exposure will depend on ambient light levels as you’ll want to record colour in the sky. Try 30 seconds at f/11 and ISO 100 then increase or reduce it as required.
Tip 14. Coastal landscapes
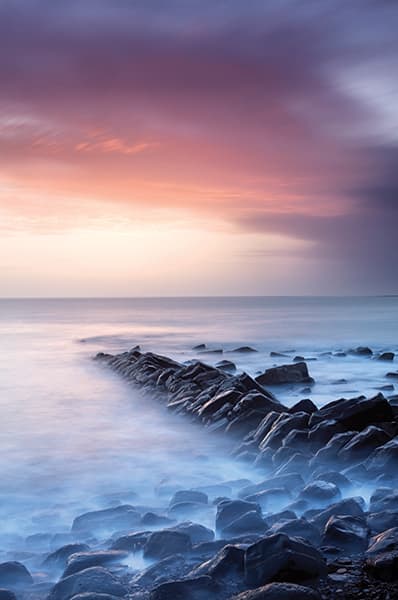
Head to the coast either before sunrise or around sunset and capture sea views at the fringes of the day. Light levels are naturally low so you can use long exposures of 30 seconds or more to record motion in the sea, while wet sand and rocks will reflect the rich colours in the sky overhead.
The end of the day is better than the start as you can arrive before sunset and keep shooting until there’s no colour left in the sky.