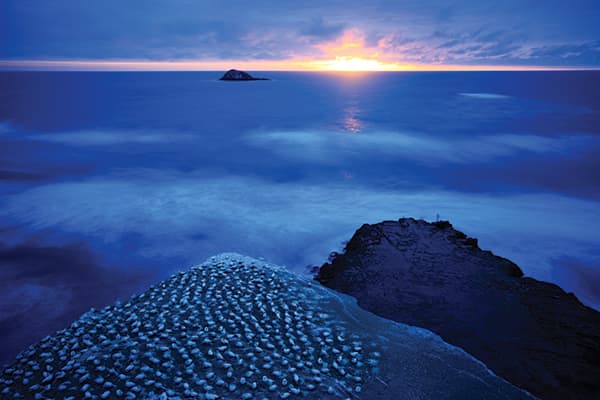

Muriwai, New Zealand. Live view is useful for composing landscape scenes, especially in low light when the image on the screen is easier to see than that through the viewfinder.
Canon EOS 5D Mark II, EF 17-40mm f/4L at 29mm, 30 seconds @ f/8, ISO 100
Live view is one of the more important features introduced by Canon into its EOS cameras over the past decade. For a start, the technology behind it enables Movie Mode. This in turn sparked a revolution in the way that people make movies and television shows (does anybody remember that episode of House shot entirely with an EOS 5D Mark II?).
It has also fuelled the rise of the mirrorless camera. If you use an EOS M3 with Canon’s electronic viewfinder attachment, you are essentially looking at the live view feed in the viewfinder rather than the camera’s LCD screen.
Have you ever wanted to take a photo but your view is obscured? With live view you can lift the camera above your head and take a photograph. You can also place it on the ground for a different viewpoint, and use live view to compose. In both cases, it’s much easier if your camera also has a vari-angle LCD screen.
Under many circumstances, live view is awkward to use. Optical viewfinders are included on the camera for a reason – it’s much harder to hold the camera steady when it’s held away from your body than when it’s pressed up against your face, but put the camera on a tripod and it’s a different story. Now it’s easier to look at the image on the camera’s LCD screen than it is to look through the viewfinder.
Live view and landscapes
That’s why live view is so popular with landscape photographers. They tend to have the time to set up the camera, make sure any required filters are in place, and find the best composition.
Live view helps you evaluate sharpness. Press the depth-of-field preview button and the camera stops the aperture down so you can see how the scene looks at that setting. If you are using a neutral-density graduated filter, this also helps you see if the line is too hard or soft, and if the filter is in the right place.
Unlike looking through the viewfinder, the display on the camera’s LCD screen doesn’t go dark when the aperture is set to f/11 or f/16 (unless you are shooting in very low light).
This benefit also extends to infrared and 10-stop neutral-density filters. Put either of those on your camera lens and you won’t be able to see anything through the viewfinder. But, as long as the ambient light levels are bright enough, you’ll get a nice clear display in live view.
You can use live view to help you focus manually. Press the Magnify button on the back of the camera to enlarge the area under the focusing square five times. Press the magnify button again to zoom in 10 times. This even works with near opaque infrared and neutral-density filters.
Exposure simulation
Live view also assists with finding the correct exposure. With Exposure Simulation enabled (in the camera’s menu) the display reflects the exposure settings. The quickest way to see how this works is to set your camera to Aperture Priority and adjust Exposure Compensation. Enter a positive value and the image becomes brighter; enter a negative one and it goes darker.
The camera can even display a histogram (press the Info button until it appears, Exposure Simulation must be enabled). This lets you set exposure before you press the shutter button – much more efficient than taking the photo then checking the histogram afterwards.
Black & white
One of the challenges of working in black & white is learning to visualise the scene in monochrome. Just how will that beautiful landscape you see in front of you, in all its glorious colour, look once you’ve converted it to B&W? In live view, there’s no need to guess – just set Picture Style to monochrome. The camera displays the scene in black & white. Remember to use the Raw format, so you have a full colour file to work with in post-processing.
Most EOS cameras offer a variety of aspect ratio settings. In live view, the camera automatically crops the scene if you select a setting other than the camera’s 3:2 native aspect ratio. For those of you into B&W square-format long-exposure photography (yes, that’s a genre), live view is an essential tool that eliminates much of the guesswork.
If you’re working in colour, the camera applies the current Picture Style and White Balance settings to the live view feed.
Composition in Live View

Venice, Italy. Live view helped me compose the image with the camera close to ground level.
Canon EOS 40D, EF 17-40mm f/4L at 28mm, 2.5sec @ f/8, ISO 100
In live view, the camera can superimpose one of two grids over the live feed (some models have a third diagonal line overlay). These help you see whether the horizon is level or compose your scene according to the rule of thirds.
The benefits of live view aren’t limited to landscape photography. They apply to any area where you might use a tripod-mounted camera. In architectural photography, the grid overlays help you make sure that the sides of buildings are straight (a big benefit to photographers using wideangle or tilt-shift lenses).
If macro or close-up photography is your thing, you’ll probably find looking at the live view display much easier than looking through the viewfinder, especially if your subject is static. The 5x and 10x zooms help you make sure your subject is truly in focus. The depth-of-field button helps you evaluate depth of field.
Some portrait photographers like to work with the camera on a tripod. If this applies to you, then you might like to try
live view combined with face-detect autofocus. It’s easier than looking through the viewfinder and lets you concentrate on talking to your subject, helping put them at ease and create a good portrait. If you’re working in black & white it helps to see the portrait displayed in monochrome.
Autofocus in Live View
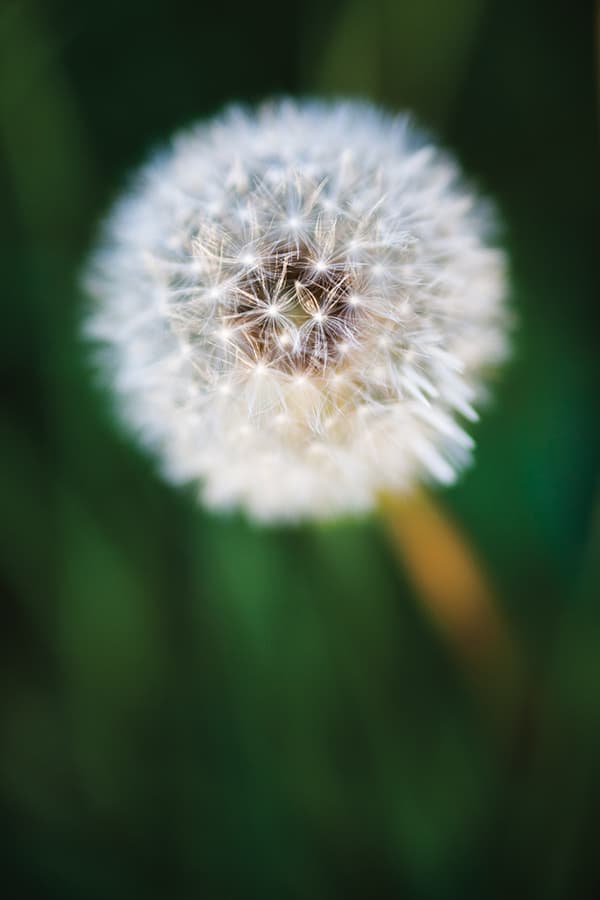
I used a 500D close-up lens on an 85mm lens to get close to this dandelion. An aperture of f/1.8 meant only a small part of it was sharp. Live view helped me focus exactly where I wanted to.
Canon EOS 5D Mark II, EF 85mm f/1.8 with 500D close-up lens, 1/500sec @ f/1.8, ISO 400
Autofocus options available in live view vary greatly between models, so this is an area where you should check your camera’s instruction manual to see exactly what it can do. The first cameras with live view didn’t even have autofocus, while newer cameras such as the EOS 80D are quite sophisticated and can even track moving subjects (although don’t expect it to work as well as the phase-detection AF used by the camera when you view the subject through the viewfinder).
In live view, the camera uses contrast detection to focus on the subject, taking readings from the camera’s sensor. This is marginally slower than phase-detection autofocus, but more accurate, even at wide apertures, and eliminates the need for autofocus micro-adjustment.
Newer EOS cameras (such as the EOS 80D and 7D Mark II) have dual-pixel CMOS autofocus. The technology sounds impressive, and it is. Each effective pixel on the camera’s sensor contains two photo diodes. The camera takes separate readings from each one for focusing purposes, enabling it to focus more smoothly than when using contrast-detection autofocus, in which the lens tends to hunt before locking on the subject. The principal use of dual-pixel CMOS autofocus is for smooth focus in Movie Mode, but it’s also useful for still photographers as it helps the camera track moving subjects in live view.
Step by step: How to set up Live View on a Canon EOS 5D Mark III
Step 1
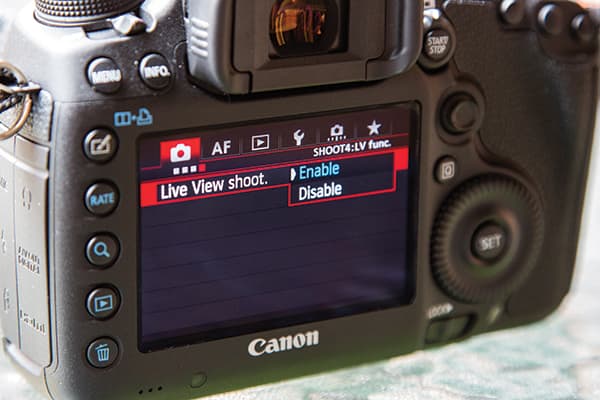
To start, activate Live View using the camera’s menu. Navigate to Live View Shoot and select Enable.
Step 2
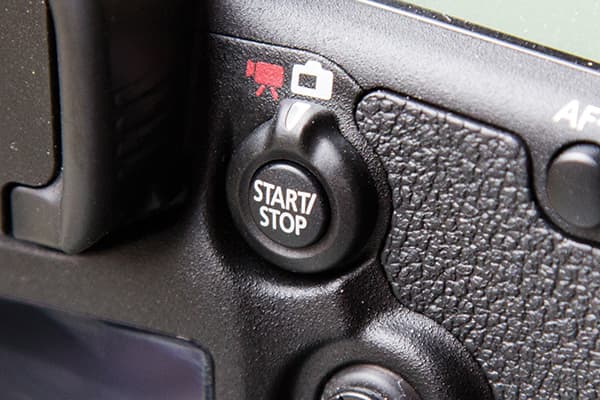
Find the Live View Shooting switch, located to the right of the viewfinder on the back of the camera. Set it to Live View, represented by the white camera-shaped icon.
Step 3
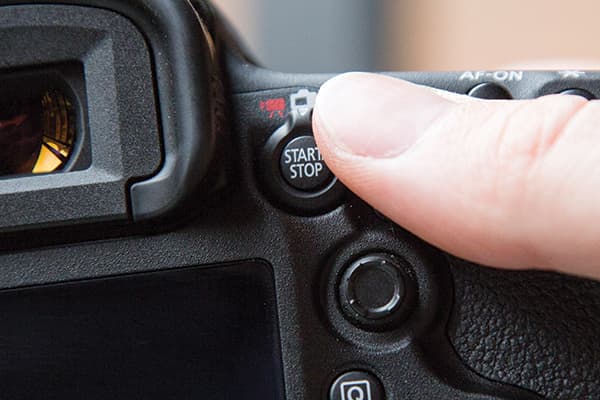
Press the Start/Stop button to enter Live View. The camera’s mirror locks up, the viewfinder goes dark and the camera displays a live feed on the rear LCD screen.
Step 4
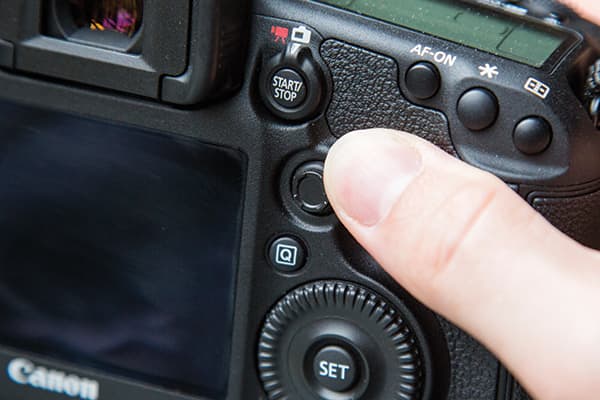
Use the Multi-controller joystick or Cross Keys to move the AF square to the part of the subject you want to focus on (if your camera has a touchscreen you can tap the LCD screen instead).
Step 5
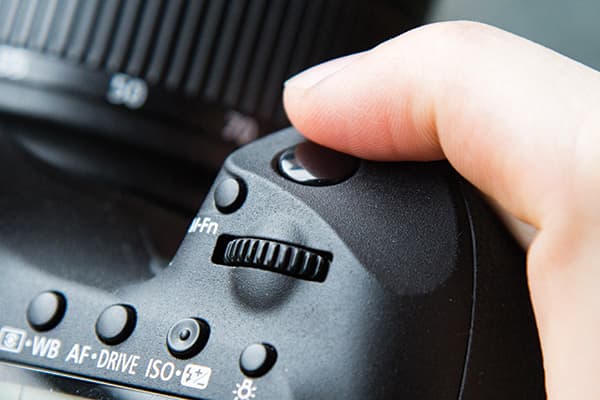
With the lens set to AF (autofocus), press the shutter button half way to focus, and all the way down to take the photograph.
Words and pictures Andrew Gibson