From getting the best out of your camera’s built-in flash, to creative off-camera flash techniques, we show you how to get the best results from your camera flash.

What you’ll learn: How to correctly balance your exposure with flash
What you’ll need: DSLR or Compact System Camera
How long will it take: 1hr max
How to use your camera flash: the basics…
From simply illuminating your subjects to adding a real creative twist to your images, flash can be an incredibly powerful photographic tool.
Trouble is, it can seem a bit confusing and daunting if you haven’t used it that much before. But it needn’t be, as we’ll show you everything you need know about flash, so lets get started.
How to use your camera flash: flash exposure
The key thing to remember when you’re shooting with flash is that you’re dealing with two light sources.
As well as the ambient light for the scene, there’s your camera flash. Successful flash images are all about getting a pleasing balance between the two light sources.
When your camera flash is triggered when you press the shutter, the pulse of light is so brief compared to the exposure of the ambient scene, it’s independent to your shutter speed – the shutter speed you use will only affect the ambient exposure.
Traditionally though, Aperture not only affects the ambient exposure and depth-of-field, but also the flash exposure also. By controlling the amount of light from the flash hitting the sensor in that split second, it controls how dark or light your flash-subject is illuminated.
With the aperture wide open (at f/2.8 for example), your subject will be brighter than if you shot at f/4, while it’ll be darker still at f/5.6. Remember too that altering the aperture will also affect the ambient exposure, which is taking place at the same time.
That’s the basics of camera flash if you’re going to be controlling every element of the exposure – from the shutter speed and aperture, through to the power of the flash. This is the way pros tend to work, and it will give them complete control over the shot. This isn’t always practical, while if you’re just starting out with your new kit, can seem quite complex.
Luckily, flash technology has evolved quite a bit over the years, making it much easier for everyone to achieve great looking flash photography too. Most of this is down to DSLRs and CSCs featuring sophisticated TTL (Through The Lens) flash systems.
These TTL systems can transmit a pre-flash as soon as you fire the shutter to assess the light level that the exposure provides, before setting the power of the main flash to deliver a well-balanced shot. All this in done in the blink of an eye.
How to use your camera flash: flash power

While the burst of flash may appear to light up an entire room or stadium, camera flash actually has a rather limited range, with the intensity of the light diminishing the further it travels.
This means that the further away your subject is, the less illumination they’ll receive. Even the most powerful dedicated flashguns will struggle to light up a subject over 40m away, while your built-in camera flash is good for around 5m at best.
Traditionally, it’s the flashgun’s Guide Number (GN) that’s referred to the maximum output available, and should be measured at ISO 100.
There’s an easy formula you can use to work out the kind of reach you can expect by simply taking the GN of the flash and dividing it by the aperture used to work out the distance.
A Nikon SB-900 with a GN of 34 (measured in metres) at ISO 100 will have enough kick to cover 8.5m if you shoot at f/4. Compare that output to a built-in flash, which will normally have a GN of 12 or thereabouts on most DSLRs, and you’ll only be able to reach a distance of 3m.
Notch up the ISO however, and you’ll be able to reach even further. At ISO 3200, the same SB-900 flashgun will provide a GN of 192 that will have a range of 48m at f4 – If you want to calculate Guide Numbers for higher ISOs, multiply it by 1.414 for every doubling in ISO value.
How to use your camera flash: hassle-free flash shots


If you want to get the best result from your flash shots, don’t shoot in one of your camera’s Auto modes – the camera will only turn the flash on when the light drops below a certain level.
This makes them fine for snaps when the ambient light is pretty poor, but won’t give you those professional-looking results.
Instead, switch to one of your camera’s more creative shooting modes – Program, Shutter Priority, Aperture Priority or Manual. Here you’ll find a wider selection of flash modes for a variety of lighting conditions. Let’s have a look at the key modes and what they bring to your shot.
How to use your camera flash: Fill-in Flash
This is the default mode for most cameras, and can be really versatile – even with a relatively low-powered built-in flash.
If you’re shooting outdoors, sunlight can often cause harsh shadows under the nose and eye sockets, while shooting directly into the sun will cause your subject to be silhouetted.
However, with a blip of flash, these shadows will be eradicated, while the ambient light in the scene will render the rest of the shot correctly exposed. Remember, because your camera has TTL flash metering, you needn’t worry about the power of the flash – it’ll calculate how much is needed for the scene.
If you’re using camera flash outdoors for fill-in, this is where you may encounter one of the limitations of using flash. Even on a bright day, you might find that you can’t use a shutter speed faster than 1/200th of a second for instance. This is what’s known as your camera’s flash sync speed, and your camera won’t be able to shot any faster than this with flash.
This is down to the design of your camera’s shutter. Made up of two curtains, the first one opens up when you take a photo to expose the sensor, with the second following to block out the light. At fast shutter speeds, this happens in unison almost, with the second curtain starting to close before the first one opens all the way.
Because the pulse of the flash is so fast, the second curtain can be recorded at fast shutter speeds, resulting in part of the shot being obscured. That’s why cameras have a flash sync speed to stop this happening, with the sync speed varying slightly from camera to camera, though these aren’t massive differences.
How to use your camera flash: red-eye reduction
Red-eye occurs when the camera flash bounces off the back of the eyeball, and is more pronounced the closer the flash is to the lens, so can be a problem with built-in flashes.
Every camera now offers some form of red-eye reduction flash mode. While they do work most of the time, they’re best avoided if we’re honest. T
he camera will send out a pre-flash with a noticeable delay before the shutter and flash are fired. People either think the pre-flash was the flash, or end up holding a pose longer than expected. Either way, the results never look as natural without using it.
If your images do suffer from red-eye, editing programs like Photoshop Elements feature tools to easily remove it and would be our advice.
How to use your camera flash: slow-sync flash

Indoors or under lowlight, we’ve all probably taken shots where our subject is nicely lit, but the background is pitch black, even though it’s not that dark in reality.
This is because your camera has taken the decision to sacrifice the ambient light in an effort to avoid having to use a shutter speed that will be slow enough to introduce camera shake.
If you’re shooting in Program or Aperture Priority, most cameras have a default shutter speed of 1/60th of a second when shooting with flash – fast enough to comfortably handhold the camera without fear of camera shake. While the camera flash will illuminate your subject without a problem, the shutter speed is nowhere near long enough in lowlight conditions to correctly expose the background.
But buy selecting the slow-sync flash mode, you’re letting the camera know you want a more balanced exposure, and will correctly expose for the ambient scene – even if that means dropping the shutter speed down dramatically.
Depending on your subject, this does mean you may have to use a tripod in some instances to avoid camera shake, though just as you’d normally do, you can always increase the ISO to combat this.
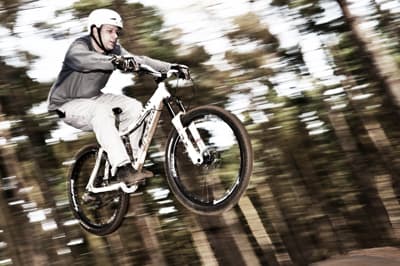
How to use your camera flash: rear curtain slow-sync

By default, your camera is programmed to fire at the beginning of the exposure, which is fine for short exposure times. When you want to extend the exposure time, either to increase the ambient exposure or introduce movement into the shot, this can become and issue.
If your subject is moving, by firing the flash at the start of exposure, it can make then look like they’re moving backwards by the time the exposure is complete. This is thanks to the blur from the ambient exposure trailing back to the sharp ‘flashed’ part of the shot.
To avoid this, cameras feature a rear curtain sync mode, which will fire the flash at the end of the exposure. It requires a bit more anticipation and practice, by produces a much more pleasing, natural result, as the blur from the ambient exposure looks like it’s trailing the flashed subject.
How to use your camera flash: flash exposure compensation
TTL flash systems can be pretty spot-on most of the time, but just like your camera’s advanced meter for overall exposure, it can get it wrong now and again, too.
You’ll find that most DSLRs and CSCs feature a Flash Exposure Compensation button, so if the camera flash is too bright or not producing enough kick to illuminate your subject, you can dial in some flash exposure compensation to either purposefully over or underexpose the flash.
How to use your camera flash: dedicated flashguns

If you find that a built-in camera flash can be a bit limiting in it’s power and the direct lighting a touch harsh (even with some clever TTL metering, the flash can look fairly severe), then it’s worth thinking about investing in a dedicated flashgun.
Not only do these models kick out much more power than a built-in model, they also allow you to control the direction of the light to a certain degree. You’ll find that you can angle the flash upwards so it can bounce of the ceiling, delivering a much more soft and pleasing result, while many flashguns can swivel their heads 270 degrees, so you can bounce the flash off walls or the ceiling if you’re shooting in portrait format.
Diffusers can also be attached to either soften or change the quality of the light for different creative effects.
On top of that, pricier models will also allow you to fire them remotely, as well as being able to produce strobe bursts and focus the direction of the flash for different creative results.
With the exception of Sony DSLRs, all flashguns will be able to attach to a different manufacturers hotshoe.
However, because each manufacturer has their own TTL recipes and clever technology, the electronic contacts that communicate the information between the camera and the flashgun are different. This is why you need to ensure the flashgun you buy is dedicated to your camera so you can take full advantage of the various features available.
If you buy third party flashgun, such as a Metz or Sigma, they produce specific versions of their flashguns for each brand.
Author: Matt Tuffin